
I’ve been wanting to implement Storybook in my Nuxt.js projects for a while now.
For those who don’t know, Storybook is an open source tool for developing UI components in isolation. Check out its use cases.
Using Storybook with plain Vue.js is no hassle but it’s another story with Nuxt as it doesn’t work straight out the box. The info out there is disperse and I had to dig around other people’s repos and examples to have it working with Nuxt, including with how I usually make use of the Store.
I thought I’d write it down and make a more robust example repository for others out there who want to start using Storyboook with Nuxt.
My usual project setup includes using the Vuex Store, the Nuxt’s Axios module, TailwindCSS and custom SCSS.
That’s roughly what I’d like to see working along with Storybook without having to change too much how I use Nuxt in general.
At the end of this example, we’ll have a List component that loads data externally from JSONPlaceholder.
Check out how it’ll look like here.
This is an extensive guide, so feel free to jump right to the section you’re looking for. You can grab all this code here.
Initial setup
Because this guide is from the ground up, we’re starting with a fresh Nuxt project using create-nuxt-app:
npx create-nuxt-app nuxt-storybook
Also, we’ll update Nuxt to it’s latest stable release 2.5.1:
npm rm nuxt && npm i -S nuxt
Build error?
At the time of writing this article, upgrading to Nuxt 2.5 results in an error when building:
ERROR  Failed to compile with 1 errors                                                                                                                                          friendly-errors 13:29:07
[...]
Module parse failed: Unexpected token (7:24)                                                                                                                                     friendly-errors 13:29:07
[...]
|
| var _0c687956 = function _0c687956() {
>   return interopDefault(import('../pages/index.vue'
|   /* webpackChunkName: "pages/index" */
|   ));
If that’s still the case, the following works on my machine™ (macOS), based on this workaround:
rm -rf node_modules package-lock.json
npm i -D webpack@4.28.4
npm i
Running npm run dev should now display the default Nuxt welcome page.
Adding Storybook
We’ll install Storybook and necessary dependencies manually according to their guidelines for Vue. Most dependencies are already present due to Nuxt, with babel-preset-vue being the only one missing.
// Add Storybook & dependencies
npm i -D @storybook/vue babel-preset-vue
Now create a folder named .storybook and add the file config.js in it.
Config.js is used as the “entry point” to tell Storybook where to look for and load Stories as well as importing and using other necessary plugins or addons to use with Stories.
Following the Vue Guidelines, config.js would initially look like this:
// /.storybook/config.js
import { configure } from '@storybook/vue';
function loadStories() {
  const req = require.context('../stories', true, /\.stories\.js$/);
  req.keys().forEach(filename => req(filename));
}
configure(loadStories, module);
What it’s doing is iterating over each file ending as .stories.js within the folder stories. Because I like to have my Stories near my Components and not all in bulk within a stories folder, I simply change the folder to components and let the function traverse each folder in it.
We’ll be coming back to config.js later. For now let’s make sure Storybook is able to load a simple Story and display it.
Adding our first Story
Inside your components directory, create a new folder named list and within it a file named List.vue with the code below. We’ll use it to build our final component as we go.
// /components/list/List.vue

<template>
  <div class="list">
    I'm a list
  </div>
</template>

<script>
  export default {
    name: 'List'
  }
</script>

<style scoped>
  .list {
    background: #CCC;
  }
</style>
Noting much, just something to have our Story display. Now in the same folder add a file named List.stories.js with the following code in it:
// /components/list/List.stories.js
import Vue from 'vue'
import { storiesOf } from '@storybook/vue'
import List from './List'

storiesOf('List', module)
  .add('As a component', () => ({
    components: { List },
    template: '<List />'
  }))
  .add('I don\'t work', () => '<List />')
Now to start Storybook we need to add the run script to package.json (to run it on a different port, add -p <port-number>)
“storybook”: “start-storybook”
Type in npm run storybook in your terminal and your browser will open up a new tab:

That’s Storybook running. And because it uses hot reloading, you’ll be able to see your changes reflected instantly.
Notice the second story doesn’t work? That’s because we haven’t told Storybook to use our List component for that Story as we did for the first one (opening the browser console will show you these errors).
We can register List as a global component just like we register them using Nuxt’s plugins, only within config.js, so it ends up looking like:
// /.storybook/config.js
import { configure } from '@storybook/vue';
import Vue from 'vue'
import List from '../components/list/List.vue'

Vue.component('List', List)

function loadStories() {
  const req = require.context('../components', true, /\.stories\.js$/);
  req.keys().forEach(filename => req(filename));
}

configure(loadStories, module);
Now the 2nd story works. That was just to give you an idea that some of your components may use other ones. In order to avoid always importing these, we can define them globally as we did (the remaining example won’t make use of this so you can delete that).
You now have a vanilla setup of Storybook working with Nuxt. But it ain’t much of a story yet.
Enhancing our List component & Adding the Store
First off we’ll add some complexity to our List components and worry with the errors Storybook throws at us later.
The List should:
- once mounted — fetch either fake users or fake comments using JSONPlaceholder;
- iterate each user/comment and render it using a ListItem component;
- make use of Vuex to dispatch our API calls;
- look prettier, using TailwindCSS & some custom styles;
Styles
For the styling we’ll use some TailwindCSS utility classes as well as some custom styles to exemplify its usage with Storybook. I use SCSS so we’ll need to add the usual node-sass & sass-loader:
npm i -D node-sass sass-loader
The List will accept the prop source so it knows which data source we want to fetch. We’ll also leave it prepared to call the adequate Store action to perform the API calls once we’ve build these.
The List component should now look like:
// /components/list/List.vue

<template>
  <div class="list p-5 rounded">
    I'm a {{ source }} list
  </div>
</template>

<script>
  export default {
    name: 'List',
    props: {
      source: {
        type: String,
        default: 'users'
      }
    },
    data() {
      return {
        entities: []
      }
    },
    mounted() {
      switch (this.source) {
        default:
        case 'users':
          this.loadUsers()
          break
        case 'comments':
          this.loadComments()
          break
      }
    },
    methods: {
      loadUsers() {
        //  Will call store action
        console.log('load users')
      },
      loadComments() {
        //  Will call store action
        console.log('load comments')
      },
    }
  }
</script>

<style lang="scss" scoped>
  $background: #EFF8FF;
  .list {
    background: $background;
  }
</style>
Adding the Store & API calls
I usually keep my API calls in the Store’s actions so I can easily call them using this.$store.dispatch.
.env: We’ll keep our endpoints in a .env file, so in order to get these values we’ll install the @nuxtjs/dotenv module npm i -S @nuxtjs/dotenv and add it to out nuxt.config.js modules.
Create a .env within the project’s root file and add:
USERS_ENDPOINT=https://jsonplaceholder.typicode.com/users
COMMENTS_ENDPOINT=https://jsonplaceholder.typicode.com/comments
Onto adding out Store actions to retrieve Users and Comments. Add an actions.js file under the existing store directory with the following code:
// /store/actions.js
export default {
  async GET_USERS({ }) {
    return await this.$axios.$get(`${ process.env.USERS_ENDPOINT }`)
  },
  async GET_COMMENTS({ }) {
    return await this.$axios.$get(`${ process.env.COMMENTS_ENDPOINT }`)
  },
}
We can now modify our List component’s methods to call these actions when it is mounted, ending up looking like:
// /components/list/List.vue

<template>
  <div class="list p-5 rounded">
    I'm a {{ source }} list
  </div>
</template>

<script>
  export default {
    name: 'List',
    props: {
      source: {
        type: String,
        default: 'users'
      }
    },
    data() {
      return {
        entities: []
      }
    },
    mounted() {
      switch (this.source) {
        default:
        case 'users':
          this.loadUsers()
          break
        case 'comments':
          this.loadUsers()
          break
      }
    },
    methods: {
      loadUsers() {
        this.$store.dispatch('GET_USERS')
        .then(res => {
          console.log(res)
        })
        .catch(err => {
          console.log('API error')
          console.log(err)
        })
      },
      loadComments() {
        this.$store.dispatch('GET_COMMENTS')
        .then(res => {
          console.log(res)
        })
        .catch(err => {
          console.log('API error')
          console.log(err)
        })
      },
    }
  }
</script>

<style lang="scss" scoped>
  // Pointless. Just for the sake of the example
  $background: #EFF8FF;
  .list {
    background: $background;
  }
</style>
We now get an array of data returned from each endpoint. Let’s display them.
Adding ListItem component
Depending on whether we are listing Users or Comments, we’ll display a variation of the ListItem component. Each variation will have its own component too.
Create a folder under list called items and create a file named ListItem.vue. Here’s the code to add to it:
// /components/list/items/ListItem.vue

<template>
  <div class="list-item rounded bg-blue-light px-5 py-3">
    <div v-if="itemType === 'users'">
      A user item
    </div>
    <div v-else>
      A comment item
    </div>
  </div>
</template>

<script>
  export default {
    name: 'ListItem',
    props: {
      itemType: {
        type: String,
        default: 'user'
      },
      data: {
        type: Object,
        default: () => {
          return {}
        }
      }
    }
  }
</script>
Nothing much for now, we’ll change it in a moment. In the meanwhile, I styled the home page so we can see both of our lists side by side:

Now let’s actually use our ListItem component to iterate each entity returned by our API and style it accordingly.
Adding a User & Comment component
We’ll create a component for each entity, based on the following data structure:
// User
{
  "id": 1,
  "name": "Leanne Graham",
  "username": "Bret",
  "email": "Sincere@april.biz",
  "address": {
    "street": "Kulas Light",
    "suite": "Apt. 556",
    "city": "Gwenborough",
    "zipcode": "92998-3874",
    "geo": {
      "lat": "-37.3159",
      "lng": "81.1496"
    }
  },
  "phone": "1-770-736-8031 x56442",
  "website": "hildegard.org",
  "company": {
    "name": "Romaguera-Crona",
    "catchPhrase": "Multi-layered client-server neural-net",
    "bs": "harness real-time e-markets"
  }
},
// Comment
{
  "postId": 1,
  "id": 1,
  "name": "id labore ex et quam laborum",
  "email": "Eliseo@gardner.biz",
  "body": "laudantium enim quasi est quidem magnam voluptate ipsam eos\ntempora quo necessitatibus\ndolor quam autem quasi\nreiciendis et nam sapiente accusantium"
}
Add a Comment.vue file in /components/list/items/ with the code:
// /components/list/items/Comment.vue

<template>
  <div>
    <b>{{ name }}</b>
    <p>{{ body }}</p>
  </div>
</template>

<script>
  export default {
    name: 'Comment',
    props: {
      name: {
        type: String,
        default: ''
      },
      body: {
        type: String,
        default: ''
      }
    }
  }
</script>
Add a User.vue file in /components/list/items/ with the code:
// /components/list/items/User.vue

<template>
  <div>
   <nuxt-link
      :to="{ name:'user' }"
      class="text-lg"
    >
      {{ name }} - "{{ username }}"
    </nuxt-link>
    <div class="flex flex-wrap justify-start my-2">
      <div class="w-1/2 mb-2">
        <span class="text-grey-dark font-bold">Email</span>
        <p class="p-0 m-0">{{ email }}</p>
      </div>
      <div class="w-1/2 mb-2">
        <span class="text-grey-dark font-bold">Phone</span>
        <p class="p-0 m-0">{{ phone }}</p>
      </div>
      <div class="w-1/2 mb-2">
        <span class="text-grey-dark font-bold">City</span>
        <p class="p-0 m-0">{{ address.city }}</p>
      </div>
      <div class="w-1/2 mb-2">
        <span class="text-grey-dark font-bold">Company</span>
        <p class="p-0 m-0">{{ company.name }}</p>
      </div>
    </div>
  </div>
</template>

<script>
  export default {
    name: 'User',
    props: {
      name: {
        type: String,
        default: ''
      },
      username: {
        type: String,
        default: ''
      },
      email: {
        type: String,
        default: ''
      },
      phone: {
        type: String,
        default: ''
      },
      address: {
        type: Object,
        default: () => {
          return {}
        }
      },
      company: {
        type: Object,
        default: () => {
          return {}
        }
      }
    }
  }
</script>
Note: for the sake of the example I’ve added a nuxt-link. For it we’ve also added the respective page /pages/user/index.vue. There’s nothing in it, just for nuxt-link to link somewhere.
Let’s change our ListItem component to make use of these new components:
// /components/list/items/ListItem.vue

<template>
  <div class="list-item rounded bg-indigo-lightest shadow px-5 py-3 mb-3">
    <div v-if="itemType === 'users'">
      <User
        :name="data.name"
        :username="data.username"
        :email="data.email"
        :phone="data.phone"
        :address="data.address"
        :company="data.company"
      />
    </div>
    <div v-else>
      <Comment
        :name="data.name"
        :body="data.body"
      />
    </div>
  </div>
</template>

<script>
  import User from '@/components/list/items/User'
  import Comment from '@/components/list/items/Comment'

  export default {
    name: 'ListItem',
    components: {
      User,
      Comment
    },
    props: {
      itemType: {
        type: String,
        default: 'user'
      },
      data: {
        type: Object,
        default: () => {
          return {}
        }
      }
    }
  }
</script>
Finally we need to change List.vue so we actually pass the API call’s response as props instead of just logging it. Change the methods so it looks like:
// /components/list/List.vue
[...]
methods: {
  loadUsers() {
    this.$store.dispatch('GET_USERS')
    .then(res => {
      this.entities = res.data
    })
    .catch(err => {
      console.log('API error')
      console.log(err)
    })
  },
  loadComments() {
    this.$store.dispatch('GET_COMMENTS')
    .then(res => {
      this.entities = res.data
    })
    .catch(err => {
      console.log('API error')
      console.log(err)
    })
  },
}
[...]
After some minor style tweaks, this is how it should now look:
We’re now ready to move on to Storybook and see what happens.
Resolving Storybook’s complaints
We’ll now iron out each of the raised issues when running Storybook, the first one being:
Module not found
Error: Can’t resolve ‘@/components/list/items/ListItem’
If you look at Storybook’s examples, you’ll see it references components using relative paths. That’s an issue for us using Nuxt as the framework makes use of the @ alias.
Do we now need to use relative paths everywhere? Luckily no. Remember we installed babel-preset-vue previously? That plus using webpack’s alias allows us to work around this issue.
First, create a file in the .storybook folder named .babelrc with the following:
// /.storybook/.babelrc
{
  "presets": [
    "@babel/preset-env",
    "babel-preset-vue"
  ]
}
Create another file named webpack.config.js in the .storybook folder with the following:
// /.storybook/.webpack.config.js

const path = require('path')

module.exports = {
  resolve: {
    alias: {
      '@': path.dirname(path.resolve(__dirname))
    }
  }
}
You should now be able to keep using the @ alias to import your components.
For the sake of having concise code, we can now change how we import the List component in its Story from import List from './List' to import List from '@/components/list/List'.
Module parse failed: handling SCSS
Storybook now throws:
Module parse failed: Unexpected character ‘#’ (69:13)
You may need an appropriate loader to handle this file type.
That’s because we haven’t specified how to load these. We can resolve that by adding a module rule for CSS/SCSS to webpack, making our file now look like this:
// /.storybook/.webpack.config.js

const path = require('path')

module.exports = {
  module: {
    rules: [
      {
        test: /\.s?css$/,
        loaders: ['style-loader', 'css-loader', 'postcss-loader', 'sass-loader'],
        include: path.resolve(__dirname, '../')
      }
    ]
  },
  resolve: {
    alias: {
      '@': path.dirname(path.resolve(__dirname))
    }
  }
}
We must also add import '@/assets/css/tailwind.css to .storybook/config.js so we can use Tailwind’s utility classes.
Fire up Storybook again, and this time you should have the browser open a new tab with the nicest:

Using Vuex with Storybook
If you’ve followed Storybook’s Vue guidelines prior to this walkthrough, you should already be importing and using Vuex in config.js.
If not, here’s how it should be looking now:
// /.storybook/config.js

import Vue from 'vue'
import Vuex from 'vuex'
import { configure } from '@storybook/vue'
import '@/assets/css/tailwind.css'

Vue.use(Vuex)

function loadStories() {
  const req = require.context('../components', true, /\.stories\.js$/)
  req.keys().forEach(filename => req(filename))
}

configure(loadStories, module)
But just that won’t cut it.
Nuxt components reference the Store as this.$store and our Story doesn’t know about that, therefore we need to create a new Store and pass it along to our component.
But do we need to recreate the whole Store? Thankfully no. We’ll indeed create a store, but reuse all existing actions, getters, mutations or states our existing Store has.
For that we’ll create a file named store.js in the .storybook directory with the following code:
// /.storybook/store.js

import Vue from 'vue'
import Vuex from 'vuex'
import axios from 'axios'

// You can do the same for getters, mutations and states
import actions from '@/store/actions'

let store = new Vuex.Store({
  actions: actions
})

/*
  Bind Axios to Store as we don't have access to Nuxt's $axios instance here
*/
store.$axios = axios

/*
Remap Axios's methods to make use of $ symbol within the
Store's actions so we don't re-write our Axios' calls
*/

store.$axios.$get = store.$axios.get
store.$axios.$post = store.$axios.post

export default store
We can now import and pass along this store to our Stories.
For now we only have a story listing Users, being the default source. Let’s add another Story to list Comments and rename each:
// /components/list/List.stories.js

import Vue from 'vue'
import { storiesOf } from '@storybook/vue'

import List from '@/components/list/List'

import store from '@/.storybook/store'

storiesOf('Lists', module)
  .add('Users', () => ({
    components: { List },
    store: store,
    template: '<List />'
  }))
  .add('Comments', () => ({
    components: { List },
    store: store,
    template: `<List :source="'comments'" />`
  }))
API response caveat
The
store.$axios.$get = store.$axios.gethacks are not 100% reliable depending on how the API you’re using responds. Be careful as you may end up with Stories working yet breaking the actual app.In this example we need to change our List.vue methods so that the app keeps working correctly as well as the component’s story:
// /components/list/List.vue
[...]
if ('data' in res) {
  this.entities = res.data
} else {
  this.entities = res
}
[...]
It’s hackish but is a minor change in our code. In the case of Thoro for instance, I was able to keep using res.data normally so no changes to my code were necessary. If you know a better way, do share in the comments!
After following the above steps we should now see both Stories for our List component:

Handling nuxt-link
Finally we can see something! But our links are missing..

If you open up the browser console on Storybook’s tab, you’ll see it doesn’t know what nuxt-link is (also, you can always have a look at potential errors there if things aren’t working properly).
A final adjustment to Storybook is required in order to have these working and functional.
For that, we need to install the @storybook/addon-actions dependency: npm i -D @storybook/addon-actions and add them to Storybook by creating the file addons.js in the .storybook directory with the lines:
// /.storybook/addons.js
import '@storybook/addon-actions'
import '@storybook/addon-actions/register'
Finally we need to import { action } from '@storybook/addon-actions in config.js and register a tweaked nuxt-link component to Vue. Our config.js file should now look like:
// /.storybook/config.js

import Vue from 'vue'
import Vuex from 'vuex'
import { configure } from '@storybook/vue'

import { action } from '@storybook/addon-actions'

import '@/assets/css/tailwind.css'

Vue.use(Vuex)

Vue.component('nuxt-link', {
  props:   ['to'],
  methods: {
    log() {
      action('link target')(this.to)
    },
  },
  template: '<a href="#" @click.prevent="log()"><slot>NuxtLink</slot></a>',
})

function loadStories() {
  const req = require.context('../components', true, /\.stories\.js$/)
  req.keys().forEach(filename => req(filename))
}

configure(loadStories, module)
This replaces all instances of < nuxt-link > with a regular anchor element as well as setting a log method showing the lint’s path when clicking it.
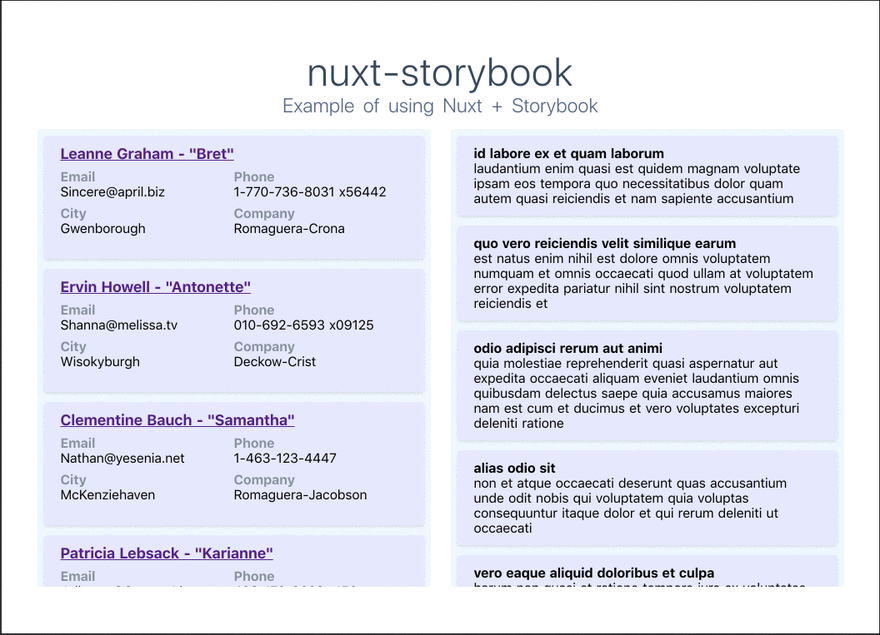
After that, we should no longer see any error on the browser’s console and have actual clickable links on our users’ names:

Storybook working with Nuxt!
It took a while but we’ve managed to have Storybook working nicely with Vue.js components within a Nuxt.js project.
This isn’t a fully-fledged guide as we’re missing tests and key aspects of Nuxt such as the < no-ssr > tag (I also wonder how asyncData and Storybook may end up working together).
Bonus: deploy Storybook to Netlify
When running Storybook, you get an IP you can share to others in your local network and that’s cool if you’re on the same WiFi. But what if you want to share it to your clients so they can give you feedback on last week’s iteration?
In that case, host it on Netlify. Simply add the script below to your package.json file which will generate a static Storybook in the storybook-static directory:
"build-storybook": "build-storybook -c .storybook"
Then access Netlify and select your repository. Define the build command as npm run build-storybook and the publish directory as storybook-static.
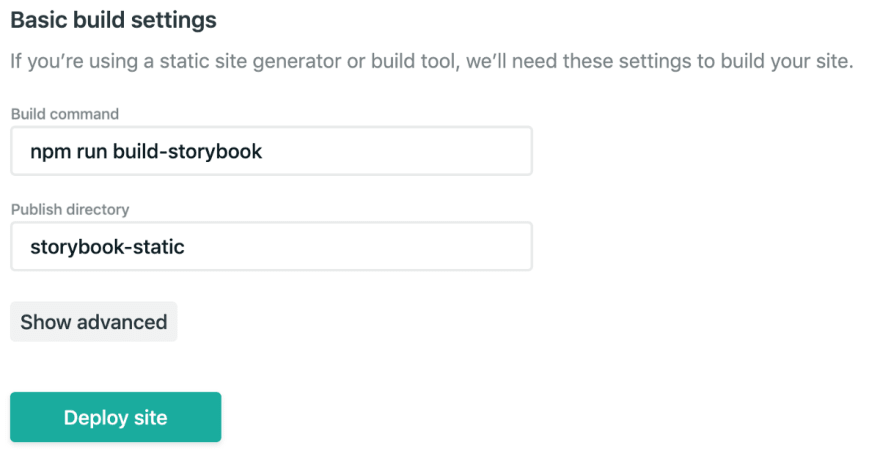
You should then have your Storybook live and updated each time you push/merge into your master branch. Check it out!
Final Repo & Resources
Feel free to grab the code on Github https://github.com/mstrlaw/nuxt-storybook and check out this reading material and other repos that were useful to build this guide:
- Storybook’s Vue guide;
- learnstorybook.com (Vue guide);
- This blog post (chinese) and this repo;
- David Walsh’s blog post which dives into actual tests using Jest;
- This question;
Chime in and leave your thoughts and suggestions in the comments below.
Originally posted on Medium


Top comments (1)
@mstrlaw Hi Lawrence, thanks for this article. I'm using Nuxt but before I dive into spending a few hours on Storybook, I'm unclear what it's for.
I saw strybook-nuxt-demo.netlify.com/?pa... but then why not just use a component library like element.eleme.io or veutify? Why reinvent the wheel? Most of the time, we don't need custom components...what am I missing here? Thanks!