I decided to write this tutorial after creating a handy service for one of our users named Levente. Levente works as a marketer for Midori- a company that develops and sells apps for Jira and Confluence on the Atlassian Marketplace. Levente was looking into products on Product Hunt that would help him use the Atlassian Marketplace API for his job without involving any of their always-super-busy developers. After learning about Standard Library and Code.xyz, he reached out and asked how complex it would be to put together a Slack service for Midori to monitor their apps’ latest metrics.
I had good news for Levente and his team at Midori! Standard Library makes projects like this a snap, even for less experienced developers. All that we needed was the API that Atlassian Marketplace publishes for vendors to manage their apps.
So We Turned This:

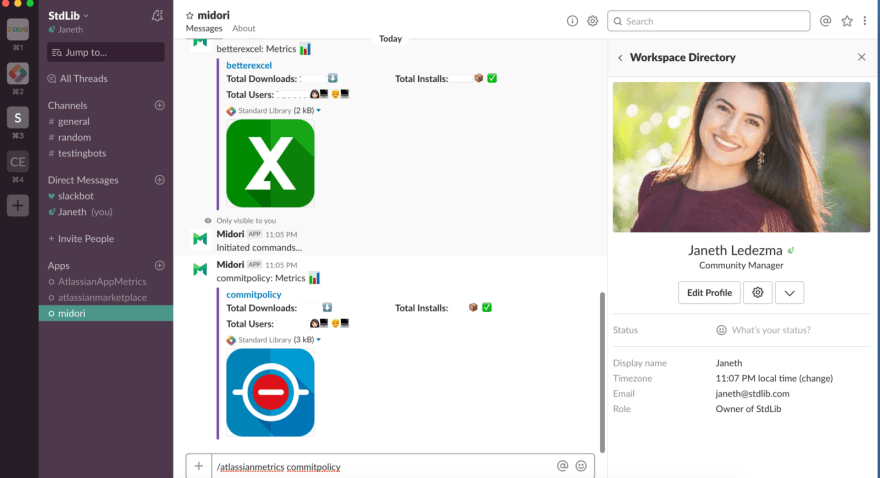
Into This:

Metrics for Questions for Confluence sold on Atlassian Marketplace
I will walk us through how I created a Slack app for Levente that fetches applications’ metrics using a Slack slash command. You can easily replicate these steps! If you need help setting up your app, I will be available on Standard Library Developers’ Slack workspace to answer your questions. :)
If you’re not familiar with Standard Library, you’re in for a treat! Standard Library is turning everyone in your organization into a developer with Code.xyz — an embeddable development environment for easily building APIs, webhooks, and workflow automation tasks.
What You’ll Need Beforehand
1x Slack Team
1x Standard Library Account
Step 1: Prepare Your Slack App
Make sure you’re signed in to Slack and visit your Slack Apps page at https://api.slack.com/apps. You’ll see a screen that looks like the following:

Click Create New App. You’ll be presented with a modal to enter your App Name and the Development Slack Workspace you’d like to add it to (I named mine “Midori”).

From here, click Create App, you’ll find yourself on a Basic Information page.
Scroll down to Display Information. This is where you can give your Slack app a name, description, and an image if you’d like.

Keep the Basic Information page open in your browser; we’ll be using it in a second to retrieve your Slack app credentials.
Step 2: Create a Free Standard Library Account using Code.xyz
Next, we need to create a Standard Library service to host your Slack app. Head over to https://code.xyz/and create a free account. Code.xyz is an online API editor built by the team at Standard Library — an embeddable development environment for easily building APIs, web-hooks, and workflow automation tasks.

On the bottom left corner of Code.xyz click (sign in). If you have a Standard Library account, click Already Registered and sign in using your Standard Library credentials. A module will pop up prompting you to claim a namespace (this is your username). Input your e-mail and choose a password.
After you create your account, a different module will appear listing the subscription plans. A free account is all you need to get started. Once you click Subscribe + Earn Credits, you should see a confirmation message pop up. Click Continue to return to the Code.xyz landing page.
Step 3: Select the @janethl/atlassianappsmetrics Sourcecode
I have published my Slack app’s code on the Standard Library so that it’s available for anyone to easily copy and modify.
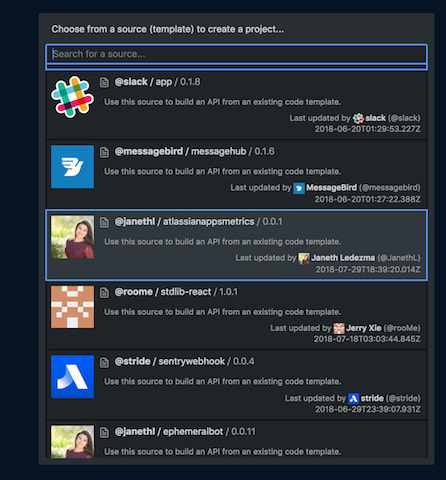
Click API from Sourcecode You’re going to fork my code and create your own, personal API that will power your Slack app!
Find & select @janethl/ atlassianappsmetrics.
Make sure to enter a unique name for your API and hit Okay (or press enter).

Once you hit enter, you’ll see an API project scaffold on the left sidebar (a folder tree view) that has been automatically generated.
A Brief Explanation of the Sourcecode:
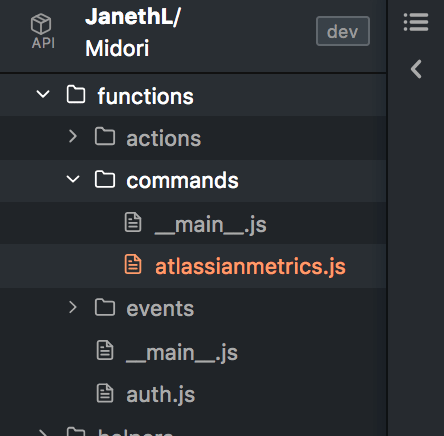
The sourcecode for Slack Apps contains four directories (folders). For this tutorial, we will only work within the functions directory which comes equipped with actions/commands/ events/__main__.js.
When you deploy your API, Standard Library will automatically generate https endpoints for each function. The resulting URLs allow Slack users to configure web-hooks that listen and respond to Slack’s actions, slash commands, and events.
All five functions are set up with a main.js file (or the function’s main endpoint). These __main__.js endpoints dispatch the appropriate function when they receive a message from Slack. For a more in-depth explanation of how functions work head on over to our docs page.
Commands: We’ll only need the commands directory for this tutorial. You should use the commands directory as the endpoint for all Slack slash commands. To create any additional commands, all you have to do is add another .js file under /functions/commands/ as name.js where name matches the name of your Slack slash command.
Step 4: Add Your Standard Library and Slack App Credentials

We are almost there! It’s time to open your env.json (environment variables). We’ll be making modifications to the "dev" environment variables — make sure you’re modifying the right set! Note that "dev” values are for your development environment and "release" values should only be populated when you’re ready to release your app. “local” variables can be left blank when deploying from code.xyz — they should be filled when testing service from your local CLI.
Place your cursor in between the quotation marks (see screen) and either right-click and select Insert Library Token or use the shortcut ⌘ + K.

Select your library token
Select Library Token to fill in "dev"and environments.
Now go back to the Basic Information page of your Slack App and scroll down to App Credentials:

Copy your Client ID, Client Secret, and Verification Token. Paste them into their respective fields in “dev” section of theenv.jsonfile.
Add the name you gave your Slack app in env.json.
Fill in “SLACK_REDIRECT” with
https://username.lib.id/servicename@dev/auth/ — the https URL with your user name and your service name.
Set your Slack app’s capabilities and permissions with the following scopes:
“SLACK_OAUTH_SCOPE”:
bot,commands,chat:write:bot,chat:write:user,files:write:user,channels:history

Make sure to save the changes with ‘⌘ + s’ (or hit Save in the bottom right).
On the sidebar navigate through functions/commands to open the atlassianmetrics.js file and deploy the function by clicking “Run.”

*It’s normal to see the “Invalid app name” error message when you deploy your service because the endpoint is intended to be called via Slack slash command.
Step 5: Create a New Slash Command
Next, we need to create our /atlassianmetrics Slack command. Find and Click Slash Commands on the sidebar menu.

After clicking Create New Command, you’ll be asked to enter some command details, for this example use:
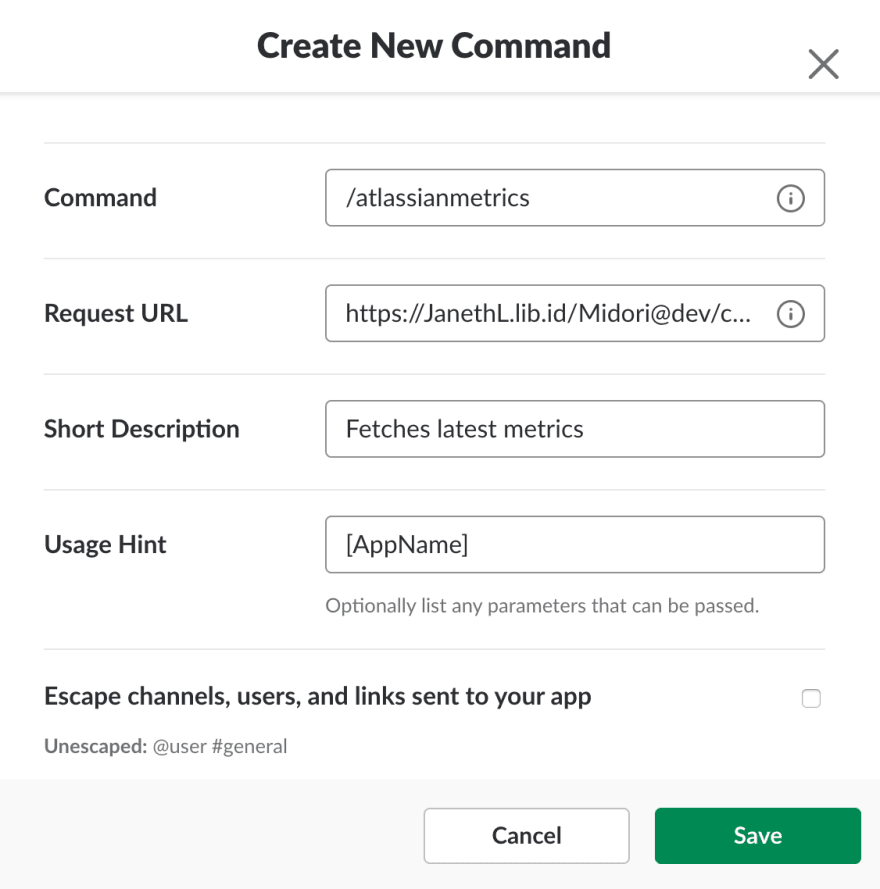
Command: /atlassianmetrics
RequestURL: https://username.lib.id/servicename@dev/commands/:bg
Fill in with your username and service name.
Short Description: fetches latest metrics
Usage Hint:[app_name]
Hit “Save” once complete
Step 6: Enable OAuth & Permissions

Return to your Slack App; we’ll need to enable OAuth. On the sidebar menu, click OAuth & Permissions.
Once there, you’ll want to enter in a Redirect URL as follows:
https://username.lib.id/servicename@dev/auth/
where username is your Standard Library username and servicename is the name you gave your deployed Standard Library Service.
click “Add” and “Save URLS.”
Step 7: Add a Bot to Your Slack App
Return to your Slack App page, and click Bot Users on the left sidebar. Click Add Bot User. Keep the default settings.

The final step is to authorize the app. In your browser, type: https://username.lib.id/servicename@dev/

Click the Add to Slack button. You will be taken to another authorization screen.
https://cdn-images-1.medium.com/max/1200/1*mBM2juH7s_3gmwr-Tk12ZA.png
Click Authorize. You should see a success message!
Step 8: Test Your Application Metric Tracker

You’re all done. Try it out! Your Slack App is now available for use in the Slack workspace you authorized it. Your Slack app should respond to a /atlassianmetrics questions as I show in the screenshot above.
Step 9: Return and Add Your Applications Unique Identifiers
Return to your API on Code.xyz and on the sidebar navigate through functions/commands to open the atlassianmetrics.js. The code inside your file should look like this:
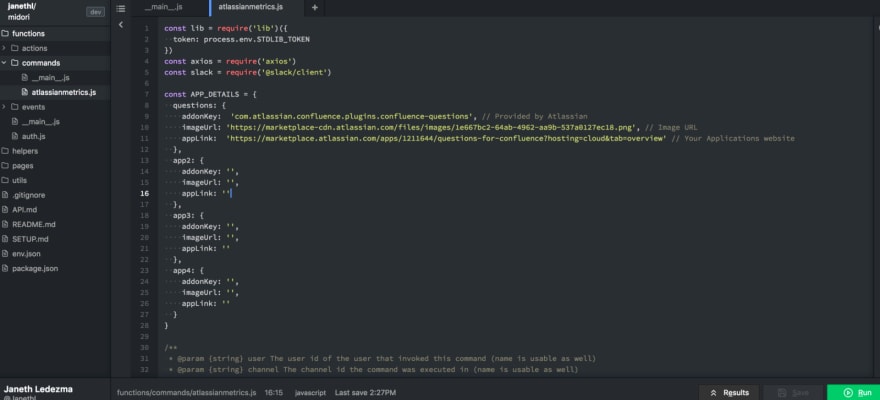
I published the Sourcecode with a sample APP_DETAILS including addonKey, imageUrl, and appLink for Questions for Confluence application currently sold on the Atlassian Marketplace. This function was triggered when you typed /atlassianmetrics question inside your Slack message field.
When you are ready, fill in the APP_DETAILS with your own applications’ information. Change the default name APP2 to a short name description of your app. Add your unique addonKey, provide an image Url to display an image of your application, and if you’d, like add an appLink to redirect to your app's website from Slack. Make sure you save the changes by selecting the orange “Save” button on the bottom right corner and re-deploy your API by clicking the “Run” button again.
Below is a screenshot of the Slack app service I created for Midori. I configured the service so that one Slack slash command could return the metrics of four different apps.
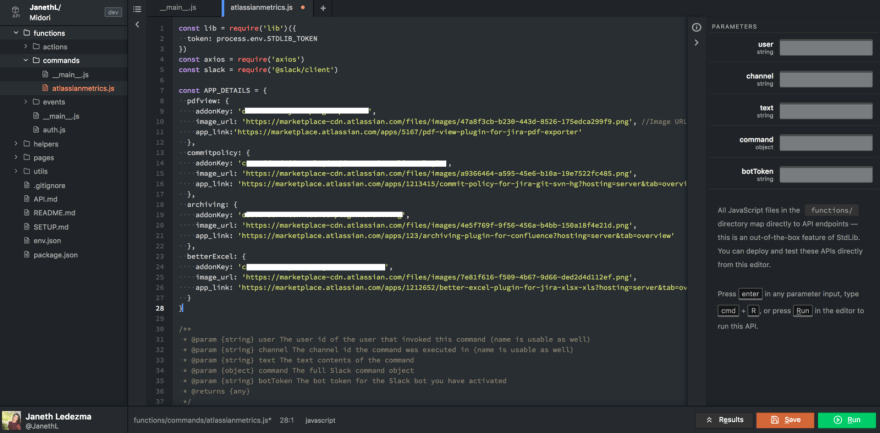
You can add as many app addonKeys as you would like to your Standard Library service.
That is it & Thank You!
I hope you found this tutorial helpful. I would love for you to comment here, e-mail me at Janeth [at] stdlib [dot] com, or follow Standard Library on Twitter, @stdlibhq. Let me know if you have an additional functionality request for your Slack app — I’d love to help!


Top comments (0)