INFORMATION: This tutorial is for creating a Discord robot with Slash Commands. Learn more about using Slash Commands
This post is available in French language →
📚 Prerequisites before starting
Before you start this tutorial, follow these instructions. You need to install several tools for the robot to work, and create a folder with any name, preferably short and without spaces. This will be your folder containing your robot files.
List of tools and things to know :
- Know the basics of JavaScript
- Install the latest stable version of Node.js
- Have access to the terminal
- Have a good Internet connection
- A text editor or IDE (Notepad++, Atom, WebStorm, VSCode ...)
- Be able to read English for documentation
We will first check if everything has been installed, open your command prompt and not the one installed by Node.js (if you are on Windows), and type :
node --version
It is supposed to tell you which version you have installed. Leave this window open for the rest of the installation.
✨ What we are going to do for this tutorial
Before you read on, you should understand that you need to alter some values, such as IDs and command names. We'll make a simple Discord bot with Slash Commands, and with that we'll add a module to synchronize our command list very easily. And finally, an example command: /ping.
Sample image for the body of the /ping command
It should also be noted that the packages in this example of package.json are offered with a fixed version, so do not hesitate to check if there is an update for each of them.
🕺🏼 Installation of the project and packages
After you have correctly installed the latest version of Node.js, you need to go to your robot's folder. To move to the command prompt :
cd /nameOfTheFolder
For simplicity, go to your folder using the GUI and not the command prompt and copy the URL at the top. Then paste it into the command prompt by adding cd before your copied text.
If you are not in your bot folder with the command prompt, please review the lines at the top. We are going to install the package to make the bot work. This package is called Discord.js, it is a library to help interact with the Discord API and is developed in JavaScript.
The different packages
We will need different Node packages (npm) to make the robot work.
- discord.js : For creating the bot and reply to messages
- discord-api-types/v10 : For creating the Slash Commands
- discord-sync-commands: This is not a package, but we will use it as a module to synchronize our Slash commands.
npm install discord.js discord-api-types/v10 fs
Example of package.json
You can in itself have the same package.json:
{
  "name": "example_discord_bot_slash_commands",
  "version": "1.0.0",
  "main": "app.js",
  "scripts": {
    "start": "node app.js"
  },
  "keywords": [
    "discordapp",
    "bot",
    "discordjs"
  ],
  "author": "Thomas Bnt <contact+git@thomasbnt.fr>",
  "license": "GPL-3.0-only",
  "dependencies": {
    "discord-api-types": "^0.37.31",
    "discord.js": "^14.7.1"
  }
}
As you can read, we have specified in the script a file, app.js is the file where we will run the bot.
We will therefore install all packages :
npm install
🤖 Creation of the robot on the platform
Now you have to create the bot on the Discord platform and add it to your server. We will do this in two steps.
Follow this process, you must be logged in to your Discord account in order to access this page.
- Go to: https://discord.com/developers/applications
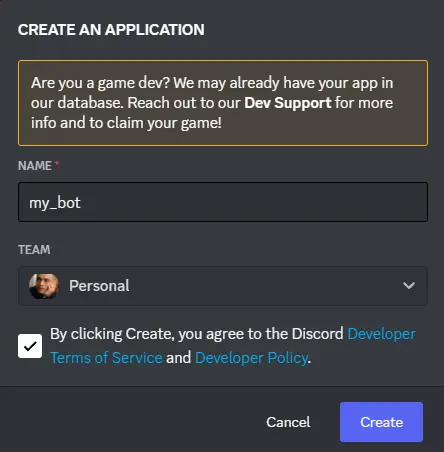
- Then Applications → New Application.
- Fill in the form. Once done, click on "Create".
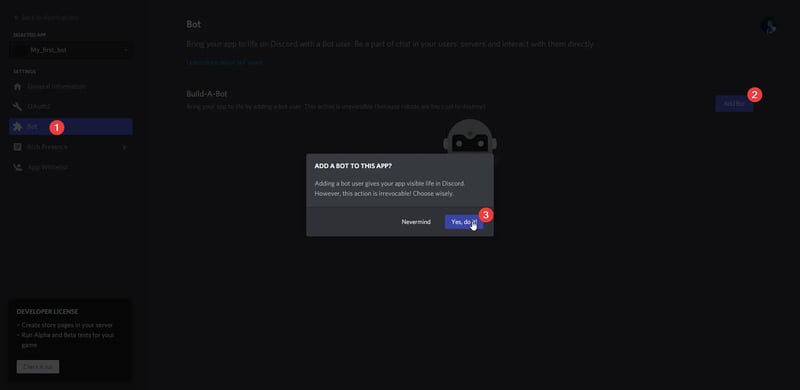
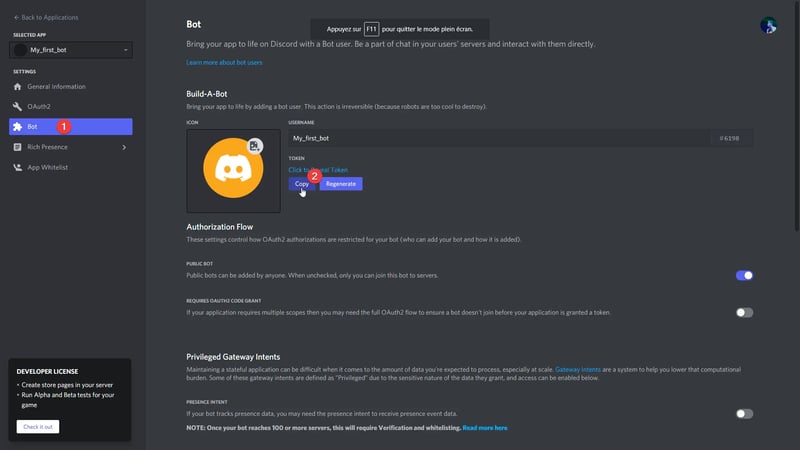
- Go to the Bot tab
- Click on "Add Bot", then click on "Yes, do it!"
All that remains is to add it to your own server. To do this, just go to the OAuth2 tab, give it the necessary permissions for the bot to work properly, and generate your link.

Copy it and open it in a new tab, you are asked to select a server. Select yours and click Allow. You now have your robot on your server, but it is offline. This is perfectly normal! Follow the steps below to turn it on.
🚀 Create the first command
Here we are! This is the moment when we will create our first command.
The main file: app.js
After you have installed everything correctly, you need to create the app.js file.
It simply serves as your project's root, I like to call it its heart 💜. Because it's where everything starts from.
Here is an example of a file named app.js :
/**
 @document   : app.js
 @author     : Thomas Bnt
 @version    : 3.0.0
 @copyright  : 2023, Thomas Bnt
 @license    : GNU General Public License v3.0
 @repository : https://github.com/thomasbnt/Bord-Pi
 @description: Un robot Discord gérant et aidant les utilisateurs pour un serveur.
*/

const fs = require('fs')
const { Client, Collection, GatewayIntentBits, Options } = require('discord.js')

const client = new Client({
  // The intents will depend on what you want to do with the robot,
  // but don't forget to activate them in your discord.dev dashboard
  // at the address https://discord.com/developers/applications/{ID}/bot,
  // section "Privileged Gateway Intents"
  intents: [
    GatewayIntentBits.Guilds,
    GatewayIntentBits.GuildMessages
  ],
})

// We create a collection for commands
client.commands = new Collection()
const commandFiles = fs
  .readdirSync('./commands')
  .filter((file) => file.endsWith('.js'))

for (const file of commandFiles) {
  const command = require(`./commands/${file}`)
  client.commands.set(command.data.name, command)
}

// Events like ready.js (when the robot turns on),
// or messageCreate.js (when a user/robot sends a message)
const eventFiles = fs
  .readdirSync('./events')
  .filter((file) => file.endsWith('.js'))

for (const file of eventFiles) {
  const event = require(`./events/${file}`)
  if (event.once) {
    client.once(event.name, (...args) => event.execute(...args, client))
  } else {
    client.on(event.name, (...args) => event.execute(...args, client))
  }
}

// The interactionCreate event directly here, as this is the heart of the robot.
client.on('interactionCreate', async (interaction) => {
  if (!interaction.isCommand()) return
  const command = client.commands.get(interaction.commandName)
  if (!command) return

  // We log when a user makes a command
  try {
    await console.log(
      `/${interaction.commandName} — Par ${interaction.user.username}`
    )
    await command.execute(interaction, client)
    // But if there is a mistake,
    // then we log that and send an error message only to the person (ephemeral: true)
  } catch (error) {
    console.error(error)
    return interaction.reply({
      content: "An error occurred while executing this command!",
      ephemeral: true,
      fetchReply: true
    })
  }
})

// The token of your robot to be inserted
client.login("NICE TOKEN NEVER TO BE DISCLOSED")
Synchronisation of Slash Commands
This file will be put in the modules/ folder, and called as soon as the bot is launched with the Ready event (events/ready.js). I took it from this GitHub repository made by Androz. It allows you to easily synchronize and update your list of commands.
Here is the Slash Commands synchronization file (/modules/sync_commands.js):
const Discord = require('discord.js')
module.exports = async (client, commands, options = { debug: false, guildId: null }) => {
  const log = (message) => options.debug && console.log(message)

  const ready = client.readyAt
    ? await Promise.resolve()
    : new Promise((resolve) => client.once('ready', resolve))
  await ready
  const currentCommands = await client.application.commands.fetch(
    options.guildId && { guildId: options.guildId }
  )

  log(`Synchronizing commands...`)
  log(`Currently ${currentCommands.size} commands.`)

  const newCommands = commands.filter(
    (command) => !currentCommands.some((c) => c.name === command.name)
  )
  for (const newCommand of newCommands) {
    await client.application.commands.create(newCommand, options.guildId)
  }

  log(`Created ${newCommands.length} commands!`)

  const deletedCommands = currentCommands
    .filter((command) => !commands.some((c) => c.name === command.name))
    .toJSON()
  for (const deletedCommand of deletedCommands) {
    await deletedCommand.delete()
  }

  log(`Deleted ${deletedCommands.length} commands!`)

  const updatedCommands = commands.filter((command) =>
    currentCommands.some((c) => c.name === command.name)
  )
  let updatedCommandCount = 0
  for (const updatedCommand of updatedCommands) {
    const newCommand = updatedCommand
    const previousCommand = currentCommands.find(
      (c) => c.name === updatedCommand.name
    )
    let modified = false
    if (previousCommand.description !== newCommand.description) modified = true
    if (
      !Discord.ApplicationCommand.optionsEqual(
        previousCommand.options ?? [],
        newCommand.options ?? []
      )
    )
      modified = true
    if (modified) {
      await previousCommand.edit(newCommand)
      updatedCommandCount++
    }
  }

  log(`Updated ${updatedCommandCount} commands!`)

  log(`Commands synchronized!`)

  return {
    currentCommandCount: currentCommands.size,
    newCommandCount: newCommands.length,
    deletedCommandCount: deletedCommands.length,
    updatedCommandCount
  }
}
A loooot of things, but just remember that it limits Discord's API requests, and it syncs your commands without difficulty. It's a module, so we'll have to call it in an event which is the Ready!
The Event Ready file
When you turn on your bot, each time this event will run. So we can make sure that we put in a function or some other code that should run from the beginning.
const synchronizeSlashCommands = require('../modules/SyncCommands')
const { ActivityType } = require('discord.js')
module.exports = {
  name: 'ready',
  async execute(client) {
    console.log(`Connected as ${client.user.username}`)
    client.user.setActivity(`/bord`, { type: ActivityType.Watching })

    // This is when the Slash Commands synchronisation starts
    await synchronizeSlashCommands(client,
      client.commands.map((c) => c.data),
      {
        // The parameters to be modified for synchronisation
        debug: true,
        // If you set a server ID, then it will ONLY be for the targeted server.
        // If you don't put guildID, it will be in GLOBAL,
        // So on all servers.
        guildId: "YourDiscordServerOrDeleteThisLine"
      }
    )
  }
}
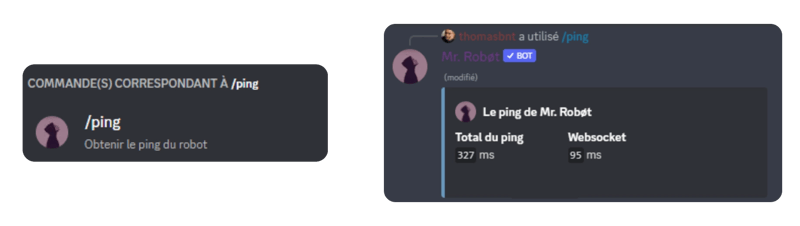
The /ping command as an example
So it's a basic command, but it can also be used to detect anomalies in the connection. So it's not that useless.
const { EmbedBuilder } = require('discord.js')
module.exports = {
  // "data" is the body of the command,
  // this is what we will find when we type /ping
  data: {
    name: 'ping',
    description: 'Get the ping from the robot',
    options: []
  },
  // and all this is the logic of the order
  async execute(interaction, client) {
    // For example here we create an embed with EmbedBuilder from discord.js
    // We add a name and iconURL to it, and then modify it with the values.
    const PingBeforeEmbed = new EmbedBuilder().setAuthor({
      name: `The bird will come back with the bot ping...`,
      iconURL: client.user.avatarURL()
    })
    const sent = await interaction.reply({
      embeds: [PingBeforeEmbed],
      fetchReply: true,
      ephemeral: true
    })
    const TotalPing = sent.createdTimestamp - interaction.createdTimestamp
    const PingEmbed = new EmbedBuilder()
      .setAuthor({
        name: `Ping of ${client.user.username}`,
        iconURL: client.user.avatarURL()
      })
      .addFields(
        {
          name: 'Total ping',
          value: `${TotalPing}ms`,
          inline: true
        },
        {
          name: 'Websocket',
          value: `${client.ws.ping} ms`,
          inline: true
        }
      )
    await interaction.editReply({
      embeds: [PingEmbed],
      ephemeral: true
    })
  }
}
What I should have in my project
- Create the
app.jsfile - Create the
events/folder and theevents/ready.jsfile - Create the
modules/folder and themodules/sync_commands.jsfile - Create the
commands/folder and thecommands/ping.jsfile
.
├── app.js
├── commands
│   └── ping.js
├── events
│   └── ready.js
├── modules
│   └── sync_commands.js
└── package.json
If you're missing something, you haven't read everything. 😱
🥳 Start the bot!
- You need to copy your robot's token from the Discord page for developers.
- And insert it with this code at the end of your
app.js:
client.login("YOUR TOKEN HERE WITHOUT SPACES AND NEVER TO BE REVEALED")
- Save your file and do this command in the command prompt:
node app.js
🎉🎉 That's it! Your bot is on! 🎉🎉
🌟 An example of a robot
Bord Pi : A robot specifically designed for its own Discord server.
NOTE The documentation is written in French language, but the code isn't.
Here is an example of slash commands, feel free to download the repository and modify it.
This is a Discord bot that runs on the Discord.js library and is set up for your Discord server. It is accessible and easy to configure it your way.
Photo by Clem Onojeghuo on Unsplash
| ☕ | Check my Twitter account. You can see many projects and updates. You can also support me on Buy Me a Coffee, Stripe or GitHub Sponsors. Thanks for read my post ! 🤩 |
|---|


Oldest comments (2)
Yo! Great post! 🙌
Thank you Michael! 🤩