Introduction
We have already seen the process of deployment of a Django app on Heroku, now we can move to another platform which is Railway App. This allows a faster and more intuitive way to deploy a Django app(or any sort of web app). This platform has several Starter Apps for shipping your app in several clicks, definitely, it would require some configuration and tweaking a bit.
We will be following similar steps from the Django-Heroku Deployment Guide for configuring and setting up our Django project for the deployment on the Railway app. We explore a few different ways to create and deploy a Django project on Railway.
Creating a Project on Railway App
Once we have our Django project setup, we can move ahead and create a Railway Project. A Railway project is a collection of environments, plugins, services, and deployment variables. By heading on the New Project webpage, you can log in or sign up for a free account and create a simple project.
Here we can have a few options:
- Create a Django App Template (Djangopy Starter)
- Pull a Project from a GitHub Repository (Deploy from GitHub Repo)
We'll look into each of them, the first one is by allowing the Railway bot to create a prebuilt Django template on our GitHub account. The second option is for fetching and deploying an existing Django project repository on GitHub.
Railway Django Project Template
Railway provides a simple Django project template, it consists of a single app and a simple view that displays a HttpResponse. The Django project template provided by Railway is open source and available on GitHub. With this method, you won't require any django project to create by yourself, it would be a template of django project created by the railway bot. Though for extending and building a meaningful django project, you will have to clone the repository and make necessary changes to it.
Create a Project by heading on to the New Project Tab and search for Django, you should see a django project as a starter pack.

Once you select the Django project, we have an initial configuration tab opened up for us. It is mandatory to fill the SECRET_KEY environment variable as it makes your django project more secure. Also, do change the name of the repository as it will be the name of your repository name in your GitHub account.
To create a SECRET_KEY key, you can move into your terminal and do some python wizardry.
Open a Python REPL, by entering the command python or python3. Import the secrets module and run the function token_hex(24) which will generate a key of length 24.
python

import secrets
secrets.token_hex(24)

Now, copy the SECRET_KEY without quotes into the prompt and this will create a repository on your GitHub with the provided name. The Railway Bot will create a django project with the name djangopy in that repository with some pre-configured settings.


This will create a simple repository on your GitHub but also a django application deployed on Railway along with PostgreSQL Database attached to it.

So, this has deployed the project on Railway with this https://djangopy-production-43cb.up.railway.app/ URL Link. The name of the link can be configured from the Settings Tab in Dashboard Section and editing the Service Domains and even adding a Custom domain.
So this is how we deploy a basic django application on railway app. Further, you can modify the contents of the Github repository and push the code by committing the changes and it will pick it from there and also deploy it automatically, thereby creating a sort of CI-CD.
We'll be demonstrating this in the next section which is a method to deploy the project from a custom GitHub repository i.e. by setting up everything ourselves and then attaching the Railway app for deployment. The benefit of this method is that we can configure some already existing Django applications by tinkering a bit.
Deploying from GitHub repository to Railway
This is the second method for deploying the Railway project. For this we need a proper Django Project, we will set up a django application from scratch, I have already created a simple CRUD application in Django for a Blog on GitHub. This won't be a Django guide for setting up views and creating models, I've explained all the setup of the django-blog in my Django Basics series.
Creating a Django Application
For deploying an app, we definitely need an app, we need to create a basic Django application to deploy on the web. We'll be creating a simple blog application with a couple of views and a simple model structure. As for the database, we'll be using Postgres as Railway has an database service for it and it is pretty easy to configure.
Set up a virtual environment
We need to set up a virtual environment in order to keep the Django project neat and tidy by managing the project-specific dependencies and packages. We can use the virtualenv package to isolate a python project from the rest of the system.
# install the virtualenv package
pip install virtualenv

# create a virtual env for the project
virtualenv .venv

# activate the virtualenv
Windows:
.venv\Scripts\activate

Linux/macOS:
source .venv/bin/activate
This will set up the project nicely for a Django project, you now install the core Django package and get started with creating a Django application.
# install django
pip install django

# start a django project
django-admin startproject blog .

cd blog

# create a application in django project
python manage.py createapp api

# Create some models, views, URLs, templates

# run the server
python manage.py runserver
We assume you already have a Django project configured with some basic URLs, views, and templates or static files as per your project and requirements, for this tutorial I will be using the simple blog application from my previous Django tutorials as a reference. As said earlier, you can follow along with my Django Basics series and refer to the Blog Application project on GitHub.
Configuring the Django Application
Make sure to create and activate the virtual environment for this django project. This should be done to manage the dependencies and packages used in the project. If you are not aware of the virtual environment and django setup, you can follow up with this post.
Creating a runtime.txt file
Now, Firstly we need to specify which type and version of language we are using. Since Django is a Python-based web framework, we need to select the python version in a text file.
runtime.txt
python-3.9.5
Here, the version can be anything as per your project and the packages installed.
Creating requirements.txt file
We'll first create a requirements.txt file for storing all the dependencies and packages installed in the application. This will help in installing dependencies while deploying the application. We can either use a requirements.txt file using virtualenv or a Pipfile using Pipenv. Both serve the same purpose but a bit differently.
Assuming you are in an isolated virtual environment for this Django project, you can create a requirements.txt file using the below command:
Make sure the virtualenv is activated before running the command:
pip freeze > requirements.txt
This will create a simple text file that contains the package names along with the versions used in the current virtual environment. A simple Django requirements file would look something like this:
asgiref==3.4.1
Django==3.2.11
pytz==2021.3
sqlparse==0.4.2
typing_extensions==4.0.1

This is vanilla Django without any additional dependencies but if you have integrated other functionalities like Django Rest Framework, PostgreSQL, Crispy Forms, Schedulers, etc. there might be additional dependencies that become quite crucial for the smooth working of the project.
If you are using pipenv, you don't need to make any efforts to manually activate and manage the virtual environment, the dependencies are installed and taken care of by the pipenv installer. You just need to make sure to install any package with pipenv install and not pip install for better and improved package tracking.
So, that's all we need to take care of packages and keep a list of these integrated packages for the project. You need to update the requirements.txt file every time you install any new package or modify the dependencies for a project. Simply use the command pip freeze > requirements.txt in the activated virtual environment.
Creating a Procfile
Next up, we have the Procfile, a procfile is a special file that holds information about the processes to be run to start or activate the project. In our case, for django we need a web process that can manage the server.
A Procfile is a simple file without any extension, make sure to write Procfile as it is the name of the file in the root folder of the project. Inside the file add the following contents:
Procfile
web: gunicorn <project_name>.wsgi
For the Procfile, Railway has a built Procfile in the Django Template, you can refer to it and create it as follows:
web: python manage.py migrate && gunicorn <project_name>.wsgi
As we can see we have defined the web process using gunicorn, Gunicorn is a python package that helps in creating WSGI HTTP Server for the UNIX operating systems. So, we need to install the package and update the package dependency list.
pip install gunicorn

pip freeze > requirements.txt
Configuring Environment Variables
We need to keep our secrets for the django project out of the deployed code and in a safe place, we can create environment variables and keep them in a .env file which will be git-ignored. We do not want this .env file to be open source and thus should not be committed.
We first need to create a new secret key if you already have a GitHub repository, chances are you would have committed the default secret key open for the world to see, it is an insecure way of deploying django apps in production.
This should generate a secret key that only you know now. So, just copy the key without the quotes and create a file .env in the root project folder.
.env
SECRET_KEY=76419fd6885a677f802fd1d2b5acd0188e23e001042b05a8
The .env file should also be added to the .gitignore file, so simply append the following in the .gitignore file
.env
This is just one of the environment variables in our django project, further, we will also be adding a few other variables like database credentials, debug status, etc.
We have now created environment variables for our django application, we now need a way to parse these environment variables into the Django project.
Parsing Environment variables using python-dotenv
We will use python-dotenv to parse variables into the django settings configurations like SECRET_KEY and DATABASES.
- Install
python-dotenvwith pip with the command :
pip install python-dotenv
We need to then modify the default variables in the settings.py file. Firstly, we will load in the .env file for accessing the environment variables for the configuration of the project.
Append the following code, to the top of the settings.py file, make sure don't override the configuration so remove unnecessary imports and configurations.
# <project_name>/settings.py

import os
from dotenv import load_dotenv

BASE_DIR = Path(__file__).resolve().parent.parent

load_dotenv(os.path.join(BASE_DIR, ".env"))
We have imported the package dotenv basically the python-dotenv into the settings.py file and the module os for loading the .env file. The load_dotenv function helps in loading the key-value pairs which are the configuration variables that can act as actual environment variables. We provide in a file to the load_dotenv function which is the .env file in our case, you can pick up any location for the .env file but make sure to change the location while parsing the file into the load_dotenv function.
After loading the variables into the settings.py file, we now need to access those variables and set the appropriate variables the configuration from the variables received from the load_dotenv function. The os.getenv function to access the environment variables. The os.getenv function takes a parameter as the key for the environment variable and returns the value of the environment variable.
SECRET_KEY = os.getenv("SECRET_KEY")
We have secretly configured the SECRET_KEY for the django project. If you have any other variables as simple key-value pairs like AUTH passwords, username, etc. you can use this method to get the configuration variables.
Add gitignore file
We would need a .gitignore file for only committing the project and pushing it to the remote repository. Here, we will set up a minimal .gitignore file in our root repository.
Here's a sample .gitignore for a minimal django project.
.env/
.venv/
env/
venv/
*.env

*.pyc
db.sqlite3
staticfiles/
If you want a full-fledged .gitignore for a complex django project, you can take the reference from Jose Padilla's gitignore Template for a django project.
That would be good to go for creating and serving up the project while deploying the project on Railway App.
Git Commit the Django Project
Now, we can safely commit the code and push it to a GitHub repository. This will make sure you have a basic django proejct on GitHub from which we can build the Railway app into deployment.
git status

git add .

git commit -m "config for railway deployment"
Carefully check the status of the git repository before committing and make sure you don't forget anything by mistake, only commit the files which you think are important and ignore the rest.
git remote add rail https://github.com/Mr-Destructive/django-blog/tree/railway

git push rail railway

Creating the Railway project
Now, since we have a django project nicely configured and setup on GitHub, we can pull out a railway project and fetch the project from the GitHub repository.

Spinning up the database
We also need a database that we can attach in the django project in our Railway application. We can integrate a PostgreSQL database as a service running in our Railway project instance. We can do that by locating the +New tab on the project dashboard and attaching a Database in the drop-down menu.
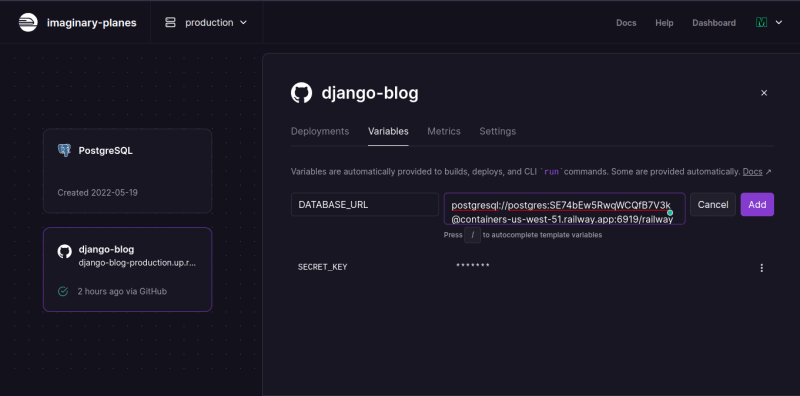
After creating a database service, we need the credentials of the database or the DATABASE_URL of the PostgreSQL in order to integrate it into the django settings. We can locate into the Connect of the PostgreSQL service and grab the URL of the database. This can be stored in the main django application serves as an environment variable.
DATABASE_URL=postgresql://postgres:SE74bEw@containers-51.railway.app:6919/railway
In the Django Starter Project provided by Railway, we should have a PostgreSQL database integrated as a Service. So, we can consume the database in our django project.
We will add the DATABASE_URL config variable into the .env file and also add it into the main Django project service so that it can communicate to the database. You need to copy the DATABSE_URL into our local setup file(.env file). Copy the Database URL and paste it into the .env file as follows:
DATABASE_URL=postgres://sjxgipufegmgsw:78cbb568e@ec2-52-4-104-184.compute-1.amazonaws.com:5432/dbmuget
The format for the Postgres URL is as follows:
postgresql://[user[:password]@][netloc][:port][/dbname]
Loading Database configuration
Databases are a bit different as compared to other simple configurations in django. We need to make a few adjustments to the default database configuration. We will install another package dj-database-url to configure DATABASE_URL. Since the databse_url has a few components we need a way to extract the details like the hostname, port, database_name, and password. Using the dj-database-url package we have a few functions that can serve the purpose.
pip install dj-database-url
At the end of your settings.py file, append the following code.
import dj_database_url

DATABASE_URL = os.getenv("DATABASE_URL")

DATABASES = {
    "default": dj_database_url.config(default=DATABASE_URL, conn_max_age=1800),
}
We would need an adapter for making migrations to the PostgreSQL database i.e. the psycopg2 package. This is a mandatory step if you are working with postgres database. This can be installed with the simple pip install:
pip install psycopg2

# If it does not work try
pip install psycopg2-binary


# if still error persists try installing setuptools
pip install -U setuptools
pip install psycopg2
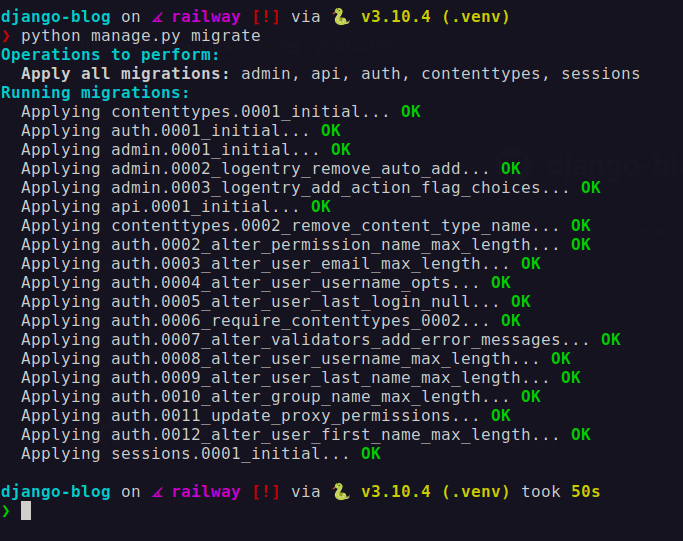
Now, that we have configured the database, we can now apply migrations to the new database of Postgres provided by Railway. We will simply run the migrate command and in the Railway Project the PostgreSQL database would have been modified and an appropriate schema should be applied.
python manage.py migrate
Make sure to update the requirements.txt file before pushing the project to Railway app for making sure everything works as expected. Since we have installed a few additional packages that are directly used in the settings.py file, we need to run the pip freeze command to update the requiremnets.txt file.
Serving Static Files
Now, if you have some static files like CSS, Javascript, or images, you need to configure the static files in order to serve them from the Railway app server. We will require another config variable for collecting the static files from the selected repository.
STATIC_URL = "static/"
STATICFILES_DIRS = [os.path.join(BASE_DIR, "static")]
STATIC_ROOT = os.path.join(BASE_DIR, "staticfiles")
Here, if you have served your static files from the static folder in the root directory of your django project, you can add the above code in the settings.py file. We will collect all static files in the folder along with the default static files provided by django in the staticfiles directory. Run the following command if you want to test whether the static files are properly collected and served.
python manage.py collectstatic
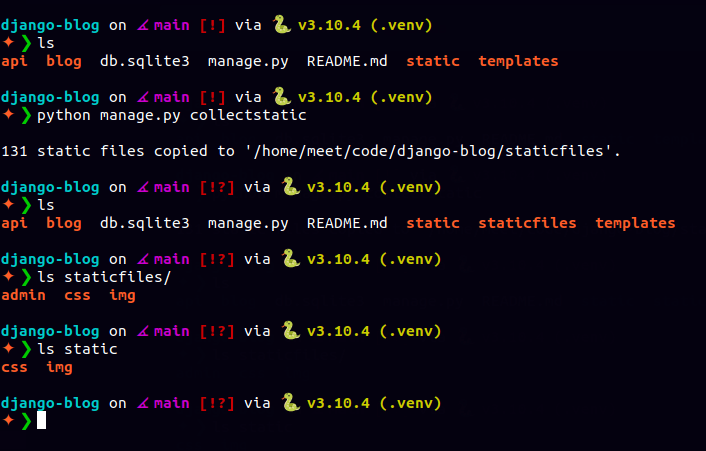
So, this command will collect all the static files and store them in a single place. We see that the files from the admin section are also copied as well as the custom static files from the project configuration. Now, we can move on to set the config variable for the Railway app in the Variables Tab.
DISABLE_COLLECTSTATIC = 0
We can set the DISABLE_COLLECTSTATIC variable as 0 or 1 indicating whether to disable it or not. We have currently enabled the static file collection while deploying the app but you can set it to 1 to disable the collection of static files.
Since I first tested the application on Railway, the static files don't work as expected, we need another package to make sure the staticfiles are served property. We will be installing the whitenoise package which serves as the middleware for serving the static files.
pip install whitenoise
Add the whitenoise middleware whitenoise.middleware.WhiteNoiseMiddleware to the MIDDLEWARE list in the settings.py file.
MIDDLEWARE = [
...
...
...
    'whitenoise.middleware.WhiteNoiseMiddleware',
]
That should be enough to make the most of the deployment on Railway app. You will have to make a few adjustments as per your requirements and project.
Deploy to GitHub
Finally, we will have all the pieces connected, only we need to push the code to the GitHub repository in order to trigger a build on the railway app. So, we make sure we commit every critical thing that are in our django project and include every sensitiv information in the gitignore file.
pip freeze > requirements.txt
This step is quite important because you need to make sure that all the packages are listed in the requirements.txt file else you will have to wait for the build to fail and redeploy.
Make sure the server is running first on your local machine, remember the server will be set up from scratch but the database will already have applied migrations if you have applied migrations before after connecting the Railway database service.
python manage.py collectstatic

python manage.py runserver
This will set up the origin of the remote repository that will be pushing the project code. Next, make sure to commit the code which will contain all the required stuff for deploying the code.
Checklist for deploying the code
- requirements.txt
- Procfile
- runtime.txt
- django-project
- environment variables / config variables
- static file configuration
- database configuration
- migrate schema of database
- gitignore file for ignoring virtualenvs, .env file, staticfiles, etc
git push origin main

origin -> remote repository URL
main   -> branch name

Railway CLI
Railway also provides a cool CLI, it has some quite handy features like creating and managing services, local development environment, etc. We'll just dive into a few nice features of the CLI tool.
We'll first install the CLI on our local system, for that the guide is quite limited in a way for a few options to choose from like npm, shell, and scoop. For me, the shell was the way to go, but it had a few issues with permission, so I made a few changes in the install.sh script ran on my machine and it worked fine.

Now, that we have the Railway CLi set up we can run a few commands like:
railway login

OR

# if it doesn't work
railway login --browserless

OR

# with node
npx railway login

This will sign you in with your railway account.
We now need to link our project and execute and work around the command in that project from the railway app. To link a project from a railway account, you have to use the link command. The link command takes in a parameter as the project id which can be obtained from the project dashboard settings tab.
railway link <proejct_id>
Now, we can explore some more commands like run, up, and so on. The run command is pretty solid and provides an interface to run commands for your project for instance in Django, create a superuser, manage dependencies, collectstatic files, etc. This allows us to set up and run commands into the actual production environment just from the CLI.
# railway run (command to be executed)
railway run python manage.py createsuperuser

# deploy the project
railway up
So, this was all about creating and deploying a django application on Railway. Here are some reference links:
Conclusion
So, that's how we deploy a Django project on the Railway app. We have seen two of the many ways to create and deploy a Django application on Railway. We also integrated a PostgreSQL service provided by Railway in our Django Project. Using the Railway CLI, we were able to manage and create Projects from the terminal, also interaction of the railway project was achieved along with the production build from CLI.
Hopefully, you liked the above tutorial, if you have any questions. feedback, or queries, you can contact me on the Social handles provided below. Thank you for reading and till the next post Happy Coding :)series: "django-deployment"


Latest comments (29)
I have this error while deploying on Railway, what should I do
Please I'm getting this error, any idea how to fix it.
Hello, this is a beautiful write-up, i followed it and i have my app deployed, but i have one request, on heroku, we have an app called heroku scheduler, whats the alternative on railway?
Hello! How should I configure Django to serve media files?
I haven't tried media files, though you can look into this post, it might be similar to it.
Hi Raj.. Please my own case is a bit different. I created different environments for the development and production. In development, I'm using sqlite3 database. In production, I'm using postgresql though through dj_database_url. Please, how do I createsuper user in production environment?
After a successful deployment of a Django app to railways how do I add a superuser admin?
Make sure your app is running on railway, and you can also add the railway database locally and run
python manage.py createsuperuser. From this you can connect the railway db locally and create a superuser. From there on you can use admin from the deployed app.You should add how to deal with media files in production. This will make this blog complete
This helped me today, thanks for the updates.
Beautiful piece, thank you so much but I'm getting this error message "Application Error
is your app correctly listening on $PORT?"
I have done every thing I can from creating an environment variables in my railway project to deleting my project severally but still after a successful deployment my project still crashes.
Add logging to your app then git and deploy. On your dashboard under deployment there is a view logs button.Then click build logs .This will tell you the exact problem.
Thank you I'll try this out too
Have you entered the port number correctly from the postgres service on railway. I think that is probably the issue.
Alright I'll try that out, although I didn't use postgresql for this project I used Django's default sql lite, I'll try this out and get back to you. thank you so much
Fixed the issue. thanks for your assist
Hey, May I know how you have fixed the issue?
@osahenru May I know how you fixed the issue?
Railways have developed complete guidelines. Thank you.
please help me out with this error

There might be problems in the psycopg2 package installation, so I have already mentioned in the post:
If psycopg2 doesn't work, remove the packge from the requirements.txt file and add the psycopg2-binary package after installing.
halo, i followed this and i'm getting this error when i apply migration
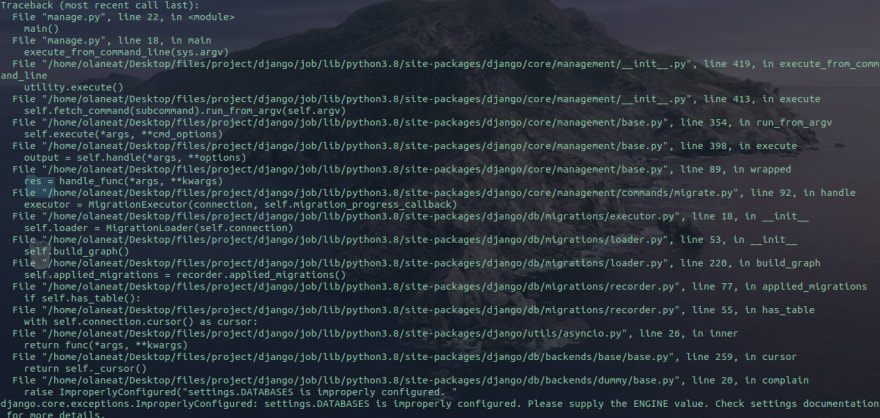
Thank you for reading and giving feedback,
Make sure you have created the PostgreSQL database service on Railway, specified the
DATABASE_URLproperly in the.envfile, and setupdj-database-urlfor smooth working of the database operations.Also you could try an alternative way instead of installing and setting up the dj-database-url:
Let's say my database url is given by railway as:
This is of the format,
So, we can convert this URL into a object like representation of the remote database in django settings.
Try these few things out and let me if it still doesn't works.
tnks this worked but now i'm getting a different err
The address of the hostname must be taken from the URL and don't use
Localhost.very thorough post! I need to give railway a try
Just curious. What kind of app will you deploy?
No idea, I don't have anything that I need public compute for at the moment.