In this article, I’ll teach you how to make your laravel project handel multiple database by using laravel tenancy package Laravel Tenancy.
1. The Setup:
1- We need a laravel project to start with.
composer create-project --prefer-dist laravel/laravel multi-tenancy
Note:
The official documentation https://tenancy.dev/ if you want to install the package by your self and skip this part and go to the next section or follow these steps with me.
2- after we finish install the new project we need to install the laravel tenacy.
composer require hyn/multi-tenant
3- After we finish install the package successfully with no errors I hope, we publish the vendors.
php artisan vendor:publish --tag=tenancy
- The tenancy publish will make a
config/tenancy.phpfile that has all the configuration and migrations you can go and check the migrations before we start to take a look to the table just take a look..
4- after that we go to config/database.php and in connections
we put or system database.
'system' => [
    'driver' => 'mysql',
    'url' => env('DATABASE_URL'),
    'host' => env('DB_HOST', 'localhost'),
    'port' => env('DB_PORT', '3306'),
    'database' => env('DB_DATABASE', 'forge'),
    'username' => env('DB_USERNAME', 'forge'),
    'password' => env('DB_PASSWORD', ''),
    'unix_socket' => env('DB_SOCKET', ''),
    'charset' => 'utf8mb4',
    'collation' => 'utf8mb4_unicode_ci',
    'prefix' => '',
    'strict' => true,
    'engine' => null,
]
5- Then make our migrations
PHP artisan migrate
2. Tenant Models & System Models:
Now after everything is set up, we create our tenant model and migrations, in the documentation there is a section call models https://tenancy.dev/docs/hyn/5.4/models in this section explain if you want to use tenant connection or system connection in other words models that you want to connect to the system database you will use system connection and the models that you want to connect to the tenant database will have tenant connection and that it how simple is that.
In this example I will make users for the system and users for the tenant.
1- Lets begin with the tenant users,first of all we need to make a folder that will hold every tenant models and system models, so we go to /app/Models and create Tenant folder and System folder like this

then we move the User model that come default in laravel to /Models/System and change the namespace and put or system connection to that user and the final result will be like this
<?php

namespace App\Models\System;

use Illuminate\Contracts\Auth\MustVerifyEmail;
use Illuminate\Foundation\Auth\User as Authenticatable;
use Illuminate\Notifications\Notifiable;
use Hyn\Tenancy\Traits\UsesSystemConnection;

class User extends Authenticatable
{
    use Notifiable, UsesSystemConnection;

    /**
     * The attributes that are mass assignable.
     *
     * @var array
     */
    protected $fillable = [
        'name', 'email', 'password',
    ];

    /**
     * The attributes that should be hidden for arrays.
     *
     * @var array
     */
    protected $hidden = [
        'password', 'remember_token',
    ];

    /**
     * The attributes that should be cast to native types.
     *
     * @var array
     */
    protected $casts = [
        'email_verified_at' => 'datetime',
    ];
}
2- Now lets make the Tenant User model is very simple just make a model called users.
php artisan make:model Models/Tenant/User
<?php

namespace App\Models\Tenant;

use Illuminate\Database\Eloquent\Model;
use Hyn\Tenancy\Traits\UsesTenantConnection;

class User extends Model
{
    use UsesTenantConnection;

}
3. Tenant & System Migrations:
- After we successfully created our two models and make declare which model will connect to which database, now here comes the time to make migration to each one.
1- Now we go to the migrations folder in /database/migrations
and create folder called tenant inside the migrations folder,
the package documentation says that will migrate the migrations that inside the tenant folder https://tenancy.dev/docs/hyn/5.4/migrations
now lets make the tenant users migrations
php artisan make:migration create_users_table --path=/database/migrations/tenant
2- Then we add the same users columns that come default in laravel to the tenant users table
      Schema::create('users', function (Blueprint $table) {
            $table->id();
            $table->string('name');
            $table->string('email')->unique();
            $table->timestamp('email_verified_at')->nullable();
            $table->string('password');
            $table->rememberToken();
            $table->timestamps();
        });
so we have the users system table that comes default in laravel and then we have the tenant users table that inside the tenant folder, that it for migrations lets go to the next step.
4. Seeding:
- Now we need to test the users for both so we need to seed them, so we will start with the tenant first.
1- First we will make a seeder file
PHP artisan make:seed TenantDatabaseSeeder
- don't forget to add the
namespaceso the package know which file the package will call.
<?php

namespace Database\Seeds;

use Illuminate\Database\Seeder;


class TenantDatabaseSeeder extends Seeder
{
    /**
     * Run the database seeds.
     *
     * @return void
     */
    public function run()
    {
      // Users Tenant seeder will go here
    }
}
2- We go to /config/tenancy.php and open this file and go to tenant-seed-class and add the seed file that we created.
'tenant-seed-class' => Database\Seeds\TenantDatabaseSeeder::class,
- now every tenant you will made will run this seeder file and seed the tenant database
3- Then we will make the users system seeder and the tenant users seeder in this example I will not make factory I will publish the users in the seeder directory.
so we make a users tenant seeder
php artisan make:seed TenantUsersSeeder
inside this folder we will add the User model that we made for the tenant that have UsesTenantConnection
<?php

use Illuminate\Database\Seeder;
use Faker\Factory as Faker;
use Illuminate\Support\Str;
use App\Models\Tenant\User;

class TenantUsersSeeder extends Seeder
{
    /**
     * Run the database seeds.
     *
     * @return void
     */
    public function run()
    {
        for ($x = 0; $x <= 5; $x++) {
            $faker = Faker::create();
            User::create([
                'name' => $faker->name,
                'email' => $faker->unique()->safeEmail,
                'email_verified_at' => now(),
                'password' => '$2y$10$92IXUNpkjO0rOQ5byMi.Ye4oKoEa3Ro9llC/.og/at2.uheWG/igi', // password
                'remember_token' => Str::random(10),
            ]);
        }
    }
}
4- Then we will make the same for the system users seeder but the only diffrance that we will call the Users model that in the system the one that have UsesSystemConnection
php artisan make:seed SystemUsersSeeder
this is the SystemUsersSeeder
<?php

use Illuminate\Database\Seeder;
use Faker\Factory as Faker;
use Illuminate\Support\Str;
use App\Models\System\User;

class SystemUsersSeeder extends Seeder
{
    /**
     * Run the database seeds.
     *
     * @return void
     */
    public function run()
    {
        for ($x = 0; $x <= 5; $x++) {
            $faker = Faker::create();
            User::create([
                'name' => $faker->name,
                'email' => $faker->unique()->safeEmail,
                'email_verified_at' => now(),
                'password' => '$2y$10$92IXUNpkjO0rOQ5byMi.Ye4oKoEa3Ro9llC/.og/at2.uheWG/igi', // password
                'remember_token' => Str::random(10),
            ]);
        }
    }
}
4- we call the two file that we made in DatabaseSeeder and the TenantDatabaseSeeder
in DatabaseSeeder
$this->call(SystemUsersSeeder::class);
in TenantDatabaseSeeder
$this->call(\TenantUsersSeeder::class);
- That it for our seeder now here comes the fun part in our project ___
5. Make a tenant:
Finally we come to the important part of our article making a tenant with a database.
You will find in the documentation https://tenancy.dev/docs/hyn/5.4/creating-tenants section
you can follow the documentation like I said before or come along with me.For this example I will not make a specific CRUD for tenant I will try to keep it short just creating a new tenant.
When you createing a new tenant I recommend to use the UUID that the package provide UUID Wikipedia
what is UUID?
The UUID is used for the database username and database name.
1- before we start to add a new tenant we will make the UUID not more than 32 character and we will put it in our .env file.
LIMIT_UUID_LENGTH_32=true
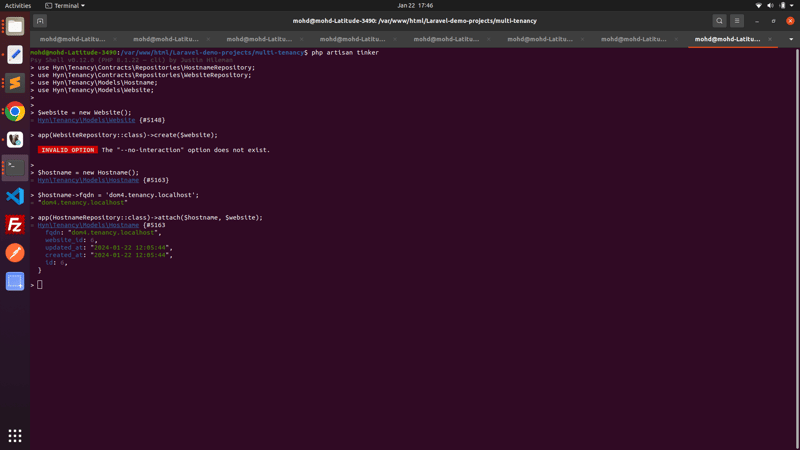
2- so lets open our tinker and start creating.
php artisan tinker
use Hyn\Tenancy\Contracts\Repositories\HostnameRepository;
use Hyn\Tenancy\Contracts\Repositories\WebsiteRepository;
use Hyn\Tenancy\Models\Hostname;
use Hyn\Tenancy\Models\Website;


$website = new Website();
app(WebsiteRepository::class)->create($website);

$hostname = new Hostname();
$hostname->fqdn = 'foo.tenancy.localhost';
app(HostnameRepository::class)->attach($hostname, $website);
Don't forger to press enter on the last line or your tenant domain will not register :D
Note:-
The fqdn is the tenant domain that the only way that the package will know which domain belongs to which database.
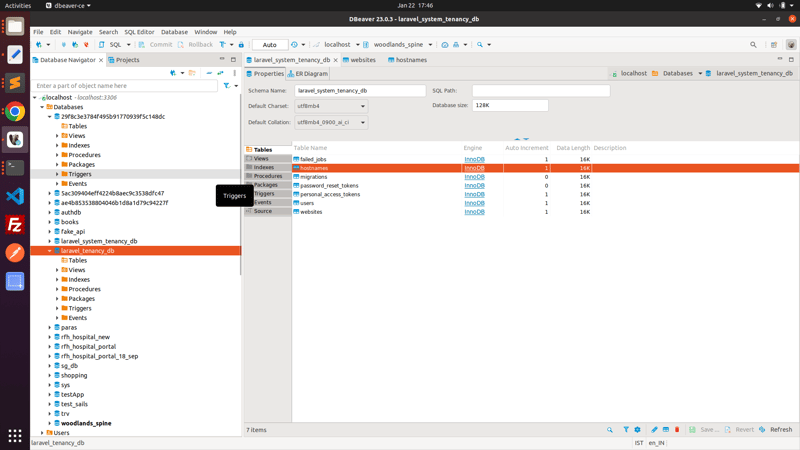
so now if you check your system database and go to
websitestable and you will see the tenant database name here

if you open the
hostsnamsyou will the the domain that we register in fqdn column and thewebsite_idthat related to.

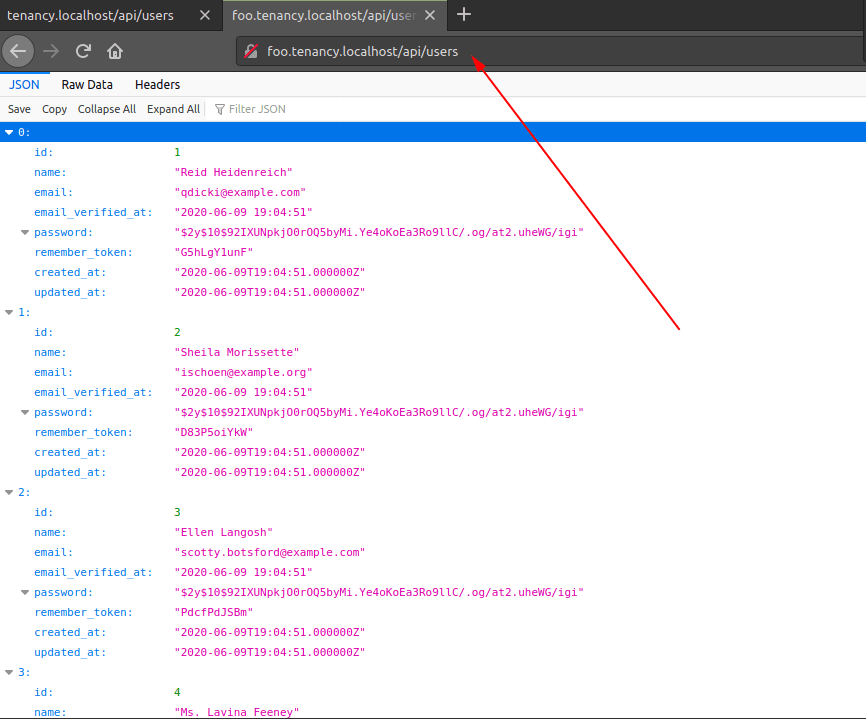
Now after you making your first tenant hopefully without any errors you can check your database and you will see this

This is your tenant database and if you open the users inside it you will see that have users that from the seeder we have madefor the tenant.

Before we go to the next part we need to seed or system users to right :D
PHP artisan db:seed
6. Making Routing:
- We can separate the system routes from the tenant route by makeing a
tenants.phpfile inroutesfolder by default in the package will look to tenants file but if you want to change the name and the place you can go to/config/tenancy.phpand change the route dir .
 'routes' => [
        /**
         * Routes file to load whenever a tenant was identified.
         *
         * @info Set to false or null to disable.
         */
        'path' => base_path('routes/tenants.php'),
    ],
1- But we will stick with the default so after we creating or tenants.php in routs folder we add the controller that we will create it after this section.
<?php

use Illuminate\Support\Facades\Route;


$namespace = 'App\\Http\\Controllers\\Tenant\\';

Route::prefix('api')->namespace($namespace)->group(function () {
    Route::apiResource('users', 'UserController');
});
- The perfix will add
apilike a normal laravel api and the namespace will direct to the place we will put or Tenant controller.
2- We do the same in api.php so we can also access the system users
api.php
<?php

use Illuminate\Http\Request;
use Illuminate\Support\Facades\Route;


Route::apiResource('/users', 'System\UserController');
- Now our routes are ready lets create the controller that will give us the users for the tenant and the controller for the system.
7.Controllers:
- Now lets create the
UsersControllerfor both, like the models example we will separate the two controller by thetenantfolder and the system folder.
1- Users system controller
php artisan make:controller /System/UserController --resource
2- Users tenant controller
php artisan make:controller /Tenant/UserController --resource
3- In system controller we will use the User model that belongs to the system.
System/UserController
use App\Models\System\User;
Tenant/UserController
use App\Models\Tenant\User;
4- In both controller in index function we will call all the users.
 /**
     * Display a listing of the resource.
     *
     * @return \Illuminate\Http\Response
     */
    public function index()
    {
        return User::all();
    }
Remeber in both the index function .
8.Depoly and test:
This is the last pice of the puzzle I promise you this is the last section.
To make the tenant work you have to deploy you laravel app on a server or your machine it doesn't matter the most important thing is the system domain and the tenant domain both must route the same project that the trick, in this example I'm using
Ngnix
for running my laravel app you can use what ever you like.
1- Now after install nginx we will go to sites-available and make the system domain system.localhost Nginx file.
system.localhost
server {
    listen 80;
    listen [::]:80;

    root project path;

    index index.php index.html index.htm index.nginx-debian.html;

    server_name tenancy.localhost;

    location / {
    try_files $uri $uri/ /index.php$is_args$args;
    }

    location ~ \.php$ {
      try_files $uri /index.php =404;
      fastcgi_pass unix:/var/run/php/php7.4-fpm.sock;
      fastcgi_index index.php;
      fastcgi_param SCRIPT_FILENAME $document_root$fastcgi_script_name;
      include fastcgi_params;
    }

    location ~ /\.ht {
        deny all;
    }
}
2- make the same file but change the name and change the server_name to the fqdn that we made before it was foo.tenancy.localhost
server {
    listen 80;
    listen [::]:80;

    root the same project path;
    index index.php index.html index.htm index.nginx-debian.html;

    server_name foo.tenancy.localhost;

    location / {
    try_files $uri $uri/ /index.php$is_args$args;
    }

    location ~ \.php$ {
      try_files $uri /index.php =404;
      fastcgi_pass unix:/var/run/php/php7.4-fpm.sock;
      fastcgi_index index.php;
      fastcgi_param SCRIPT_FILENAME $document_root$fastcgi_script_name;
      include fastcgi_params;
    }

    location ~ /\.ht {
        deny all;
    }
}
3- after that we make a shortcut of the two files to sites-enabled
if you using Ubuntu just run this command for both the file
ln -s /etc/nginx/sites-available/fileName /etc/nginx/sites-enabled/
4- then we restart Nginx
service nginx restart
now we have two domain that route to our project and the project will handle which database will connect to, and that it.
Here you go one laravel project handle multiple database.

- Here is the repo if you forget any thing: https://github.com/MostafaElGamal/multi-tenancy


Top comments (3)
Thanks for this helpful post, it's really helping in my project
while running the tinker, website and hostname created successfully. Also DB instanse created successfully. but users and migration table not created, not able to find the bug,
Nice post bro. It is detailed