
Open-source is not a new concept but in recent years specially it has gained more attention from both developers and the companies in tech industry.
Successful businesses such as Gitlab, Terraform and Sentry are some of the examples of billion dollar startup unicorns which all are offering a service which is open-source at its heart.
Not only these companies have hired the main contributors in their open-source projects, but also other companies are keen to hire developers who have proved their skills and experience working on an open-source project.
In this post I give you a practical guide with the useful commands and scenarios you need to be aware of to be able to start contributing to open-source.
First of all each open-source project is stored on one or more Git repositories, meaning you need to know some basics of Git and the platform.
Repository used in the examples:
https://github.com/dotenx/dotenx
Github
The most popular platform used by absolute majority of open-source projects is Github.
So let's start with the very first things you should know about an open-source repository on Github by an example.
In this picture I've added some details about some particularly important parts of the Github panel on the landing page of a repository (dotenx).
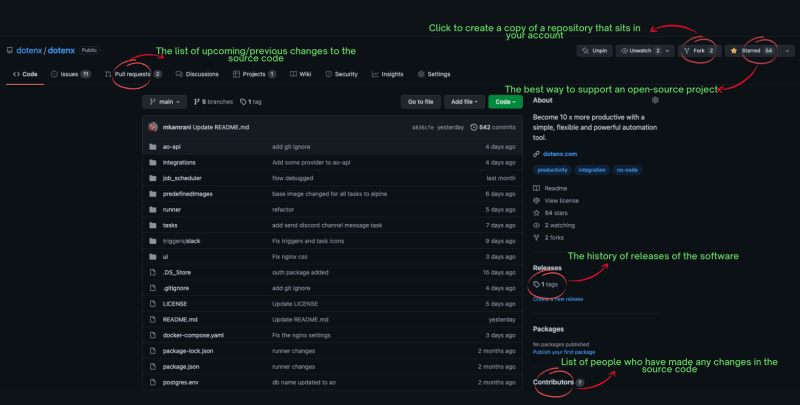
On this page we have the links to the Issues and Pull Requests pages.
Issues

In this page you can see all the "Issues" of the repository.
The open issues are either reported by someone or created by the contributors to address a bug, a missing part in a feature, problem in the documentation, etc.
This is where you can search particularly for the open areas to contribute to the project. You can usually search for the issues with labels like these:
- good-first-issue
- easy
- beginner
Pull Requests

Changing the source code in open-source repositories happen through PRs. A Pull Request in simple terms means "These are my changes, pull them and merge them into the repository if OK".
In order to create a PR you have to follow these steps:
- Identify an issue you want to work on
- Fork the repository
- Clone the forked repository:
git clone <repo url> - Create a branch:
git checkout -b <your branch name> - Implement your changes
- Commit the changes:
git commit -m <commit message> - Push the changes:
git push - Create a PR on the original repository
- Respond to the reviews and commit+push new changes if required
Finally, open-source is all about supporting each other. Appreciate it if you support my work by adding a star to my project:
https://github.com/dotenx/dotenx
If you're interested to see more beginner friendly, easily digestible, git and open-source articles please let me know in the comments or like this post.


Oldest comments (6)
Of you are a beginner, bookmark this for a handy guide! ✅
Love this!! Very helpful
I share with you my Open Source Projects that I'm working on:
Header-Only C++ Library for Graph Representation and Algorithms
CXXGraph
Share on
Introduction
CXXGraph is a small library, header only, that manages the Graph and it's algorithms in C++. In other words a "Comprehensive C++ Graph Library" An alternative to Boost Graph Library (BGL).
We are Looking for...
We are looking for:
If you are interested, please contact us at zigrazor@gmail.com or contribute to this project. We are waiting for you!
Roadmap
A C++ Library that give microservice framework ( Server / Client ) upon 0mq framework
CXXMicroService
A C++ Library that give microservice framework ( Server / Client )
Introduction
CXXMicroService is a C++ library, that manages MicroServices, upon different Framework ( actually only 0mq is implemented).
We are Looking for...
We are looking for:
If you are interested, please contact us at zigrazor@gmail.com or contribute to this project. We are waiting for you!
Roadmap
Multi Thread Library
MTL (Multi Threading Library)
Multi Threading Library is a set of utilities, easy and ready to use for common task in multi threading environment and development.
Roadmap
See the open issues for a full list of proposed features (and known issues).
Getting Started
This is an example of how you may give instructions on setting up your project locally To get a local copy up and running follow these simple example steps.
Prerequisites
The following are required to get the project up and running.
Google Test
GoogleTest
Python State Machine
PyStateMachine
Introduction
PyStateMachine is a Framework that support state machines in Python
Requirements
How to Run
How do we import the framework?
Insure that Python3 is installed:
Install the PyStateMachines framework
Example
After framework is installed, import and create a small example Create xml file from sample with the State machine states.
myStateMachine.xml
Create Python Script to run state machine pyStateMachine.py
run Python script to execute state machine
pyStateMachineUnitTest.py
If you are a beginner of Open-Source Software I can give you full support to start in the best way!
See you soon
Think I am a beginner. I'd like to know how and where to start. :)
We all have to start from somewhere and always there is something new to learn.
Stay tuned for the next parts. I'll keep the short like this to make it easier to follow along.
What language you want to use/learn on your path?
I can give you help to start.