
As a software developer or a software development team, the most important thing for you is building quality software, shipping it and getting feedback from your customers.
Utopiops (utopiops.com) is a new player in town that aims to solve the problem uniquely by giving you a complete ecosystem that supports you entire platform from build, deployment and hosting your applications to monitoring the platform, incident reports and integrations with issue tracking systems.
Utopiops also supports Fully-managed and Managed applications. The Fully-managed applications are hosted on Utopiops cloud platform, while Managed applications are hosted on your own cloud accounts.
In his post I show you how to host your applications using Fully-managed applications on Utopiops for free.
To do so, I have implemented a simple node application with express framework along with a typical Dockerfile.
This is how server.js looks like:
'use strict';

const express = require('express');
const app = express();
const port = process.env.PORT || 3000;

app.get('/', (req, res) => {
  res.send('Hello Utopiops!');
});

app.listen(port, () => {
  console.log(`Server is listening on port ${port}`);
});
And this is my Dockerfile:
FROM node:16

WORKDIR /usr/src/app

COPY package*.json ./

RUN npm ci --only=production

COPY . .

EXPOSE 3000

CMD [ "node", "server.js" ]
I also always have .dockerignore file in my repositories so I avoid bloating my docker images with unnecessary or unwanted files.
If you're wondering what it does, it just acts similar to gitignore and simply tell you Dockerfile to ignore those files/directories.
node_modules
README.md
You can find all these files in the repository here.
Before we begin the deployment you need to create an account on Utopiops if you already haven't done that before, by registering and verifying your email.
Now we create a dockerized application

Then we choose the repository we have stored our code:
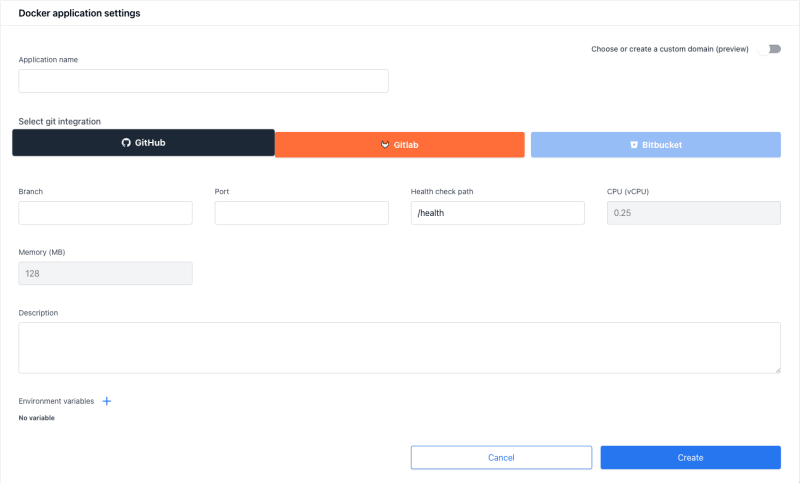
I'm using Github for this example, but you can also use Gitlab and Bitbucket too.
Finally just git your application a name, set the git branch, the port your application is listening on, and an endpoint that can be used as health check. Remember that health-check path is just any endpoint that returns a 2xx response to an unauthorized HTTP GET request.
You can also set the environment variables if you like.

Right away the built-in CICD on Utopiops is set up and starts building and deploying your application.

You can see the build logs live as they happen:

And in a just few seconds your application is available (for this example it took 3 seconds to be precise)

Notice that by default HTTPS is provided for you application, just the certificate takes a few minutes to be effective, but guess what! We're working on it to reduce that to few seconds as well.

Worth mentioning, any time you make a change to your target branch, the new version of your application is built and deployed right away.
Final note
We're a very young startup with huge goals in our mind. You can be part of the first users who get to know about our features and our journey.
Please join our family by joining our discord channel, following us on Twitter, and using our service. We have a generous hobby plan!
Please leave a comment if you have any questions or even want to see a private demo!


Top comments (0)