
Table of contents
- 1. Setting up
- 2. Creating Heading component
- 3. Creating UserName component
-
4. Adding Firebase persistence
NOTE: This series goes a bit unconventional, by not using any libraries or abstractions for Redux, following plain Flux architecture conventions. The recommended way of writing Redux is by using RTK (Redux Toolkit).
Previously in part 2, we did all the hard work of setting up Redux & Firebase, plus creating and connecting our first component. In this part, we are going to add the initial user functionality by assigning a default, random username when first visiting the app and also being able to edit it.
As per the requirements laid out in the first part:
- Each client gets assigned a default random username when first visiting the app which he can also refresh.
- Any participant can edit his/her username, as well as the feature-to-be-implemented title.
So, let's go and see what we can do! 🚀🚀
Setting up
The Heading component is going to host the application title, as well as the UserName component itself. Inside the components folder create a Heading folder and add two more things:
- A
UserNamefolder, which is going to hold the relevant component. - A
Heading.jsfile.
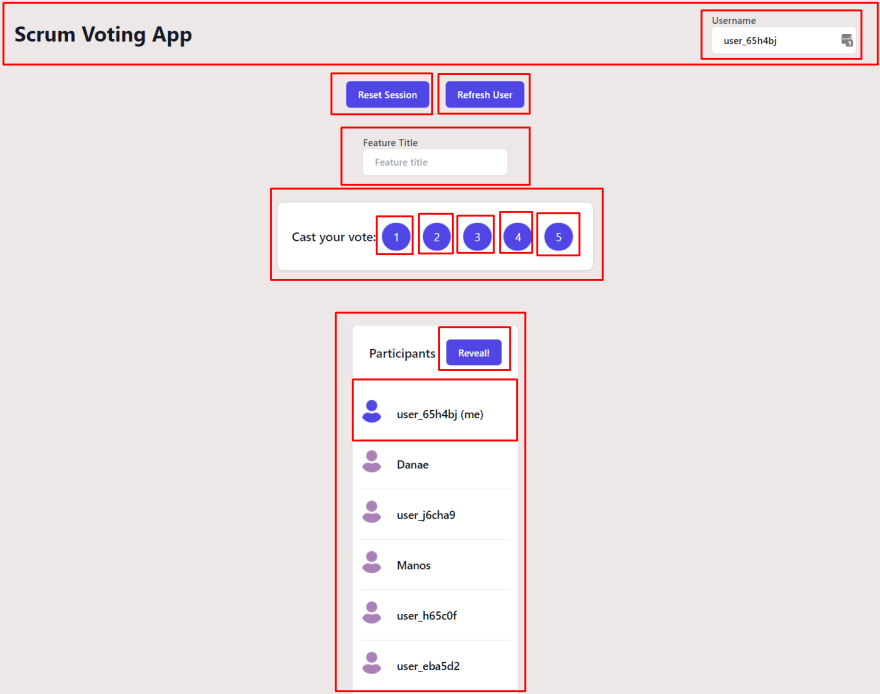
A visual reminder of what we are building:
We are also going to create three utility functions to make local storage manipulation easier throughout the app. Inside the utils folder create three files named getLocalStorage.js, setLocalStorage.js and removeLocalStorage.js and paste the following functions, to each one respectively:
// getLocalStorage.js

const getLocalStorage = key => {
    return JSON.parse(localStorage.getItem(key));
};

export default getLocalStorage;
// setLocalStorage

const setLocalStorage = ({ key, value }) => {
    localStorage.setItem(key, JSON.stringify(value));
};

export default setLocalStorage;
// removeLocalStorage

const removeLocalStorage = key => {
    localStorage.removeItem(key);
};

export default removeLocalStorage;
Creating Heading component
Import our UserName component (which we are going to implement right after) and place it inside the Heading, along with a simple title for our app and some styles. Paste the following code inside the Heading.js file:
import UserName from "./UserName";

const Heading = () => {
    return (
        <div className="md:flex md:items-center md:justify-between">
            <div className="flex-1 min-w-0">
                <h2 className="text-2xl font-bold leading-7 text-gray-900 sm:text-3xl">
                    Scrum Voting App
                </h2>
            </div>
            <div className="mt-10 flex md:mt-0 md:ml-4 justify-center">
                <div>
                    <UserName />
                </div>
            </div>
        </div>
    );
};

export default Heading;
Creating UserName component
Under components/Heading/UserName create an index.js file and add the following code:
// Generic Input component we also used for FeatureTitle
import Input from "../../Input/Input";

import { useDispatch, useSelector } from "react-redux";
import { useEffect } from "react";

// Redux action/thunks
import updateUser from "../../../store/actions/users/updateUser";

// Simple utility to retrieve and parse values from local storage
import getLocalStorage from "../../../utils/getLocalStorage";
import createDefaultUser from "../../../common/createDefaultUser";

const UserName = () => {
    const dispatch = useDispatch();
    const state = useSelector(state => state.users);

    const currentUserId = getLocalStorage("userId");

  // Default user creation handling
    useEffect(() => {
        // Create a user if none exists
        if (currentUserId === null) createDefaultUser(dispatch);
    }, [dispatch, currentUserId]);

    // Retrieve current user using saved id from local storage
    const user = state.users.find(user => Object.keys(user)[0] === currentUserId);

    const handleUserUpdate = event => {
        // Action payload (updated user object)
        const updatedUser = {
            id: currentUserId,
            data: {
                ...user[currentUserId],
                username: event.target.value
            }
        };

        dispatch(updateUser(updatedUser));
    };

    return (
        <Input
            label="Username"
            placeholder="Type a username..."
            handleChange={event => handleUserUpdate(event)}
            // While loading display a loading message, else display current user
            value={user ? user[currentUserId].username : "Loading username..."}
            name="username"
            className="inline-flex items-center px-4 py-2 border border-transparent rounded-md shadow-sm text-sm font-medium focus:outline-none focus:ring-2 focus:ring-offset-2 focus:ring-indigo-500"
            // Disable editing while loading
            disabled={user ? false : true}
        />
    );
};

export default UserName;
I have placed some comments to make things easier to grasp. We basically add an Input component, which will a have a dual role: Displaying our current username and changing it.
Crafting the state
Let's go ahead and create anything state-related to add and update users.
Constants
Under store/constants create a file named users.js. It will contain all the action constants for the user slice.
For now, we only want ADD, UPDATE and REVERT functionality, so go ahead and add those three constants:
export const ADD_USER = "ADD_USER";
export const UPDATE_USER = "UPDATE_USER";
export const SET_USERS = "SET_USERS"; // This is going to be used for state reversion
Actions
Under store/actions create a folder named users. It will hold all user-related actions. First, we are going to create an action to add a user, so go ahead and create a file named addUser.js. Then paste the following code:
// Firebase module to add user
import firebaseAddUser from "../../../firebase/users/addUser";
import setLocalStorage from "../../../utils/setLocalStorage";

const addUser = payload => (dispatch, getState, getFirebase) => {
    // Get firebase object
    const firebase = getFirebase();
    const state = getState();

    // Username of the new user
    const { username: value } = payload;

    // Get old state (used to revert in case of error)
    const {
        users: { users: oldState }
    } = state;

    // Pass necessary data to our firebase module
    const config = {
        ref: "users/", // Firebase reference to perform query on
        payload,
        oldState,
        firebase,
        dispatch
    };

    // Update local storage with the username to create persistency
    setLocalStorage({ key: "username", value });

    // Add user to firebase
    firebaseAddUser(config);
};

export default addUser;
What we just created above is called a thunk which, as we stated here in the previous part, is basically an enhanced action which returns a function instead of an object. Inside this function we can run any asynchronous code we want, as well as dispatch other actions. Notice how dispatch, getState and getFirebase methods are provided as arguments to our action, by the thunk middleware.
Once again, I hope that the comments help explain what's going on above. We are doing two main things here:
- Creating a config object to pass to
firebaseAddUser(which is called asynchronously). - Persist username to local storage. This is going to be useful in getting the user identified correctly and not creating a new one, each time he visits the app on the same browser (provided he doesn't clear the local storage).
Also, notice how we are not dispatching any action to update the state. The reason is that there can be no change in the UI state (and thus a visual change), until we get a response from the database. It's also an automatic and one-time procedure, while the result is stored in local storage, so no Redux persistence is needed.
Similarly, let's create the action to update a user. Again, under the actions directory create a file named updateUser.js and paste the following code:
import { UPDATE_USER } from "../../constants/users";

// Firebase module to update user
import firebaseUpdateUser from "../../../firebase/users/updateUser";

const updateUser = ({ id, data }) => (dispatch, getState, getFirebase) => {
    const firebase = getFirebase();
    const state = getState();

    // Grab user object form state (used to revert in case of error)
    const [oldState] = state.users.users.filter(user => user[id]);

    const config = {
        ref: `users/${id}`, // Firebase reference to perform query on
        payload: data,
        oldState,
        firebase,
        dispatch,
        resetActionType: UPDATE_USER
    };

    // Update user record in firebase
    firebaseUpdateUser(config);

    // Dispatch asynchronously to maintain a responsive UI
    dispatch({
        type: UPDATE_USER,
        payload: {
            [id]: data
        }
    });
};

export default updateUser;
Some notes:
- Regarding the
refproperty usage you can check the Firebase Documentation. Basically, it's a "path" used to specify the location in our database, upon which the query is going to execute. - Regarding the two custom firebase modules,
firebaseAddUserandfirebaseUpdateUser, we are going to create them right after finishing with the reducers below. - The reason why we are specifying the
resetActionTypeis because later on, we are going to be using a different reducer when resetting the state, based on whether we are updating a single user or resetting the votes for every user. - In contrast to the
addUseraction, here we are dispatching an action to update the state which happens asynchronously and independently of the Firebase update, in order to maintain a responsive UI.
Reducers
Under store/reducers create a users.js file to create our users reducers. Then paste the following:
import * as actionTypes from "../constants/users";

const initState = {
    users: []
};

const usersReducer = (state = initState, action) => {
    switch (action.type) {
        case actionTypes.ADD_USER: {
            return {
                ...state,
                users: [...state.users, action.payload]
            };
        }

        case actionTypes.UPDATE_USER: {
            return {
                ...state,
                users: state.users.map(user => {
                    /*
                     * Grab IDs
                     */
                    const [stateUserId] = Object.keys(user);
                    const [payloadUserId] = Object.keys(action.payload);

                    // Return the same user object if IDs don't match
                    if (stateUserId !== payloadUserId) return user;

                    // Else replace objet and update user
                    return action.payload;
                })
            };
        }

        case actionTypes.SET_USERS:
            return {
                ...state,
                users: action.payload // Replace the whole users array
            };

        default:
            return state;
    }
};

export default usersReducer;
Don't forget to also combine the new reducer with the root one. Make sure that store/reducers/index.js looks like this:
import { combineReducers } from "redux";
import feature from "./feature";
import users from "./users"; // <-- New line

export default combineReducers({
    feature,
    users // <-- New line
});
Adding Firebase persistence
Push updates to Firebase
Now we have to persist our Redux data to Firebase, just as we did in the previous part for the FeatureTitle component. Under src/firebase create a users folder and add an addUser.js file. Then paste the following code:
import { SET_USERS } from "../../store/constants/users";

const addUser = ({ ref, payload, oldState, firebase, dispatch }) => {
    firebase
        .ref(ref) // Select ref to update
        .push(payload) // Push the new user

        // Handle error
        .catch(e => {
            // Revert to old state in case of error
            dispatch({
                type: SET_USERS,
                payload: oldState
            });

            /*
            * Dispatch snackbar with our browser's
            * built-in, sophisticated notification system 😎
            */
            alert("There was an error performing the request.");
        });
};

export default addUser;
The above code will handle the persistence of any new user that gets added to the database. To persist any updates made, add the following action in a file named updateUser.js:
import debounce from "../../utils/debounce";

const updateUser = ({
    ref,
    payload,
    oldState,
    firebase,
    dispatch,
    resetActionType
}) => {
    firebase
        .ref(ref)
        .set(payload)
        .then(error => {
            // Revert to old state in case of error
            if (error) {
                dispatch({
                    type: resetActionType,
                    payload: oldState
                });

                /*
                 * Dispatch snackbar with our browser's
                 * built-in, sophisticated notification system 😎
                 */
                alert("There was an error performing the request.");
            }
        });
};

export default debounce(updateUser, 500);
The logic is very similar here, except that we are also debouncing the action, since it is subject to manual user typing and can very well be spammed.
Receive updates from Firebase
Same as with the FeatureTitle component from the previous part, we need to setup the appropriate listeners in order to successfully receive updates from Firebase and update our Redux store. Inside store/actions/users folder the we have created, add a new file named setupFirebaseListeners.js. The code inside this file is going to do exactly that: Setup the appropriate listeners in order to subscribe to updates from Firebase.
import { ADD_USER, UPDATE_USER } from "../../constants/users";

import getLocalStorage from "../../../utils/getLocalStorage";
import setLocalStorage from "../../../utils/setLocalStorage";

const setupUsersListener = () => (dispatch, getState, getFirebase) => {
    const firebase = getFirebase();
    const usersRef = firebase.database().ref("users");

    /* User updates handling */
    usersRef.on("child_changed", snapshot => {
        const { key } = snapshot;

        // Update state
        dispatch({
            type: UPDATE_USER,
            payload: {
                [key]: snapshot.val()
            }
        });
    });

    /* Users loading and new user handling */
    usersRef.on("child_added", snapshot => {
        const user = snapshot.val(); // get user object
        const { username } = user;
        const { key } = snapshot; // user ID

        if (username === getLocalStorage("username")) {
            // Save user id in local storage if it matches own username
            setLocalStorage({ key: "userId", value: key });
        }

        // Update state
        dispatch({
            type: ADD_USER,
            payload: {
                [key]: user
            }
        });
    });
};

export default setupUsersListener;
The thunk we created above is going to be dispatched once on application start and listeners for the relevant Firebase events are going to be registered. Import the action and dispatch it inside App.js:
import "./App.css";

import FeatureTitle from "../components/FeatureTitle";

import { useDispatch } from "react-redux";
import { useEffect } from "react";

import setupFeatureListeners from "../store/actions/feature/setupFirebaseListeners";
import setupUsersListeners from "../store/actions/users/setupFirebaseListeners"; // <--- New line

function App() {
    const dispatch = useDispatch();

    // Setting up listeners
    useEffect(() => {
        dispatch(setupUsersListeners()); // <--- New line
        dispatch(setupFeatureListeners());
    }, [dispatch]);

    return (
        <main className="max-w-7xl mx-auto my-5 px-4 sm:px-6 lg:px-8">
            <div className="flex flex-col flex-wrap max-w-3xl mx-auto mt-10">
                <div className="flex justify-center">
                    <FeatureTitle />
                </div>
            </div>
        </main>
    );
}

export default App;
That's it! Run npm start, visit localhost:3000 (or whatever port you are using) and you should be able to see a default username assigned on the top right corner. Try editing it on both your browser and firebase and make sure that the two are synced. If you try to open the app in Incognito mode, you are going to get assigned a new user, because of a clean local storage.
Thanks for reading, stay tuned for the next one 🎉🎉


Oldest comments (6)
Hi, I'm a Redux maintainer.
I'm sorry to tell you this, but the style of Redux you are displaying here is a very outdated style that we are no longer teaching for production use. Modern Redux (since 2019) does not use switch..case reducers, ACTION_TYPE constants or immutable reducer logic and is as a consequence a lot more concise and readable.
I would urge you to check it out by following the official Redux tutorial at redux.js.org/tutorials/essentials/... and it would be very great if you could update the article to showcase modern Redux or at least add a warning at the beginning - still far too many people are learning old-style Redux and new articles in that style unfortunately contribute to that problem.
Hi, thanks for the feedback!
First of all, this specific project was created about a year ago, so it's inevitable that there is some outdated stuff. You are correct in that I should put a warning at the beginning, I was thinking about this yesterday.
As for the rest of the comment, I suspect that you are referring to using RTK instead of vanilla Redux. When I wrote this code, I was currently learning Redux and I didn't want to dive into abstractions like RTK without taking the time to consider what they are doing for me. I think that every developer should do the same: Create his own action types as stated in the official Flux documents, instead of letting RTK do it for him behind the scenes, learn how to write immutable logic (which I think is really important in itself) and more importantly, WHY he should never mutate the state as stated in the official Redux style guide , etc.
The code I wrote demonstrates the Flux state management architecture, which fundamentally relies on
switch..casereducers, immutable data structures andACTION_TYPEconstants. It was written while learning Redux and I think that everyone new to Redux should write at least one project in this way, especially if he is new to Flux state management in general!Mark Erikson commented something similar on the previous part, I suggest you read my response to your fellow-maintainer. I don't really like magic, I always look under the hood 🧙
P.S.: I am currently working on an Electron application and I really enjoy using Redux Toolkit. I am gonna write a post on it soon! ✌️
Well, in the official tutorials we essentially have two learning paths:
Both learning paths are perfectly viable - as long as the "this shows the internals, never do this in production" sticker is big enough.
We get people into chat on an almost daily basis that are implementing Vanilla Redux in their application after following a tutorial without that warning that are overwhelmed by the amount of concepts and frustrated by the amount of code they have to write.
And telling them that the style of Redux they are learning right now is outdated by 2+ years does not make them a lot happier, since at that point they have burnt a lot of their time.
So, by now, I am very eager to see that "warning label" pretty much everywhere, but especially in new posts.
Also, even for Vanilla Redux, the Redux Style Guide is still very much something we would love to see taught, so even if you are showing how stuff works under the hood, you are not doing your readers a big service by showing a split into multiple files between actions, constants and reducers - even if you write it by hand, we are very much encouraging putting all of that into one file to reduce indirection. (redux.js.org/style-guide/style-gui...)
So maybe that could be a way to go about it and at least reduce indirection in this article a bit?
I am using "single slice files", like you are mentioning, in a medium-sized app and they are not aging very well. Having state, actions, reducers and selectors, all in a single file does not scale well. Especially when following the "ducks" folder structure, a single feature can very well have 50 action types, 50 reducers and 30 selectors, for example. That could mean an over 1000 line file. Nobody wants to work with that. I think that following the single-file approach is better suited to something like RTK, where you omit creating action types.
Splitting those in separate files and exporting them from a single index.js file seems the way to go, IMHO. Of course there are mistakes and I don't claim that my approach is perfect. There are many (mainly structural) changes I want to make.
However, the code was written one year ago, I am glad that I made mistakes that I can now acknowledge. That's why I plan to refactor and post updates, but this is something I don't have the time to do right now. Moreover, I like to be able to see my progress. I am certainly going to put a warning note, though!
That kinda sounds like you are really overusing that. Are those real "business logic" reducers or is that just api interaction stuff?
Regular "thick" reducers. All API related stuff lives in thunks. It's just a very big module using vanilla Redux.
In an Electron application, where I am using RTK, it scales really well. I think that you have made a great job both in writing the docs for Redux and RTK & in the RTK development itself, it saves from a lot of hassle.
The point I am stretching here is that in order to appreciate and understand RTK or any other abstraction, you have to get your hands dirty first. Keep up the good work 😊