
Apache Airflow is a workflow management system that allows you to orchestrate sequenceable tasks. It is commonly used for ETL workflows, triggering machine learning jobs, and running DevOps operations such as backup and restore.
Considering its widespread usage, many different use cases, and open-source distribution, Airflow is used on many Kubernetes stacks. However, it can be difficult to configure and run Airflow on Kubernetes, so we want to offer a straightforward path to get you started.
This article will go over setting up a fresh Kubernetes cluster and installing Airflow onto that cluster using Plural, a free open-source Kubernetes DevOps platform that allows you to deploy Kubernetes clusters and open-source applications with little to no management experience necessary.
Additionally, this article will explain how to install other applications onto your Kubernetes cluster, enabling you to collocate Airflow and other applications you want to orchestrate with it.
Prerequisites
Before getting started with this tutorial you will need your cloud provider’s CLI installed and configured. For more information on this step please refer to our cloud provider guide and follow the provider-specific instructions.
Apache Airflow and Kubernetes Installation
Install Plural CLI and Dependencies
Plural’s CLI can be pulled down via curl, brew, or as a prebaked Docker image. Since we’re on a Mac, we’ll use brew. If you’re not on a Mac, you can use one of these other options to pull the CLI down.
brew install pluralsh/plural/plural
Brew will install Plural, alongside terraform, helm, and kubectl for you. If you have already installed any of those dependencies yourself previously, you can add --without-helm, --without-terraform, or --without-kubectl.
Set up a Repository for Configuration
Once Plural is installed in your CLI, move to a directory that you use for Git repos and run:
plural init
This command will start the process of creating a Git repository in the current working directory with GitHubor GitLab. This repo will hold all of the configuration required for spinning up a Kubernetes cluster. Additionally, it will contain all of the helm and terraform needed for spinning up Plural’s console and your Airflow instance.
If you’re already logged in to app.plural.sh, Plural will recognize that and prompt you to log in there with your previously created account.
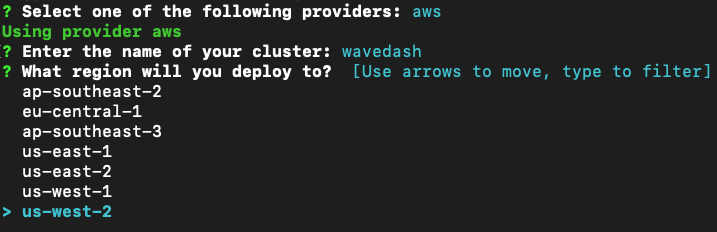
First, you are going to choose a name for your cluster and your desired cloud provider and deployment region.
Note: For this to work, you will need to configure your cloud provider CLI beforehand.
Select your Cloud provider, name your cluster and choose which region to deploy the cluster on. Picture courtesy of Plural.
Plural will now guide you through a few configuration steps to make sure that we can accurately configure and spin up your resources. Let’s break it down into a list.
- Bucket Prefix - This will be attached to the front of any bucket name for buckets created by Plural on your behalf. This is for deduplication.
- Domain Provider - To host your applications on the web, you’ll need to configure ingress. We can set this up for you for free, which we recommend. If you have requirements to use your own DNS, check out this guide.
- SCM Provider - Basically, will you be using GitHub or GitLab to create your repository? Afterwards, you'll receive an OAuth workflow for us to create your repository on your behalf.
- Select an Organization - If you’re setting this up as part of a company or organization that you are a part of and have to write permissions for, you can set the repository to be created there. Otherwise, simply pick your personal org.
-
Saving your SSH keys - Generally, don’t save these unless you haven’t configured Git SSH yet. If you can use
git cloneto pull a repository down already, just say no here. - Choose a repo name - It’s advised to just pick the same name as your cluster name unless you have a predefined naming scheme or already have a repository with your cluster name.
… And you’re done! If everything went well, your terminal should look like this:
Make sure to 'cd' into your new workspace. Image courtesy of Plural.
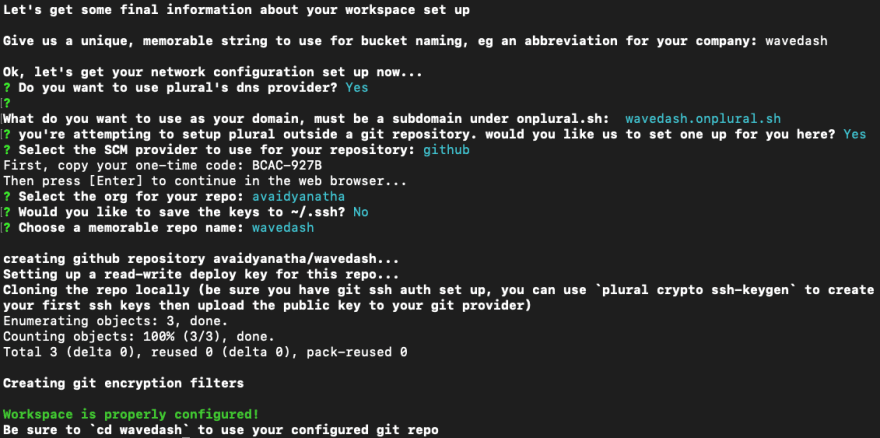
Now that your workspace is properly configured, you can start installing Airflow.
Now, change directories into the repository that you created to start installing applications to your workspace.
Install the Plural Console
The Plural console provides built-in monitoring of your Kubernetes cluster, tailored dashboards for your applications, incident management, and more. Console setup is not required but is highly recommended.
To check out the name of the console version you want to install for your specific cloud provider you can run plural bundle list console
Plural bundle list to check out name of the console version you want to install. Image courtesy of Plural.

Using the name you received, you can then install the console with the corresponding command.
plural bundle install console $CONSOLE_NAME.
Here’s how it would look for AWS:
plural bundle install console console-aws.
You will then be prompted to go through the configuration process for your application. Here you will enter a vpc_name , which will be the name of the virtual private cloud created by Plural for all Plural resources to be hosted in. In most cases it is best to name your vpc 'plural' - this is a cluster-level setting that we will only ask for once. You will not be prompted to do this again unless you destroy your workspace.
Next, you will name your WAL bucket which contains the write-ahead logs for the Postgres database that backs Plural. To use the default name, hit enter on your keyboard.
Similar to before when you set up DNS for the workspace, you are going to set up a subdomain specific to your application. We recommend you use the following naming convention:
console.$YOUR_ORG_NAME.onplural.sh
After setting up your admin name you will be prompted with the option to enable "Plural OIDC". Open ID Connect allows you to manage authentication across all of your Plural applications by simply being logged in to app.plural.sh.
If you enable Plural OIDC you will no longer need to set up usernames and passwords for every single application that you deploy on Plural. We created this functionality for convenience. However, if you have a restriction on using this for your organization you can choose to not enable OIDC and manually authenticate each application you add to Plural.
Once completed, Plural will have all of the necessary information to successfully create the helm and terraform required for spinning up Plural’s console on Kubernetes.
Here’s how all that should look:
You can enable Plural OIDC through the command line. Image courtesy of Plural.

Install Apache Airflow
To install Airflow on our configured Kubernetes cluster, we will go through a similar flow. Use the requisite install command:
AWS : plural bundle install airflow aws-airflow
GCP : plural bundle install airflow gcp-airflow
Azure : plural bundle install airflow azure-airflow
KinD : plural bundle install airflow kind-airflow
You’ll be guided through another configuration wizard to get your Airflow configuration files set up. To help with every configuration parameter, Plural created a document to answer any questions you might have.
Here’s how it will all look when you’re done:


Note : You can preload your dagRepo with DAGs or add them later, Airflow will run a sync to pick any new DAGs up every few minutes or so.
Build and Deploy your Infrastructure Configuration
Now that you have installed all the bundles you need you can run:
plural build
This command tells Plural to write deployment files based on the configuration that we gave in both of these setup processes earlier.
The final step is to run:
plural deploy --commit "initial deploy
By running this command, Plural commits your configuration that we built earlier on your behalf to your Git repo and tells Plural to deploy the configured infrastructure and applications. Once this is kicked off, Terraform will start building the resources that your application needs.
Note: This step will likely take several minutes as Plural is requesting infrastructure from your cloud provider.
7. Accessing Plural Console and Airflow
Once your setup is complete, you can now access your Plural console and Airflow instance through your browser. To access your Airflow installation head over to the following URL you defined earlier in your web browser to access the Airflow UI.
Note: If you set up Plural OIDC earlier you don’t need to worry about managing authentication for logging into the console or the Airflow UI.
The URL to access your Airflow installation should look like this:
airflow.$YOUR_ORG_NAME.onplural.sh
To monitor and manage your brand new Kubernetes cluster and its applications, head over to:
console.$YOUR_ORG_NAME.onplural.sh
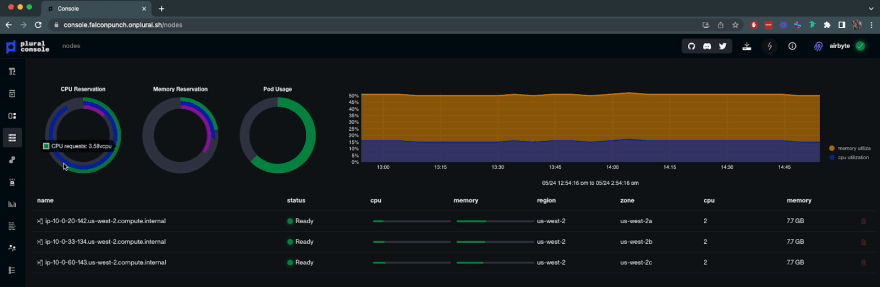
The Plural console acts as your command center for your Plural applications. It comes with a lot of out-of-box functionalities such as:
- Runbooks: Recommended settings and optimal operating procedures for running your application.
- Components: Statuses for each individual component in your Airflow deployment and Kubernetes cluster. Inside this, you can look into Pod logs and Pod events and use them to drill down into the root cause of any problems with your Kubernetes cluster
- Nodes: Graphs and detailed information about the utilization of resources and deployments on each node.
- Incidents: View incidents that are automatically created by Plural on component failure. Access a direct connection with our support team to troubleshoot any issues.
- Dashboards: View charts that have been tailored for your application. Every Plural application will ship with a custom console dashboard.
Next Steps with Plural
Through this article, you have learned how to:
- Create a Plural Git repository to store your infrastructure configuration
- Provision a fully configured Kubernetes cluster with no management experience necessary
- Install an instance of Airflow on your fresh Kubernetes cluster
Are you looking to get your Airflow instance up and running on Kubernetes with minimal effort?
Reach out to meand the rest of the team over at Plural to learn more about how Plural works and how we are helping engineering teams across the world deploy open-source applications in a cloud production environment.
Make sure to join our Discord community for deployment help, discussion, and meeting other Plural users.
Ready to effortlessly deploy and operate open source applications in minutes? Get started with Plural today.


Top comments (0)