
Whether you use AWS across your organisation or for personal projects, it is useful to set up multiple accounts on AWS to seperate your staging/test and production environments. It is especially useful if you are building serverless applications as many of the tools you will use (e.g. Lambda) have soft limits on concurrent usage at the account level.
Apart from getting around usage limits, separating your development and production accounts allows you to experiment in a real cloud environment without negatively impacting your production environment.
The naive way of doing this involves constantly logging out and back in each time you want to change accounts, or to set up multiple chrome profiles that save your credentials for each account. Instead you can leverage assumed roles via IAM permissions and Organisation Units.
AWS Organisations
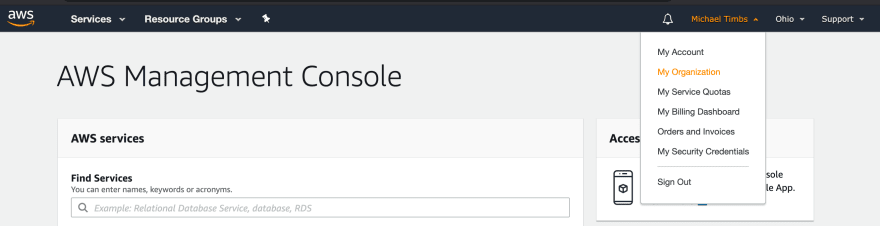 AWS console — Navigate to My Organisation
Under your root AWS account create an organisational unit. Below I’ve created Production, Staging and Playground organisation accounts. Production and Staging are generally fine for most companies. I use playground as a place to try new AWS products in an environment I know I can safely nuke anything at any time.
Note: All the accounts we are about to create all get billed in your root account.
 AWS Console — Organisation Unit View
Once we have created these organisational units, we are going to need to add user accounts to them. Under Accounts we are going to create some new accounts
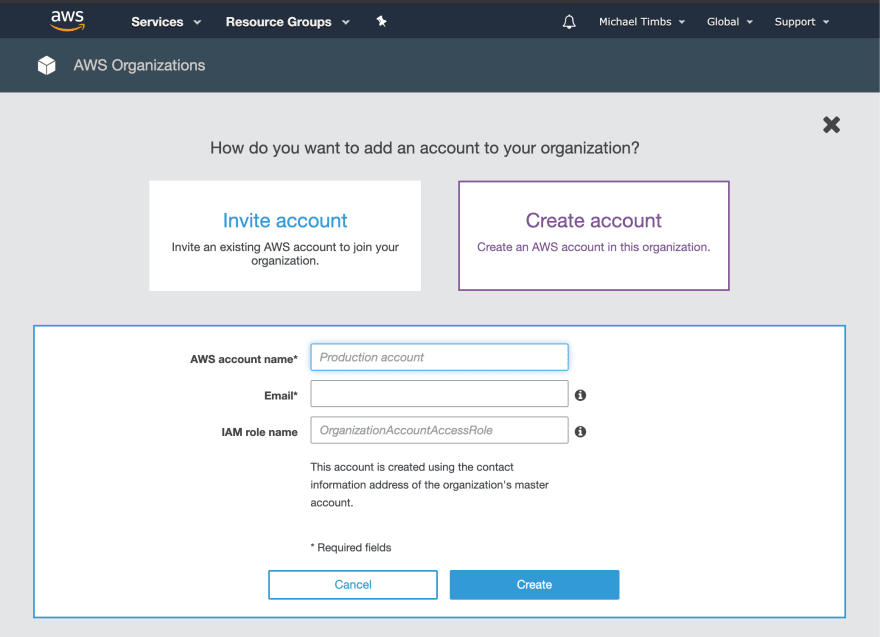 AWS Console — Create Account View
The AWS account name I generally name after the organisational unit to keep things clear. The email I will usually do something like michael+@domain.com. Leave the IAM role name as the default *OrganizationAccountAccessRole *(this is important).
Note: AWS requires unique emails, so adding the “+pod” etc will satisfy that requirement while still delivering emails to your primary domain.
Once you create these users, you’ll need to wait 1–5 minutes for an invitation email from AWS. You’ll then need to use the forgot password functionality to set a password for these accounts. I suggest using a password manager and making these strong.
Log in to each of these accounts and note down the Account Number of each one. You’ll need these in a later step.
Create an IAM User
Once we have the root accounts for production and staging, we need to create a user that can easily hop between these accounts. Unfortunately (and for reasons that aren’t clear to me) root accounts can not hop between other root accounts. We’ll need to create a dedicated IAM user and then give them access to all the accounts we created (root, production, staging etc).
 AWS Console — Create IAM user
We give this user a username and give them access to the AWS management console. It’s important that we don’t give programmatic access here — if we need programmatic access to these accounts (for deployments via CLI etc, we will use the root credentials or create new ones). This user is merely for hopping between the AWS console across your accounts.
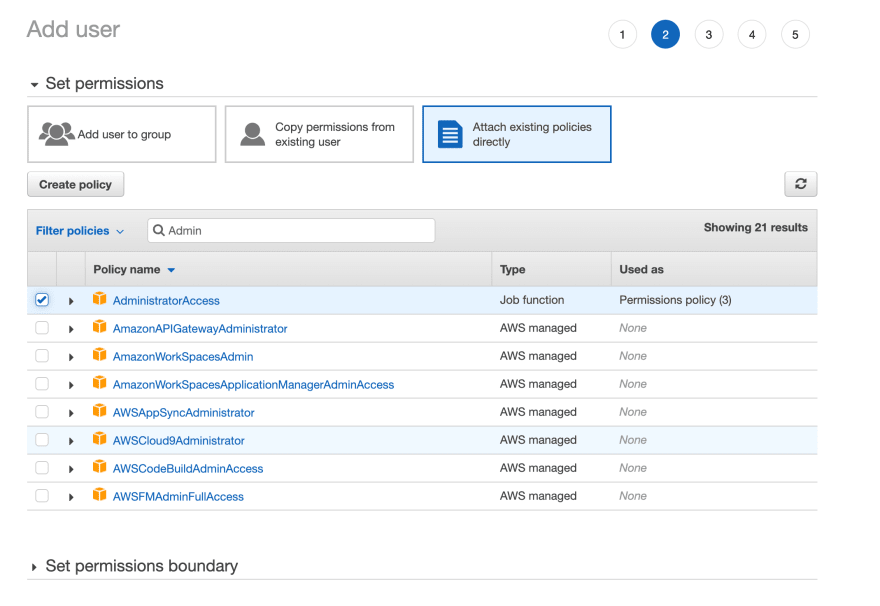 AWS Console — IAM user permissions
I’ll give this user administration permissions as I am the admin and want to use this user across all my accounts. If you are creating a user for someone else in your organisation you may want to change the access policies as needed.
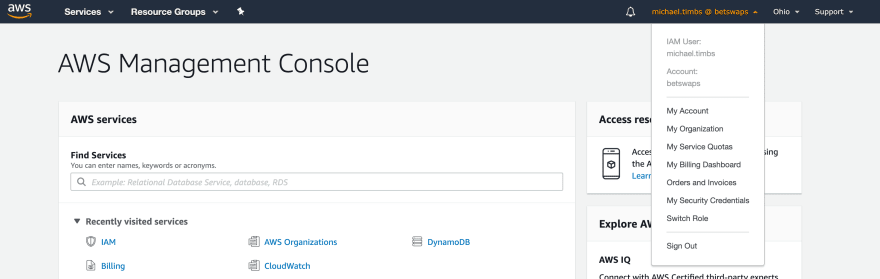
Switch Roles
Once you create this user you will be given a special log in link. Click through to this link and then log in as this user. One you log in you should see that the main account menu gives you access to a new option called Switch Role.
 AWS Console — IAM user login with Switch Role
 AWS Console- Switch Role
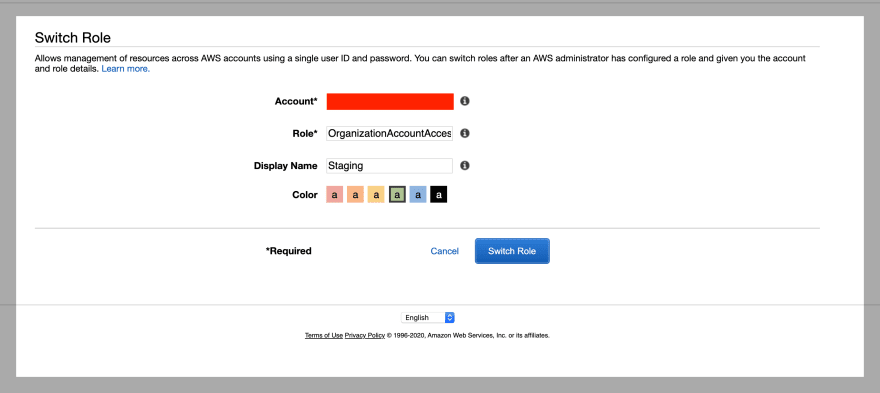
The Switch Role screen will prompt you to input the account number of the account you want to switch to. Add the account number of the Staging/Production account we created earlier.
In the Role*section we need to input the role name we created with those accounts *OrganizationAccountAccessRole. Then give the account display name and a colour and hit the Switch Role button.
This will save this role on your account and redirect you to it. You can repeat this step with any other accounts you want to be able to hop between.
 AWS Console — Switch Roles
You’ll now be able to switch between accounts at the click of a button. Once you switch to an account you’ll clearly be able to see which account you are in.
 AWS Console — Example Production Account
Now as a solo developer you’ll be able to sandbox your environments, have clean accounts to play with new technologies (like Sagemaker) and not have to worry about deleting resources or experimenting and breaking production code.
At an organisation level you will be able to create seperate root accounts for various parts of your organisation, and give users access to only the environments they need.


Top comments (2)
Great read! Another way to do this is using Granted, a CLI to access the AWS console for multiple accounts and regions at once and allows multiple cloud accounts to be opened in your web browser simultaneously.
Any tips on how to find that special login link if you lose it?