Due to COVID-19 small businesses have been forced to adopt a takeout/delivery only model, which also means new protocols when picking up your order. Previously you might pickup your order from an employee at a counter. Since COVID-19 customers stand outside or wait in their cars, and businesses have to keep tabs on who has arrived for their order. To help in the tiniest way I built this prototype to help small businesses communicate new takeout protocols to their customers and make order pickups a bit more efficient for everyone.
When orders are placed, small businesses can send customers a message with information about their pickup procedures. In-turn customers provide details when they arrive for their order, which are sent to the business to manage in real-time. Business owners can also send alerts to customers when their order is ready with the click of a button. All of this accomplished with text messages leveraging Twilio APIs through a Flask application.
To start businesses enter the customer name and phone number for the customer when the order is placed.

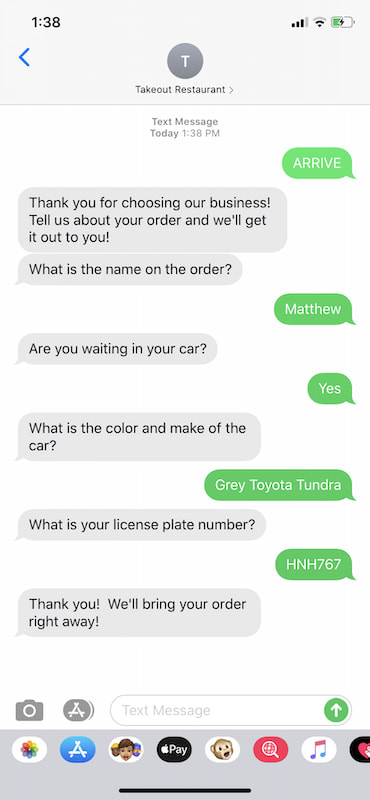
Using Twilio's Programmable SMS a text message is sent to the customer confirming the order has been received with instructions about how to pickup their order to help guide them through the process.

The customer can reply to the text message with the keyword when they arrive to pickup their order. The "arrive" keyword triggers the Autopilot bot to get details from the customer. For example, if the customer is waiting in a car, what car are they in, so the business can get the order out to them.
Details gathered by Twilio Autopilot are sent to the business in real-time using Twilio Sync Maps. With the real-time view you can see who is waiting for their order and even send quick reminders when the customer's order is ready just by clicking a button.

Now that you've seen an overview of the prototype, the rest of this post will walk through some of the key pieces of code in a little more detail. To get started you can clone the GitHub repo with the full code and follow along!
Order Pickup Manager GitHub Repo
Happy Building!
Prerequisites for this Project
Before getting started there are a couple things we need to have setup.
- If you don't have a Twilio account already, you can use this referral link to setup your account with a free $10 to fund your account to get started!
- Install ngrok to connect our Autopilot webhooks to.
- Setup the Twilio CLI tool and install the Autopilot CLI plug-in which will be used to deploy your Autopilot bot and create your Sync Map for storing orders.
- A Twilio phone number. You can log into the Twilio console and get one here.
Setup ngrok
Ngrok is used to allow Twilio to communicate with your local Flask application. If you haven't already, download and install ngrok. Once ngrok is installed you can begin using ngrok by typing ./ngrok http 5000 in the commandline. Ngrok creates a unique URL that will forward any requests made to that URL to your local development environment. You should see something similar to this in your command window:

There should be two URLs labeled "Forwarding" one prefaced with https:// and the other with http://. The https:// forwarding URL will be used as the webhooks to process data collected from your Autopilot bot in the next step.
Setting Up the Autopilot Bot
When customers arrive to pickup their orders we want to gather some basic information about them, what's their name, are they waiting in a car, if so, what car? Collecting this information will be done using Twilio Autopilot.
Autopilot allows you to define tasks for you bot to take based on user inputs. The schema defining the tasks for this Autopilot bot is in the schema.json file. Our bot in this application will have three tasks.
-
confirm_arriveto get basic arrival information, customer name and whether they're waiting in a car. -
get_car_detailsto get more details about the car from the customer -
welcome_messagefor instances where customers say a friendly "hello" that will inform them of the pickup policy.
The schema.json file needs to be updated to utilize your ngrok URL, specifically the confirm_arrive and get_car_details tasks. Each of these tasks have endpoints defined in the Flask application. To send the input provided by the user to your application you need to edit schema.json to point the webhooks to your ngrok domain.
confirm_arrive Task
In the schema file find the confirm_arrive task. Substitute your ngrok URL from the previous step into the redirect value
      "uniqueName" : "confirm_arrive",
      "actions" : {
        "actions" : [
          {
            "say" : "Thank you for choosing our business!  Tell us about your order and we'll get it out to you!"
          },
          {
            "collect" : {
              "on_complete" : {
                "redirect" : "<YOUR NGROK URL>/bot/confirm-in-car"
              },
              "name" : "customer_name",
              "questions" : [
                {
                  "question" : "What is the name on the order?",
                  "name" : "first_name"
                },
                {
                  "type": "Twilio.YES_NO",
                  "question": "Are you waiting in your car?",
                  "name": "in_car"
                }
              ]
            }
          }
        ]
      },
The Flask endpoint to this task will parse the customer responses. If they respond that they are waiting in a car the customer will be asked a few more follow-up questions, otherwise their arrival for the order pickup is processed.
@app.route("/bot/confirm-in-car", methods=["POST"])
def confirm_in_car():
    """
    Endpoint for the confirm_arrive Autopilot task.

    Parses customer responses.  If member indicates they are waiting in their vehicle they will be handed off to
    another Autopilot task to get more details.  Otherwise, the business is alerted the customer has arrived and
    the customer interaction is complete.
    """
    memory = json.loads(request.values.get("Memory"))
    in_car = memory["twilio"]["collected_data"]["customer_name"]["answers"]["in_car"]["answer"]

    # If customer is waiting in the car get more details.
    if in_car == "Yes":
        return {"actions": [
            {
                "redirect": "task://get_car_details"
            }

        ]}

    # Otherwise alert the business the customer has arrived for their order.
    response = alert_arrival(memory)

    return response
get_car_details Task
If users are waiting in their car then some follow-up questions are asked to get some details about the car they are in. Make sure you substitute your ngrok URL in this section as well.
      "uniqueName": "get_car_details",
      "actions": {
        "actions": [
          {
            "collect": {
              "name": "car_detail",
              "questions": [
                {
                  "question": "What is the color and make of the car?",
                  "name": "car_make"
                },
                {
                  "question": "What is your license plate number?",
                  "name": "car_license"
                }
              ],
              "on_complete": {
                "redirect": "<YOUR NGROK URL>/bot/parse-car-details"
              }
            }
          }
        ]
      }
Responses for the car details are parsed by Flask.
@app.route("/bot/parse-car-details", methods=["POST"])
def parse_car_details():
    """
    Endpoint for the get_car_details Autopilot task.

    Gets the customer responses to the task and passes those to the business to update the order with the additional
    detail.  Customer is thanked for their order.
    """
    memory = json.loads(request.values.get("Memory"))

    response = alert_arrival(memory)

    return response
Once all the data is gathered for the customer the alert_arrival function will update the order with data provided by the customer and build a response to the customer to let them know their order will be brought to them.
def alert_arrival(customer_input):
    """
    Updates order details with the input collected by the customer from the Autopilot bot.
    :param customer_input: Memory object from the Autopilot bot with customer response.
    """
    # Parse incoming data.
    collected = customer_input["twilio"]["collected_data"]
    arrival_details = dict()
    arrival_details["in_car"] = collected["customer_name"]["answers"]["in_car"]["answer"]

    phone_num = customer_input["twilio"]["sms"]["From"]

    if "car_detail" in collected:
        arrival_details["car_make"] = collected["car_detail"]["answers"]["car_make"]["answer"]
        arrival_details["car_license"] = collected["car_detail"]["answers"]["car_license"]["answer"]

    arrival_details["status"] = "Arrived"

    # Get order associated with phone number.
    # If phone number isn't associated with an order let the customer know.
    try:
        order = TWILIO_CLIENT.sync.services(TWILIO_SYNC_SERVICE_SID).\
            sync_maps(TWILIO_SYNC_MAP_SID).\
            sync_map_items(phone_num).\
            fetch().\
            data
    except TwilioRestException as ex:
        return {"actions": [
            {"say": "Hmmmmm we can't find an order associated with this phone number."}
        ]}

    # Update the order object with the details from the customer.
    for k, v in arrival_details.items():
        order[k] = v

    # Update the order details.
    updated_order = TWILIO_CLIENT.sync.services(TWILIO_SYNC_SERVICE_SID).\
        sync_maps(TWILIO_SYNC_MAP_SID).\
        sync_map_items(phone_num).\
        update(
        data=order
    )

    # Response to provide back to the customer.
    return {"actions": [
        {"say": "Thank you!  We'll bring your order right away!"}
    ]}
Now the webhooks for your Autopilot bot are configured to use the Flask endpoints in your local environment.
Deploying the Autopilot Bot
With the schema file updated our Autopilot bot is ready to be deployed. The Twilio CLI is the quickest way to deploy and manage your Autopilot bots. If you haven't already setup the Twilio CLI and installed the Twilio Autopilot CLI plug-in.
Once you have the Twilio CLI and Autopilot plug-in ready open a terminal window and navigate to the directory containing your schema.json file. Once there you can deploy your bot by typing:
twilio autopilot:create --schema schema.json
If you make updates to your bot all you have to do is make those changes in schema.json and then use the update command in the CLI:
twilio autopilot:update --schema schema.json
Attaching Autopilot to Your Twilio Number
The last step is to attach the Autopilot bot to your Twilio number so that when customers text your number Autopilot will handle their request.
Log into the Twilio console and select Autopilot from the menu on the left. Click on the order_pickup bot you just created.
Select Channels from the menu on the left and then choose Programmable Messaging.
Copy the MESSAGING URL.
Select Phone Numbers from the left menu of products and services. Choose the phone number you want to use from the list.
Scroll down to the bottom and paste the Messaging URL into the A Message Comes In text box.

Now you have an interactive Autopilot bot ready to get your order arrival details from you!
Creating a Sync Map
Next, we need to create a Sync Map where orders will be stored. Twilio Sync allows the platform to track real-time updates for customer arrivals and display new information through the platform without the user having to refresh the page.
Before using Sync, we have to create a Sync service to use, which similar to Autopilot can be done through the commandline in a couple commands.
First, create a Sync service by typing the following into the commandline:
twilio api:sync:v1:services:create
In the response find and copy the sid attribute. Next, you need to create a map and associate that with the service.
In the commandline type the following where you will substitute the sid from above.
twilio api:sync:v1:services:maps:create --service-sid <YOUR_SYNC_SERVICE_SID>
In the response there will be a sid beginning with "MP". Keep this handy as it will be needed in setting up the Flask application.
Our Sync Map is ready for use!
Generate a Twilio API Key
The last piece of setup is you need to generate an API key that will be used to handle JavaScript requests. After you create the key keep track of the API Key and Secret that are provided. We'll need those in the next step.
Setting Up the Flask Environment
Flask will serve as the back-end of the platform providing the web pages as well as the webhook for the Autopilot responses from the customers. The app.py file contains the core code for the application that handles interactions with the web application and the appropriate API calls with Twilio. To setup the Flask application you need to fill in the details of the .env file with details from your Twilio account. These environment variables are used to make your API calls with Twilio. Do not share them with anyone!
-
TWILIO_ACCOUNT_SIDandTWILIO_AUTH_TOKENcome directly from the Twilio console with you login - Fill in
TWILIO_API_KEYandTWILIO_API_SECRETwith the info generated in the previous step -
TWILIO_SYNC_SERVICE_SIDandTWILIO_SYNC_MAP_SIDcome from creating the Sync Map with the CLI -
TWILIO_FROM_NUMBERis the phone number you purchased. Make sure it's in E.164 format with (ex. +14155552671)
# Required for all uses
TWILIO_ACCOUNT_SID=
TWILIO_AUTH_TOKEN=
TWILIO_API_KEY=
TWILIO_API_SECRET=

# Twilio Sync SIDs
TWILIO_SYNC_SERVICE_SID=
TWILIO_SYNC_MAP_SID=

# Twilio Number to send messages from.
TWILIO_FROM_NUMBER=
Once you have all the environmental variables filled out you can deploy the Flask application. From the commandline make sure you are in the directory of the application and then enter:
python app.py
Your application is now live! You can open up your Flask application and begin to interact with your app.
Let's look at some more detail about some of the functionality and the related code.
Sending Initial Text to the Customer
When new orders are placed businesses can simply send a text message to their customer by entering the customer's name and phone number. Two things happen, first a personalized text message is sent to the customer thanking them for their order with directions to pickup their order and then a new entry is created in the Sync Map for the customer. In this prototype we're going to use the customer's phone number is going to be the unique identifier for each order and the key in our Sync Map. The phone number will link all the actions to an order in the application. All of this is handled by the send_text endpoint in the Flask app.
@app.route("/send-text", methods=["POST"])
def send_text():
    """
    Creates a customized text message confirming the order and alerting the customer about the pickup service.
    """
    customer_name = request.form["customer-name"]
    to_num = request.form["to-number"]

    # Replace punctuation and spaces in phone number.
    e164_num = to_num.translate(str.maketrans('', '', string.punctuation)).replace(" ", "")
    e164_num = f"+1{e164_num}"

    # Send text message to the customer.
    TWILIO_CLIENT.messages.create(
        to=e164_num,
        from_=os.getenv("TWILIO_FROM_NUMBER"),
        body=f"Thanks for your order {customer_name}!\n\nTo make order pickup easier send ARRIVE to this number to let us know you're here."
    )

    # Create new Sync Map entry for the order.
    try:
        sync_map_item = TWILIO_CLIENT.sync \
            .services(TWILIO_SYNC_SERVICE_SID) \
            .sync_maps(TWILIO_SYNC_MAP_SID) \
            .sync_map_items \
            .create(key=e164_num, data={
                'name': customer_name,
                'status': 'Order Placed',
                'readPhone': to_num
            })
    except TwilioRestException as ex:
        print(ex.msg)

    return render_template("order_created.html", customer_name=customer_name, phone_number=to_num)
Getting a List of Orders
Once orders are placed the business needs to be able to manage them. Using the Twilio API all active orders are retrieved from the Sync Map and displayed on the orders page.
@app.route('/orders')
def orders():
    """
    Gets active order objects from the Sync Map and populates the webpage.
    """
    all_orders = TWILIO_CLIENT.sync.\
                       services(TWILIO_SYNC_SERVICE_SID).\
                       sync_maps(TWILIO_SYNC_MAP_SID).\
                       sync_map_items.\
                       list()

    return render_template("order_list.html", orders=all_orders)
Sending a Text Reminder
One feature built into this prototype is the ability for businesses to send a quick reminder to customers when their order is ready. With the click of a button a personalized text message is sent to the customer telling them their order is ready along with the pickup instructions.
@app.route("/send-order-reminder", methods=["POST"])
def send_order_reminder():
    """
    Sends a reminder to the customer when their order is ready.
    """
    to_num = request.form["orderID"]

    # Get name on order.
    order_item = TWILIO_CLIENT.sync.\
        services(TWILIO_SYNC_SERVICE_SID).\
        sync_maps(TWILIO_SYNC_MAP_SID).\
        sync_map_items(to_num).\
        fetch()

    customer_name = order_item.data["name"]

    msg = f"Hi {customer_name}!  Your order is ready for pickup!\n\n" \
        f"When you are here to pickup your order text ARRIVE and we'll bring it out to you!"

    response = TWILIO_CLIENT.messages.create(
        to=to_num,
        from_=os.getenv("TWILIO_FROM_NUMBER"),
        body=msg
    )

    # Update the order status.
    order_item.data["status"] = "Reminder Sent"
    order_item.update(data=order_item.data)

    return "SUCCESS"
Real-Time Order Updates
Orders are updated real-time using the Twilio Sync JavaScript SDK. When new orders are received a new card for the order is created using the Sync Map itemAdded event.
      // When a new arrival occurs create a new card with the details.
      syncMap.on('itemAdded', function(event) {
        console.log("New Order Added");
        createOrderCards(event.item);
      });
After the customer completes the Autopilot bot questions the order information needs to be updated for the card using the Sync Map itemUpdated event.
      syncMap.on('itemUpdated', function(item) {
        console.log("Order Updated");
        // Update card details...
      });
Wrapping Up
This project demonstrated a prototype for helping small businesses improve communication with their customers to make order pickup a little easier. I hope you found something useful from this project. This was also the first Hackathon I've participated in and I can't wait to do more of these! There are a bunch of other features I wanted to add like scheduling follow-up customer surveys and sending coupon codes for future visits. Being my first Hackathon I wanted to avoid overwhelming myself with features to add, so I'm looking forward to working on these in the future.
Building front-end applications and doing front-end design is a new frontier for me as well. I'm a big proponent of learning by doing so I'm excited to incorporate more front-end components into my projects going forward.
Hope you enjoyed! And stay safe!


Top comments (0)