
Building good software and writing code quickly to achieve business goals seems like some dilemma as claimed by some programmers. Developers want to build products faster and also write good software at the same time. With CI/CD (Continuous Integration/Continuous Delivery), this is no longer an issue and yes, everyone wins 😊 😊 😊.
The purpose of CI/CD is to continuously merge working product versions to the main development branch and frequent build execution to discover potential bugs and resolution of integration problems. CI improves on the stability of the product with each development cycle since each time code is pushed, automatic builds are triggered and integration tests are run to ensure that the new units being added do not “break” the previously successfully built application. If the test fails, the build fails hence ensuring that the app remains stable. When it comes to preparing an app for release, that is “Continuous Delivery” as “Continuous Deployment” is responsible for automatic deployment to production. I guess it’s clear now 😉 😉 😉.
Today, there are a good number of tools for setting up CI/CD for many programming languages. I will be walking us through setting up CI/CD for a Flutter application with CodeMagic.

CodeMagic is a CI/CD tool and like other CI/CD tools, it starts with a Git repository or some decentralized repository at least. When code is pushed to this repository, it triggers a new build process. If the build fails at any point, it will halt any further progress of the CI/CD process and give logs so we know where exactly the issue came from. Successful builds deliver the application artefacts for iOS and Android for installation on the respective devices. Codemagic allows to test and release Flutter apps without issues and with no configuration. As a developer, you can run custom scripts and create custom workflows for your apps. Cool right 😎😎😎? Lets Start…
Requirements
Setting up your Flutter app on Codemagic, you need a couple of things.
- Obviously, your Flutter app with some tests.
- The Flutter app should be hosted on GitHub, GitLab or Bitbucket.
- Optional code signing details, like certificates and provisioning profiles, if you want to publish to App Store or Play Store.
- Optional Slack workspace for sending build reports and artefacts.
Now, we are ready to add CI/CD to our Flutter app. However, this writeup will not cover code signing and publishing.
Create a Github Project
Create your flutter application and push it to GitHub. For the purpose of this tutorial, I will be using the WhatsApp status saver built in my previous article. The codes are available on Github. Click here to access the codes. You can read the previous articles here and here and follow the development process.
Register For CodeMagic
Visit codemagic.io and sign up using your GitHub, Bitbucket or GitLab account. You can connect all of these repositories with one Codemagic account, so you can have all of your apps in one place.

Your First Build
Once you sign in, you will see the Codemagic dashboard with the app repositories. You can filter the list or search apps to find your Flutter app.

For apps which you are configuring for the first time, you can start by clicking “Start your first build” button. In the above screenshot, we have a not applicable button as this app has been built previously.
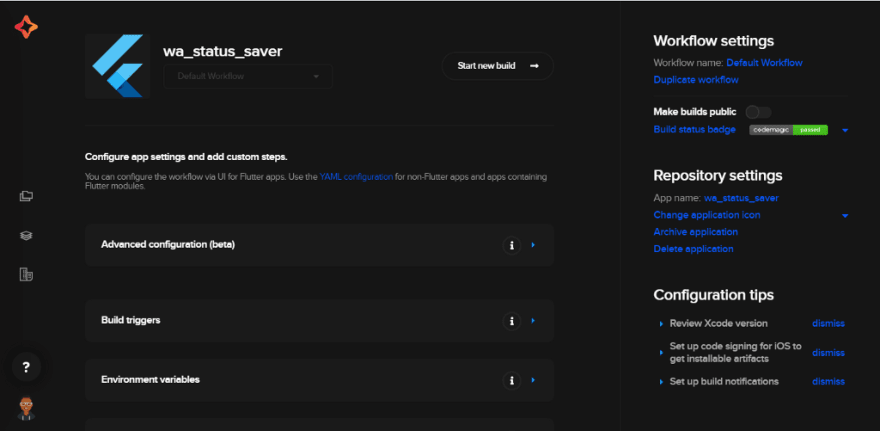
The Build Workflow
When you start a build, Codemagic will create a workflow for your Flutter project. You can also customize it to suit your needs.

From the above, we can see that the default workflow will start the build with the following steps — preparing the build machine, fetching app sources(checking out the source code), installing Flutter dependencies, running tests, building the apps and publishing the artefacts.
Build Report
Below is an overview of the details when the build is finished.

An email will also be sent to you with all these details. You can also set up your Slack channel to receive the build reports. The mail you receive should look like this:

Yes, we have just added CI/CD support for our Flutter app without any configuration 😋 😋 😋. This is the magic in Code-magic 😁😁😁.
But wait, what if your build fails? 😪 😪 😪. Do not worry, it will not end in tears 😉.
Build Failures
Well, not all builds are successful. I have had my own fair share of failed builds 😪 😪 😪 but then we can always resolve it as Codemagic provides very detailed logs of each step regardless of whether it passes or fails 😃 😃 😃. Here we can see a failing unit test and all of the details are logged in the build failure.

As seen above, integration tests and widget tests are passing, but the unit test is failing. We can then fix the problem to fix the build. When tests fail, you will also get an email about the test failure with link to the build logs. I will cover integration, unit and widget tests in another article 🤓 🤓 🤓.
Default Workflow And Custom Workflow
Default flow covers all the basics needed for the CI/CD but then, you will want to add some custom things as part of your build process. You may want to send build status to some third party communication channel such as Slack for example. Let’s dive into customizing a workflow.
Build Phase
Codemagic build phase of Flutter apps has various options to define the build process. You can start by selecting which branches to build and how to trigger builds.
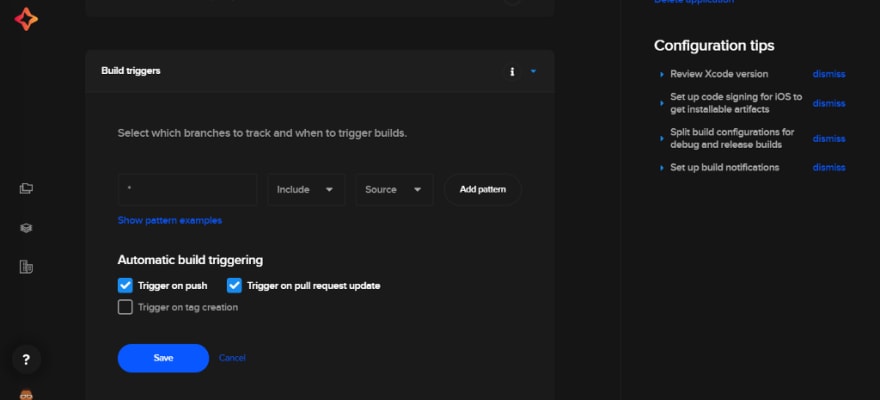
You can also select other categories like Flutter version, build configuration, platform, Xcode version and custom build arguments.

Above is the default workflow settings. You can customize the build process by changing the default behaviour. Also, you can add a custom script before every phase. It's easy to setup. Just click on the + sign on top of each phase. See the below image for what you are expected to see.

You can add any command in the pre-build script say you want to install some dependencies.
Test Phase
Here, you can enable or disable execution. This phase has two sections, one for the unit and widget tests and the other is for the integration tests. The test settings are kind of straightforward. You set how the tests affect the build. You can enable Flutter analyzer, enable Flutter test which runs the unit tests in your application. You can deactivate the automatic build failures resulting from failed tests here, though this is not a recommended option for builds going out to production at least. Always save the settings for each individual section since there is no universal button to save all settings. Codemagic automatically recognizes the widget, unit and integration tests and enables them by default as you can see below.

we can use custom test commands by disabling the default behaviour. For example, say we want to run just UI tests from the command line, we can add a pre-test phase with the command:
$flutter drive --target=test_driver/main.dart
Publish Phase
By default, only the email is configured if you have provided it with GitHub/Bitbucket/GitLab as we have to explicitly configure any other aspects of the Publishing phase, including:
- Uploading the code signing assets for Android and iOS
- Setting up slack
- Providing Google Play and App Store Connect details for publishing

Even with these, you can also write some custom scripts to deploy the artefacts to third-party services. With the power of scripting, we can configure custom workflows in Codemagic to define a stronger build process for Flutter apps.
Multiple workflows
Codemagic allows us to create multiple workflows to meet different requirements of various configurations and software versions. Create a new workflow by duplicating the existing one and renaming it. To do this, follow these easy steps:
- Go to app settings.
- In the Workflow settings section, click Duplicate workflow. Select the workflow and rename it.
Build Status Badge
You want to include a build status badge to your GitHub repo so the status of your build is shown? Say no more. Click on the settings icon in your Codemagic build. A screen as shown below should appear.
At the right-hand side, we can see a build badge. For builds that passed, colour is green and for failed builds, the colour is red. You could choose to make the builds available publicly. You can also add the badge to your repo by either a markdown or a badge URL which you could add to your README.md. Click on the arrow/dropdown button beside the badge and you should see the badge URL and markdown. Copy it and use where necessary. We should have a shiny badge as shown below in the Github repository.

And just like that, your Workflow is set and all the triggers are in place 😍 😍 😍. When you push code, make a pull request, it will trigger the magic and boom your app will be delivered and deployed to all interested parties through the preset channels.
Head to codemagic.io and try it out. The user experience is 💥 💥 💥.
You can also visit Codemagic blog — https://blog.codemagic.io/getting-started-with-codemagic/


Top comments (0)