Assuming you have a Linux workstation somewhere (it could be in the cloud, or in a network you can VPN into), how can you improve your day-to-day experience?
This post will show you how how to setup a Chromebook for remote development: starting from how to streamline SSH access (with key-based authentication, a tailored SSH profile, and automatic spawning of tmux), how to setup VSCode Remote to edit files directly on the remote workstation, and how to access from your Chromebook services that are local to the remote workstation.
This post was originally published on March 22, 2020 on my personal blog: https://www.marcolancini.it/2020/blog-remote-development-chromebook/
Prerequisites
First of all, there are a couple of prerequisites you'll have to install on your Chromebook: mainly a shell, and Visual Studio Code (VSCode).
Linux Backend
Linux (Beta) is a feature that lets you develop software using your Chromebook: with it, you can install Linux command line tools, code editors, and even IDEs.
You can refer to the official documentation from Google (Set up Linux (Beta) on your Chromebook) to see how to set it up, but in short the process is more or less like the following:
- At the bottom right of your screen, select the time.
- Select "Settings ⚙️".
- Under "Linux (Beta)" select "Turn On".
- Follow the steps on the screen. Setup can take around 10 minutes, but it is pretty straightforward.
Visual Studio Code
Thanks to the Linux Backend we can also install Visual Studio Code for Linux:
- Open the Linux terminal on your Chromebook.
- Download the latest binary (using the direct download link) and install it:
❯ sudo wget https://go.microsoft.com/fwlink/?LinkID=760868 -O /tmp/vscode.deb
❯ sudo dpkg -i /tmp/vscode.deb
❯ sudo apt install -f
- Reboot your Chromebook and sign back in.
Light Terminal
Optionally, I've found the Secure Shell App extension to be a handy alternative to the native terminal that comes with the Linux Backend.
Streamline SSH access
Next, you'll probably want to streamline SSH access to the remote Linux workstation (for this post I will be assuming it has a hostname of workstation.dev), by using key-based authentication, and (most importantly) by creating a custom profile to speed up login and to simplify access to a remote session.
Setup SSH Keys
Nothing new here, just a normal key-based authentication to setup:
- Generate a new keypair:
❯ ssh-keygen -t rsa -b 4096 -f ~/.ssh/id_rsa-remote-ssh
- Install the newly generated public key in the remote machine's
authorized_keys:
❯ ssh-copy-id -i .ssh/id_rsa-remote-ssh.pub your_user@workstation.dev
- Try connecting with the new keypair:
❯ eval `ssh-agent`
❯ ssh-add .ssh/id_rsa-remote-ssh
❯ ssh -i .ssh/id_rsa-remote-ssh your_user@workstation.dev
Create a Custom Profile
With the key pair now trusted, we can create a custom profile to invoke every time we want to login to the remote workstation, without having to provide the combination of username/hostname/keys:
❯ cat .ssh/config
Host workstation
    HostName workstation.dev
    User your_user
    IdentityFile ~/.ssh/id_rsa-remote-ssh
    DynamicForward 8080
    IPQoS lowdelay throughput
    ServerAliveInterval 30
    ServerAliveCountMax 5
- Line
2: we are defining a new configuration namedworkstation. - Line
3-4: hostname and user of the remote host. - Line
5: we are instructing SSH to use the key pair we specifically created and trusted (id_rsa-remote-ssh). - Line
6: we are instructing SSH to start dynamic port forwarding, which will be useful in the Accessing Services Local to the Remote Workstation section. - Line
7-9: a couple of tweaks to improve stability of the SSH connection.
With this profile, we can now access the remote machine easily just by typing:
❯ ssh workstation
This could be enough, but every time we disconnect (or the connection drops) we will have to re-connect and restart from scratch whatever we were doing.
To avoid this, we can rely on a terminal multiplexer like tmux (or screen):
your_user@penguin:~$ cat .bashrc
...
alias dev='ssh workstation -t "tmux attach || tmux new"';
With this alias, every time we type dev, we will automatically connect to the remote workstation and attach to the tmux session currently in use (or will create a new one if none exists).
Edit Remote Codebases with VSCode Remote
VS Code Remote Development is probably one of the biggest features of this IDE, as it allows you to use a container, remote machine, or the Windows Subsystem for Linux (WSL) as a full-featured development environment.
The main advantage is that no source code needs to be on your local machine: the Remote Development extension pack can run commands and other extensions directly inside a container or on a remote machine so that everything feels like it does when you run locally.
Here is the process to set it up:
- Search for "VSCode" in your apps on your Chromebook and open it.
- Press Ctrl+P and paste in
ext install ms-vscode-remote.vscode-remote-extensionpack. - Select the new "Remote Explorer" icon at the bottom of the left sidebar on VSCode.
- Select "configure an SSH host" and select the config file created in the previous section (usually under
/home/$USER/.ssh/config). - Click the icon to the right of "
workstation" in the list of SSH Targets: this will open a new window and initialize a connection. - Accept the connection and enter your username and password into the prompt.
- Under "Start" select "Open folder..." and locate the directory containing your codebase.
From now on, you'll be able to use VSCode on your Chromebook like if you were directly connected to the remote workstation.
Accessing Services Local to the Remote Workstation
So far we saw how to easily setup an SSH connection and how to modify remote files with VSCode, but what about services only exposed locally to the remote workstation? Main examples could be webapps spawn with docker-compose, or Kubernetes services exposed from minikube with kubectl port-forward.
Well, this is taken care by the DynamicForward option we defined in line 6 of the SSH configuration profile, which will instaurate dynamic port forwarding between the remote host and the Cromebook. There's only one catch (and I have to thank my colleague Henry for figuring this out), to make this work with Linux subsystem you'll have to add the following to the /etc/hosts file on your remote workstation:
::1             workstation-6
127.0.0.1       workstation
Then, we can install a proxy switcher (like SwitchyOmega) to make Chrome aware of the port forwarding. Within SwitchyOmega, create a new profile and define a SOCKS5 proxy with localhost as server and 8080 as port (as we specified in line 6 of the SSH configuration profile):

Next, we have to define the auto-swicthing rules, as some traffic (the one intended for local apps, with hostname of workstation or workstation-6) will go through the proxy, whereas the rest will be direct to the end servers:
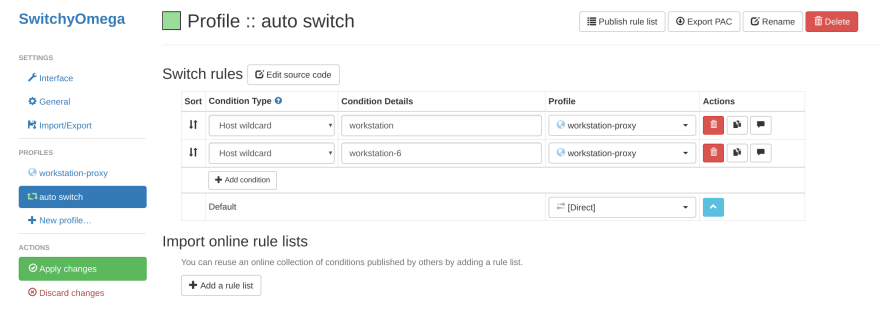
After you apply these settings, you'll be able to use http://workstation:<port> to access services locally to the remote workstation (where port is the same port they were exposed to originally).
Remote Desktop
Finally, in case the previous setup is not enough for you, you can rely to access your workstation via Remote Desktop. Although not the most straightforward, this method could be the preferred one for people needing access to GUI-based applications.
Here a summary on how to set it up on the remote workstation:
- Create a new file under
/home/$USER/.chrome-remote-desktop-sessionand paste the following:
export $(dbus-launch)
XDG_SESSION_TYPE=x11 DESKTOP_SESSION=ubuntu XDG_CURRENT_DESKTOP=ubuntu:GNOME XDG_RUNTIME_DIR=/run/user/$(id -u) exec /usr/sbin/lightdm-session '/usr/bin/gnome-session'
- Install Remote Desktop:
❯ wget https://dl.google.com/linux/direct/chrome-remote-desktop_current_amd64.deb -O /tmp/remote.deb
❯ sudo dpkg --install /tmp/remote.deb
❯ sudo apt install --assume-yes --fix-broken
❯ sudo systemctl stop chrome-remote-desktop && sudo pkill chrome-remote
❯ sudo usermod -a -G chrome-remote-desktop $USER
❯ sudo systemctl restart chrome-remote-desktop
- Visit https://remotedesktop.google.com/access/ and click the download icon in the bottom right of the window "Set up remote access". It will redirect you to the extension store, where you can install the Chrome remote desktop extension.
- There will now be an option that says "Turn on": click on it and set your desired name for the remote profile.
- Choose a pin and press "Start"
Using your Chromebook, you can now visit https://remotedesktop.google.com/access/ to remote connect into your workstation.


Top comments (3)
Hi Marco, thanks for sharing this. I tried the step Press Ctrl+P and paste in ext install ms-vscode-remote.vscode-remote-extensionpack, but no extensions came up. When I just type "remote", I do see a "Remote -SSH: Explorer", but it says it's deprecated. I also see one named "Remote Development". Is that the right one?
it appears the ssh extensions don't work with community vs code which is needed for arm chrome books :/
remotedesktop.google.com/access/
that link is broken