
Application deployment with Docker and Kubernetes is easier than ever before, but could it even be much faster and much more seamless? This is where Compose Generator comes into play by helping you with common Docker tasks with a command line interface.

Deploy a project
With Compose Generator you only have to do the following four steps:
- Install Compose Generator (instructions below)
- Clone repository of your project from a VCS
- Run
compose-generator installto install Docker and Docker Compose (can be skipped if you have Docker and Docker Compose already installed) - Run
compose-generator -rto generate your deployment configuration and run it subsequently

Lets dive a bit further into Compose Generator to better point out the various advantages and why you should consider using it.
Generate Docker Compose configurations
Compose Generator can be seen as a deployment assistant and acts like a wrapper around your Docker installation. As you see above, Compose Generator can be used to install Docker and Docker Compose on your system, so you only need to care about installing Compose Generator in the first place. The main feature of Compose Generator is - as the name might suggest - to generate the Docker Compose configuration for your project. Moreover, Compose Generator can generate secrets (like e.g. database credentials, etc.), manage volumes, networks, environment variables and much more.
In the following example, we’re going to deploy a basic Angular Application, connected to a Spring Boot API and a MySQL database. Compose Generator supports a wide variety of service templates (tendence growing), which you can find listed here.
Example stack deployment
However it is recommended to install Compose Generator on your host system as described here, for this beginners guide you can also run it as Docker container, by executing following command:
$ docker run --rm -it -v /var/run/docker.sock:/var/run/docker.sock
     -v $(pwd):/cg/out chillibits/compose-generator
Docker pulls the image and runs it in interactive mode. The $(pwd) placeholder stands for the current path on your Docker host system and gets mapped to the /cg/out directory within the container. This means, that the resulting output files, like docker-compose.yml will later be located in the directory, in which you execute the command above.
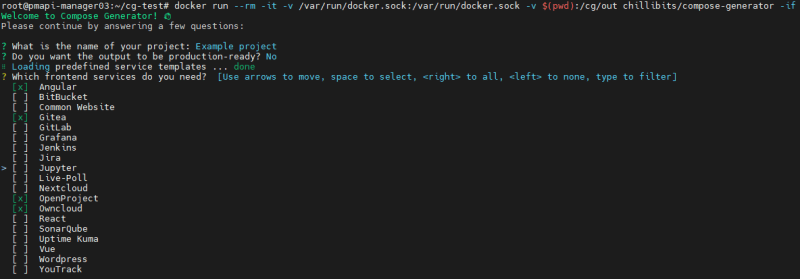
Compose Generator asks you for the name of your project and if you want to create a production-ready configuration instead of the default development config, to hide your services behind a reverse proxy. Compose Generator offers a variety of predefined service templates, which you can arrange for your needs like in a building block system. For our example, we will select Angular in the frontend section, Spring with Maven in the backend section and MySQL in the database section. For each item you select from the templates list, Compose Generator asks you service-specific questions, that are important for setting them up. After having answered all questions for MySQL you can see, that Compose Generator pre-selected PhpMyAdmin, because it is the default db admin system for MySQL. You can deselect it or press enter to continue.

Tip: You can execute
compose-generator -ato launch the Compose Generator Cli in advanced mode. Then you also get questions for advanced stack customization. Find more information about cli options of the generate sub-command here.
After having all questions answered, Compose Generator will generate following file structure in the directory where it was called in:
current directory
├─volumes
│ ├─volume1
│ ├─volume2
│ ├─volume3
│ └─...
├─.gitignore
├─.cg.yml
├─docker-compose.yml
└─environment.env
The docker-compose.yml file contains your Docker Compose configuration. If your containers require any secrets, they are stored in the environment.env file, which will be attached to all regarding containers at runtime. As you see above, Compose Generator also creates the volume directories for you. Depending on the stack template you’re choosing, there already will be files in the volume directories (such as configuration files, etc.) to take as much workload off your shoulders as possible.
The .gitignore file in the root directory contains the environment.env file to not accidentally committing any secrets to a VCS.
.cg.yml is a configuration file for Compose Generator itself to remember some selections of yours.
Removing services from a configuration
Imagine, you have generated a stack with Angular, Spring with Maven, MySQL and PhpMyAdmin, but you want to switch to MongoDB as you have to deal with more document-like data structures in your Spring application.
What you can do is to ask Compose Generator to remove the services MySQL and PhpMyAdmin and add MongoDB instead.
To remove the first two, you can execute the following command in the directory where the docker-compose.yml file for your configuration lives:
$ compose-generator remove
Select the two services MySQL and PhpMyAdmin and press the enter key. Compose Generator will remove those services from your compose configuration without leaving residues, e.g. unused volumes, networks, etc.
Adding services to a configuration
To now add the service for MongoDB, you can execute following command:
$ compose-generator add mongodb
After answering all questions, the docker-compose.yml file should now contain a service database-mongodb and the services database-mysql and db-admin-phpmyadmin should be gone.
Further reading about Compose Generator
The key concept behind Compose Generator is, that it is durable and extensible. Therefore it is possible to create own predefined service templates and add them to the list of selectable services. If you do so, feel free to hand it in as a community contribution on GitHub!
There will be more upcoming articles regarding in-depth information about creating predefined service templates and all available cli subcommands!
Thank you for interest and for reading this article.
If you want to learn more about Compose Generator, please visit the official documentation at www.compose-generator.com and the open source project on GitHub (github.com/compose-generator/compose-generator).
Header image source: Photo by Dominik Lückmann on Unsplash


Top comments (1)
Thanks for this code. I am using this code to make a page for generator service.