Automated deployments are awesome. A team of devs can work locally on configuration and data structure changes, commit their changes via git and the deploy tool takes care of the rest in an organized way.
Update May 2023: I wrote another simple guide without Deployer usage.
The open source software Deployer recently released Version 7. So let's give it a try with the following stack:
- Craft CMS (Commercial)
- GitHub repository (could be private as well)
- DDEV for my local dev environment (Open Source)
- Deployer v7 for the actual deployment workflow (Open Source)
- Ploi.io to help setting up the cloud server and adding PHP projects
- Hetzner Cloud Hosting for the actual (price-capped) PHP hosting
btw: With ddev pull you can even pull the production content and media assets down to your local dev environment. This enables testing with real production data. 🙌
🚧 This article is work in progress, suggestions welcome. 🚧
0. "Build everything on target"-approach
This tutorial uses the workflow where Deployer will
- connect to the target (production) server via SSH,
- does the checkout of the git repository on target server
- and runs
composer install(&npm run build) on target server as well
So it's a "Build everything on target server"-approach. In an upcoming article I'll try to move this into a Github Action (based on this tutorial typo3 gitlab Deployment).
1. Install CraftCMS via DDEV
The following is based on Intro to CraftCMS: Install. I use train-to-lake as temporary project title, inspired by https://www.bahn-zum-berg.at/ (train to mountain).
mkdir train-to-lake
cd train-to-lake/
ddev config --project-type=php --php-version=8.0 --docroot=web --create-docroot
ddev composer create -y craftcms/craft
Answer yes for
Are you ready to begin the setup? (yes|no) [no]: yes
and input the following answers for DDEVs local env:
- (mysql or pgsql) → mysql (default)
- Database server name or IP address → db
- Database port → 3306 (default)
- Database username → db
- Database password → db
- Database name → db
- Database table prefix → (leave blank)
After successful installation, you can open your site in the browser via
ddev launch
2. Register a Hetzner Cloud Account
Hetzner launched a flexible cloud service back in 2018, but I wasn't really aware of it. Why Hetzner? They offer servers in Germany (and other EU-locations) which is important to avoid GDPR-struggles. They are also listed in the Green Web Directory. 🌱
The CX11 entry plan starts with a monthly price cap of 4,15€ / month. If you use it less than a month and delete it before, there will be just a hourly rate billed based on your usage.
That is great for trying out stuff of course.
How do you bill your servers?
Servers have both a monthly price cap and a price per hour. Your server's bill will never exceed its monthly price cap. If you delete your Cloud Server before the end of the billing month, you will only be billed the hourly rate. We will bill you for each cloud server until you choose to delete them. Even if you aren't actively using your server, we will bill you for it.
Register an account at hetzner.com/cloud and create a API token for Ploi (see next step):

3. Connect Ploi with Hetzner via API token
Ploi.io is like your personal IT server administrator which helps you setting up and configuring the cloud servers. You could do this yourself as well if you're experienced in these (linux) things. I'm not really, so I'll use a service like Ploi, Laravel Forge, Cleavr, etc. ;-)

4. Create (provision) the first server
Now let's create our first server, I'll go with PHP 8.0 by now:

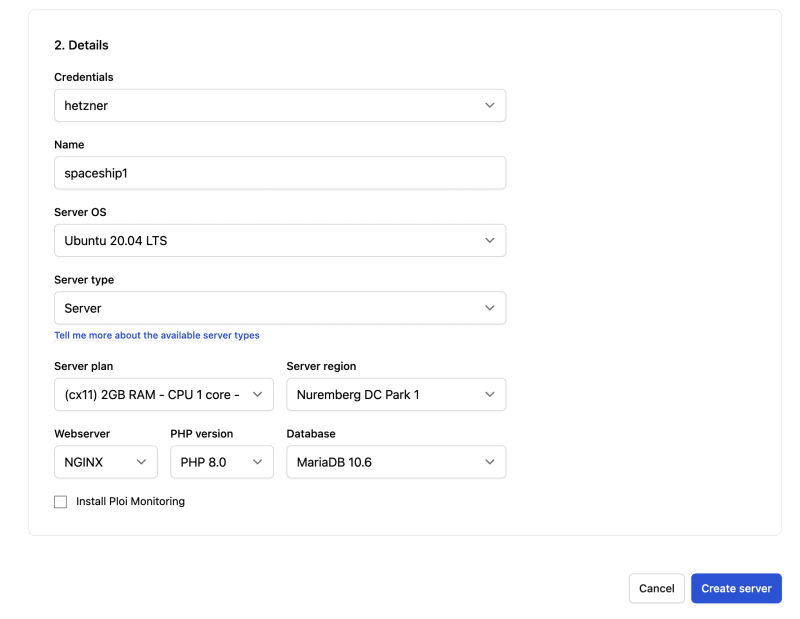
Ploi will now install and configure nginx webserver, database, Redis, Supervisor, PHP, Composer, Memcached, NPM (NodeJS), UFW Firewall, Fail2ban and basic packages on the new server. (See: ploi.io - Server Installation.
5. Create a new site
We can add multiple sites to a server. Let's create a new one. The domain doesn't really matter, we'll create a ploi test domain in the next steps.

We don't use 1-click and don't add a repo on Ploi!
On the next screen, Ploi will suggest adding a git repository or even install CraftCMS with 1-click:
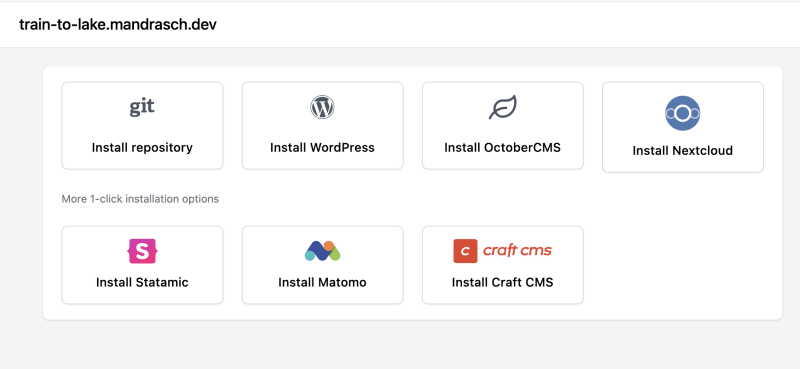
We don't use a 1-click-install and we don't connect a Git repository on Ploi!
Instead we want to use a standardized and portable deployment solution via a Deployer script which can be used on any host and it can also run in Github / Bitbucket / Gitlab Actions. See next steps:
6. Add Deployer script
The following Deployer workflow is a nice option if your target production server supports composer, NodeJS and SSH. You can write your deploy routine in PHP (instead of fiddling around with Github Action pipeline commands) and test it beforehand locally.
The docs of Deployer are a little bit confusing, because simple and concrete examples are missing in my opinion. But it's an Open Source project after all, we will struggle through this together.
If you use Deployer for client work, please consider sponsoring Anton Medvedev!
First install Deployer to your local project:
ddev composer require --dev deployer/deployer:^7
Now we need to create our deploy.php file (you could also write a deploy.yaml file).
This is my current state for the deploy.php file, it is a fork of mtwalsh/deploy.php. I also took commands from nystudio107/devmode. Thanks very much for sharing these!
🚧 This file is work in progress, suggestions welcome! 🚧
<?php
// Fork of https://gist.github.com/mtwalsh/fce3c4aa416996e5900e8ac9f471dd6c, thanks!
// TODO: use full automated approach later https://t3terminal.com/blog/typo3-gitlab-deployment/
// TODO: use vite

namespace Deployer;

require 'recipe/common.php';

// Project name
set('application', 'traintolake.mandrasch.dev');

// Project repository
// See: https://blog.harveydelaney.com/configuring-multiple-deploy-keys-on-github-for-your-vps/
set('repository', 'repo-train-to-lake:mandrasch/train-to-lake-craftcms.git');
// If you have only one deploy key, just use
// set('repository', 'git@githosting.com:enovatedesign/project.git');

// Shared files/dirs between deploys
set('shared_files', [
    '.env'
]);
set('shared_dirs', [
    'storage'
]);

// Writable dirs by web server
set('writable_dirs', [
    'storage',
    'storage/runtime',
    'storage/logs',
    'storage/rebrand',
    'public/cpresources',
    // added by myself
    'public/media-files'
]);

// TODO: do we need it?
// Set the worker process user
// set('http_user', 'worker');

// Set the default deploy environment to production
set('default_stage', 'production');

// TODO: is this needed?
// Disable multiplexing
set('ssh_multiplexing', false);

// Tasks

// TODO: add this later
// Upload build assets
task('upload', function () {
    upload(__DIR__ . "/public/assets/", '{{release_path}}/public/assets/');
    //upload(__DIR__ . "/public/service-worker.js", '{{release_path}}/public/service-worker.js');
});

// TODO: this is in tasks?
desc('Execute migrations');
task('craft:migrate', function () {
    // TODO: Steps from https://github.com/nystudio107/devmode/blob/develop/buddy.yml#L94
    run('{{release_path}}/craft off --retry=60');
    // - "# Backup the database just in case any migrations or Project Config changes have issues"
    // - "php craft backup/db" ?
    // - "# Run pending migrations, sync project config, and clear caches"
    run('{{release_path}}/craft clear-caches/all');
    run('{{release_path}}/craft migrate/all');
    // originally: run('{{release_path}}/craft up');
    // - "# Turn Craft on"
    run('{{release_path}}/craft on');
})->once();

// Hosts

// Production Server(s)

host('production')
    ->set('remote_user', 'ploi')
    ->set('hostname', '162.55.187.201')
    ->set('deploy_path', '~/train-to-lake.mandrasch.dev');

/*host('110.164.16.59', '110.164.16.34', '110.164.16.50')
    ->set('deploy_path', '/websites/{{application}}')
    ->set('branch', 'master')
    ->stage('production')
    ->user('someuser');

// Staging Server
host('192.168.16.59')
    ->set('deploy_path', '/websites/{{application}}')
    ->set('branch', 'develop')
    ->stage('staging')
    ->user('someuser');
*/
// Group tasks

desc('Deploy your project');
task('deploy', [
    // 'deploy:info', --> THIS IS INCLUDED IN PREPARE in v7
    'deploy:prepare',
    // 'deploy:lock', --> THIS IS INCLUDED IN PREPARE in v7
    //'deploy:release', --> THIS IS INCLUDED IN PREPARE in v7
    // 'deploy:update_code', --> THIS IS INCLUDED IN PREPARE in v7

    // TODO: re-add later
    // 'upload', // Custom task to upload build assets

    // 'deploy:shared', -> --> THIS IS INCLUDED IN PREPARE in v7
    // 'deploy:writable', -> --> THIS IS INCLUDED IN PREPARE in v7
    'deploy:vendors',
    'deploy:clear_paths',
    // 'deploy:symlink',  --> THIS IS INCLUDED in publish
    // 'deploy:unlock', --> THIS IS INCLUDED in publish
    'deploy:publish',
    // 'deploy:cleanup',  --> THIS IS INCLUDED in publish
    // 'deploy:success' --> THIS IS INCLUDED in publish
]);

// [Optional] Run migrations
after('deploy:vendors', 'craft:migrate');

// [Optional] If deploy fails automatically unlock
after('deploy:failed', 'deploy:unlock');

// Run with '--parallel'
// dep deploy --parallel
Source: https://github.com/mandrasch/train-to-lake-craftcms/blob/main/deploy.php
7. Try Deployer workflow locally
To use the dep cli command of Deployer in DDEV, we need a little custom command add-on:
ddev get mandrasch/ddev-deployer-dep
Now we need to set the connection settings in deploy.php accordingly to the information shown in ploi, the user is always "ploi" and the IP address is shown in the dashboard:
host('production')
    ->set('remote_user', 'ploi')
    ->set('hostname', '123.456.789.123')
    ->set('deploy_path', '~/train-to-lake.mandrasch.dev');
To connect to the server via SSH, you need to add your local public SSH key to your ploi profile:
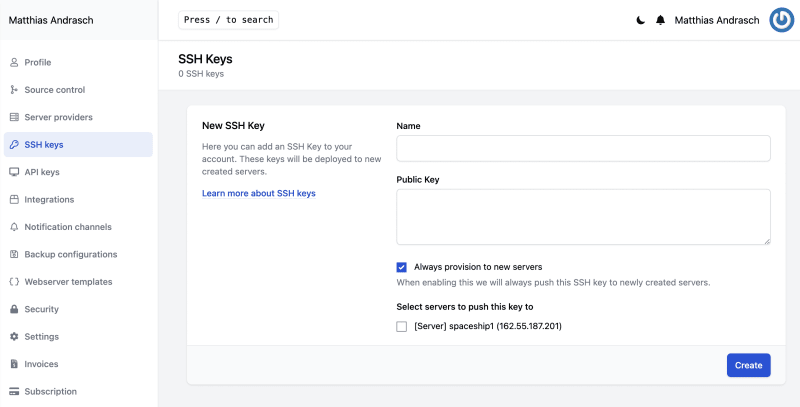
On Mac you'll get your public key via
cat ~/.ssh/id_rsa.pub
Paste it in and send it to your servers:

The important part now is to add your local SSH keys to your DDEV project containers as well. This is just a quick command:
ddev auth ssh
Afterwards we can try our first Deployer run locally via DDEV:
ddev dep deploy production
Deployer will connect to your target server via SSH, clone the repository from Github and run the rest of the routine described in deploy.php. For example Deployer will run the npm production build and setup the folder structure (all via SSH on the target server).
8. Add servers SSH key to GitHub Deploy Keys
The SSH connection from DDEV to the server should work by now, but the private git repository can't be accessed (of course):
[production] git@github.com: Permission denied (publickey).
[production] fatal: Could not read from remote repository.
[production] Please make sure you have the correct access rights
Therefore we need to add the SSH key of the target server (the ploi/hetzner server!) to Github.
We need to connect to the ploi server via ssh ploi@XXX.XXX.XXX and use the command cat ~/.ssh/id_rsa.pub again. Add this key to the Deploy Keys of your private repository on github.com:

⚠️ If you want to connect multiple repositories, you'll need to follow this tutorial: Configuring multiple SSH Deploy Keys on GitHub from one server. Just create multiple keys via ssh keygen command, it will prompt you for the filename. Use filenames like /home/ploi/.ssh/repo1-name and just create the key with no password. Afterwards create your ssh config as described in the tutorial.
After setting up your keys you should now have a success moment after running ddev dep deploy production:
It should connect to the server but then it fails to connect to the database.
9. Configuring the .env file
For database access you need to create a database in the server settings.
Afterwards the connection must be configured in shared/.env.
You can use SSH and nano or you could use an FTP program to edit the file. The file is located in shared/.env.
Unfortunately - while I was testing the "Edit environment" feature of ploi it did not work with this Deployer setup, Deployer moves the .env-file to shared/. Make sure to set the project directory to current/ anyhow to use the craft commands provided in dashboard:

10. Install Craft initially
🚧 This section is work in progress, suggestions welcome! 🚧
I don't know yet how to do this in a more clean way. But your first initial deployment will fail with something like
Error: SQLSTATE[42S02]: Base table or view not found: 1146 Table 'traintolake.migrations' doesn't exist
You need to connect to the ploi server via SSH and run the initial installation. This will create Crafts database tables and also create an admin user for you. Switch to the latest (failed) deployed release folder and run:
cd releases/<Number latest Release>
php craft install/craft
11. Let's finish this!
Now the next deployment run should work and your Craft site should be available on the ploi test domain.
ddev dep deploy production

12. Resources and ideas
Update: Found this great tutorial which could be converted for the CraftCMS use case https://www.mitrais.com/news-updates/how-to-create-ci-cd-with-github-action-and-laravel/.
- Demo repo: https://github.com/mandrasch/train-to-lake-craftcms
- Next article: Would be cool to run the complete build in the pipeline and just rsync the artifacts to the production sever (See: typo3 gitlab deployer example
- Add DDEV + vite support
- so many more ;-)
See https://my-ddev-lab.mandrasch.eu/ for more notes on DDEV.


Oldest comments (1)
Can't wait for the second part! Thanks so much for sharing this.