What is Pulumi ?.

Pulumi is a universal infrastructure as code platform that allows us to create, deploy and manage cloud infrastructure using well-known programming languages and tools.
Pulumi is free, open source and optionally integrated with Pulumi Service to make infrastructure management secure, reliable and seamless. Choose one of the following options to deploy a simple cloud application using Pulumi.

What is Pulumi service ?.
Pulumi is a fully managed service that makes it easy to host the open source Pulumi SDK. It provides built-in health and security management, integrates with source control and CI/CD, and offers a web console and API that simplify infrastructure visualization and management. It's free for personal use, along with features that can be used by teams.
How we can use Pulumi in AWS ?.
The Pulumi Infrastructure as Code SDK lets us create, deploy, and manage AWS containers, serverless functions, and infrastructure using programming languages like TypeScript, Python, Go, C#, and Java, and markup languages like YAML. With the Pulumi AWS Provider Bundle and CLI, we can accomplish all of this in minutes.
Benefits of Pulumi
Managing the complexity of the modern cloud
Bringing the cloud closer to application development
Use cases of technology with infrastructure
Make collaboration easier and innovate faster
Pulumi Challenge
Thousands of developers believe Pulumi is the perfect IaC tool to accelerate developers and manage complexity at modern cloud scale. Pulumi Challenges are a great way to experience the Pulumi platform.
This challenge is Startup in a Box, where we will build and deploy our very own website to run on Amazon S3 using Cloudfront and Checkly, all of this in Pulumi. The code is in TypeScript.
Prerequisites
To do this, we need to establish a few things in advance.
- A Pulumi account
- The Pulumi CLI
- AWS account
- Checkly account
- Install Language Runtime(Nodejs)
- AWS CLI
- Configure Pulumi to access your AWS account
Step 1 - First Pulumi Program
We will be creating a new Pulumi program using an AWS-specific Pulumi template using TypeScript. Create a new folder called Pulumi-challenge and run the following in it.
mkdir Pulumi-challenge
pulumi new aws-typescript


This command will walk you through creating a new Pulumi project.

Enter a value or leave blank to accept the (default), and press <ENTER>.
Press ^C at any time to quit.

project name: (pulumi-challenge)
project description: (A minimal AWS TypeScript Pulumi program)
Created project 'pulumi-challenge'

Please enter your desired stack name.
To create a stack in an organization, use the format <org-name>/<stack-name> (e.g. `acmecorp/dev`).
stack name: (dev) production
Created stack 'production'

aws:region: The AWS region to deploy into: (us-east-1)
Saved config

Installing dependencies...

added 140 packages, and audited 141 packages in 3m

48 packages are looking for funding
  run `npm fund` for details

found 0 vulnerabilities
npm notice
npm notice New minor version of npm available! 8.15.0 -> 8.19.1
npm notice Changelog: <https://github.com/npm/cli/releases/tag/v8.19.1>
npm notice Run `npm install -g npm@8.19.1` to update!
npm notice
Finished installing dependencies

Your new project is ready to go!

To perform an initial deployment, run `pulumi up`
The pulumi new command creates a new Pulumi project with native support based on the specified cloud and language. After logging in, the CLI will guide us to create a new project.
First, we will be asked for a project name and description. Press ENTER to accept the default value or enter a new value.
We will then be prompted for the stack name. Accept Dev's default settings by pressing ENTER or enter a new value as Production.
Finally, some configuration values for the stack are requested. For AWS projects, we will be prompted to enter the AWS region. We can accept the default value or choose another value, such as us-east-1. After npm installs some dependencies, your project and stack will be ready.

Let's take a look at some of the generated project files.

-
Pulumi.yamldefines the project. -
Pulumi.production.yamlcontains the settings for the newly initialized stack. -
index.tsis a Pulumi program that identifies stack resources.
Lets examine index.ts.
import * as pulumi from "@pulumi/pulumi";
import * as aws from "@pulumi/aws";
import * as awsx from "@pulumi/awsx";

// Create an AWS resource (S3 Bucket)
const bucket = new aws.s3.Bucket("my-bucket");

// Export the name of the bucket
export const bucketName = bucket.id;
This Pulumi program creates a new S3 bucket and exports the name of the bucket.
Step 2 - Create your first resource
Now that our basic AWS project is set up, we need to create our first resource. In this case, we create a new S3 bucket where we can store our static website. Also, make sure this bucket is private, as we only want to expose it to the CDN we'll configure later.
Delete the below existing code in pulumi-challenge/index.ts.
// Create an AWS resource (S3 Bucket)
const bucket = new aws.s3.Bucket("my-bucket");

// Export the name of the bucket
export const bucketName = bucket.id;
Copy the below code and paste it into the pulumi-challenge/index.ts.
const bucket = new aws.s3.BucketV2(
  "bucketV2",
  {
    tags: {
      Name: "My bucket",
    },
  }
);

const bucketAcl = new aws.s3.BucketAclV2("bAcl", {
  bucket: bucket.id,
  acl: aws.s3.PublicReadAcl,
});
Replace My bucket with a unique name. For example, pulumi-challenge-makendran-one
Step 3 - Working with Local Files
Pulumi allows us to define our infrastructure using our preferred programming language. Today we use TypeScript. This means we can access the Node API. This includes finding folders and files. We can use these APIs to sync local files to an S3 bucket along with the original Pulumi template.
We need to add the npm mime package because it is convenient to pass the mime type of the file to S3 without encoding it.
Run the below command to install mime package.
npm install mime @types/mime
Copy the below code and paste it in the pulumi-challenge/index.ts.
import * as fs from "fs";
import * as mime from "mime";
const staticWebsiteDirectory = "website";

fs.readdirSync(staticWebsiteDirectory).forEach((file) => {
  const filePath = `${staticWebsiteDirectory}/${file}`;
  const fileContent = fs.readFileSync(filePath).toString();

  new aws.s3.BucketObject(file, {
    bucket: bucket.id,
    source: new pulumi.asset.FileAsset(filePath),
    contentType: mime.getType(filePath) || undefined,
    acl: aws.s3.PublicReadAcl,
  });
});
But we need a real website. Create a directory called website in pulumi-challenge/website and add index.html, styles.css and normalize.css to it.
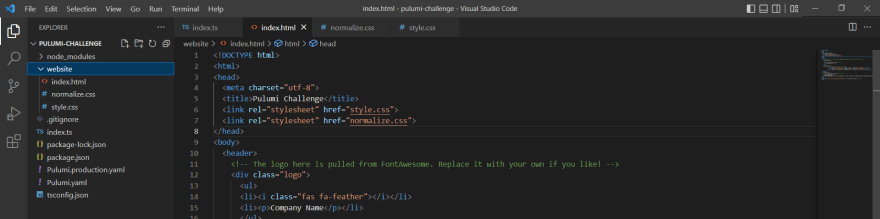
For index.html, you have a simple website layout where you can post links to your project's GitHub, Twitter and LinkedIn.
Copy index.html from GitHub and paste in the pulumi-challenge/website/index.html.
Make it beautiful with bright colors and CSS backgrounds in the style.css file.
Copy style.css from GitHub and paste in the pulumi-challenge/website/style.css.
You also need to normalize some styles so that they display consistently across browsers.
Copy normalize.css from GitHub and paste in the pulumi-challenge/website/normalize.css.
Before deploying the stack, Kindly run the command to preview the changes.
pulumi preview

Lets go ahead and deploy stack by running the below command:
pulumi up --skip-preview

Step 4 - Create a CDN
Next, we want to provision an S3 bucket with Cloudfront. These are quite large objects, but most of them can be copied and pasted without much thought.
Copy the below code and paste it in the pulumi-challenge/index.ts.
const s3OriginId = "myS3Origin";

const cloudfrontDistribution = new aws.cloudfront.Distribution(
  "s3Distribution",
  {
    origins: [
      {
        domainName: bucket.bucketRegionalDomainName,
        originId: s3OriginId,
      },
    ],
    enabled: true,
    isIpv6Enabled: true,
    comment: "Some comment",
    defaultRootObject: "index.html",
    defaultCacheBehavior: {
      allowedMethods: [
        "DELETE",
        "GET",
        "HEAD",
        "OPTIONS",
        "PATCH",
        "POST",
        "PUT",
      ],
      cachedMethods: ["GET", "HEAD"],
      targetOriginId: s3OriginId,
      forwardedValues: {
        queryString: false,
        cookies: {
          forward: "none",
        },
      },
      viewerProtocolPolicy: "allow-all",
      minTtl: 0,
      defaultTtl: 3600,
      maxTtl: 86400,
    },
    priceClass: "PriceClass_200",
    restrictions: {
      geoRestriction: {
        restrictionType: "whitelist",
        locations: ["US", "CA", "GB", "DE"],
      },
    },
    viewerCertificate: {
      cloudfrontDefaultCertificate: true,
    },
  }
);
Lets go ahead and deploy stack by running the below command:
pulumi up --skip-preview

To get the CloudFront URL, Copy the below code and paste it in the pulumi-challenge/index.ts.
export const url = cloudfrontDistribution.domainName;
Lets go ahead and deploy the stack by running the below command:
pulumi up --skip-preview
To see the output of the stack, run the below command
pulumi stack output


Current stack outputs (1):
    OUTPUT VALUE
    url dy97m8m1jyqks.cloudfront.net
To view the output in JSON format, run the below command
pulumi stack output --json


{
  "url": "dy97m8m1jyqks.cloudfront.net"
}
To see the HTML of the URL, run the below command
curl http://dy97m8m1jyqks.cloudfront.net
Step 5 - Introduction to ComponentResources
We can keep adding resources, but Pulumi is more than that. We can create our own reusable components. Let's turn the above into a CdnWebsite component in pulumi-challenge/cdn-website/index.ts.
Create a directory under pulumi-challenge as cdn-website and a file called index.ts.

Copy index.ts from GitHub and paste in the pulumi-challenge/cdn-website/index.ts.
Keep the below code alone in the pulumi-challenge/index.ts and delete the remaining code.
import * as pulumi from "@pulumi/pulumi";
import * as aws from "@pulumi/aws";
import * as awsx from "@pulumi/awsx";
Copy the below code and paste it in the pulumi-challenge/index.ts
// Deploy Website to S3 with CloudFront
// Also shows the challenger how to build a ComponentResource
import { CdnWebsite } from "./cdn-website";

const website = new CdnWebsite("your-startup", {});
Replace your-startup with a unique name. For example, pulumi-challenge-one
Lets go ahead and deploy the stack by running the below command:
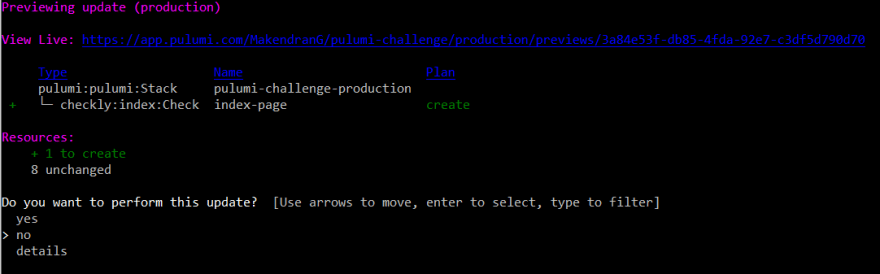
pulumi up

It will ask for us to proceed with the update or not, Select yes to deploy the change.


To get the CloudFront URL, Copy the below code and paste it in the pulumi-challenge/index.ts.
export const url = website.url;
Lets go ahead and deploy the stack by running the below command:
pulumi up --skip-preview


Updating (production)

View Live: https://app.pulumi.com/MakendranG/pulumi-challenge/production/updates/6

     Type Name Status pulumi:pulumi:Stack pulumi-challenge-production
Outputs:
  + url: "d2f4ewalsoswej.cloudfront.net"

Resources:
    8 unchanged

Duration: 57s
To see the HTML of the URL, run the below command
curl http://d2f4ewalsoswej.cloudfront.net
Step 6 - Add another provider
Now that we've served our website through S3 as fast as possible using CdnWebsite and Cloudfront, how do you know if our deployment is actually working? We can use a great service like Checkly to make sure your site goes through a series of health checks.
Checkly is the API & E2E monitoring platform for the modern stack: programmable, flexible and loving JavaScript.

First, we need to add a new provider.
npm install @checkly/pulumi
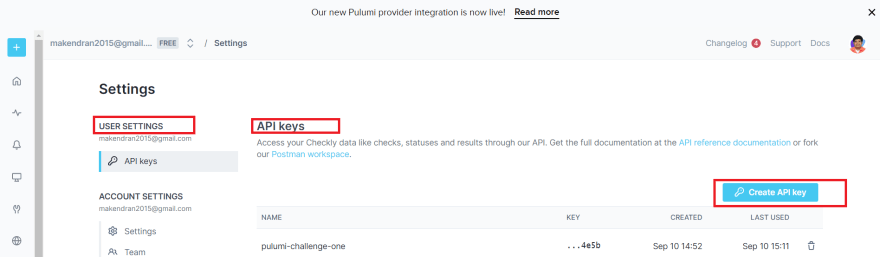
To get the API key from checkly
Login into checkly account and go to User Settings -> API keys.
Select Create API key
To get the Account ID from checkly
Go to Account Settings of checkly.
Run the below command to configure checkly provider.
# API KEY: https://app.checklyhq.com/settings/account/api-keys
pulumi config set checkly:apiKey --secret

# AccountID: https://app.checklyhq.com/settings/account/general
pulumi config set checkly:accountId
Copy the below code and paste it in the pulumi-challenge/index.ts
import * as checkly from "@checkly/pulumi";
import * as fs from "fs";

new checkly.Check("index-page", {
  activated: true,
  frequency: 10,
  type: "BROWSER",
  locations: ["eu-west-2"],
  script: websiteUrl.apply((url) =>
    fs
      .readFileSync("checkly-embed.js")
      .toString("utf8")
      .replace("{{websiteUrl}}", url)
  ),
});
Replace script: websiteUrl.apply((url) as script: url.apply((url) in the above code and also eu-west-2 as us-east-1.
We can see that we are using fs.readFileSync again. This is because it stores Checkly code and node-based code in its own file, so we get auto-completion and correct syntax highlighting without having to store them as string objects in our existing code.
Add the following to the pulumi-challenge/checkly-embed.js file:
const playwright = require("playwright");
const expect = require("expect");

const browser = await playwright.chromium.launch();
const page = await browser.newPage();

await page.goto("https://{{websiteUrl}}");
expect(await page.title()).toBe("Pulumi Challenge");

await browser.close();
Lets go ahead and deploy the stack by running the below command:
pulumi up
Step 7 - Dynamic implementation of the Swag provider
Everyone loves SWAG and Pulumi wants to give us something for completing this challenge. To do this, we need to align with dynamic providers through Pulumi. Create a new directory and file in pulumi-challenge/swag-provider/index.ts.
For this dynamic provider, only CommonJS modules are available. We can make HTTP requests using got version 11.8.0.
Run the below command to install got.
npm install got@11.8.0
Copy index.ts from GitHub and paste in the pulumi-challenge/swag-provider/index.ts.
Now add this last block to pulumi-challenge/index.ts and run pulumi up.
import { Swag } from "./swag-provider";

const swag = new Swag("your-startup", {
  name: "YOUR NAME",
  email: "YOUR EMAIL",
  address: "YOUR ADDRESS",
  size: "SIZE",
});
Replace the your-startup, YOUR NAME, YOUR EMAIL and SIZE as per your records.
Congratulations! We have Completed Pullumi's first challenge. To remove all these resources, perform a pulumi destroy. Otherwise, use the new site! Change it to make it your own.
To know more about the pulumi challenges, refer here
Gratitude for perusing my article till end. I hope you realized something unique today. If you enjoyed this article then please share to your buddies and if you have suggestions or thoughts to share with me then please write in the comment box.


Top comments (0)