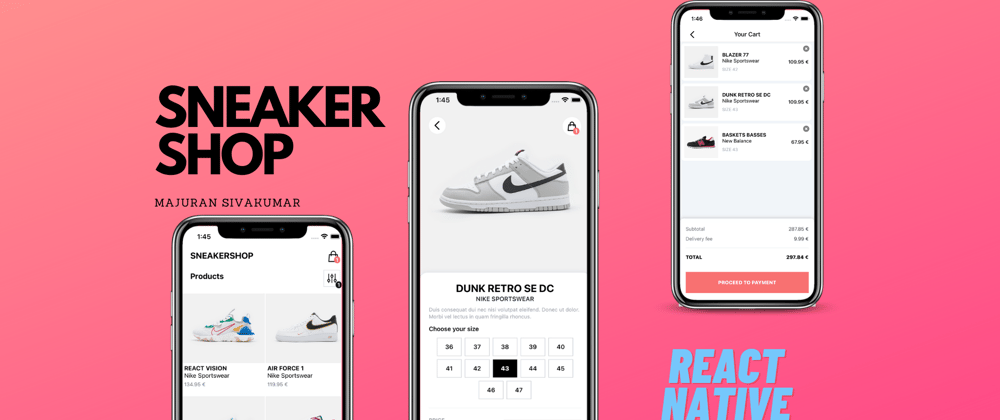
A mobile app build with ReactNative, JavaScript, Tailwind, Redux etc.
Hello 👋
It has been a long time since I wanted to give a try with ReactNative. But was looking for a good project idea to start. With a todo app, I was sure to not be enough entertained to finish it…
One day, while purchasing a new pair of sneakers, I was like “Hey! It can be fun to create a sneaker app 💡” and tada I’m here with this series!
Demo
What we are going to build together.

Features 🚀
In term of features I wanted some basics ones:
- User can browse a list of sneakers in the catalog screen and filter them.
- Open a product screen, choose a size and add the sneaker to his basket.
- In the cart screen, user can edit his cart by removing products.
Configuration 🛠️
First of all, let’s generate the project with Expo.
# Install expo-cli and create project
npm install --global expo-cli && npx create-expo-app my-sneaker-app
Here are some important libraries I used 👇
For design system:
- Tailwind. Yes ! You can use Tailwind with React Native thanks to NativeWind by Mark Lawlor 🤘
# Install NativeWind and TailwindCSS
npm install nativewind
npm install -D tailwindcss
- HeroIcons for icons
# Install HeroIcons
npm install @heroicons/react
Navigation
To navigate between screens: React Navigation.
npm install @react-navigation/native
For state management
Install React Redux and Redux Toolkit
# Install React Redux and Redux Toolkit
npm install @reduxjs/toolkit react-redux
Then create files following this structure:
/store
├── /features
│   ├── /cart
│   │   └── cartSlice.js
│   └── /products
│       └── productsSlice.js
└── index.js
cartSlice.js:
This reducer will handle state of our cart, adding, removing item in cart.
// store/features/cart/cartSlice.js

import { createSlice } from "@reduxjs/toolkit";

const initialState = {
  items: [],
};

export const cartSlice = createSlice({
  name: "cart",
  initialState,
  reducers: {
    setItemToCart: (state, action) => {
      state.items = [...state.items, action.payload];
    },
    removeItemFromCart: (state, action) => {
      state.items = state.items.filter((e) => e.id !== action.payload);
    },
  },
});

// Action creators are generated for each case reducer function
export const { setItemToCart, removeItemFromCart } = cartSlice.actions;

// Selectors
export const selectCartItems = (state) => state.cart.items;
export const nbItemsInCart = (state) => state.cart.items.length;
export const itemExistInCart = (id) => (state) =>
  state.cart.items.some((i) => i.id === id);

export default cartSlice.reducer;
productSlice.js
It is where we are going to set our products state. Its going to be usefull for catalog page. It will handle list of products, filters and sort states.
// /store/products/productsSlice.js
import { createSlice } from "@reduxjs/toolkit";

const initialState = {
  items: [],
  filters: {},
  sort: null,
};

export const productsSlice = createSlice({
  name: "products",
  initialState,
  reducers: {
    setProducts: (state, action) => {
      state.items = [...action.payload];
    },
    setFilters: (state, action) => {
      /* TODO */
    },
    deleteFilterById: (state, action) => {
      /* TODO */
    },
    setSort: (state, action) => {
      state.sort = action.payload;
    },
    resetFilters: (state, action) => {
      state.filters = {};
      state.sort = null;
    },
  },
});

// Action creators are generated for each case reducer function
export const {
  setProducts,
  setFilters,
  setSort,
  deleteFilterById,
  resetFilters,
} = productsSlice.actions;

// Selectors
export const selectProducts = ({ products }) => {
  /* TODO filter products */
  return productList ;
};

export const selectSortBy = ({ products }) => products.sort;
export const selectFilters = (id) => (state) => {
  // return filters
};
export const selectNbOfFilters = (state) =>
  Object.keys(state.products.filters).length + (state.products.sort ? 1 : 0);

export default productsSlice.reducer;
index.js
We can create our store with those reducers.
// /store/index.js
import { configureStore } from "@reduxjs/toolkit";
import cartSliceReducer from "./features/cart/cartSlice";
import productsSliceReducer from "./features/products/productsSlice";

export const store = configureStore({
  reducer: {
    cart: cartSliceReducer,
    products: productsSliceReducer,
  },
  middleware: (getDefaultMiddleware) =>
    getDefaultMiddleware({
      serializableCheck: false,
    }),
});
Screens
Let's create our main screens following this file structure:
/screens
├── CartScreen.js
├── DetailScreen.js
├── FilterScreen.js
└── HomeScreen.js
For now, we are creating empty screen with links to other screens. We will update each screen in next parts.
Cart Screen
// /screens/CartScreen.js
import React from "react";
import { useNavigation } from "@react-navigation/native";

import { Text, View } from "react-native";

const CartScreen = () => {
  const { navigate, goBack } = useNavigation();

  return (
    <View className="bg-white">
      <Text>Cart Screen</Text>
      <TouchableOpacity onPress={() => goBack()}>
        <View>
          <Text>Previous screen</Text>
        </View>
      </TouchableOpacity>
    </View>
  );
};

export default CartScreen;
Detail Screen
// /screens/DetailScreen.js
import React from "react";
import { useNavigation } from "@react-navigation/native";

import { Text, View } from "react-native";

const DetailScreen = () => {
  const { navigate, goBack } = useNavigation();

  return (
    <View className="bg-white">
      <Text>Detail Screen</Text>
      <TouchableOpacity onPress={() => goBack()}>
        <View>
          <Text>Previous screen</Text>
        </View>
      </TouchableOpacity>
      <TouchableOpacity onPress={() => navigate("Cart")}>
        <View>
          <Text>Cart screen</Text>
        </View>
      </TouchableOpacity>
    </View>
  );
};

export default DetailScreen;
Filter Screen
// /screens/FilterScreen.js
import React from "react";
import { useNavigation } from "@react-navigation/native";

import { Text, View } from "react-native";

const FilterScreen = () => {
  rconst { navigate, goBack } = useNavigation();

  return (
    <View className="bg-white">
      <Text>Filter Screen</Text>
      <TouchableOpacity onPress={() => goBack()}>
        <View>
          <Text>Previous screen</Text>
        </View>
      </TouchableOpacity>
    </View>
  );
};

export default FilterScreen;
Home Screen
// /screens/HomeScreen.js
import React from "react";

import { Text, View } from "react-native";

const HomeScreen = () => {
  const { navigate } = useNavigation();

  const goToDetails = (item) => navigate("Detail", item);
  const goToCart = () => navigate("Cart");
  const goToFilter = () => navigate("Filter");

  return (
    <View className="bg-white">
      <Text>Home Screen</Text>
      <TouchableOpacity onPress={goToCart}>
        <View>
          <Text>Go to Cart Screen</Text>
        </View>
      </TouchableOpacity>
      <TouchableOpacity onPress={goToFilter}>
        <View>
          <Text>Go to Filter Screen</Text>
        </View>
      </TouchableOpacity>
      <TouchableOpacity onPress={goToDetails}>
        <View>
          <Text>Go to Detail Screen</Text>
        </View>
      </TouchableOpacity>
    </View>
  );
};

export default HomeScreen;
Now that we have our screens, we can update our App.js :
// App.js
import React from "react";
import { Provider } from "react-redux";
import { NavigationContainer } from "@react-navigation/native";
import { createNativeStackNavigator } from "@react-navigation/native-stack";

import { store } from "./store";

import HomeScreen from "./screens/HomeScreen";
import DetailScreen from "./screens/DetailScreen";
import CartScreen from "./screens/CartScreen";
import FilterScreen from "./screens/FilterScreen";

const Stack = createNativeStackNavigator();
const screenDefaultOption = { headerShown: false };

export default function App() {
  return (
    <Provider store={store}>
      <NavigationContainer>
        <Stack.Navigator>
          <Stack.Screen
            name="Home"
            component={HomeScreen}
            options={screenDefaultOption}
          />
          <Stack.Screen
            name="Detail"
            component={DetailScreen}
            options={screenDefaultOption}
          />
          <Stack.Screen name="Filter" component={FilterScreen} />
          <Stack.Screen name="Cart" component={CartScreen} />
        </Stack.Navigator>
      </NavigationContainer>
    </Provider>
  );
}
Next 🔜
In this first part, we have setup, configured our project and can navigate between screens.
On the next post of this serie, we will start our Home Screen and list/filter products 🔜
Hope you enjoyed reading this post 😇
If you have any questions or feedback, feel free to reach out in the comment section! 💬
Source code 👨💻
Feel free to checkout the source code there 👉 Github


Latest comments (3)
Part 2?
Hey! Part-2 is under preparation. Will be out soon 😇
The code looks good, but a couple of the new balance 550 should have been coded more accurately.