When creating an application, mobile developers aim to create a fast and high-quality product. The impression of the user who tries out your application depends on it. If the application launch is slow and unpleasant, the users will be disappointed even before they try out your application.
Let’s take a look at what types of app launches there are
An app can start in one of three states: cold start, warm start, or hot start. The difference is the startup time that it takes to make your app visible to the user. With the cold start, your application is built and launched from scratch. It may take longer than in the other two states, where the application is simply brought to the foreground as it already exists on the stack.

Cold start
With the cold start, the system process did not create an application process before that start. Usually, a cold start happens when you have just installed and launched an application or when you launch an application that was in a completed state. This kind of state is more problematic than other states, since it is during a cold start that a number of complex tasks are performed. So the user can see a white screen for some time before the app screens open for interaction.

Click event gets translated into startActivity(intent), and it is routed to ActvityManagerService via Binder IPC. The ActvityManagerService performs multiple steps.
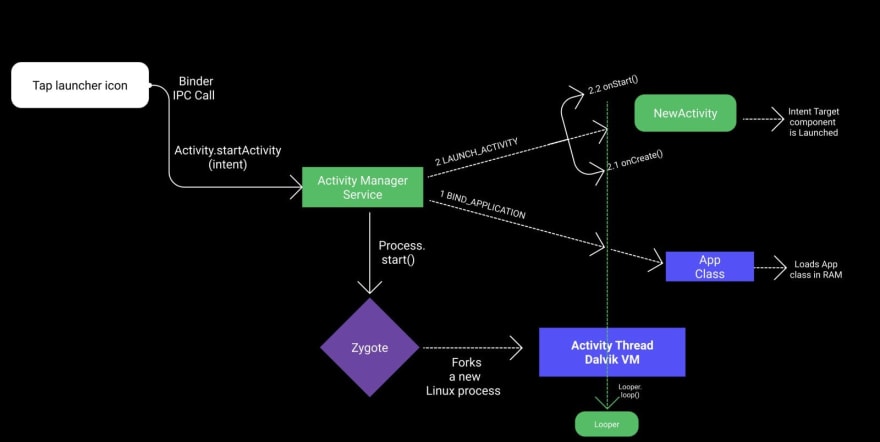
The first step is to collect information about the target of the intent object. This is done by using the
resolveIntent()method on thePackageManagerobject.PackageManager.MATCH_DEFAULT_ONLYandPackageManager.GET_SHARED_LIBRARY_FILESflags are used by default.The target information is saved back into the intent object to avoid re-doing this step.
The next important step is to check if the user has enough privileges to invoke the target component of the intent. This is done by calling the
grantUriPermissionLocked()method.If the user has enough permissions,
ActivityManagerServicechecks if the target activity requires to be launched in a new task. The task creation depends onIntentflags likeFLAG_ACTIVITY_NEW_TASKandFLAG_ACTIVITY_CLEAR_TOP.
Now, it’s time to check if the ProcessRecord already exists for the process. If the ProcessRecord is null, the ActivityManager has to create a new process to instantiate the target component.
Hot start
A hot start is when your app’s actions are in the memory and your app’s process is already running in the background. With a hot start, all the system needs to do is bring your app’s activity to the fore. This makes it much faster because the system doesn’t need to re-initialize, so the overhead is much lower.

If the user brings back activity from the Recents screen instead of tapping a launcher icon, the system process calls TaskSnapshotSurface.create() to create a starting window that draws a saved snapshot of the activity.
If some memory was cleared in response to memory pruning events, such as onTrimMemory (), then these objects will need to be recreated in response to a hot start event, in which case hot start displays the same behavior as cold start, that is, the system process displays a blank screen until the application completes rendering the action.
How to make a cold start more pleasant and prevent bad user experience?
Each user, when interacting with the app, expects to have access to the content as soon as possible, and this “start” content can be displayed with a background or the app logo.
So, to create your own background, you need to create an xml file in the drawable folder and add the desired colors:
<?xml version="1.0" encoding="utf-8"?>
<shape
xmlns:android="http://schemas.android.com/apk/res/android">

<gradient
    android:angle="45"
    android:endColor="#87CEEB"
    android:centerColor="#768087"
    android:startColor="#000"
    android:type="linear" />

</shape>
Next, the background has to be set in the application topic (values >themes.xml section) :
<item name="android:windowBackground">@drawable/bg_splash</item>
Also, as an input point for the app, you can add the SplashActivity screen, which will be displayed immediately after the app starts and forms a smooth transition so that the user does not notice much difference:
<activity android:name=".SplashActivity">
<intent-filter>
    <action android:name="android.intent.action.MAIN" />

    <category android:name="android.intent.category.LAUNCHER" />
</intent-filter>
</activity>
As content, you can use the application logo and the background that was added for the start window:
<?xml version="1.0" encoding="utf-8"?>
<androidx.constraintlayout.widget.ConstraintLayout
 xmlns:android="http://schemas.android.com/apk/res/android"
xmlns:app="http://schemas.android.com/apk/res-auto"
xmlns:tools="http://schemas.android.com/tools"
android:layout_width="match_parent"
android:layout_height="match_parent"
android:background="@drawable/bg_splash"
tools:context=".SplashActivity">

    <TextView
    android:layout_width="wrap_content"
    android:layout_height="wrap_content"
    android:fontFamily="@font/rokkitt_bold"
    android:text="@string/example_app"
    android:textColor="@android:color/white"
    android:textSize="30sp"
    app:layout_constraintBottom_toBottomOf="parent"
    app:layout_constraintLeft_toLeftOf="parent"
    app:layout_constraintRight_toRightOf="parent"
    app:layout_constraintTop_toTopOf="parent" />

</androidx.constraintlayout.widget.ConstraintLayout>
In the activity itself, you need to wrap the Intent in a Handler, which opens the interaction screen after the specified time has elapsed:
class SplashActivity : AppCompatActivity() {
override fun onCreate(savedInstanceState: Bundle?) {
    super.onCreate(savedInstanceState)
    setContentView(R.layout.activity_splash)

        Handler(Looper.getMainLooper()).postDelayed({
        /* Create an Intent that will start the MainActivity. */
        val mainIntent = Intent(this, MainActivity::class.java)
        startActivity(mainIntent)
        finish()
    }, 800)
And finally, don’t forget to add color to the MainActivty content; otherwise, it will display the background that you set in the theme:
<?xml version="1.0" encoding="utf-8"?>
<androidx.constraintlayout.widget.ConstraintLayout
 xmlns:android="http://schemas.android.com/apk/res/android"
xmlns:app="http://schemas.android.com/apk/res-auto"
xmlns:tools="http://schemas.android.com/tools"
android:layout_width="match_parent"
android:layout_height="match_parent"
android:background="@android:color/white"
tools:context=".MainActivity">

    <TextView
    android:layout_width="wrap_content"
    android:layout_height="wrap_content"
    android:text="Hello World!"
    app:layout_constraintBottom_toBottomOf="parent"
    app:layout_constraintLeft_toLeftOf="parent"
    app:layout_constraintRight_toRightOf="parent"
    app:layout_constraintTop_toTopOf="parent" />

</androidx.constraintlayout.widget.ConstraintLayout>
Now you can run the project and see the result:
I hope it was useful and interesting for you!)
Check out the sample project on GitHub.

Previously published at maddevs.io.


Top comments (0)