Don’t gamble on accessing self-hosted services on a Raspberry Pi when you’re away from home and your IP changes

Most internet service providers (ISPs) give residential customers a dynamic IP address. They pull from a pool of IP addresses and allocate one to a home.
Since the IP address might change in a few months or even in a few hours, it can be hard to consistently access your personal computer when you’re away from home.
Setting up a dynamic DNS (DDNS) service gives you reliable access to self-hosted services, like a personal website, a Minecraft server, or just your home computer. If you point a hostname to your home network, you can have Kubernetes update the DNS record when your IP inevitably changes.
What is Dynamic DNS?
Since most residential customers have dynamic IPs, there’s a few options to manage a changing IP address.
- Static IP : if your ISP offers this option, get a dedicated IP address so it never changes
- Router : if your router has a dynamic DNS option, configure DDNS on your router to always maintain an active connection
- DDNS services : Cloudflare recommends a few options, such as updating your IP using a dynamic DNS client application
Making sure your IP is up to date, or remains fixed, guarantees reliable access to your self-hosted services.

For example, I have a self-hosted Minecraft server on a Raspberry Pi at home. I want to set up DDNS so that I can access this game server even if the IP changes while I’m out of town.
How can we run a dynamic DNS service?
Let’s use a dynamic DNS client application called ddclient. Services like these keep an eye on your IP address. When the IP changes, the service automatically updates your DNS record using the DNS provider’s API.

If you’d like to learn how to set up your DNS records, take a spin through this very good tutorial that walks through how to register a domain and run ddclient using Docker on its own.
In this tutorial, let’s run ddclient on Kubernetes.
Wait, wait… You’re using Kubernetes to run a self-hosted app?!
Isn’t this overkill?
— anyone reading this
Why use Kubernetes in addition to Docker?
Docker containers are useful for packaging and running software in a way that’s predictable and consistent. While I’ve previously talked about using Kubernetes to reduce the complexity of managing containers and to scale services, we can also use Kubernetes to simplify the deployment process.

My self-hosted apps will never have Netflix- or Slack-level traffic. But if we can use Kubernetes to ease the pain of deployment, for free, then why not?
There’s a bit of a learning curve with Kubernetes, but a bunch of new tools are making it easier than ever to get started.
Let’s forge ahead.
Where can I deploy a Kubernetes cluster?
When I think about deploying on Kubernetes, I imagine working with a managed cloud service, like when we previously deployed a cluster on Amazon EKS.
But Kubernetes can also run on a local machine, like a Raspberry Pi at home.
You can deploy a Kubernetes cluster on a local machine, cloud, on-prem datacenter; or choose a managed Kubernetes cluster. You can also create custom solutions across a wide range of cloud providers, or bare metal environments.
A cluster running on a self-hosted Raspberry Pi server is perfect for my own DDNS and gaming needs. Setting up Kubernetes on a local machine is also a great way to learn Kubernetes without racking up cloud costs.
Let’s deploy ddclient on Kubernetes running on a local Raspberry Pi. To do this, we’ll use KubeSail, which can deploy on any type of cluster.
A recipe for deploying ddclient on Kubernetes with KubeSail
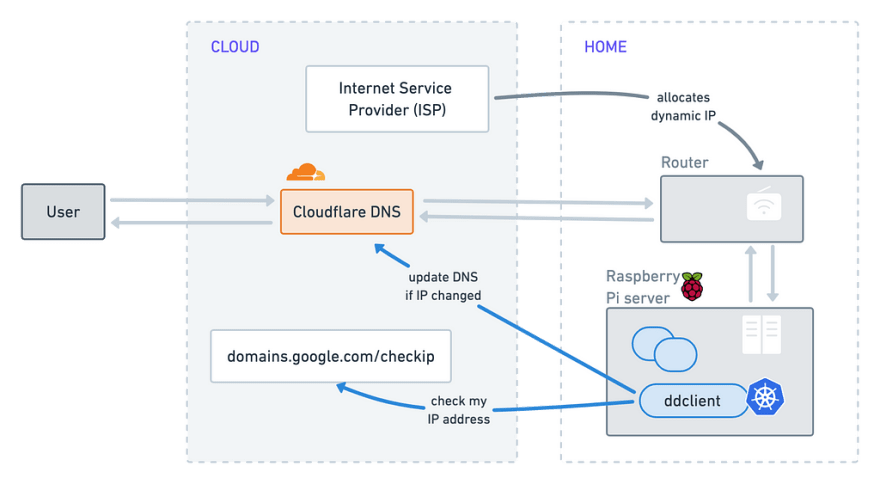
The ddclient app keeps an eye on our IP address. When the IP changes, ddclient automatically updates our DNS record using the Cloudflare API. Ddclient works with a bunch of DNS providers to keep DNS records up to date, but we’ll use Cloudflare.
- Step 0 — Pre-requisites
- Step 1 — Add a cluster to the Raspberry Pi
- Step 2 — Fork a public template
- Step 3 — Update your DNS secrets
- Step 4 — Update the deployment details (skip)
- Step 5 — Deploy on Kubernetes
Let’s get started.
0 | Pre-requisites
Do this stuff first.
KubeSail
Sign up for a free KubeSail account — we’ll use their tools to manage the apps on our Raspberry Pi.
DNS server
You’ll need to own your own domain and be able to change your domain’s nameservers. I’m using a free Cloudflare account to route my web traffic through the Cloudflare network.
Kubernetes
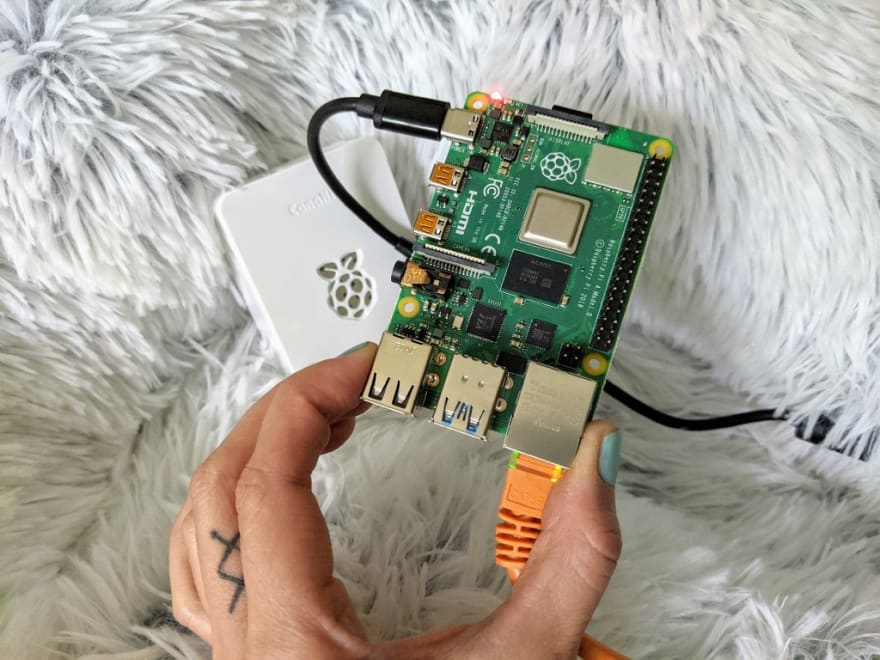
Decide where to run your Kubernetes cluster. I’m using a Raspberry Pi. The DDNS application should be running on the same home network as your self-hosted services, since the app works by checking its own network IP.
1 | Add a cluster to the Raspberry Pi
I’m using a Raspberry Pi 4 to run my Kubernetes cluster. This very good tutorial shows us how to set up a cluster on a new Raspberry Pi.
- Flash an operating system onto an SD card — I used Ubuntu
- Enable Secure Shell (SSH) to operate a headless Raspberry Pi — or use a separate keyboard and monitor
- Enable Wi-Fi also on the SD card — or I plugged directly into ethernet
- Insert the SD card into the Raspberry Pi
- Log in to the Raspberry Pi using SSH
- Install MicroK8s — a lightweight Kubernetes recommended for IOT apps, so your commands will use
microk8s.kubectlinstead of justkubectl
To connect the Raspberry Pi to KubeSail, apply the configuration file to your namespace from the Raspberry Pi’s command line.
$ sudo microk8s.kubectl apply -f [https://byoc.kubesail.com/<your-kubesail-username>.yaml](https://byoc.kubesail.com/loopdelicious.yaml)
The Raspberry Pi is now a single-node Kubernetes cluster!

The Raspberry Pi also appears in the KubeSail clusters dashboard. In the dashboard under Clusters , select the new cluster, and then select Namespaces from the sub-menu. This is where you can add a new Kubernetes namespace, or use a default namespace called default.
So now we have a cluster, a namespace, and a user —all the parameters required for our Kubernetes context.
2 | Fork a public template
I previously talked aboutthe basic concepts behind Docker and Kubernetes. YAML is used to write instructions to deploy and manage your containers.
If you’re just learning Kubernetes, or getting started with a new project, KubeSail lists community examples. You can browse these examples, and cobble together relevant YAML samples to customize your own Kubernetes apps.
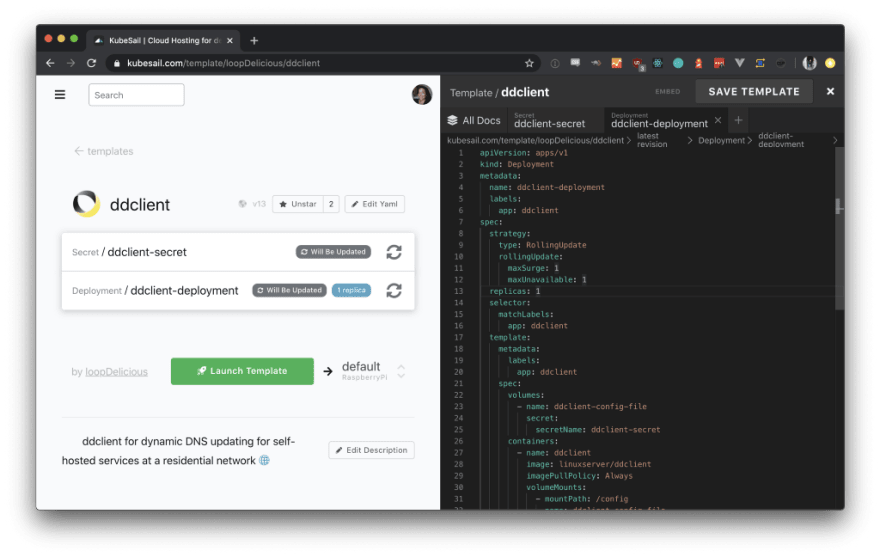
Under Templates , I made this one for ddclient.
ddclient : ddclient for dynamic DNS updating for self-hosted services at a residential network 🌐
The ddclient template has two kinds of Kubernetes resources.
- Secret — to store your confidential information
- Deployment — to describe how your application is deployed

Fork the template on this page. Then toggle the new template’s setting to Private because we’ll add our secrets in the next step.
3 | Update your DNS secrets
If you haven’t already done so, add an A record to Cloudflare that points to your home network. For now, this can point to any IP, such as 1.1.1.1 because ddclient will update the IP to the correct address when we deploy it later.

Here’s the data you need from Cloudflare.
-
zone— your domain name likeexample.com -
login— your Cloudflare account email address -
password— your global API key from under API Tokens on your Cloudflare profile - the line beneath
password— full domain name to keep updated, including subdomain likehome.example.com
Back in your new private KubeSail template, click the Edit Yaml button to open the YAML editor on the right side of the page.
There’s a couple ways to decouple Kubernetes configuration details. Using a Kubernetes Secret will store your confidential data, and inject the data into your containers only when it’s needed.
Find the Secret document tab in the YAML editor, and update your Cloudflare credentials beneath ddclient.conf.

Secret document
Here’s some other interesting details in the ddclient.conf.
-
daemon: ddclient will run this process every 300 seconds (five minutes) -
web: dclient will check if the IP address has changed, using this web service: https://domains.google.com/checkip
When you’re done, save the template.
4 | Update the deployment details (skip)
You don’t have to do anything here, but it’s helpful to understand some of the underlying YAML for this resource.
The YAML explained
Find the Deployment document tab in the YAML editor, and notice the interesting bits.
-
volumes: there’s a single Kubernetes volume, or data store, that points to our secrets from the last step -
image: the base Docker image for our containerized application islinuxserver/ddclientfrom the smart people at Linux Server -
resources: the request for how much CPU or memory a container needs to run ddclient as a fairly lightweight Perl program
If you make any changes, remember to save the template.
5 | Deploy on Kubernetes
We’re ready to deploy our app on Kubernetes! This part is easy peasy lemon squeezy since we already added a Kubernetes cluster and namespace in the first step.
In the dropdown menu next to the Launch Template button, select a Kubernetes context to deploy our app.
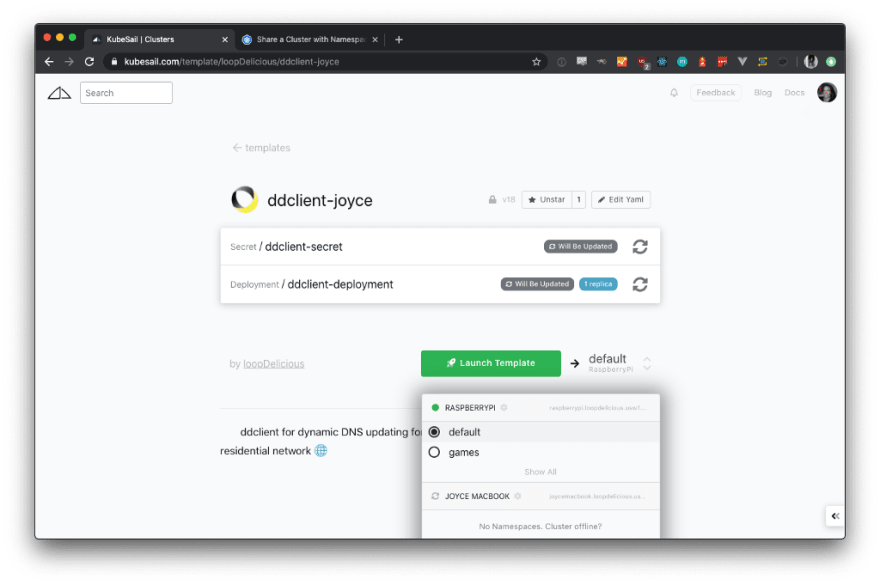
Hit Launch Template , and KubeSail will deploy ddclient.
In the example below, I deploy to the default namespace on my Raspberry Pi cluster.
default namespace on the Raspberry Pi cluster
You can see success notifications and logs under your deployment details.
Verify ddclient is working
Once your app is finished deploying, return to Cloudflare to verify that ddclient updated 1.1.1.1 to our actual network IP. Every five minutes, ddclient will check if our network IP has changed.
Besides the initial update, there’s one more check to verify that ddclient is working correctly. Once again, change the IP of your home network’s A record in Cloudflare to 1.1.1.1. Turn off your internet router long enough to ensure your ISP allocates a new IP address. I left my router unplugged overnight. In the morning when I powered up my router, I verified that ddclient updated my IP in Cloudflare.
In summary, we deployed ddclient on Kubernetes. Every five minutes, ddclient will check the IP address of the Raspberry Pi. If there’s been a change to the IP, ddclient will update our DNS record using the Cloudflare API.
Doing this, allows me to continue playing Minecraft on my Raspberry Pi when I’m away from home, and my ISP changes my IP unexpectedly.
🤓 Fun Fact: The Raspberry Pi at home hosts both ddclient and my Minecraft server. While both servers don’t need to run on the same cluster, they should be in the same home network since ddclient works by checking its own network IP. Stay tuned to learn how to set up a Minecraft server on Raspberry Pi using Kubernetes.
Final thoughts on deploying on Kubernetes
Kubernetes for simplifying deployments
Deploying projects is something I do very rarely. So when I do, it takes a while to dust off the cobwebs, and it’s pretty slow going.
Even though Kubernetes is best known for complex container orchestration at massive scale, it can also simplify modest deployments.
Share your templates
I’m new to Kubernetes. So as a n00b does, I hack on something until it works. For this project, starting with other people’s YAML examples was super helpful. This great blog post, other public templates, and these code samples saved me a ton of time.
If you come up with something that works for you, share it with the rest of us as a public template 🙏


Top comments (0)