
Written by David Omotayo✏️
Create React App (CRA) has played a pivotal role in the development of React’s community and its ecosystem at large. It is the tool of choice for developers of different skill sets when it comes to constructing a local React development environment on a whim. CRA boasts several standout features that make it hard to overlook, the most prominent ones being: local development server, Hot Module Replacement (HMR), and production bundling.
CRA does, however, have a significant drawback, which is progressive speed and performance deterioration.
As an application grows in size and complexity, Create React App’s performance tends to dip, and the time it takes to start a development server increases significantly. This makes CRA unfit for production.
In this guide, we’ll introduce Vite, a build tool built on esbuild. We’ll cover everything you need to know to start building React applications with Vite. We’ll also review the differences between Vite vs. CRA and demonstrate how to migrate from Create React App to Vite.
Jump ahead:
- Prerequisites
- What is Vite?
- How do Vite and Create React App work?
- Create React App in development
- Vite in development
- Why use Vite?
- Setting up a React project with Vite 3.0
- Migrating a Create React App project to Vite
- Differences between Create React App and Vite
Prerequisites
To follow along with the tutorial portion of this article, you'll need the following:
- Node.js v14.18 or higher
- A browser with support for native ES modules (ESM) and dynamic imports; most modern browsers have this support
- A package manager, such as npm or Yarn
What is Vite?
Vite is a build tool that aims to bridge the gap between current and next-generation web development. It focuses on providing a faster and more performant experience for developers and modern web projects.
Vite is built on top of esbuild, a JavaScript bundler written in Go, which bundles dependencies 10-100 times faster than JavaScript-based bundlers.
Vite was created by Evan You, the creator of Vue.js. However, it is platform-agnostic, meaning it can be used used to develop JavaScript/TypeScript applications with support for popular libraries such as React, Svelte, Preact, and even vanilla JavaScript.
Vite leverages the browser’s native ESM to parse and compile your code as the browser requests it. Then it serves the source file using a plugin such as Koa (a lightweight Node.js web server) to create a dev server with support for Hot Module Replacement (HMR) for updating served modules and Rollup for production builds.
How do Vite and Create React App work?
Vite and CRA are not as different as you might think. At their core, they pretty much do the same thing, which is to serve a local development server and bundle codes for production. The major difference you’ll notice is how code is served in development and which modules are supported.
Create React App is a development environment that helps speed up the development process by letting developers focus on their code instead of configuring build tools.
CRA uses a third-party build tool called webpack to handle its core functionalities under the hood. This is really what Vite is up against.
So, what is webpack? webpack is a JavaScript module bundler just like Vite. But unlike Vite, webpack supports more than one module out of the box:
- ESM
- CommonJS
- Asynchronous Module Definition (AMD) API
webpack uses any of these JavaScript module systems to combine assets and modules into one or more static assets, then it uses the Express.js web server and webpack-dev-server to serve content from the bundled asset with support for HMR.
To help put things into perspective, we’ll break down how both tools handle these functionalities in development.
Create React App in development
When you start a CRA development for the first time, the first thing webpack does is use the app’s entry point (the index.js file) to create a tree of dependencies from all the modules in the project.
Next, it transpiles the code with Babel, bundles the code together, and serves it with the Express.js web server. Lastly, it sets up sockets that will handle the Hot Module Replacement.
Although this approach is quicker and lets you focus on your code, it has a significant drawback.
webpack repeats the bundling process every time there is a change in the code. As a result, when your source code grows larger, everything becomes sluggish. The time it takes to serve a dev server and build your projects increases significantly.
Here’s a visual depiction of the CRA development process: 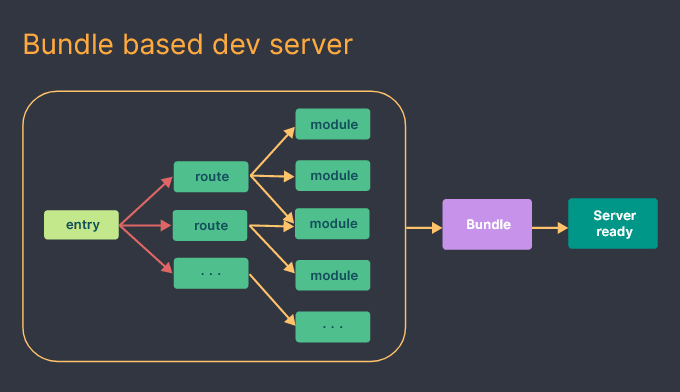
Vite in development
On the other hand, Vite only needs to pre-bundle your dependencies using esbuild the first time you start development before it begins to serve your app.
Vite doesn’t need to bundle the entire app or transpile the modules and code before starting a dev server; transpiling is done on-demand, thus making it significantly faster than CRA.
After serving the app, Vite uses route-based code-splitting to determine which part of the code needs to be loaded, instead of rebuilding and reloading the entire page like CRA. Next, it uses the browser to parse the native ES modules from the app’s entry point.
What this means is that the browser will read the import and export statements in your code and make HTTP requests back to the server for each import. The dev server then intercepts the requests and performs code transformation where necessary.
Modules without any changes will return a 304 “not modified” status code, so the browser just ignores them. This way, the browser doesn’t have to reload and the application gets to keep its state.
Here’s a visual depiction of the Vite development process: 
Why use Vite?
We previously reviewed a few advantages of using Vite for React app development. Now, let’s take a closer look at Vite’s benefits.
Superior performance
During the pre-bundling process, Vite converts dependencies that are shipped as CommonJS or UMD into ESM. This conversion occurs because Vite only supports ESM and serves native ESM codes by default.
Vite can convert dependencies with many internal modules into a single module to improve page load performance. These modules tend to fire hundreds of requests at the same time, which could create congestion in the browser and negatively impact load time. But, by pre-bundling these dependencies into a single file, they only need to send one request, thereby increasing overall performance.
Extensive plugin compatibility
Vite leverages the Rollup plugin interface to improve a developer’s experience by allowing them to rely on the mature ecosystem of Rollup plugins. In other words, Vite is compatible with most Rollup plugins out of the box.
Faster updates
We previously explained how HMR speed deteriorates significantly in a bundled-based server as the size of the application increases.
In Vite, HMR is performed over native ESM. When changes occur in a module that accepts hot updates, Vite only needs to precisely invalidate the module. This results in a faster HMR update time, regardless of the size of the application.
Faster build time
Vite uses pre-configured Rollup to build apps for production. Rollup is a more efficient bundler than webpack, so Vite’s build time tends to be quicker than that of CRA, and its output is smaller in size.
Setting up a React project with Vite 3.0
To create a Vite app, go to your machine's terminal, cd to a preferred folder, and run the following command:
npm create vite@latest
After running the command, the CLI will prompt you to provide a project name. In our case, we’ll use the default name vite-project. Next, we’ll select react from the list of available templates. This usually takes 10s or less. 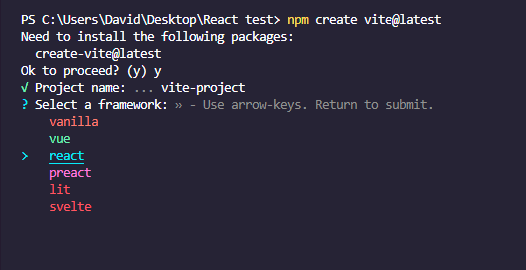
Alternatively, you can specify your template of choice in the command, and avoid going through the prompt.
You can do this by adding a --template flag, followed by the framework's name:
npm init vite@latest vite-project --template react
Next, cd into the project folder, install the necessary dependencies, and start the dev server with the following commands:
cd vite-project
npm install
npm run dev
After these commands run, a development server will be up and running on port 5173. It usually takes Vite just 1325ms to serve an application. 
Now open your browser and enter localhost:5173. You’ll see a page similar to the one below with the quintessential count button. 
That’s it! We’ve successfully set up a Vite React development environment!
Next, we’ll look at how to migrate a Create React App project to Vite.
Migrating a Create React App project to Vite
If you have an existing CRA project, it’s pretty simple to migrate it to Vite.
As a first step, open the package.json file in your project folder and delete react-scripts from the list of dependencies:
  "dependencies": {
    ...
    "react-scripts": "5.0.1",
    ...
  },
Next, add a "devDependencies" with the following content:
  "devDependencies": {
    "@vitejs/plugin-react": "^2.0.1",
    "vite": "^3.0.7"
  },
N.B., it is recommended to always use the latest version. Now, replace the scripts:
  "scripts": {
    "start": "react-scripts start",
    "build": "react-scripts build",
    "test": "react-scripts test",
    "eject": "react-scripts eject"
  },
With the following:
  "scripts": {
    "start": "vite",
    "build": "vite build",
  },
Next, go to the index.html file inside the Public folder and remove every %PUBLIC_URL%/prefix in the link paths:
<link rel="icon" href="%PUBLIC_URL%/favicon.ico" />

<link rel="apple-touch-icon" href="%PUBLIC_URL%/logo192.png" />

<link rel="manifest" href="%PUBLIC_URL%/manifest.json" />
Replace the removed prefix with the following:
<link rel="icon" href="./public/favicon.ico" />
 ...
<link rel="apple-touch-icon" href="./public/logo192.png" />
 ...
<link rel="manifest" href="./public/manifest.json" />
Then, add an entry point script inside the body element, just below the root div:
<script type="module" src="/src/index.jsx"></script>
But before you do this, rename every .js file that contains React codes to a .jsx file. For example, you’d rename the index.js file index.jsx.
Then, move the index.html file to the root folder. 
The next step is to create a Vite config file, delete the node modules folder, and reinstall the dependencies.
Start by creating a vite.config.js file inside the root folder and add the following code:
import { defineConfig } from "vite";
import react from "@vitejs/plugin-react";

export default defineConfig({
  plugins: [react()],
})
Next, go to the root folder and delete the node_modules folder. Then, run the following command to reinstall the dependencies and start the development server:
npm install
npm start
Now, if you open your browser and go to localhost:5173, the development server should successfully boot up. 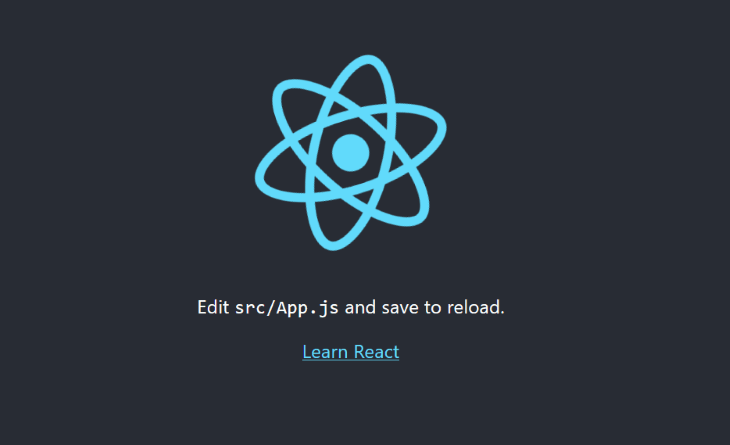
Differences between Create React App and Vite
We’ve looked at how CRA and Vite work, and we’ve reviewed some of the benefits of using Vite over CRA. Now, let’s take a look at some differences between these tools.
Absolute imports
When you start developing with Vite, the first thing you'll probably notice is the difference in path resolving. Unlike CRA, Vite doesn't have an inbuilt src path.
So, instead of importing files and components in your React app like this:
import Cards from "components/cards";
You’ll need to import them like this:
import Cards from “/src/components/cards.jsx”
Fortunately, there's a fix for this path resolving.
Go to the project's root folder, open the vite.config.js file, and replace the existing code:
import { defineConfig } from "vite";
import react from "@vitejs/plugin-react";

export default defineConfig({
  plugins: [react()],
});
With the following:
import { defineConfig } from "vite";
import react from "@vitejs/plugin-react";

export default defineConfig({
  resolve: {
    alias: [
      {
        find: "common",
        replacement: resolve(__dirname, "src/common"),
      },
    ],
  },

  plugins: [react()],
});
Save the code, and now you should be able to use absolute paths in your project.
Environment variables
Another difference between Create React App and Vite is the environment variable naming convention. If you’re using environment variables in your project, you’ll want to replace the REACT_APP_ prefix with VITE_.
//Instead of this
REACT_APP_ API_KEY = 1234567890..
//Use this
VITE_API_KEY = 1234567890..
Changing the variables one by one can be a pain, especially if you have a lot of variables present in the .env file. Fortunately, the vite-plugin-env-compatible package, lets us use environment variables without changing their names.
Use the following command to install the vite-plugin-env-compatible package:
npm i vite-plugin-env-compatible
Next, go to the vite.config.js file in the root folder of the project and add the following code:
import envCompatible from 'vite-plugin-env-compatible';

export default defineConfig({
    ...
  envPrefix: 'REACT_APP_',

  plugins: [
    react(),
    envCompatible
  ],
});
The envPrefix property will tell Vite to use variables with a REACT_APP_ prefix. Now you can use environment variables in your project without changing names. However, you’ll still have to replace process.env with import.meta.env in your code.
You can use the search feature in your IDE to quickly find and replace every process.env in your codebase.
Conclusion
In this article, we introduced Vite, compared its core concepts to those of Create React App, and looked at how both tools work in development. We also examined the benefits of using Vite and demonstrated how to migrate a Create React App project to Vite.
LogRocket proactively surfaces and diagnoses the most important issues in your React apps
Thousands of engineering and product teams use LogRocket to reduce the time it takes to understand the root cause of technical and usability issues in their React apps. With LogRocket, you'll spend less time on back-and-forth conversations with customers and remove the endless troubleshooting process. LogRocket allows you to spend more time building new things and less time fixing bugs.
Proactively fix your React apps — try LogRocket today.


Top comments (0)