
Written by Oghenetega Denedo✏️
Monorepo architecture has become a very popular trend among devs creating modern web apps.
Although the practice isn’t new by any means, large companies like Google and Microsoft have utilized monorepos for a long time to manage software at scale, and it’s also used in popular open-source projects like React, Next.js, Jest, Babel, and many more.
In this article, we will discuss what monorepos are and the tools you need for working with them.
We’ll also explore how you can build a monorepo for a Next.js project with a sample use case to follow along with.
Jump ahead:
- What is a monorepo?
- Benefits of using a monorepo in Next.js
- Monorepo tools
- Building the monorepo
- Project setup
- Creating workspaces
- Setting up the Next.js applications
- Setting up Turborepo
- Linting and formatting
- Building a reusable component library
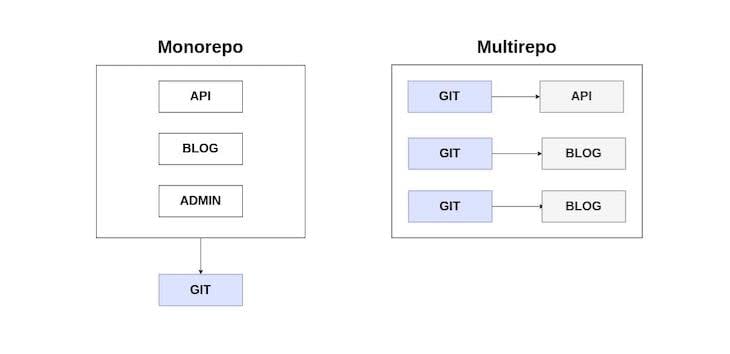
What is a monorepo?
A monorepo is a single version-controlled repository that contains several isolated projects with well-defined relationships.
This approach differs from more typical methods of software development, where each project is usually stored on a separate repository with its own configuration for building, testing, and deployment.
Benefits of using a monorepo in Next.js
There are some key factors that have caused this shift in direction regarding how software projects are structured (particularly those with large codebases).
These factors are:
Simple code sharing
Applications built in a monorepo can easily share reusable code and configurations, since they share the same repository.
In contrast to a polyrepo, this means that there is reduced code duplication, ensuring faster development and ease of maintenance.
Furthermore, developers don’t have to go through the difficult process of publishing packages and resolving incompatibilities with projects that rely on them.
Atomic commits
Large-scale changes affecting multiple applications can be made in a single commit while ensuring the application works as expected before committing changes.
An excellent example of an atomic commit is when a breaking change is made to a shared library that’s used by several apps, thereby forcing the developer to ensure the apps that depend on it are updated to be compatible with the recent change.
Consistency
Monorepos offer better consistency than polyrepos, since the codebase is all in one place and each project can easily share the same coding style and tools for testing, deployment, and code maintenance.
Monorepo tools
Monorepos are very useful for managing projects, but to get the most out of them, you need to work with the right tools to ensure your development workflow is fast and effective.
Available monorepo tools vary based on their features, language support, and barrier to entry in terms of the expertise required to use them.
The following is a list of monorepo tools for working with JavaScript/TypeScript codebases:
- Turborepo: Smart build system for JavaScript/TypeScript monorepos
- Nx: Next-generation build system with first-class monorepo support and powerful integrations
- Bazel: Fast, scalable, multi-language, and extensible build system
- Lerna: Fast and modern build system for managing and publishing multiple JavaScript/TypeScript packages from the same repository
Turborepo is the tool of choice for this tutorial. It’s an easy-to-use, fast, and effective build system for TypeScript/JavaScript codebases.
N.B., if you want to see what else can be done with Turborepo, we have another tutorial focused on building a full-stack TypeScript monorepo
Turborepo is built on workspaces, a feature supported by Yarn, npm, and pnpm for managing multiple packages within a top-level root package.
Turborepo ships with the following features that make working with monorepos easy:
- Incremental builds: This ensures builds are executed when there are changes in a workspace to prevent unnecessary computations
- Parallel execution: Executes tasks in parallel while maximizing the use of every available core in the CPU to ensure quick executions
- Remote caching: This is an impressive feature Turborepo supports that allows you to share the cache of task executions with your dev team and CI/CD server to cut down execution time
- Dependency graph visualization: This supports generating a graph of a task execution plan to give a high-level view of the steps taken to run it
Building the monorepo
For this tutorial, we’ll build a monorepo for a sample ecommerce application that’s made up of two independent Next.js apps: an admin and a store.
We’ll also cover how to leverage the significant benefits monorepos provide. These are primarily the following:
- Code sharing; to make a reusable component library that can be used by both Next.js apps
- A shared configuration package for linting and formatting
Project setup
In your terminal, enter the following command to create a new directory for the project and set up the package.json:
mkdir nextjs-monorepo
cd nextjs-monorepo
yarn init -y
This is the first step in building the monorepo; now we must set up the project’s workspaces.
Creating workspaces
Earlier in this article, I mentioned that Turborepo is built on workspaces — all packages and apps in the monorepo will be stored on a separate workspace of their own.
Open the package.json file at the root of the project and insert the code below:
{
  "name": "nextjs-monorepo",
  "private": true,
  "version": "1.0.0",
  "workspaces": [
    "apps/*",
    "packages/config/*",
    "packages/shared/*"
  ],
  "engines": {
    "node": ">=14.0.0"
  },
  "packageManager": "yarn@1.22.17"
}
The workspaces field in the package.json file is an array of paths that tells the package manager where our workspaces are located.
apps/* is for all the independent Next.js applications; packages/config/* stores reusable packages for linting and formatting; and packages/shared/* contains reusable code that is used by projects in app/ — this is where the UI component library will be stored.
Setting up the Next.js applications
At the root of the project, create a new folder, apps/, to store the Next.js apps we’re going to set up:
mkdir apps
cd apps
Next, let’s add the admin and store applications:
yarn create next-app admin
yarn create next-app store
When it's installed, open the package.json file of the admin application, located at apps/admin/package.json. Then, replace the value of the dev script with the next dev — port 3001 — so it can run on a different port.
Once that’s done, run the development server for both projects with yarn dev to ensure everything works properly.
In the apps/admin/pages/index.js file, insert the following code:
export default function Home() {
  return (
    <div>
      <h1>Admin</h1>
      <button>Click Me!</button>
    </div>
  );
}
We will do the same in the apps/store/pages/index.js file, so insert the following code once again:
export default function Home() {
  return (
    <div>
      <h1>Store</h1>
      <button>Click Me!</button>
    </div>
  );
}
Now, we’ve completed the basic setup necessary for both Next.js apps. In the next section, we’ll set up Turborepo for running our development tasks.
Setting up Turborepo
Workspaces and tasks are the building blocks of a monorepo.
Package managers like Yarn and npm work well for installing packages and configuring workspaces, but they aren’t optimized for running tasks in a complex project setup like a monorepo, and this is where Turborepo shines.
Installing Turborepo
Let’s start by installing Turborepo for our project. At the root of the monorepo, run the following script:
yarn add turborepo -DW
Once the installation is complete, create a new file, turbo.json, at the root of the monorepo to store the configuration required for Turborepo to work. Then, enter the following code:
{
  "$schema": "https://turborepo.org/schema.json",
}
Running tasks
Let’s configure Turborepo to run the Next.js applications in apps/. Open the turbo.json file and enter the code below:
{
  "$schema": "https://turborepo.org/schema.json",
  "pipeline": {
    "dev": {
      "cache": false
    }
  }
}
Let’s take a moment to examine the contents of the turbo.json file:
- The
pipelinefield defines the tasks that Turborepo will run on the monorepo; every property in thepipelineobject is a task that corresponds to a script in thepackage.jsonfile of a workspace - The
devfield inside thepipelineobject defines a workspace’s dev task;"cache": falsetells Turborepo not to cache the results of this task
N.B., Turborepo will only run tasks that are defined in the
scriptssection of the workspace’spackage.jsonfile
We’ll need to define a script in the scripts field of the package.json file at the root of the monorepo to run the dev server of the Next.js applications.
Insert the following code in the package.json file at the root of the monorepo:
{
  "scripts": {
    "dev": "turbo run dev --parallel"
  }
}
The --parallel flag tells Turborepo to run the dev task of the workspaces in parallel.
Enter yarn dev in your terminal at the root of the monorepo to start the development server for the Next.js applications.
If that was successful, you should have an output similar to the image below:

Now that Turborepo is up and running, the next step is to set up a reusable configuration package for linting and formatting.
Linting and formatting
Monorepos enable the use of a unified code standard for all projects within it to ensure consistency throughout the codebase.
An automated code linting and formatting tool like ESLint can be configured to extend a shared configuration that every workspace in the project can use.
Set up ESLint
We’ll need to create a new workspace for the shared ESLint config package that will be used across the workspaces in apps/.
Enter the following script to create a new workspace for the ESLint config package:
mkdir -p packages/config/eslint-config-custom
cd packages/config/eslint-config-custom
Create a package.json file in packages/config/eslint-config-custom and insert the following code:
{
  "name": "eslint-config-custom",
  "version": "1.0.0",
  "main": "index.js",
}
"main": "index.js" specifies the entry point of this package and index.js contains the ESLint configuration that will be imported by the modules that will use it.
Install ESLint and the plugins relevant to this project with the following:
yarn add eslint eslint-config-next eslint-config-prettier eslint-config-react eslint-config-turbo
Create a new file, index.js, in packages/config/eslint-config-custom and enter the following code:
module.exports = {
  extends: ["next", "turbo", "prettier"],
};
Now we’re done with setting up the reusable ESLint configuration package for this project, the next step is using it in our Next.js apps.
To use the eslint-config-custom package in the admin and store workspaces, we’ll need to add it as a dependency.
In the package.json file of the admin and store workspaces, remove every ESLint package and plugin and insert the following code:
{
  "devDependencies": {
   "eslint-config-custom": "*"
  }
}
Update the .eslintrc.json file in the apps/store and apps/admin workspaces with the following code:
{
  "root": true,
  "extends": ["custom"] // Tells ESLint to use the "eslint-config-custom" package
}
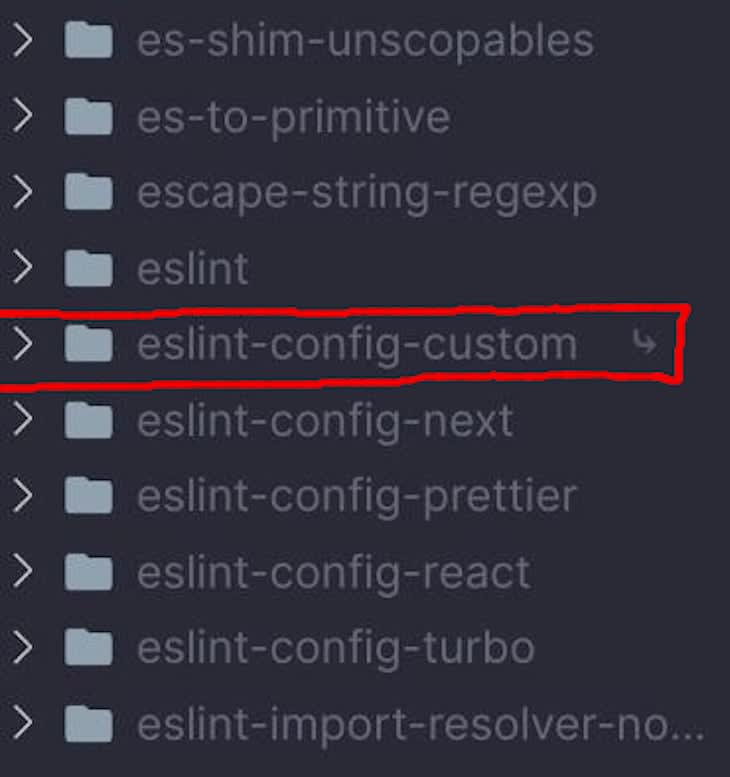
Finally, run yarn install at the root of the monorepo to update the dependencies in the node_modules folder.
If you followed the previous steps correctly, you should find the local eslint-config-custom package in the root node_modules folder.
Running linting and formatting tasks
Before we start running tasks for linting and formatting, we’ll need to add the necessary scripts in the package.json file of the admin and store apps.
Open the package.json file of the admin and store apps and insert the following in the scripts field:
{
  "lint": "eslint .",
  "format": "eslint --fix --ext .js,.jsx ."
}
Next, we’ll need to create the tasks for linting and formatting the workspaces in the monorepo. In the turbo.json file at the root of the monorepo, add the following code in the pipeline field:
{
  "lint": {
    "outputs": []
  },
  "format": {
    "outputs": []
  }
}
The outputs field in the lint and format tasks stores an array of globs — any file that matches the pattern of the glob is treated as an artifact that will be cached.
The value of the output in the lint and format tasks is set to an empty array, which tells Turborepo to cache the logs to stdout and stderr of this task. As a result, whenever this task is re-run and there are no changes in the workspace, Turborepo replays the cached logs, which means the execution time of a task is very fast.
To run the new tasks, we’ll need to update the scripts field of the package.json file at the root of the monorepo with the following code:
{
  "lint": "turbo run lint",
  "format": "turbo run format"
}
Once that’s complete, you can now run the lint and format tasks by entering the following command:
yarn lint
yarn format
Here’s a sample output of the execution of yarn lint:

Building a reusable component library
In modern frontend development, components are the building blocks of every application, irrespective of the size of the project.
The breaking down of complex UIs into reusable components and their abstraction to a shared component library is a standard development practice today — it makes codebases easier to maintain while still following software development best practices like DRY.
We will build our own reusable component library that projects in apps/ can make use of. To get started, we’ll need to create a new workspace.
Enter the following command at the root of the monorepo to create a new workspace for the component library:
mkdir -p packages/shared/ui
cd packages/shared/ui
In packages/shared/ui, create a new package.json file and insert the following:
{
  "name": "ui",
  "version": "1.0.0",
  "main": "index.js",
  "license": "MIT",
  "scripts": {
    "lint": "eslint .",
    "format": "eslint --fix --ext .js,.jsx ."
  },
  "devDependencies": {
    "eslint": "^7.32.0",
    "eslint-config-custom": "*",
    "react": "^18.2.0"
  }
}
Next, let’s create a reusable button component that can be used by the Next.js applications. In the packages/shared/ui workspace, create a new file, Button.jsx, and enter the following code:
import * as React from "react";

export const Button = ({ children }) => {
  return <button>{children}</button>;
};
Create a new file, index.js, that’ll serve as the entry point to this package and export the individual React components.
Add the following code to the index.js file:
import { Button } from "./Button.jsx";
export { Button };
To use the Button component in our Next.js apps, we’ll need to add the ui package as a dependency in the workspace’s package.json file.
Add the ui package by inserting the following code in the dependencies field within the package.json file of the admin and store workspaces, respectively:
{
  "dependencies": {
    "ui": "*"
  }
}
Once that’s complete, run yarn install to update the dependencies in the node_modules folder.
Next, in the pages/index.js file of the Next.js apps, replace the existing code with the following:
// apps/admin/pages/index.js
import { Button } from "ui";
export default function Home() {
  return (
    <div>
      <h1>Admin</h1>
      <Button>Click Me!</Button>
    </div>
  );
}

// apps/store/pages/index.js
import { Button } from "ui";
export default function Home() {
  return (
    <div>
      <h1>Store</h1>
      <Button>Click Me!</Button>
    </div>
  );
}
Restart the development server, visit each application, and you will observe an error similar to the following image:

The reason for this error is that we haven’t configured our Next.js apps to handle the transpilation of local packages, like the ui package in packages/shared.
There’s a nice package on npm that solves this problem: next-transpile-modules. It enables the transpilation of local packages with a Next.js/Babel configuration.
Let’s install the next-transpile-modules package in the admin and store workspaces by entering the following command:
yarn workspace admin add -D next-transpile-modules
yarn workspace store add -D next-transpile-modules
In the next.config.js file of the admin and store workspaces, enter the following code to use the next-transpile-modules package to transpile the component library package:
/** @type {import('next').NextConfig} */
const withTM = require("next-transpile-modules")(["ui"]);
module.exports = withTM({
  reactStrictMode: true,
  swcMinify: true,
});
Since we’ve made changes to the next.config.js file, we’ll have to restart the development server for the changes to take effect. After restarting the server, navigate to localhost:3000 and the error should be resolved, with everything now working as expected.
Conclusion
Monorepos will continue to grow in popularity in the web development community because of their numerous benefits and the advancement of tools that make working with them easier for developers.
I hope you found this guide to building a monorepo in Next.js useful — let me know of your own experiences in the comments below.
LogRocket: Full visibility into production Next.js apps
Debugging Next applications can be difficult, especially when users experience issues that are hard to reproduce. If you’re interested in monitoring and tracking Redux state, automatically surfacing JavaScript errors, and tracking slow network requests and component load time, try LogRocket.

LogRocket is like a DVR for web and mobile apps, recording literally everything that happens on your Next app. Instead of guessing why problems happen, you can aggregate and report on what state your application was in when an issue occurred. LogRocket also monitors your app's performance, reporting with metrics like client CPU load, client memory usage, and more.
The LogRocket Redux middleware package adds an extra layer of visibility into your user sessions. LogRocket logs all actions and state from your Redux stores.
Modernize how you debug your Next.js apps — start monitoring for free.


Oldest comments (0)