
Written by Adebola Adeniran ✏️
Notion is a customizable project management software that makes it easy to collaborate on projects and pages, share your work internally or externally, and keep track of teammates.
Notion is easy to use and is a favorite of both tech and non-tech companies. Some popular alternatives to Notion are Trello, Jira, and Airtable.
Notion recently released the Notion API, which allows developers to build on top of Notion. While still in public beta, we can use the Notion API to develop and test our own application.
In this tutorial, we’ll use Notion to create a database, connect to the Notion API, and create a small Node.js server that uses Fastify to serve up content from our Notion workspace. Note that this tutorial will only build out the backend of the application.
To follow along with this tutorial, you’ll need to have a basic knowledge of JavaScript and Node.js.
Let’s get started!
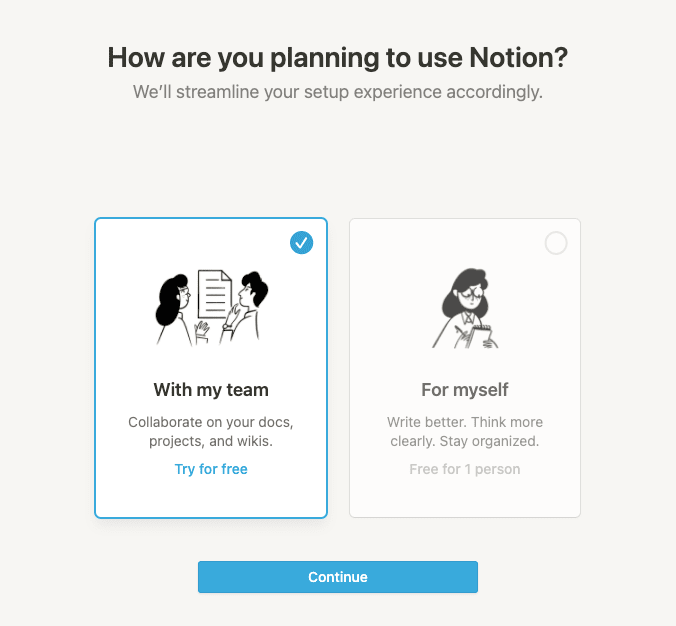
Set up your account on Notion
Head to the Notion website to sign up for an account. For our example, we’ll set up a team account, however, you may choose to register for a personal account.
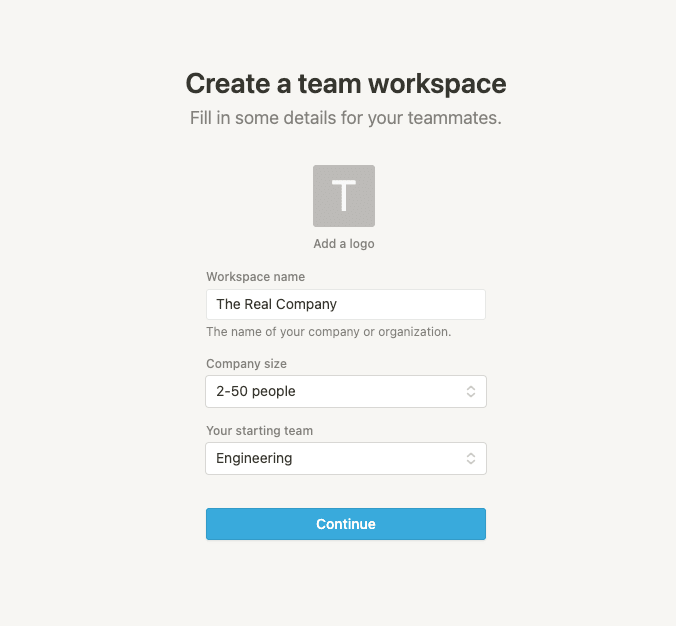
Enter details for your team’s workspace.
On the final onboarding screen, you can choose to invite teammates or continue without. For our example, we’ll skip this step.
Notice that Notion has already set up some workspaces in the left sidebar, like To-Do, Roadmap, Engineering Wiki, Docs, and Meeting Notes.

Create pages, calendars, and databases
Now, let’s get to the fun part! Let’s say that we are part of an imaginary tech company that runs a coding bootcamp attended by students from around the world.
We want to provide information to students on their dashboards about what courses they should study that month, based on information the program coordinator entered in our Notion workspace. We also want to collect names and emails from new students joining the program and store this information in a mailing list that we’ll create in Notion.
Let’s start by creating a new page on the Notion dashboard. Nearly everything in Notion is a page, and a subpage is a page nested within a page.
When you create a new workspace, begin by creating a page. To the right of the workspace header in the sidebar, click the + sign to add a new page. We’ll call our new workspace “Bootcamp”.
With our Bootcamp page created, let’s create a calendar. Calendars are a type of view in Notion, along with tables, lists, boards, galleries, and timelines.
Database views in Notion are a great way to keep data structured and organized, ensuring that the data display makes sense in the context of what we use it for.

To create a calendar database in Notion, add a new page, type in “Bootcamp”, and select Calendar from the list of databases. Notion will show you a calendar view where you can start entering your data.
Choose a day on the calendar by clicking the + icon that shows up when you hover over a particular day. Now, you’ll be able to enter data in that date.
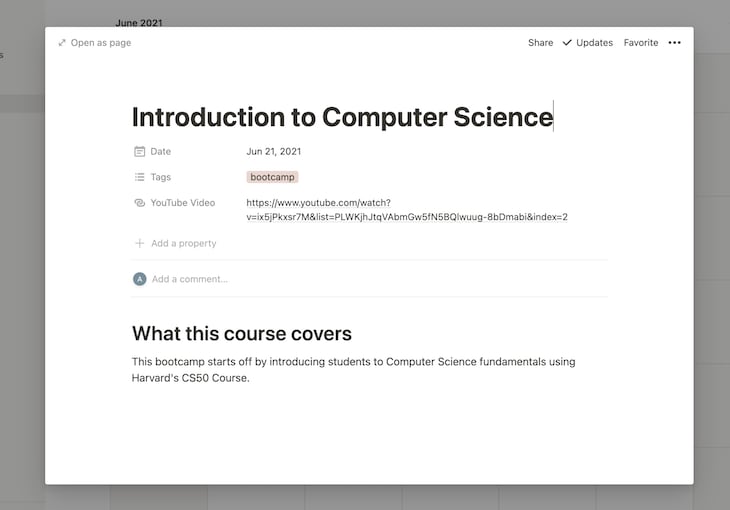
You can feel free to add data for different dates if you choose. You can also drag over dates on the calendar to create a start and end date for a page.
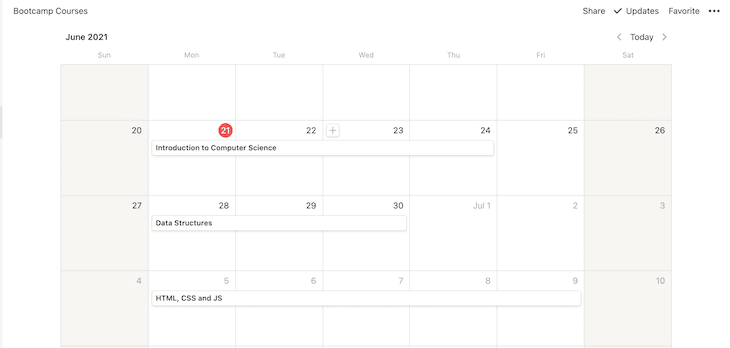
When we’ve entered our data, our calendar will look like the image below:
Use Notion to build a mailing list
As mentioned earlier, we want to set up a mailing list that contains the email address of every student in our Bootcamp. When a new student signs up from a frontend application, we’ll store their name and email address inside Notion.
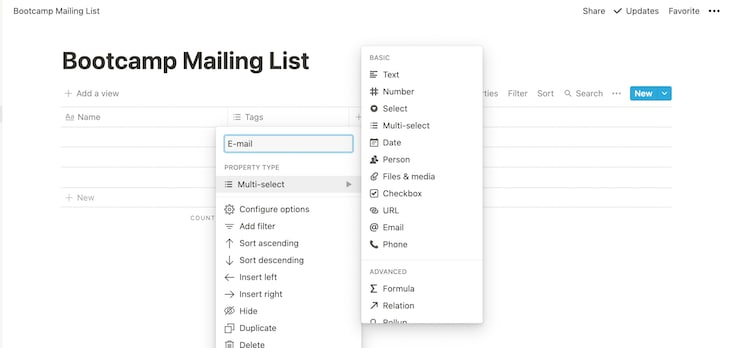
On the left sidebar, create a new workspace by clicking + Add a Page. Add a title for your page; we’ll call ours “Bootcamp Mailing List”. Select the Table option under Database. Set up your table to accept a Name text field in the first column and an Email field in the second column.
Set up access tokens for our Notion API
We’ll need to set up an integration, which connects your database via the Notion API, then generate an access token to access Notion’s APIs.
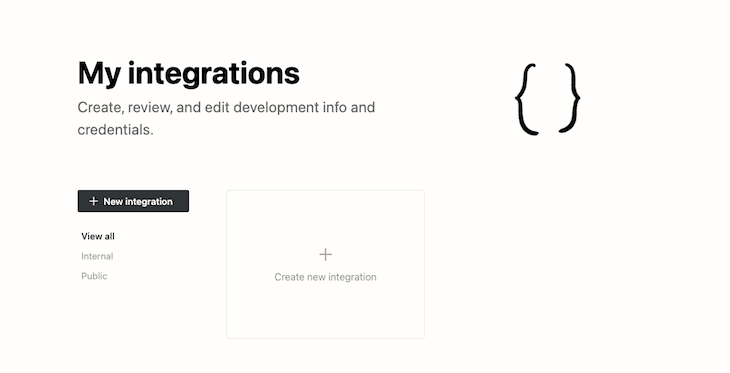
To set up your first integration, head to the Notion API docs page and click the My integrations button in the top right-hand corner. Click the + Create new integration button.
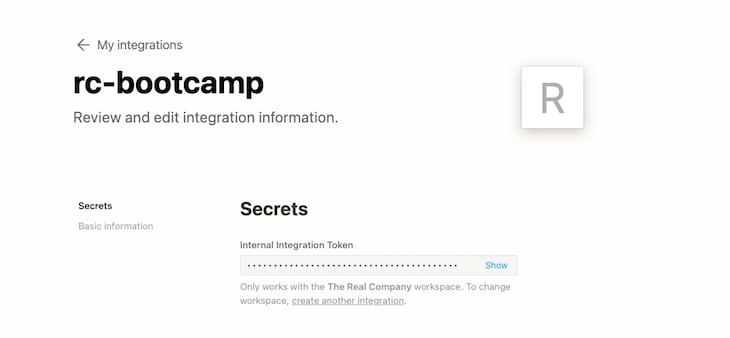
Give your integration a name. We’ll call ours “rc-bootcamp”. Then click Submit. Now, you’ll see your internal integration token.
Finally, to make the database we created earlier available for use in our integration, head to the Bootcamp workspace. Click the share button in the top right-hand corner of the page. Select the rc-bootcamp integration we just created.
Click invite. Our integration should now have access to our Bootcamp workspace.
Repeat this process for the Bootcamp Mailing List workspace we created earlier.

Set up the Notion client
Now that we have our workspace, database, and integrations set up, we can begin creating the backend server for our student dashboard application.
In your terminal, create a new Node.js project using the command npm init -y, which automatically generates a package.json file in the root of the project.
Next, we’ll need to install the Notion API SDK. Run the command:
npm install @notionhq/client
Create a .env file in your root directory. Copy the internal integration token we generated earlier and assign that to a NOTION_API_TOKEN variable in your .env file.
To use the .env file in our project, we will need to install the dotenv library:
npm i dotenv
Getting your database ID in Notion
We’ll need to find our database ID to connect to the database we’ve created. Head to your workspace and copy the alphanumeric characters in your URL between notion.so/ and ?.
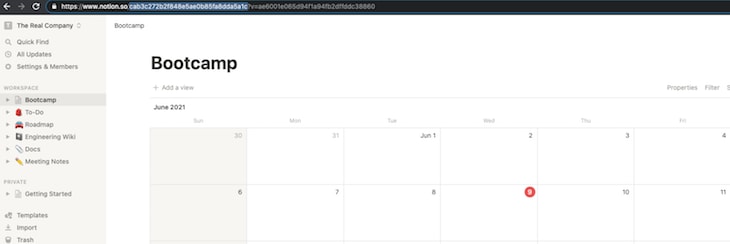
For this example, our Bootcamp database ID is cab3c272b2f848e5ae0b85fa8dda5a1c. Repeat the same process for the Bootcamp Mailing List workspace.
Add a new variable called NOTION_DATABASE_ID in your .env file. Update this variable with your Bootcamp database ID. Add another variable called NOTION_MAILING_LIST_ID and add your Bootcamp Mailing List database ID.
Now, your .env file should hold your NOTION_DATABASE_ID, NOTION_MAILING_LIST_ID, and NOTION_API_TOKEN.
Connecting to the Notion SDK
Now that we’ve obtained our NOTION_API_TOKEN, NOTION_MAILING_LIST_ID, and NOTION_DATABASE_ID, we can begin working with the Notion SDK.
Set up your project’s file structure to look like the code below:
|___controllers
  |___bootcamp.controller.js
|___models
  |___bootcamp.model.js
|___routes
  |___index.js
|___services
  |___notion.js
|___.env
|___server.js
Before we continue, let’s take a quick look at what each directory will be responsible for.
-
controllers: holds the business logic for our application -
models: holds the code for interaction with the Notion database integration -
routes: holds the code for routing within our application -
services: contains code for connecting our application to an external service like Notion
Let’s start off with services. In your services directory, paste the following block of code in your notion.js file:
// In this file, we connect to the Notion Service
require('dotenv').config()
const { Client } = require('@notionhq/client');
const notion = new Client({ auth: process.env.NOTION_API_TOKEN });
module.exports = notion;
Next, let’s set up models. The following block of code will be responsible for writing to and reading from our Notion database service:
// models/bootcamp.model.js

// This file contains code to make operations on the DB
const notion = require("../services/notion");
const courseDatabaseId = process.env.NOTION_DATABASE_ID;
const mailingListDatabaseId = process.env.NOTION_MAILING_LIST_ID;
const bootcampModel = {
  // list all the courses in the DB
getCourses: async () => {
    try {
      const { results } = await notion.databases.query({
        database_id: courseDatabaseId,
      });
      const res = results.map((page) => {
        return {
          pageId: page.id,
          videoURL: page.properties["YouTube Video"].url,
          title: page.properties.Name.title[0].plain_text,
          tags: page.properties.Tags.multi_select.map((tag) => tag.name),
          summary: page.properties.Summary.rich_text[0].plain_text,
          author: page.properties.Author.rich_text[0].plain_text,
          startDate: page.properties.Date.date.start,
          endDate: page.properties.Date.date.end,
        };
      });
      return res;
    } catch (error) {
      console.error(error);
    }
  },
  getSubscribersFromDB: async () => {
    try {
      const { results } = await notion.databases.query({
        database_id: mailingListDatabaseId,
      });
      const res = results.map((page) => {
        return {
          name: page.properties.Name.title[0]?.text.content,
          email: page.properties["E-mail"].multi_select[0]?.name,
        };
      });
      return res;
    } catch (error) {
      console.error(error);
    }
  },
  addSubscriberToDB: async ({ name, email }) => {
    try {
      const res = await notion.pages.create({
        parent: {
          database_id: mailingListDatabaseId,
        },
        properties: {
          Name: {
            title: [
              {
                text: { content: name, link: null },
                plain_text: name,
              },
            ],
          },
          "E-mail": {
            multi_select: [
              {
                name: email,
              },
            ],
          },
        },
      });
      return res;
    } catch (error) {
      return {
        error: "Failed to add user to Mailing List",
      };
    }
  },
  findSubscriberByEmail: async ({ email }) => {
    try {
      const { results } = await notion.databases.query({
        database_id: mailingListDatabaseId,
        filter: {
          or: [
            {
              property: "E-mail",
              multi_select: {
                contains: email,
              },
            },
          ],
        },
      });
      // check if the results array contains a user
      if (results.length > 0) {
        return {
          isUserInDB: true,
        };
      }
      return {
        isUserInDB: false,
      };
    } catch (error) {
      console.error(error);
    }
  },
};
module.exports = bootcampModel;
It may take some practice making requests to your database to understand how Notion structures your data. Once you get the hang of it, you’ll see it is quite straightforward.
In the models file above, we created the findSubscriberByEmail method, which checks if an email address already exists in our Bootcamp Mailing List.
The addSubscriberToDB method adds a new user to our mailing list, and the getCourses method returns a list of the courses in our calendar and details about each course.
Next, let’s set up the code for our controllers:
// controllers/bootcamp.controller.js

// Handles the business Logic
const bootcampModel = require("../models/bootcamp.model");

const bootcampController = {
  getAllCourses: async () => await bootcampModel.getCourses(),

  addSubscriberToDB: async ({ name, email }) => {
    const { isUserInDB } = await bootcampModel.findSubscriberByEmail({
      name,
      email,
    });

    // check if the E-mail exists
    if (isUserInDB) {
      return {
        error: "That E-mail already exists in our mailing list.",
      };
    }

    // if the E-mail doesn't already exist, add to Notion DB
    const response = await bootcampModel.addSubscriberToDB({ name, email });

    // if something goes wrong, send an error message
    if (response.error) {
      return {
        error: response.error,
      };
    }

    // if adding a user is successful
    return { message: "Successfully added to the Bootcamp mailing list" };
  },
};

module.exports = bootcampController;
We have two methods in our controllers. One connects to our Notion database to grab all the course details in the calendar we created on Notion, and the other adds a user to the Bootcamp Mailing List.
Setting up a Fastify server
Now, we’ll spin up a Node.js server using the Fastify framework. Although developers commonly use Express in Node.js applications, Fastify is a new, exciting framework that offers improvements to some of the best features of Express.
For example, Fastify allows us to write better and cleaner asynchronous code by parsing JSON requests. With Fastify plugins, you don’t have to install multiple npm packages from different authors to perform common tasks like authentication and validation.
Add Fastify to your application by running the code below:
npm i fastify
Let’s set up our routing directory and the code that starts our Fastify server. In your server.js file in the root directory of your project, add the following block of code:
// server.js

const fastify = require('./routes')
  fastify.listen(5000, (err, address) => {
    if (err) throw err
})
The code block above will start our server on localhost:5000.
In the routes directory you created, add the following code snippet in your index.js file:
// routes/index.js

const fastify = require("fastify")({
  logger: true,
});

// Controllers
const bootcampController = require("../controllers/bootcamp.controller");

// Routes
fastify.get("/", async (req, reply) => {
  try {
    const res = await bootcampController.getAllCourses();
    reply.type("application/json").code(200);
    return { data: res };
  } catch (error) {
    reply.type("application/json").code(400);
    return { error };
  }
});

fastify.post("/", async (req, reply) => {
  try {
    const { name, email } = req.body;
    const res = await bootcampController.addSubscriberToDB({ name, email });
    reply.type("application/json").code(200);
    return { data: res };
  } catch (error) {
    reply.type("application/json").code(400);
    return { data: error };
  }
});

module.exports = fastify;
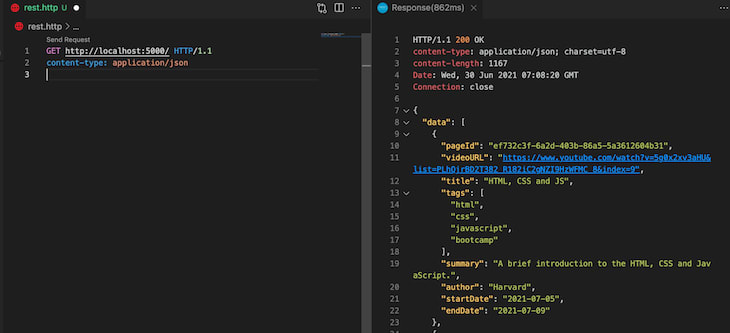
The code above uses Fastify to create two routes. The first route accepts a GET request. The bootcampController picks up the request, then returns the list of courses and the metadata for the courses, retrieved from our Notion database.
We’ll test out our routes and endpoints by making requests using the REST Client extension in VS Code. Once you have REST Client installed, create a file called rest.http in the root of your project.
Let’s try making a GET request to our root route. This route returns all the course information in our Notion database. Hit the send request button to make a GET request to localhost:5000.
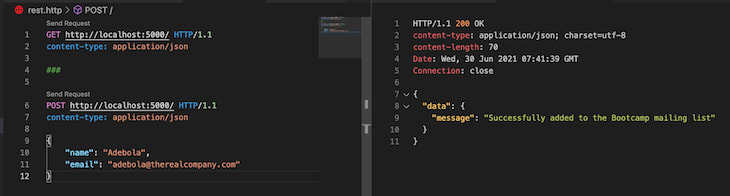
The second route accepts a POST request. This route is responsible for adding a new user to the Bootcamp Mailing List and accepts Name and Email in the body of the request.
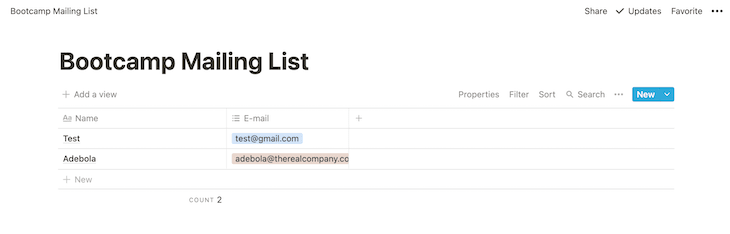
We can also navigate to our Bootcamp Mailing List page on the frontend to see that users are being added to our Notion list using the application we created.
If you’d like to test out my version of this application, you can make GET and POST requests to my server hosted on Glitch using the notion-api-demo.glitch.me endpoint. Simply replace the localhost:5000 endpoint you’re currently using inside the REST Client with my Glitch URL.
After you’ve made a POST request to this endpoint, navigate to my Bootcamp Mailing List in Notion to check that your email was added to the mailing list.
Conclusion
Our server-side code is now complete and functional! In this tutorial, we explored the Notion API by building the backend of an application that can store and retrieve data. We’ve been able to set up our application to:
- Get all the courses in our Notion database and details about those courses, including their start and end dates, title, description, and associated video URLs
- Add a user to the Bootcamp Mailing List we created in Notion
To follow along with this tutorial or to quickly test this application, you’re welcome to clone this project from my GitHub repo.
Are you adding new JS libraries to improve performance or build new features? What if they’re doing the opposite?
There’s no doubt that frontends are getting more complex. As you add new JavaScript libraries and other dependencies to your app, you’ll need more visibility to ensure your users don’t run into unknown issues.
LogRocket is a frontend application monitoring solution that lets you replay JavaScript errors as if they happened in your own browser so you can react to bugs more effectively.
LogRocket works perfectly with any app, regardless of framework, and has plugins to log additional context from Redux, Vuex, and ngrx/store. Instead of guessing why problems happen, you can aggregate and report on what state your application was in when an issue occurred. LogRocket also monitors your app’s performance, reporting metrics like client CPU load, client memory usage, and more.
Build confidently — Start monitoring for free.


Top comments (1)
Great article, Matt!