
Written by Ejiro Asiuwhu ✏️
Vue Native is a JavaScript framework designed to build cross-platform mobile applications that can run on both Android and iOS with JavaScript. By wrapping around React Native, developers can use Vue Native to build mobile applications using Vue.js.
Because of this, everything that can be done in React Native can be done in Vue Native, and code is compiled down to React Native. This way, developers benefit from what the Vue and React Native ecosystems offer.
In this post, we’ll discuss Vue Native’s features and how to create a mobile app using Vue Native.
Vue Native’s features
Vue Native has many helpful features to consider when deciding to build a mobile application with Vue.js.
Declarative rendering
Vue Native uses the declarative programming paradigm. This means we simply declare how we want our components and state to render to get our desired results.
Two-way binding
In our Vue Native app, we can share data between our component class and its template. If we change data in our state, it automatically reflects in the UI.
We must still access v-model for two-way data binding. This means we can bind the value of an input element to a property of our component’s data using the v-model.
The richness of the Vue.js ecosystem
The Vue ecosystem is one of the largest and fastest-growing ecosystems in the JavaScript space. Building an app with Vue Native provides the benefits of the larger Vue ecosystem.
This means we can use features such as v-if for conditional rendering, v-model for two-way data binding, v-for for list rendering, and Vuex for state management.
Compiling to React Native
Because Vue Native depends on React Native, it’s easier for developers familiar with the React Native ecosystem to pick up.
We can also render React Native components in Vue Native without writing a single line of extra configuration for easy integration and increased productivity.
Setting up the development environment
The fastest and easiest way to get started with Vue Native is to bootstrap a mobile app with the Vue Native CLI. This CLI generates a simple, one-page application using either the Expo CLI or React Native CLI under the hood.
This means we must install either CLI, depending on the need of our app, to use the Vue Native CLI.
To begin, we must install some dependencies. First, run the following command below to install the Vue Native CLI globally:
$ npm install --g vue-native-cli
Next, install Expo CLI globally, although this can be interchanged with React Native CLI:
$ npm install --g expo-cli
Creating a Vue Native project
Now that both Vue Native and Expo CLI are installed globally, let’s create a Vue Native project with the following command:
vue-native init <yourProjectName>
Start a development server by navigating within the project’s root folder and running this command:
 $ cd <yourProjectName>
 $ npm start
Metro Bundler, which compiles the JavaScript code in React Native, runs from http://localhost:19002/. By visiting http://localhost:8080/ in a web browser, the following page appears:
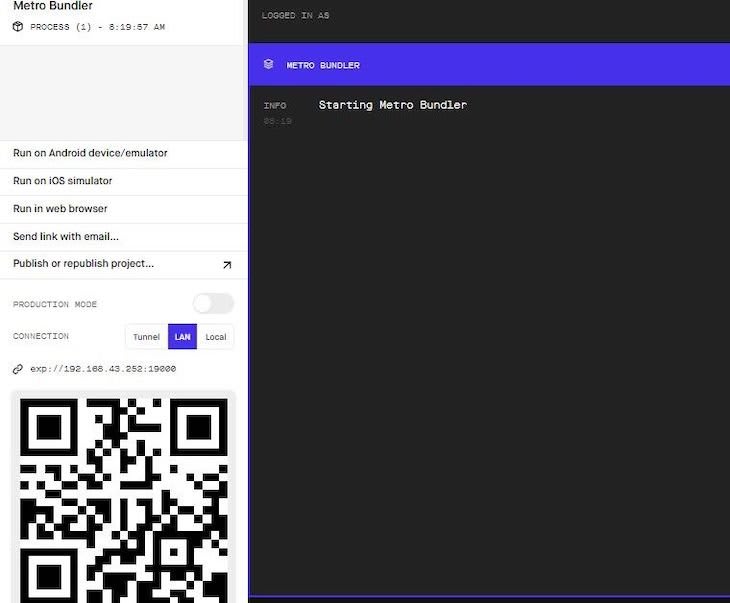
To view the Vue Native app on a physical device, scan the QR code in the browser and open the link in Expo Go for Android or iOS.
We can also open the app on the Android emulator or iOS simulator by clicking the links shown in the browser, but not all APIs that are available in Expo Go are available in the emulator or simulator.
Optionally, we can clone the Kitchen Sink demo app prepared by the Vue Native core team.
Vue Native UI components
Vue Native comes with a handful of out-of-the-box UI components to build app interfaces. Let’s take a look at some of the most important ones.
View component
The view component works just like the div tag in our regular HTML. This component is the fundamental building block for creating user interfaces in Vue Native, just like in React Native.
We can have multiple child components in a view component, like in the following code:
<template>
  <view class="container">
    <text>My Awesome Vue Native App</text>
  </view>
</template>
Text component
To output text in our mobile app, we can’t use the regular HTML tags like h1 or p. Instead, we must use the <text>…</text> component. Using this component is pretty straightforward:
<template>
  <text>Hello World</text>
</template>
Image component
The image component renders static images, network images, and images from a user’s device.
Unlike in a regular img tag where we use the src attribute, here we bind the source attribute in our image component to load our images dynamically. This allows webpack to bundle our image assets during the build process.
By adding the following, we can load images into our Vue Native app:
<template>
    <!-- Network image -->
 <image
      :style="{ width: 300, height: 150 }"
      :source="{
        uri:
          'https://images.unsplash.com/photo-1621570074981-ee6a0145c8b5?ixid=MnwxMjA3fDF8MHxwaG90by1wYWdlfHx8fGVufDB8fHx8&ixlib=rb-1.2.1&auto=format&fit=crop&w=750&q=80',
      }"
    />

    <!-- Static image -->
 <image
      :style="{ width: 300, height: 150 }"
      :source="require('./assets/photo.jpg')"
    />

    <!-- Local disk image -->
        <image
          :style="{width: 66, height: 58}"
          :source="{uri: 'data:image/png;base64,iVBORw0KGgoAAAANSUhEUgAAADMAAAAzCAYAAAA6oTAqAAAAEXRFWHRTb2Z0d2FyZQBwbmdjcnVzaEB1SfMAAABQSURBVGje7dSxCQBACARB+2/ab8BEeQNhFi6WSYzYLYudDQYGBgYGBgYGBgYGBgYGBgZmcvDqYGBgmhivGQYGBgYGBgYGBgYGBgYGBgbmQw+P/eMrC5UTVAAAAABJRU5ErkJggg=='}"
        />
</template>
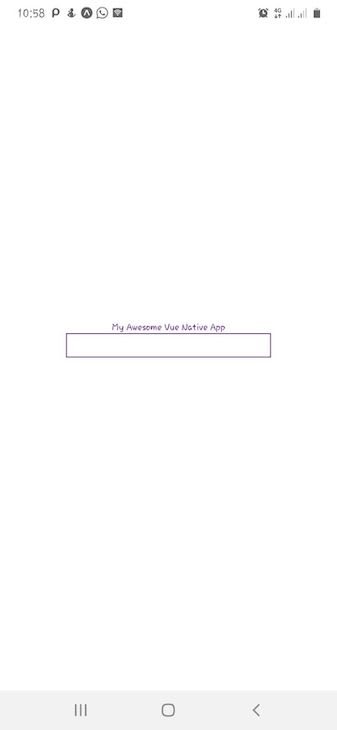
TextInput component
The TextInput component inputs text into the app through the user’s keyboard. We can use v-model to bind data in our state to the TextInput component. This allows us to seamlessly get and set the value of TextInput:
<template>
  <view class="container">
    <text-input
      :style="{
        height: 30,
        width: 250,
        borderColor: '#511281',
        borderWidth: 1,
      }"
      v-model="text"
    />
  </view>
</template>

<script>
export default {
  data() {
    return {
      text: "",
    };
  },
};
</script>
The above code then outputs the following screen in the Vue Native app:
NativeBase UI Component
To build a production-ready mobile application, using the built-in Vue Native components alone will likely not be enough. Luckily for us, Vue Native brings the best of both React Native and Vue.js ecosystems, so we can use a NativeBase UI component.
NativeBase was created by GeekyAnts, the same team behind Vue Native. This UI component gives us a truly native look and feel with a platform-specific design for Android and iOS over the same JavaScript codebase in our mobile app.
Two-way data binding
Sharing data between our Vue component template and our Vue state in Vue Native is a breeze with v-model. We can explore two-way data binding with the v-model directive, like below:
  <view class="container">
    <text-input
      :style="{
        height: 30,
        width: 250,
        borderColor: '#511281',
        borderWidth: 1,
      }"
      v-model="text"
    />
  </view>
</template>

<script>
export default {
  data() {
    return {
      text: "",
    };
  },
};
</script>
By outputting an input field with data binding from our state to the input field and a text component, we see the following:

Navigation and routing
Navigation and routing in our Vue Native app are handled with the Vue Native Router library. Under the hood, this library uses the popular React Navigation package. Both Vue Native Router and React Navigation have similar APIs, thus similar installations.
The library doesn’t come pre-installed, so to get started with navigation within our app, we must install it with the following:
npm i vue-native-router
Note that we need to install the following packages for Vue Native Router to work properly:
Run the following command in the project directory root to install these packages:
npm i react-native-reanimated react-native-gesture-handler react-native-paper
The Vue Native Router provides StackNavigator and DrawerNavigator to register screens for navigation:
<script>
import {
  createAppContainer,
  createStackNavigator,
} from "vue-native-router";

import SettingsScreen from "./screens/SettingsScreen.vue";
import HomeScreen from "./screens/HomeScreen.vue";

const StackNavigator = createStackNavigator(
  {
    Settings: SettingsScreen,
    Home: HomeScreen,
  },
  {
    initialRouteName: 'Home',
  }
);

const AppNavigator = createAppContainer(StackNavigator);

export default {
  components: { AppNavigator },
}
</script>
To navigate between screens, call the navigate method on the navigation object, which is passed down as a prop like this:
<script>
export default {
  // navigation is declared as a prop
  props: {
    navigation: {
      type: Object
    }
  },
  methods: {
    navigateToScreen() {
      this.navigation.navigate("Profile");
    }
  }
}
</script>
State management
For a centralized state management pattern in a Vue Native app, we can use Vuex, the official state management library for Vue.
Integrating Vuex is simple. First, install Vuex with one of the following commands:
npm i vuex
//or
yarn add vuex
Create a central store file and add the state, getters, mutations, or actions depending on the application‘s needs. To keep things simple, use the state object here:
// store/index.js

import Vue from 'vue-native-core';
import Vuex from 'vuex';
Vue.use(Vuex);
const store = new Vuex.Store({
  state: {
    name: 'Ejiro Asiuwhu',
  },
});
export default store;
Using the data and methods in our store is quite different from a conventional Vue app; here is how to import and use the data in our store:
<script>
import store from "./store";
export default {
  computed: {
    name() {
      return store.state.name;
    },
  },
};
</script>
Note that we are not using this.$store as we would typically do in a Vue and Vuex app setup.
Accessing device APIs
Getting access to native device APIs in our Vue Native app is possible because of React Native’s rich ecosystem. To access a user’s device geolocation API in our app, for example, we can make use of expo-location like this:
<template>
  <view class="container">
 <button
      :on-press="getLocation"
      title="Get Location"
      color="#184d47"
      accessibility-label="Get access to users' location"
    >
    <text>Location Details:</text>
    <text>{{ location }}</text>
    <text>Latitude: {{ latitude }}</text>
    <text>Longitude: {{ longitude }}</text>
    <text class="text-error">{{ errorMessage }}</text>
  </view>
</template>

<script>
import * as Location from "expo-location";

export default {
  data() {
    return {
      location: "",
      latitude: "",
      longitude: "",
      errorMessage: "",
      text: "",
      user: {
        country: "",
      },
    };
  },
  methods: {
    async getLocation() {
      try {
        let { status } = await Location.requestForegroundPermissionsAsync();
        if (status !== "granted") {
          this.errorMessage = "Permission to access location was denied";
          return;
        }
        let location = await Location.getCurrentPositionAsync({});
        this.location = location;
        this.latitude = location.coords.latitude;
        this.longitude = location.coords.longitude;
        this.errorMessage = "";
      } catch (error) {
        this.errorMessage = error;
      }
    },
  },
}
</script>
By using the Expo package, there are no extra configurations or setup needed, which makes building a mobile app with Vue Native a breeze.
Conclusion
Building a mobile app with Vue Native opens up a lot of possibilities in building cross-platform mobile apps with JavaScript.
With access to both the richness and benefits of Vue and React Native ecosystems, developers can write .vue components and integrate Expo and React Native packages into apps with little to no extra configurations.
The full code used in this tutorial is available on GitHub. Feel free to drop a comment to let me know what you thought of this article. You can also find me on Twitter and GitHub. Thank you for reading!
Experience your Vue apps exactly how a user does
Debugging Vue.js applications can be difficult, especially when there are dozens, if not hundreds of mutations during a user session. If you’re interested in monitoring and tracking Vue mutations for all of your users in production, try LogRocket.
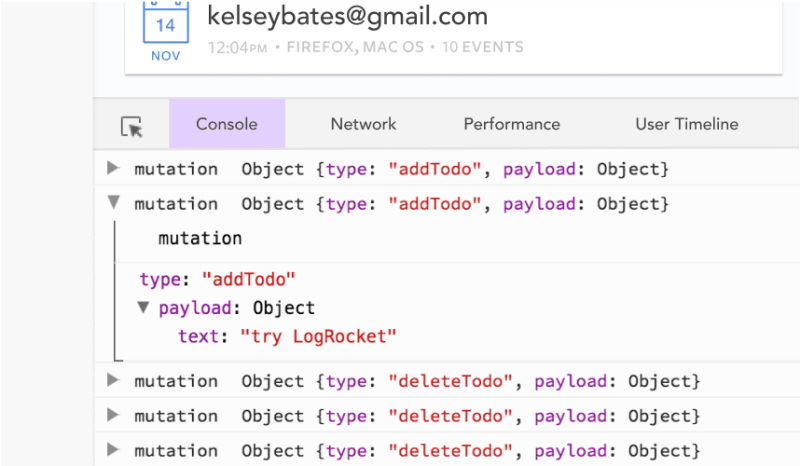
LogRocket is like a DVR for web apps, recording literally everything that happens in your Vue apps including network requests, JavaScript errors, performance problems, and much more. Instead of guessing why problems happen, you can aggregate and report on what state your application was in when an issue occurred.
The LogRocket Vuex plugin logs Vuex mutations to the LogRocket console, giving you context around what led to an error, and what state the application was in when an issue occurred.
Modernize how you debug your Vue apps - Start monitoring for free.


Top comments (0)