
Written by Precious Luke ✏️
Developers follow many conventions when programming that may or may not be hard rules, but are often the building blocks of great development projects. These conventions are used so frequently and adopted so widely because they are proven to work.
In this tutorial, we’ll learn about the popular architectural pattern Model-View-Controller (MVC) followed by building and structuring an application in Node.js using MVC.
Tutorial prerequisites
To follow this tutorial, you will need the following:
- Node.js
- A MongoDB Atlas account to create our app’s database
- Yarn if you are not using npm with Node.js
- A text editor, such as Visual Studio Code
What is Model-View-Controller?
MVC is simply a design or architectural pattern used in software engineering. While this isn’t a hard rule, but this pattern helps developers focus on a particular aspect of their application, one step at a time.
The main goal of MVC is to split large applications into specific sections that have their own individual purpose.
It also allows developers to logically structure applications in a secure way, which we will show in this tutorial. But first, let’s break down what each aspect of the pattern provides.
Model
As the name implies, a model is a design or structure. In the case of MVC, the model determines how a database is structured, defining a section of the application that interacts with the database. This is where we will define the properties of a user that will be store in our database.
The controller accesses the database through the model. You could say that the model is the heart of the application.
View
The view is where end users interact within the application. Simply put, this is where all the HTML template files go.
Controller
The controller interacts with the model and serves the response and functionality to the view. When an end user makes a request, it’s sent to the controller which interacts with the database.
You can think of the controller as a waiter in a restaurant that handles customers’ orders, which in this case is the view. The waiter then goes to the kitchen, which is the model/database, and gets food to serve the customers, which is the controller handling the request.
Now, let’s build an application using the MVC pattern!
Setting up the application
To understand how to use MVC, we will build a simple login and registration system with a dashboard that shows users' information. However, this tutorial is more about structuring than about the application we are building.
So, open up your terminal in an empty folder and run the following command:
npm init -y
This creates a package.json file.

Now for this project, we will need to install some packages to get started:
npm install express ejs mongoose bcryptjs passport passport-local
These packages provide is with the following:
-
expressis an Express application, which is necessary for our Express server -
ejsis a templating engine that generates HTML -
mongooseis a package that connects our application to our MongoDB -
bcryptjshandles encrypting passwords -
passportandpassport-localhandle authentication
After this is complete, you should see a node_module folder (this is where all the packages are downloaded to).
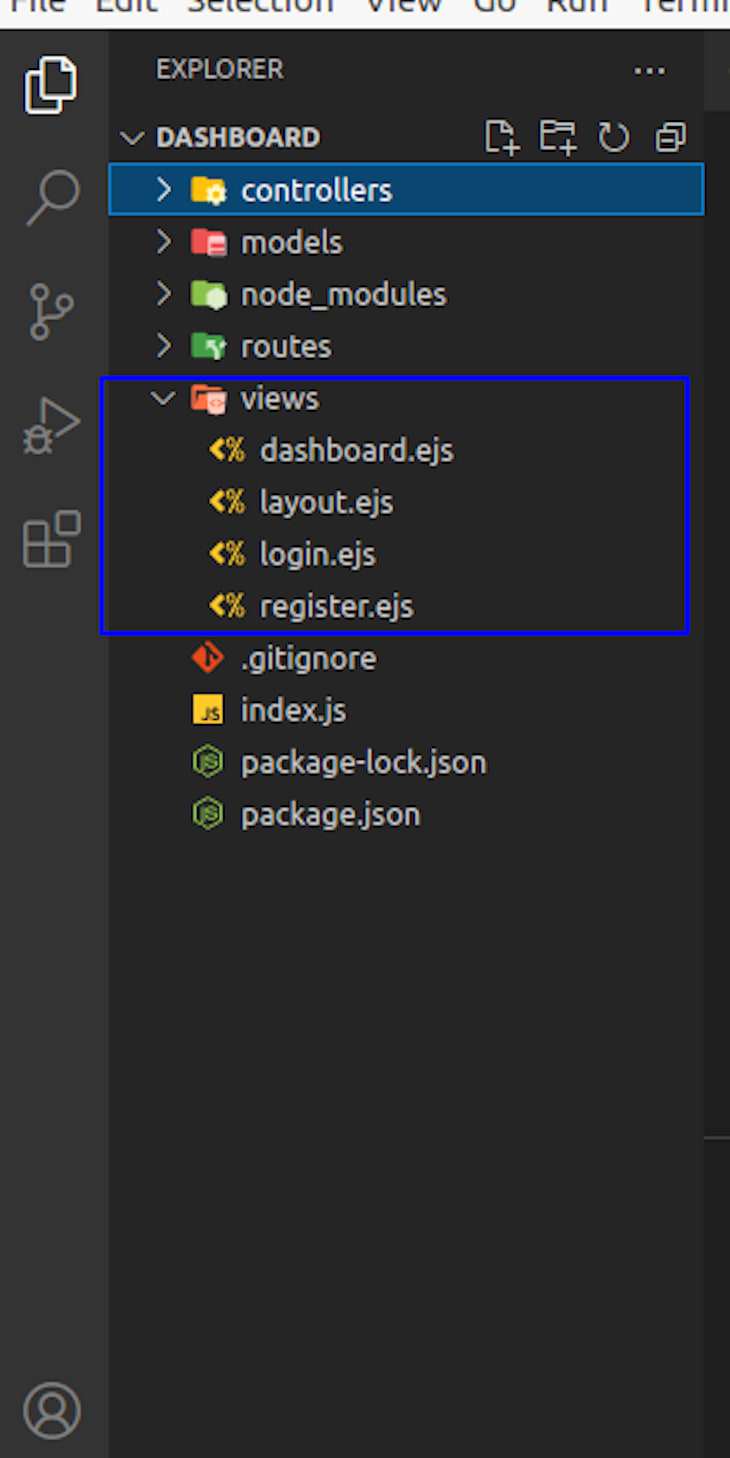
Now create three folders to represent MVC: models, views, and controllers.

Setting up the server
While we’ve created our folders, they can’t do anything without a server. To create our server, let’s create an index.js folder in our root directory. We can call this file whatever we want, provided we state so in the package.json file.
After creating the index.js file, go to the package.json file and edit the scripts like so:
{
  "name": "Dashboard",
  "version": "1.0.0",
  "description": "",
  "main": "index.js",
  "scripts": {
    "develop": "node index.js"
  },
  "keywords": [],
  "author": "",
  "license": "ISC",
  "dependencies": {
    "bcryptjs": "^2.4.3",
    "ejs": "^3.1.6",
    "express": "^4.17.1",
    "mongoose": "^6.0.3",
    "passport": "^0.4.1",
    "passport-local": "^1.0.0"
  }
}
Notice how main points to index.js and scripts has develop pointing to index.js. This means that whenever we run npm run develop from the command in the root of the application, it will run the entry point, which, in our case is the index.js file.
Now, let go of the index.js file to create our Express server. Copy and paste the following code into it:
const express = require('express');
const app = express();
const PORT = process.env.PORT || 4111;
app.listen(PORT, console.log("Server don start for port: " + PORT))
Remember that we already installed Express. Now, we are simply requiring it and assigning the express() function to app.
In line 5, we are now using the listen() method to start up a server that runs at http://localhost:4111. To confirm that our server is now up and running, run the following:
npm run develop
It then renders our confirmation that the server is running at port 4111.

Creating routes, views, and controllers
With our server up and running, let’s create some .ejs files in our view folder. Since we are following the MVC pattern, we need all our views, that is, what the end users see, to be in one folder.
Inside the views folder, create the following files: login.ejs, register.ejs, dashboard.ejs, layout.ejs.
You can copy the code from here.
The layout.ejs code is included across the .ejs files in the view folder:
<!DOCTYPE html>
<html>
<head>
    <meta charset='utf-8'>
    <meta http-equiv='X-UA-Compatible' content='IE=edge'>
    <title>MVC</title>
    <meta name='viewport' content='width=device-width, initial-scale=1'>
    <link href="//maxcdn.bootstrapcdn.com/bootstrap/4.1.1/css/bootstrap.min.css" rel="stylesheet" id="bootstrap-css">
<script src="//maxcdn.bootstrapcdn.com/bootstrap/4.1.1/js/bootstrap.min.js"></script>
<script src="//cdnjs.cloudflare.com/ajax/libs/jquery/3.2.1/jquery.min.js"></script>
</head>
<body><!-- Just an image -->
    <nav class="navbar navbar-light bg-light">
      <a class="navbar-brand" href="#">
        <img src="https://getbootstrap.com/docs/4.0/assets/brand/bootstrap-solid.svg" width="30" height="30" alt="">
      </a>
    </nav>
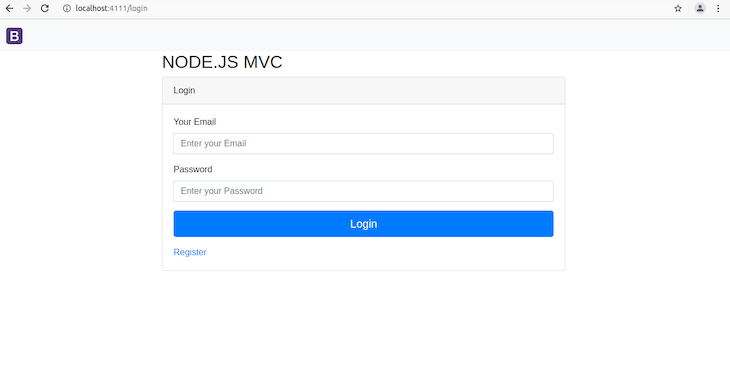
Next, the login.ejs code renders our Login page, as seen below:
Then, the register.ejs renders our Register page:

Next, create a folder called routes; this is technically part of the controller, but it is nice to have all the routing in one, separate folder.

Here is the loginController.js file in the controller folder:
//For Register Page
const registerView = (req, res) => {
    res.render("register", {
    } );
}
// For View
const loginView = (req, res) => {

    res.render("login", {
    } );
}
module.exports =  {
    registerView,
    loginView
};
Here, registerView and loginView render the register.ejs and login.ejs view, respectively. Both are exported.
This is followed by the login.js code in the routes folder.
const express = require('express');
const {registerView, loginView } = require('../controllers/loginController');
const router = express.Router();
router.get('/register', registerView);
router.get('/login', loginView);
module.exports = router;
What we are doing here is using the Express router with registerView and loginView, which are exported from loginController under controllers.
The above two code blocks will not render the Login and Register pages without updating the index.js file to the following:
const express = require('express');
const app = express();
app.set('view engine', 'ejs');
//Routes
app.use('/', require('./routes/login'));
const PORT = process.env.PORT || 4111;
app.listen(PORT, console.log("Server has started at port " + PORT))
Notice that we have set the view engine to use .ejs and defined the root route to use what's in login under routes.
Setting up MongoDB Atlas
As mentioned earlier, we must set up a MongoDB database with Atlas. Remember that we installed Mongoose as part of the npm packages that we needed. So, go ahead and create a new account if you don’t already have one.
Now, you should have your Atlas MongoDB account ready. Go to Atlas and create a new project and a cluster (use the free option for the sake of this tutorial).
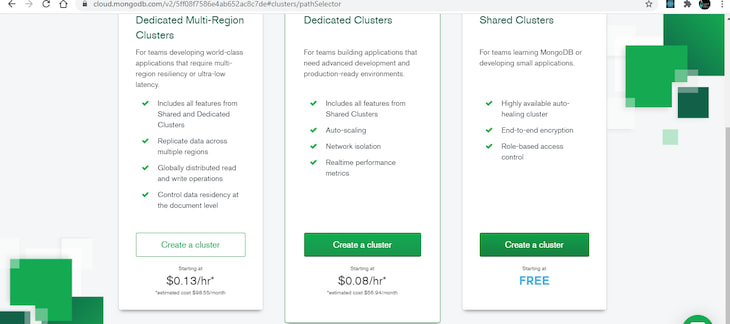
After creating a cluster, a second page opens, which we can ignore and leave everything in the default settings. Then, click Create Cluster.

There are few things we need to set to connect the created cluster to our application.
On the Security tab, select Database Access and create a user by deciding a username and password. Next, allow users to read and write the database.
Again, on the Security tab, select Network Access, add the IP address, select ALLOW ACCESS FROM ANYWHERE, and confirm it (this will take about three minutes to be active).
Now, go back to the clusters, click Connect, and select Connect your application

The driver should be Node.js by default, and the version should be 3.6 or later.
The highlighted part in the screenshot below is where your host will be. Note that yours will be different than mine.

Copy the host and head back to the project.
Connecting to the database
To connect to our database, we must store the credential we copied somewhere and ensure it’s safe. So, it is best practice to put sensitive credentials in an .env file.
Let’s go ahead and install .dotenv and create the .env file in our root directory:
npm install dotenv
Inside the .env file, add the following:
MONGOLAB_URI= "Your credential goes here"
Note that this .env file should not be uploaded to your production or even committed to Git; you must include it in your .gitignore file. The .env file stores virtual environments that must be rebuilt on the server using our configuration.
Now, let’s go to our index.js entry point to import Mongoose and connect it to our database. Remember that we installed dotenv, and we must import and use it along with Mongoose.
Now our index.js becomes the following:
const express = require('express');
const app = express();
const mongoose = require('mongoose');
const dotenv = require("dotenv");
dotenv.config();
// Mongo DB conncetion
const database = process.env.MONGOLAB_URI;
mongoose.connect(database, {useUnifiedTopology: true, useNewUrlParser: true })
.then(() => console.log('e don connect'))
.catch(err => console.log(err));

app.set('view engine', 'ejs');
//Routes
app.use('/', require('./routes/login'));
const PORT = process.env.PORT || 4111;
app.listen(PORT, console.log("Server has started at port " + PORT))
By importing mongoose and dotenv, they immediately call the config method to enable our connection to read the environment variables and assign their contents to process.env.
We also created a database variable and assigned it to process.env.MONGOLAB_URI that receives its value from what we defined in .env file. Lines 9 to 11 then connect to the database using the Mongoose method, mongoose.connect().
Stop the server from your terminal with Ctrl + C and run npm run develop again. You should get this response that lets us know we did everything correctly.

Our application is now connected to our MongoDB database.
Creating a model for user registration
Models are what communicate directly to our database. So in our model folder, let’s create a User.js. file and input the following code:
const mongoose = require("mongoose");
const UserSchema = new mongoose.Schema({
  name: {
    type: String,
    required: true,
  },
  email: {
    type: String,
    required: true,
  },
  password: {
    type: String,
    required: true,
  },
 location: {
   type: String,
   default: "New York",
   },
  date: {
    type: Date,
    default: Date.now,
  },
});
const User = mongoose.model("User", UserSchema);
module.exports = User;
These are the fields we want to insert into the database whenever a new user registers through the Registration page. We can store a name, password, email address, give users a default location of New York, and include a timestamp when the registration completes.
Registering users
We have created a schema to store our user information in our database inside the User.js folder within the model folder. To see how this works, let’s make a POST request on the Registration page.
Whenever an end user hits the Register button, a POST request is sent to the /register route (remember what we did before was a GET request). To make this work, we must go to loginController.js and require the User.js model bycrypt because we must hash the password:
const User = require("../models/User");
const bcrypt = require("bcryptjs");
Next, create a function that handles the POST request to the /register route. Here, the registerUser function uses data submitted through the form at the Registration page:
//Post Request that handles Register
const registerUser = (req, res) => {
  const { name, email, location, password, confirm } = req.body;
  if (!name || !email || !password || !confirm) {
    console.log("Fill empty fields");
  }
  //Confirm Passwords
  if (password !== confirm) {
    console.log("Password must match");
  } else {
    //Validation
    User.findOne({ email: email }).then((user) => {
      if (user) {
        console.log("email exists");
        res.render("register", {
          name,
          email,
          password,
          confirm,
        });
      } else {
        //Validation
        const newUser = new User({
          name,
          email,
          location,
          password,
        });
        //Password Hashing
        bcrypt.genSalt(10, (err, salt) =>
          bcrypt.hash(newUser.password, salt, (err, hash) => {
            if (err) throw err;
            newUser.password = hash;
            newUser
              .save()
              .then(res.redirect("/login"))
              .catch((err) => console.log(err));
          })
        );
      }
    });
  }
};
In line 4, we get all the inputs submitted into the form by users:
const { name, email, location, password, confirm } = req.body;
req.body is an Express API that holds the submitted parameters through the frontend of our application. From lines 5 to 7, we check to see if any of the fields are empty; if any are empty, it logs, "Fill empty fields".
Lines 8 to 10, check to see if the password fields match; if they do not match, it logs "Password must match".
Lines 11 through 21 are an else if statement that only happens if the first two conditions are false. What it does is check to make sure that multiple users do not register with the same email address.
By checking the database, if a user exists with the same email address, it will console log "email exists" and renders the Registration page maintaining the user’s inputs.
Add a built-in Express middleware that parses incoming requests by adding the following to the index.js file:
//BodyParsing
app.use(express.urlencoded({extended: false}));
This built-in express middleware gives us the ability to process posted data and store it in the req.body.
Before we save the user’s information and hashed the password, we must also check the database to ensure there will never be multiple email addresses so every user’s email is unique.
Finally, we can export the registerUser module and import it into our login.js file.

Whenever a user selects the Register button, if everything checks out, the form creates a user instance in the database and redirects them to the Login page.

Logging in and authenticating users
We have made the user registration process work. Now let’s work on the login section of our application.
To ensure our Login page works, we must authenticate users using Passport. If there is a user in the database, Passport redirects us to a dashboard that displays the user’s details.
For better organization, let’s create a folder that will handle authentication. In our root folder create an auth folder, and add passport.js and protect.js.

In the passport.js file, paste the following code:
const bcrypt = require("bcryptjs");
LocalStrategy = require("passport-local").Strategy;
//Load model
const User = require("../models/User");
const loginCheck = passport => {
  passport.use(
    new LocalStrategy({ usernameField: "email" }, (email, password, done) => {
      //Check customer
      User.findOne({ email: email })
        .then((user) => {
          if (!user) {
            console.log("wrong email");
            return done();
          }
          //Match Password
          bcrypt.compare(password, user.password, (error, isMatch) => {
            if (error) throw error;
            if (isMatch) {
              return done(null, user);
            } else {
              console.log("Wrong password");
              return done();
            }
          });
        })
        .catch((error) => console.log(error));
    })
  );
  passport.serializeUser((user, done) => {
    done(null, user.id);
  });
  passport.deserializeUser((id, done) => {
    User.findById(id, (error, user) => {
      done(error, user);
    });
  });
};
module.exports = {
  loginCheck,
};
Within lines 2 to 5, we imported bcryptjs, passport-local, and our User.js model file. bcryptjs compares the plain text entered into the login form with the encrypted data in the database.
Lines 6 through 45 contain the loginCheck function that has the passport parameter. Inside the function, we used the LocalStrategy to check the database to see if there is an existing email already; if there is none, it consoles "wrong email".
bcrypt.compare() then compares the entered password with the one previously encrypted in the database.
With the introduction of passport.serializeUser and passport.deserializeUser to configure authentication, if the previous conditions in the code are false, Passport will serialize and deserialize the user.
Once confirming the user, Passport creates a session that the user’s browser maintains for subsequent requests.
Finally, we export the loginCheck. This is what handles our authentication, but we will need to add some middleware to our index.js file to initialize it.
The middleware requires the passport package and loginCheck from the ./auth/passport.js:

In lines 22 and 23, we used the middleware provided by Passport in our Express app instance to initialize Passport and maintain a consistent session.
Finally, we must create a route for POST requests to /login. In our a loginController.js inside the controller folder, right above the export objects, paste the following code:
const loginUser = (req, res) => {
  const { email, password } = req.body;
  //Required
  if (!email || !password) {
    console.log("Please fill in all the fields");
    res.render("login", {
      email,
      password,
    });
  } else {
    passport.authenticate("local", {
      successRedirect: "/dashboard",
      failureRedirect: "/login",
      failureFlash: true,
    })(req, res);
  }
};
With this, we declare a loginUser function. Inside this function, we look for the email and password entered into our Login page and check to see if the password or the email field is empty.
If either are empty, we console "Please fill in all the fields" and re-render the Login page.
Now, if that does not happen, and the email and password are correct, we then log the user in and redirect to /dashboard. However, we have not created this route yet.
The finalized loginController.js is as follows:
const passport = require("passport");
const User = require("../models/User");
const bcrypt = require("bcryptjs");
//For Register Page
const registerView = (req, res) => {
  res.render("register", {});
};
//Post Request for Register
const registerUser = (req, res) => {
  const { name, email, location, password, confirm } = req.body;
  if (!name || !email || !password || !confirm) {
    console.log("Fill empty fields");
  }
  //Confirm Passwords
  if (password !== confirm) {
    console.log("Password must match");
  } else {
    //Validation
    User.findOne({ email: email }).then((user) => {
      if (user) {
        console.log("email exists");
        res.render("register", {
          name,
          email,
          password,
          confirm,
        });
      } else {
        //Validation
        const newUser = new User({
          name,
          email,
          location,
          password,
        });
        //Password Hashing
        bcrypt.genSalt(10, (err, salt) =>
          bcrypt.hash(newUser.password, salt, (err, hash) => {
            if (err) throw err;
            newUser.password = hash;
            newUser
              .save()
              .then(res.redirect("/login"))
              .catch((err) => console.log(err));
          })
        );
      }
    });
  }
};
// For View
const loginView = (req, res) => {
  res.render("login", {});
};
//Logging in Function
const loginUser = (req, res) => {
  const { email, password } = req.body;
  //Required
  if (!email || !password) {
    console.log("Please fill in all the fields");
    res.render("login", {
      email,
      password,
    });
  } else {
    passport.authenticate("local", {
      successRedirect: "/dashboard",
      failureRedirect: "/login",
      failureFlash: true,
    })(req, res);
  }
};
module.exports = {
  registerView,
  loginView,
  registerUser,
  loginUser,
};
Dashboard sessions and logging out
With a user authenticated and every login detail is correct, let’s look into the dashboard route that will display the user’s name and location. We must protect this route from unauthorized users. In our auth folder inside the project.js file, paste the following code:
const protectRoute = (req, res, next) =>{
  if (req.isAuthenticated()) {
    return next();
  }
  console.log('Please log in to continue');
  res.redirect('/login');
}
const allowIf = (req, res, next) =>{
  if (!req.isAuthenticated()) {
    return next();
  }
  res.redirect('/dashboard');
}
module.exports = {
    protectRoute,
    allowIf,
  };
The protectRoute function redirects the user to the Login page if they try to access the dashboard without being authenticated first by logging in through the Login page.
With the function exported, let’s first add some code to the dashboard.ejs to define the routes we want to protect.
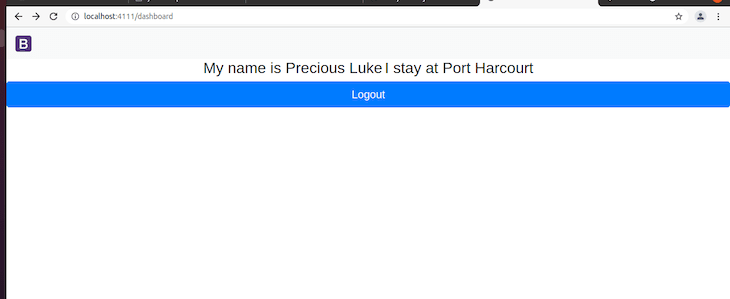
In dashboard.ejs under views, add the following code:
<%- include('layout.ejs'); %>
<div class="container">
<div class="row justify-content-center">
<h3>My name is <%= user.name %> </h3>
<h3>I stay at <%= user.location %> </h3> <br>
</div>
</div>
<div>
<a href="/logout"> <button type="submit" class="btn btn-primary btn-lg btn-block login-button">Logout</button> </a>
</div>
</body>
</html>
This is simply using the layout.ejs, providing some dynamic user information displayed using .ejs templating and a button for logging out.
For orderliness, create another controller file. So, in the controllers folder, create the dashboardController.js file and add the following code:
//For Register Page
const dashboardView = (req, res) => {
  res.render("dashboard", {
    user: req.user
  });
};
module.exports = {
  dashboardView,
};
Here, we render the dashboard.ejs as the view here and accessing the req.user, which is available once there is an active session established by expressjs . With that, we have successfully logged into the dashboard.
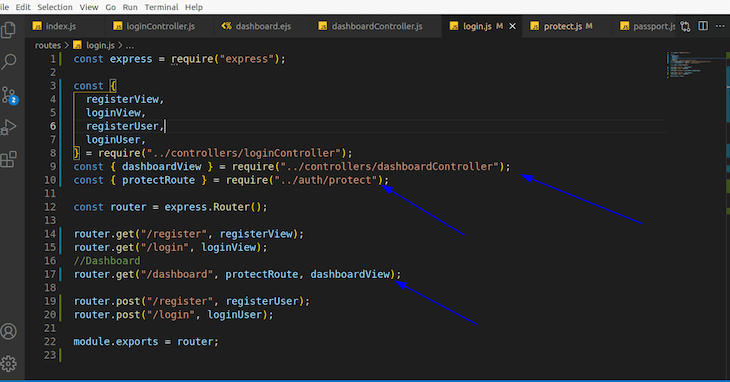
Then, in our login.js folder under routes, require the protectRoute that we exported from protect.js under auth:
const { protectRoute } = require("../auth/protect");
Next, require the dashboardController.js under controllers:
const { dashboardView } = require("../controllers/dashboardController");
Finally, add the protected dashboard route to return the dashboard.ejs through the dashboardView:
router.get("/dashboard", protectRoute, dashboardView);
Our login.js under routes should look like this:
A final Express middleware is needed to initialize a session. In this instance, we can use express-session. To install, run:
npm i express-session
After this installs successfully, require it in the index.js file after our express app instance:
const session = require('express-session');
Then, add this before initializing your Passport instance. You can find the full code here:
app.use(session({
    secret:'oneboy',
    saveUninitialized: true,
    resave: true
  }));
This creates a session. And note, according to the Express docs, “Session data is not saved in the cookie itself, just the session ID. Session data is stored server-side."
Now, when we log in with the correct email and password, we should see this:
Conclusion
Congratulations! You have seen this through. I hope you enjoyed and learned a lot about how to structure and build your next application using the MVC architectural pattern.
We were able to elucidate on what model, view, and controller mean and followed this pattern to build and structure a user registration and login system using Express.js and Passport for authentication. You also saw how we put all these together with a MongoDB database.
Note that with this structure, you can extend it to whatever application you want to create, including a full application.
200’s only ✔️ Monitor failed and slow network requests in production
Deploying a Node-based web app or website is the easy part. Making sure your Node instance continues to serve resources to your app is where things get tougher. If you’re interested in ensuring requests to the backend or third party services are successful, try LogRocket.

LogRocket is like a DVR for web apps, recording literally everything that happens on your site. Instead of guessing why problems happen, you can aggregate and report on problematic network requests to quickly understand the root cause.
LogRocket instruments your app to record baseline performance timings such as page load time, time to first byte, slow network requests, and also logs Redux, NgRx, and Vuex actions/state. Start monitoring for free.


Top comments (0)