
Written by Piyush Sinha✏️
To us humans, conversation is second-nature; it comes naturally to us, but the same can’t be said for bots. Even a simple question like, “How was your day?”, could be rephrased several ways (for example, “How’s it going?”, “How are you?”), none of which a bot can ordinarily understand.
We can interpret the intent behind the question, but a lot goes into building the logic to facilitate a smarter conversation with a bot, and for most developers, coding it from scratch isn't feasible.
Well, fortunately, there's something called NLU (natural-language understanding), which enables better human-computer conversation – in other words, a smart chatbot that utilizes machine learning and other technologies in order to better understand human interactions.
An NLU algorithm doesn't just recognize text, but also interprets the intent behind it. Hence, it’s an ideal algorithm for chatbots. Read more about NLU here.
And this is where the purpose of this article comes in. We are going to build our chatbot using Google's NLU platform, DialogFlow. Read on to learn more about DialogFlow, and how to integrate it into a React application with this follow along tutorial.
- Getting started with DialogFlow
- What is an agent?
- What are intents?
- Adding regular intents
- Connecting with a NodeJS server
- Authentication
Getting started with DialogFlow
In simple terms, DialogFlow is an end-to-end tool powered by NLU to design and integrate chatbots into our interfaces. It translates natural language into machine-readable data using machine learning (ML) models trained by the language we provide. How does it work? Let's learn while we build our chatbot.
Open the DialogFlow console and log in with your Google account. Upon successful login, we see the following interface: 
The first thing that may catch your attention is the Create Agent option.
What is an agent?
Nothing fancy! The chatbot itself is an agent. Collecting the user's query, acting on it, and finally sending a response is all handled by our agent.
Let's create our chatbot; how about a bot for a coffee shop, for our example? No prizes for guessing my coffee shop inspiration. 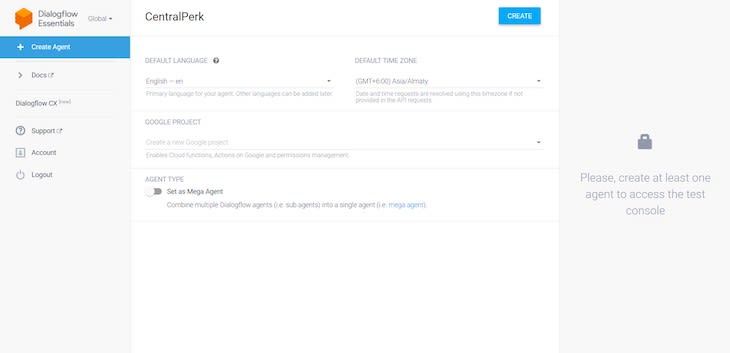
This is how the console should look now: 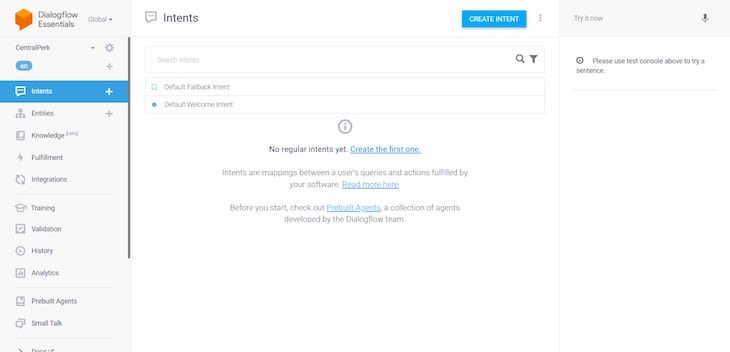
Now, more jargon has appeared on the screen – Intents.
What are intents?
The console says that, "Intents are mappings between a user's queries and actions fulfilled by your software". So, what does this mean?
Let me explain: in the case of our bot, we expect to receive queries like, "I would like a cappuccino" and, "When does the shop open?", etc. We can categorize these queries into user intentions such as "Take Order", "Timings", etc. To handle them, we define these categories as intents in our agent.
We also see that our agent comes with two default intents; Default Welcome Intent and Default Fallback Intent. Let's explore them in a little more detail: 
Quite a bit of jargon in here; let's go through them one by one:
Contexts
In a human conversation, to understand phrases, we usually need some context. Likewise, with the bot, an intent needs to know the context of the query. To make this possible, we connect one or more intents via contexts. We will learn more about this later in this article.
Training phrases
These are example phrases to train and help our agent match queries with the right intent. More phrases and variations will improve the accuracy of intent matching.
By seeing the default list of phrases, it's clear that this intent is used to greet our users.
Events
We just learned the agent looks for training phrases to trigger intents. However, intents can also be triggered by events. There are two types of events:
- Platform events: These are provided by the platform itself and occur when platform-specific events occur (e.g., a Welcome event)
- Custom events: These are defined by us (e.g., the response from an API call made by us)
Actions and parameters
Once the query is matched with the right intent, next comes action on it. To act, sometimes we need to extract some data from the query. To extract, we define parameters with entity types. Take this for example: "Is the coffee shop open today?"; the parameter to extract here is today, which is critical info needed to perform some logic and respond accordingly. We will learn more about this later in this tutorial.
Responses
Response to the user. Here, we see static phrases, but they can be dynamic, too, if we make use of parameters or fulfillment.
Fulfillment
When we enable fulfillment, the agent gives a dynamic response by making an API call defined by us (e.g., if a user wants to book a table, we can check the database and respond based on availability). Again, more on this a little later.
Let's try this default intent first before going any further. On the right side, we have a Dialogflow Simulator to test our agent. We say something similar to the training phrases, and the agent responds from the list of responses: 
And, if we say something completely different, the agent triggers a Default Fallback Intent: 
So, if the agent fails to find the right intent, it triggers the fallback intent. Pretty smooth, right? But, let's try to avoid it and add intents to carry out the whole conversation.
Adding regular intents
Let's try to create this conversation shown in the diagram below: 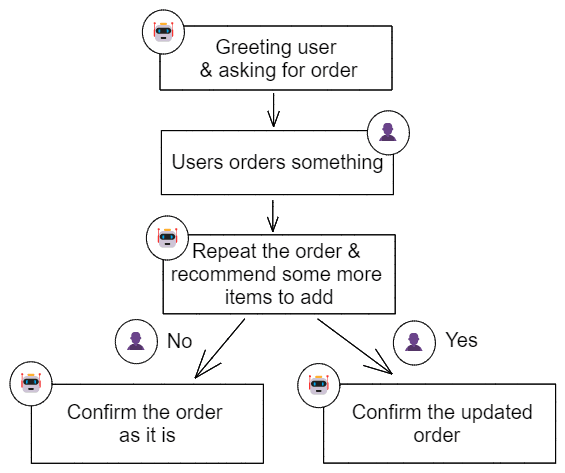
Modify the response of Default Welcome Intent to greet and ask for the order. Something like this; "Greetings! What would you like to order?".
Create an intent to take the order, and name the intent to something simple that makes sense, like Take Order.
Now, we add training phrases. The user might say, “I would like to have 2 lattes”. Adding this to the list of training phrases is enough to get it matched with this intent. But, we also need the qualifying information; ‘2’ and ‘lattes’.
To extract them, we will add a couple of parameters within the phrase – quantity (@sys.number entity type) and item (@sys.any entity type): 
Add more variations to make it better. Here’s some I added: 
Once the parameter-rich phrases are added, this table is automatically filled. We can mark them as required/optional and set a default value if needed. In addition, we need to define a question as a prompt, to force the user to enter the required parameter, if not entered the first time.
So, this means that if we get the first phrase from the list, “I would like to order”, and the item (required) is missing, the prompt will get triggered to ask for it. If we get the second phrase from the list; “I would like to order a mocha”, and quantity (optional) isn’t there, then, instead of prompting the user to enter the quantity, we will just set the default value as 1 and use that.
We can return a dynamic response to make use of parameters to repeat the order and ask if they would like an add-on: 
To do this, create an intent to handle the user’s response to the add-on question.
The response will be either Yes or No. This is the ideal scenario to introduce follow-up intents. As the name suggests, these are used to follow-up with the conversation in the parent intent.
DialogFlow provides many predefined follow-up intents for common replies like “Yes”, “No” or “Cancel”. Also, If you need to handle custom replies, you can create your own custom follow-ups. We’re going to use the predefined ones for this tutorial, but it’s up to you if you wish to put your own spin on it.
From the intent list, hover the mouse over the TakeOrder intent and click Add follow-up intent. Select Yes and the follow-up intent is created named Take Order - yes. 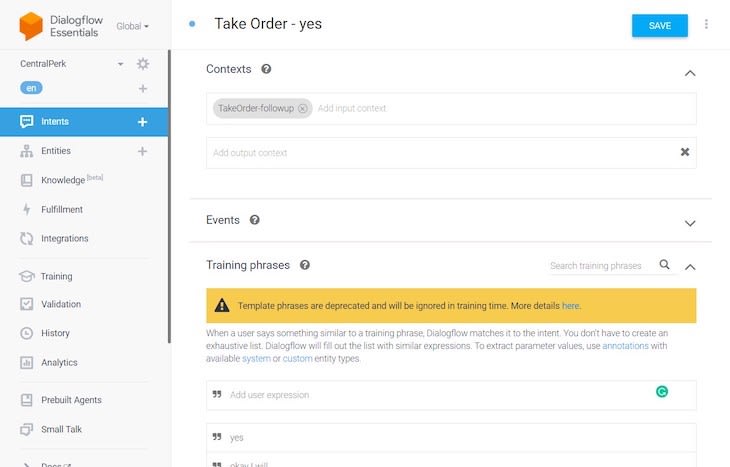
You may have noticed there’s an input context added (TakeOrder-followup). For follow-ups to work, they need to be linked to the parent intent, and that’s where the context comes in handy.
When we create a follow-up intent, an output context is automatically added to the parent intent and an input context of the same name is added to the follow-up intent.
We don’t need to worry about the training phrases, as they are already in place. Now, add a dynamic response for this intent. As contexts are in place, we can use the parameters from the parent intent, like this: 
Similarly, create a predefined follow-up intent to handle No in response. This one will be named Take Order - no. Just add a dynamic response here, as well: 
The agent is ready to carry out the conversation. We can always test it in the simulator, but let’s try something different. Click Integrations in the sidebar and enable Web Demo. Open the URL provided there and start the conversation: 
The agent is working fine as expected, but wouldn’t it be nice to show the total billing amount of the order? We can fetch the prices from a server and return the calculated amount to the user.
Connecting with a NodeJS server
While discussing intents, we came across Fulfillment, which helps to return dynamic responses by making API calls defined by us. That’s what we need here to interact with our server.
Find Fulfillment in the sidebar and open it. DialogFlow provides two ways to use fulfillment:
- An in-line editor powered by Google Cloud Functions. But, to enable this, we need to add a valid billing account as this integration has charges, if used beyond a certain limit
- A webhook service
I’m going to build a webhook service and make it public. Before proceeding, make sure the service meets the requirements mentioned here.
Building our server
Create a node app in a new directory and install the necessary dependencies:
mkdir centralperk-server
cd centralperk-server
npm init -y
npm i express dialogflow-fulfillment
Start with a basic server in index.js:
const express = require("express");
const app = express();

app.get("/", (req, res) => {
  res.send("Hi from server!");
});

app.listen(8080, () => {
  console.log("server running...");
});
This simply runs the server at port 8080. Now, let’s write some code to handle webhook requests from DialogFlow:
const express = require("express");
const app = express();

const { WebhookClient } = require("dialogflow-fulfillment");
const getPrice = require("./helpers");

app.get("/", (req, res) => {
  res.send("Hi from server!");
});

app.post("/", express.json(), (req, res) => {
  const agent = new WebhookClient({ request: req, response: res });

  function handleIntent(agent) {
    const intent = agent.intent;
    const item = agent.contexts[0].parameters.item;
    const quantity = agent.contexts[0].parameters.quantity;
    const billingAmount = getPrice(intent, item, quantity);

    const response =
      intent === "Take Order - yes"
        ? `Great! Your ${quantity} ${item} and cookies will be ready in no time. Please pay ${billingAmount}$.`
        : `Okay! Your ${quantity} ${item} will be ready in no time. Please pay ${billingAmount}$.`;

    agent.add(response);
  }

  const intentMap = new Map();
  intentMap.set("Take Order - yes", handleIntent);
  intentMap.set("Take Order - no", handleIntent);
  agent.handleRequest(intentMap);
});

app.listen(8080, () => {
  console.log("server running...");
});
Helpers to calculate price:
const priceList = {
  mocha: 5,
  latte: 7,
  cookies: 2,
};

module.exports = function (intent, item, quantity) {
  const total =
    intent === "Take Order - yes"
      ? priceList[`${item}`] * quantity + priceList["cookies"]
      : priceList[`${item}`] * quantity;

  return total;
};
Let’s walk through the above implementation.
The imported WebhookClient will handle the communication with DialogFlow's webhook fulfillment API. When a fulfillment-enabled intent is matched, an HTTPS POST webhook request is sent to our server. This request is handled by agent.handleRequest(intentMap). It takes in a map of handlers and each handler is a function callback. The one defined here extracts all the needed information from the passed instance, calculates the billing amount, and then finally returns the dynamic response.
Making the server public
Using ngrok is the fastest and easiest way to put the server on the Internet. Follow the steps here for quick setup and installation. Once done with the steps, run the following command:
ngrok http 8080
And the secured public URL is ready in no time:
ngrok (Ctrl+C to quit) Visit http://localhost:4040/ to inspect, replay, and modify your requests Session Status online Account Piyush (Plan: Free) Version 3.0.6 Region India (in) Latency 55ms Web Interface http://127.0.0.1:4040 Forwarding https://2c73-182-64-199-236.in.ngrok.io -> http://localhost:8080 Connections ttl opn rt1 rt5 p50 p90 5 0 0.00 0.01 2.37 5.21
(Note: Remember to keep the local server up and running)
Enabling the webhook
Go ahead and enable the webhook in the Fulfillment window and enter the secured public URL. In addition, bear in mind that webhook calls need to be enabled for both follow-up intents.
All looks good. Let’s test it now: 
Our chatbot is all set up!
Integrating the DialogFlow chatbot into a React App
There are many ways to integrate the chatbot into a React app:
- Build the chat widget in React from scratch. Handle the state of incoming and outgoing messages using a library like Redux and modify the Node server to handle calls from the React app as well as sending them to DialogFlow. This does sound interesting, but is a lot to cover and is outside the scope of this particular article
- Using Kommunicate to rather more effortlessly integrate the DialogFlow chatbot into React app
In this blog tutorial, we’re going with the Kommunicate option.
DialogFlow ES: Kommunicate integration
Follow these steps:
Go for Free Trial and sign up with your Google account.
Click Bot Integrations and select DialogFlow ES.
Get the JSON key from the DialogFlow cloud account using the instructions mentioned in the following image: 
Next, we get to choose a customized avatar: ![]()
And that’s all we need to do for DialogFlow ES and Kommunicate integration! 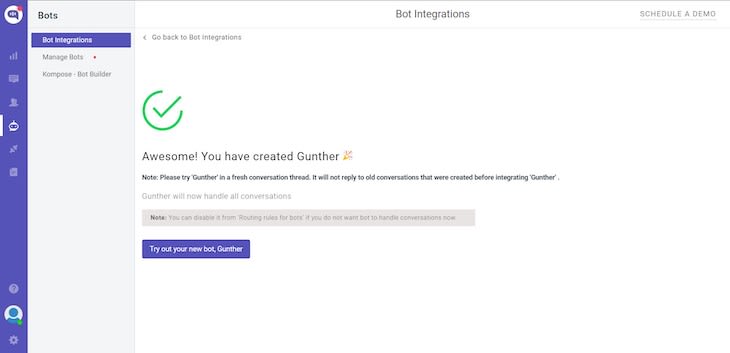
Integrate the Kommunicate chat widget into a React App
Create a chatbot component and paste the following code in useEffect():
(function (d, m) {
      var kommunicateSettings = {
        appId: "<YOUR APP_ID>",
        popupWidget: true,
        automaticChatOpenOnNavigation: true,
      };
      var s = document.createElement("script");
      s.type = "text/javascript";
      s.async = true;
      s.src = "https://widget.kommunicate.io/v2/kommunicate.app";
      var h = document.getElementsByTagName("head")[0];
      h.appendChild(s);
      window.kommunicate = m;
      m._globals = kommunicateSettings;
    })(document, window.kommunicate || {});
import React, { useEffect } from "react";

function Chatbot() {
  useEffect(() => {
    (function (d, m) {
      var kommunicateSettings = {
        appId: "<YOUR APP_ID>",
        popupWidget: true,
        automaticChatOpenOnNavigation: true,
      };
      var s = document.createElement("script");
      s.type = "text/javascript";
      s.async = true;
      s.src = "https://widget.kommunicate.io/v2/kommunicate.app";
      var h = document.getElementsByTagName("head")[0];
      h.appendChild(s);
      window.kommunicate = m;
      m._globals = kommunicateSettings;
    })(document, window.kommunicate || {});
  }, []);
  return <div></div>;
}

export default Chatbot;
Remember to replace the placeholder with your appId. Finally, import it in the App component:
import "./App.css";
import Chatbot from "./Chatbot";

function App() {
  return (
    <div className="App">
      <Chatbot />
    </div>
  );
}

export default App;
Run the app locally to test the integration: 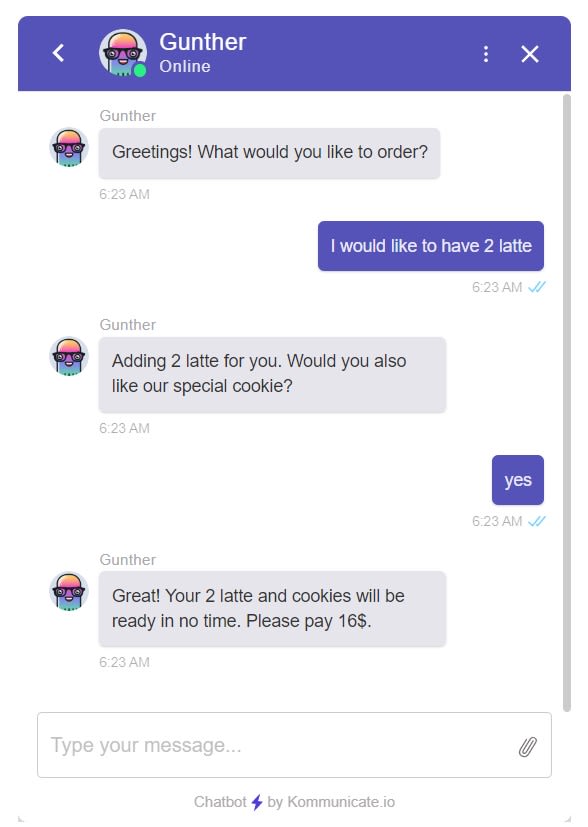
And just like that, we have added our chatbot into our React app. Visit this dashboard to add more customizations to things like color, icons, and notification sounds, etc.
Conclusion
That’s all for this blog! We learned several aspects of chatbot development; from building it with DialogFlow, connecting with the NodeJS server, to finally Integrating it into React app. I hope it made sense to you and you were able to follow along with this tutorial with ease.
If you have any questions, you can leave them in the comments and I’ll be happy to answer them. Feel free to reach out to me on LinkedIn or Twitter.
Full visibility into production React apps
Debugging React applications can be difficult, especially when users experience issues that are hard to reproduce. If you’re interested in monitoring and tracking Redux state, automatically surfacing JavaScript errors, and tracking slow network requests and component load time, try LogRocket.
LogRocket is like a DVR for web and mobile apps, recording literally everything that happens on your React app. Instead of guessing why problems happen, you can aggregate and report on what state your application was in when an issue occurred. LogRocket also monitors your app's performance, reporting with metrics like client CPU load, client memory usage, and more.
The LogRocket Redux middleware package adds an extra layer of visibility into your user sessions. LogRocket logs all actions and state from your Redux stores.
Modernize how you debug your React apps — start monitoring for free.


Top comments (0)