
Written by Marie Starck✏️
Table of contents
- Create a Shopify Store
- Get Shopify’s Storefront API token
- Set up the Next.js app
- Create the ecommerce store’s homepage with Next.js
- Create different collection pages in the ecommerce app
- Create a product page in Next.js and Shopify
- Retrieve your products with the Shopify Storefront API
Since COVID-19 appeared in the world, ecommerce has exploded. According to the International Trade Administration, there’s been a 19 percent increase in revenue between pre- and post-COVID ecommerce in 2020. As a result, entrepreneurs turned to online platforms such as Shopify, WordPress (and its plugin, WooCommerce), and Squarespace to set up their online stores.
With Shopify, not only can users set up an online store, but thanks to their Storefront API, developers can create a custom client application to connect to it.
In this article, you will learn how to set up a Shopify store and get your Storefront API token. Once your token is acquired, you will create a Next.js application to list and display your products with dummy data. Finally, you will connect your Next.js application to your Shopify application to fetch your real products.
Create a Shopify Store (optional)
If you already have a Shopify store set up, you can skip this step and head to step 2.
If not, head to Shopify’s website and sign up for a free trial. Once done, you can start by creating some collections, which are used to categorize your products.
To create a collection, go to Products, then Collections. Next, click on Create collection. Enter a title and choose Manual for the collection type. With the latter, you can manually add products to this collection. 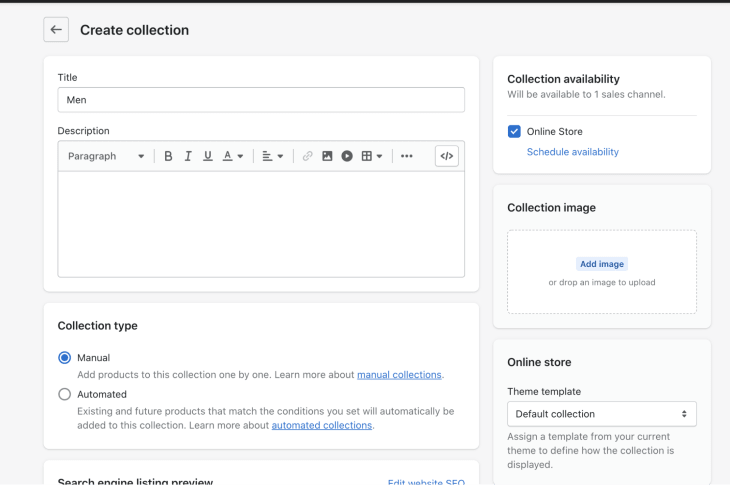
For this tutorial, two collections are necessary: men and women.
Once your collections are set up, click on Products and then Add product.
To create a product, here are some steps to follow:
- Enter a title
- Upload a picture in the media file input
- Choose a type (i.e., shoes)
- Select a collection (i.e., women or men)
- Enter a price
- In the inventory section, add a quantity in the available column
- Set the product status as active
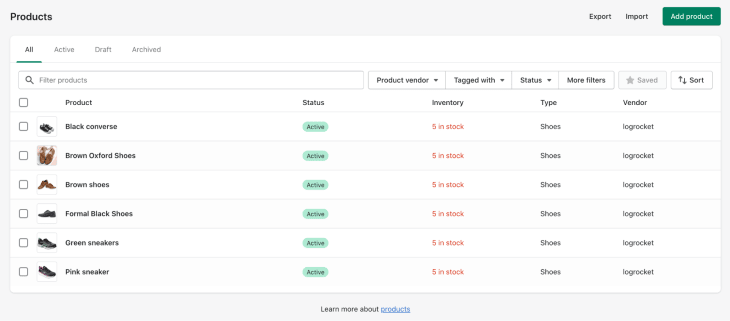
- Finally, click save. This will create an active product in your store. Repeat these steps a few times to fill your store. For example, here is an online store with some shoes:
Get Shopify’s Storefront API token
Once your store is set up, you will need an API token to access it from a third-party application. Go to Apps, click on Develop apps for your store, and go through the step to enable app development. 
Once this feature is enabled, click on Create an App and fill out your app name.
Once your app is created, click on your new app and head to Configuration. In the Storefront API section, click on Configure. 
Next, under Storefront API access scopes, select all the checkboxes. This will grant you the ability to fetch data from your store, such as your products, while being unauthenticated. Click Save. 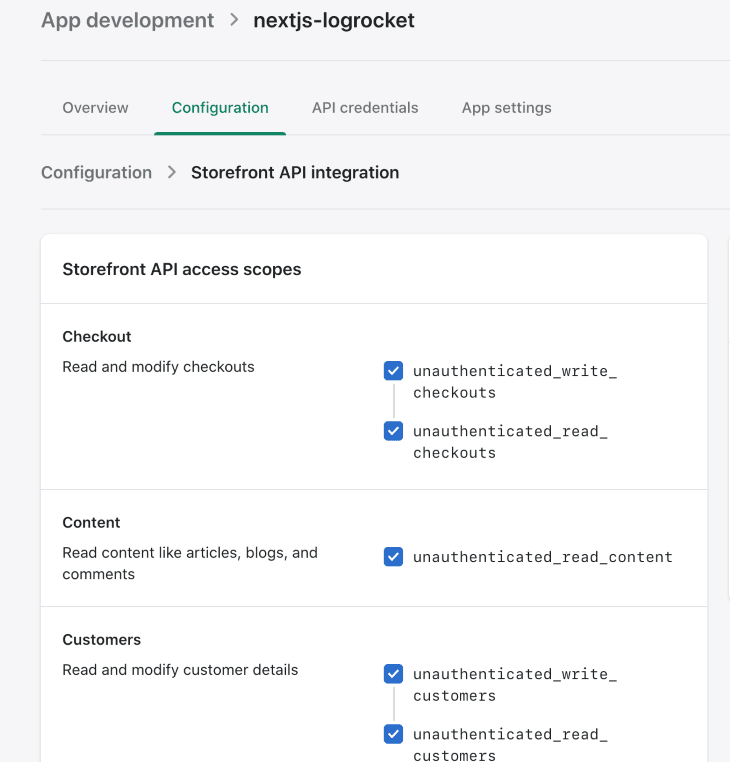
To get your Storefront access token, you will need to install your newly created app, so click on the green Install button.
You can now retrieve your access token by going back to your application and to API credentials. Note that token down, as you will need it later. 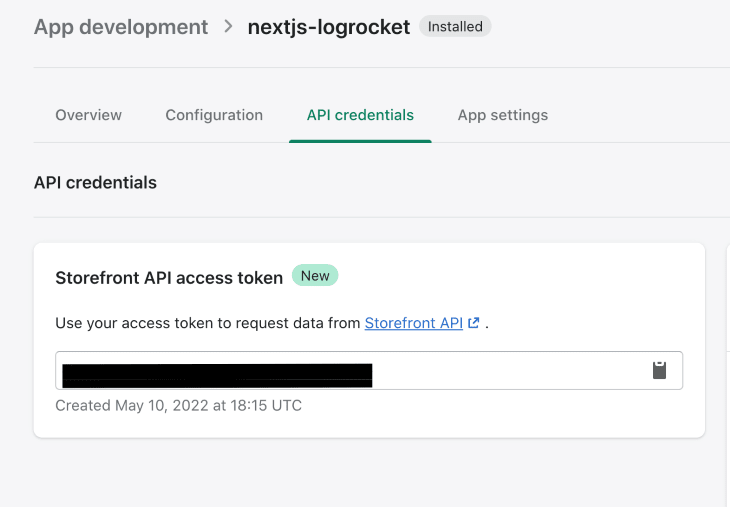
Set up the Next.js app
For this tutorial, you’ll use MUI. This component library allows you to get prebuilt components to build UI far quicker.
Thankfully, MUI also comes with a Next.js starter project which you can get by running this command:
curl https://codeload.github.com/mui/material-ui/tar.gz/master | tar -xz --strip=2 material-ui-master/examples/nextjs
The previous command, unfortunately, will create the project with the default name nextjs. if you would like to rename it, run:
    mv nextjs <your_app_name> # Mac
    ren nextjs <your_app_name> # Windows
Once done, enter your project and install the dependencies:
    cd <your_app_name>
    npm install
    npm run dev
Creating your UI will be easier with some dummy data. To do so, create a data.js inside your root folder and add some dummy products:
    const PRODUCTS = [
      {
        handle: 1,
        name: 'Women Black Shoes',
        price: '14.99',
        collection: 'women',
        image: 'https://external-content.duckduckgo.com/iu/?u=http%3A%2F%2Fcohenwoodworking.com%2Fwp-content%2Fuploads%2F2016%2F09%2Fimage-placeholder-500x500.jpg&f=1&nofb=1'
      },
      {
        handle: 2,
        name: 'Women Brown Shoes',
        price: '14.99',
        collection: 'women',
        image: 'https://external-content.duckduckgo.com/iu/?u=http%3A%2F%2Fcohenwoodworking.com%2Fwp-content%2Fuploads%2F2016%2F09%2Fimage-placeholder-500x500.jpg&f=1&nofb=1'
      },
      {
        handle: 3,
        name: 'Women Purple Shoes',
        price: '14.99',
        collection: 'women',
        image: 'https://external-content.duckduckgo.com/iu/?u=http%3A%2F%2Fcohenwoodworking.com%2Fwp-content%2Fuploads%2F2016%2F09%2Fimage-placeholder-500x500.jpg&f=1&nofb=1'
      }
    ];

    export default PRODUCTS;
Create the ecommerce store’s homepage with Next.js
Inside your Next.js root folder, create a components folder.
Inside this folder, you will create a component to list your products called ProductList. MUI has some prebuilt components to create a list with images and titles underneath them in a grid format.
These components are called: ImageList, ImageListItem, and ImageListItemBar. You can find the documentation here.
Inside your components folder, create ProductsList.js. Import all the necessary components from MUI and set up your grid. Assume that your component will receive an array of products and map over it to create a single product entry with an image and a title underneath.
 import * as React from 'react';
    import Typography from '@mui/material/Typography';
    import ImageList from '@mui/material/ImageList';
    import ImageListItem from '@mui/material/ImageListItem';
    import ImageListItemBar from '@mui/material/ImageListItemBar';

    export default function ProductsList({products}) {
      return (
        <ImageList cols={5} gap={20}>
          {products.map((product) => (
            <ImageListItem key={product.image}>
              {/* Product's image*/}
              <img
                src={`${product.image}?w=250&fit=crop&auto=format`}
                srcSet={`${product.image}?w=250&fit=crop&auto=format&dpr=2 2x`}
                alt={product.name}
                loading="lazy"
              />
              {/* Product's name + price under the image */}
              <ImageListItemBar
                title={product.name}
                subtitle={<span>Price: {product.price}</span>}
                position="below"
              />
            </ImageListItem>
          ))}
        </ImageList>
      )
    };
Another component you will need is a navigation bar. You can use MUI’s AppBar and Toolbar to create one. Inside, add your collections as text. You will learn how to set up routing later.
Here is the result of your Navigation.js component:
  import * as React from 'react';
    import AppBar from '@mui/material/AppBar';
    import Toolbar from '@mui/material/Toolbar';
    import Typography from '@mui/material/Typography';

    export default function Navigation() {
      return (
        <AppBar position="static">
          <Toolbar>
            <Typography mr={2}>All products</Typography>
            <Typography mr={2}>Women</Typography>
            <Typography>Men</Typography>
          </Toolbar>
        </AppBar>
      )
    };
Finally, use your newly created components, ProductsList and Navigation.js, in your application’s homepage. This page is available at the URL and is rendered from the pages/index.js file.
Note: If you are unfamiliar with Next.js’s page functionality and its rendering, check out the documentation.
Inside index.js, import Navigation, ProductLists, and your dummy data. You can pass your data into your list of products:
  import * as React from 'react';
    import Container from '@mui/material/Container';
    import Box from '@mui/material/Box';

    import Navigation from '../components/Navigation';
    import ProductsList from '../components/ProductsList';
    import PRODUCTS from '../data.js';

    export default function Index() {
      return (
        <Box>
          <Navigation />
          <Container maxWidth="lg">
            <ProductsList products={PRODUCTS} />
          </Container>
        </Box>
      );
    }
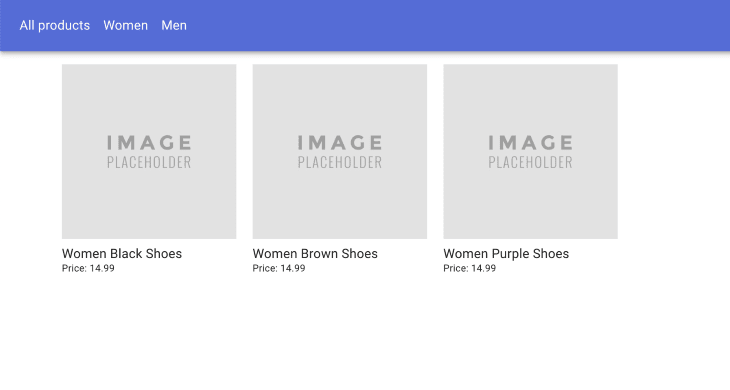
By this point, once you refresh your page, you should see this:
Create different collection pages in the ecommerce app
Now that your homepage is set up, you need collections pages. Most online shops split their products into categories, so it’s easier for users to browse their catalogs. As a result, we will create a specific collection.
Next.js offers dynamic routing. If you are unfamiliar with it, it allows you to create routes, such as /collections/[collectionName. By doing so, URLs such as /collections/women or /collections/men will use the same .js page.
Inside your pages folder, create a collections folder and inside that, a [collectionName].js file. This component will be very similar to your homepage. You will, however, filter your products to grab only the ones from the correct collection.
Thankfully, Next.js also comes with a useRouter hook from which you can get the query params from the URL. Once you have the collectionName, you can use it when filtering your products. Finally, pass your filtered list of products to ProductsList.
 import * as React from 'react';
    import { useRouter } from 'next/router'

    import Container from '@mui/material/Container';
    import Box from '@mui/material/Box';

    import Navigation from '../../components/Navigation';
    import BreadcrumbsNavigation from '../../components/BreadcrumbsNavigation';
    import ProductsList from '../../components/ProductsList';
    import PRODUCTS from '../../data.js';

    export default function CollectionPage() {
      const router = useRouter()
      const { collectionName } = router.query
      const products = PRODUCTS.filter(product => product.collection === collectionName)
      return (
        <Box>
          <Navigation />
          <Container maxWidth="lg">
            <BreadcrumbsNavigation collection={collectionName} />
            <ProductsList products={products} />
          </Container>
        </Box>
      );
    }
Notice that your collection’s page is using a custom component called BreadcrumbsNavigation. This is to render custom breadcrumbs for your store.
To create this component, inside your components folder, create a BreadcrumbsNavigation.js. MIU offers a Breadcrumbs component for you to use. Added to this, the Link component allows you to add routing to get back to your homepage.
Here is the end result:
    import * as React from 'react';

    import Box from '@mui/material/Box';
    import Breadcrumbs from '@mui/material/Breadcrumbs';
    import Typography from '@mui/material/Typography';
    import Link from '@mui/material/Link';

    export default function BreadcrumbsNavigation({title}) {
      return (
        <Box mt={2}>
          <Breadcrumbs separator="›" aria-label="breadcrumb">
            <Link underline="hover" key="1" color="inherit" href="/">
              Products
            </Link>
            <Typography key="3" color="text.primary">
              {title && title.replace(/^\w/, c => c.toUpperCase())}
            </Typography>
          </Breadcrumbs>
        </Box>
      )
    }
In Navigation.js, import the MUI’s Link component you just used and add some routing on your app bar for your homepage and your collections:
    import * as React from 'react';

    import AppBar from '@mui/material/AppBar';
    import Toolbar from '@mui/material/Toolbar';
    import Typography from '@mui/material/Typography';
    import Link from '@mui/material/Link';

    export default function Navigation() {
      return (
        <AppBar position="static">
          <Toolbar>
            <Link href="/" underline="none" color="inherit"><Typography mr={2}>All products</Typography></Link>
            <Link href="/collections/women" underline="none" color="inherit"><Typography mr={2}>Women</Typography></Link>
            <Link href="/collections/men" underline="none" color="inherit"><Typography>Men</Typography></Link>
          </Toolbar>
        </AppBar>
      )
    };
In your ProductList.js, you can add a check in case there are no products:
    import * as React from 'react';

    import Box from '@mui/material/Box';
    import Typography from '@mui/material/Typography';
    ...

    export default function ProductsList({products}) {
      return (
        <Box>
          {
            (products && products.length > 0) ?
            <ImageList cols={5} gap={20}>
              ...
            </ImageList>:
            <Typography variant="body1" align="center">There are no products in this collection</Typography>
          }
        </Box>
      )
    };
If you head to http://localhost:3000/collections/women, you should now see this:
![]()
Create a product page in Next.js and Shopify
With your homepage and collections pages set up, you can move on to the product page. Like the collections page, Next.js dynamic routing can be used to set up the page.
Create a products folder. Inside, add a new file called [productHandle].js. Whether you want to use IDs or handles like black-converse as productHandle, this page will render your product page.
After getting the productHandle parameter from the URL, you can use it to grab your product. To display your product’s image, Next.js provides an [Image](https://nextjs.org/docs/basic-features/image-optimization) component that comes with built-in image optimization.
Here is the result for a product page:
  import * as React from 'react';
    import { useRouter } from 'next/router';
    import Image from 'next/image';

    import Container from '@mui/material/Container';
    import Box from '@mui/material/Box';
    import Grid from '@mui/material/Grid'
    import Typography from '@mui/material/Typography';
    import Button from '@mui/material/Button';

    import Navigation from '../../components/Navigation';
    import BreadcrumbsNavigation from '../../components/BreadcrumbsNavigation';
    import ProductsList from '../../components/ProductsList';
    import PRODUCTS from '../../data.js';

    export default function ProductPage() {
      const router = useRouter()
      // Get productHandle from url: /products/[productHandle]
      const { productHandle } = router.query
      // Get product data
      const product = PRODUCTS.find(product => product.handle === parseInt(productHandle))
      const { name, image, price } = product || {}

      return (
        <Box>
          <Navigation />
          {product &&
            <Container maxWidth="lg">
              <BreadcrumbsNavigation title={name} />
                <Grid container direction="row">
                  <Grid item xs={6}>
                    <Image
                      src={image}
                      alt={`Picture of ${name}`}
                      width={500}
                      height={500}
                    />
                  </Grid>
                  <Grid item xs={6}>
                    <Typography variant="h3" my={2}>{name}</Typography>
                    <Grid mt={4}>
                      <Typography variant="h6" component="span">Price: </Typography>
                      <Typography variant="body1" component="span">{price}</Typography>
                    </Grid>
                    <Grid mt={1}>
                      <Button variant="contained">Add to cart</Button>
                    </Grid>
                  </Grid>
                </Grid>
            </Container>
          }
        </Box>
      );
    }
If you end up using the Image component, you will need to add your image’s domain to next.config.js, like this:
  module.exports = {
      reactStrictMode: true,
      images: {
        domains: ['external-content.duckduckgo.com'],
      },
    };
You will have to restart your server when changing next.config.js.
Finally, let’s implement routing to your product page. To do so, head back to your components/ProductsList.js and use the Next.js router to navigate to your product page when a user clicks on the image in the product's list. Add on onClick on your ImageListItem, along with the cursor styling, and create a goToProductPage to navigate.
Here is the end result:
import * as React from 'react';
    import { useRouter } from 'next/router'

    ...

    export default function ProductsList({products}) {
      const router = useRouter()
      // Navigate to product's page
      const goToProductPage = productHandle => router.push(`/products/${productHandle}`)

      return (
        <Box>
          {
            (products && products.length > 0) ?
            <ImageList cols={5} gap={20}>
              {products.map((product) => (
                <ImageListItem
                  key={product.image}
                  style={{cursor: 'pointer'}}
                  onClick={() => goToProductPage(product.handle)}>
                  ...
                </ImageListItem>
              ))}
            </ImageList>:
            <Typography variant="body1" align="center">There are no products in this collection</Typography>
          }
        </Box>
      )
    };
Once rendered, here is what you will get: 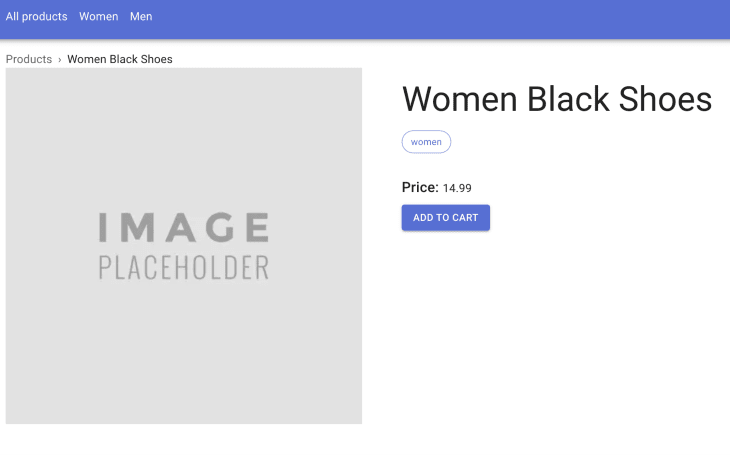
Retrieve your products with the Shopify Storefront API
Your client application is now set up. However, it’s relying on dummy data. To finish your project, data from your Shopify store needs to be fetched and used.
To do so, you will need the Shopify JavaScript Buy SDK, which you can get by installing the necessary package:
npm install shopify-buy
Remember the Storefront API tokens we got in the beginning of this article? You will store them in environment variables. Inside your root project, create a file called .env.local and add your token, along with your Shopify domain:
  SHOPIFY_STORE_FRONT_ACCESS_TOKEN=*****
    SHOPIFY_STORE_DOMAIN=********
You can also find your domain by clicking on Settings in your Shopify store: 
Once your variables are set up, create a lib folder in your root project and a shopify.js file inside. In this file, you will import your shopify-buy library and create a Shopify client with your variables.
Once you make an API call to Shopify, the response returned will need to be stringified and parsed to be used as a JSON object later. As a result, create a parseShopifyResponse function so you can use it repeatedly throughout your app:
  import Client from "shopify-buy";
    export const shopifyClient = Client.buildClient({
      storefrontAccessToken: process.env.SHOPIFY_STORE_FRONT_ACCESS_TOKEN,
      domain: process.env.SHOPIFY_STORE_DOMAIN,
    });

    export const parseShopifyResponse = (response) =>  JSON.parse(JSON.stringify(response));
Let’s continue by fetching all your products for your homepage. In index.js, use Next.js’ getServerSideProps to make an API call when the page is requested. With shopifyClient.product.fetchAll(), you can fetch all the products in your store. Once the data is returned, it will be passed as props to your homepage and in your ProductsList component:
  import * as React from 'react';
    import Container from '@mui/material/Container';
    import Box from '@mui/material/Box';

    import Navigation from '../components/Navigation';
    import ProductsList from '../components/ProductsList';
    import { shopifyClient, parseShopifyResponse } from '../lib/shopify'

    export default function Index({products}) {
      return (
        <Box>
          <Navigation />
          <Container maxWidth="lg">
            <ProductsList products={products} />
          </Container>
        </Box>
      );
    }

    export const getServerSideProps = async () => {
      // Fetch all the products
      const products = await shopifyClient.product.fetchAll();

      return {
       props: {
        products: parseShopifyResponse(products),
      },
     };
    };
The format from your dummy data is not the same as what Shopify will return. You will need to adapt ProductsList.js to this new data. Inside this file, let’s create a Product component and grab the ID, title, image, price, and handle from your product.
The Shopify API response can be a bit confusing. For example, your product’s price will be in the variants object. Here is the complete documentation to get a better idea of a product’s structure.
Shopify’s product also comes with a handle field generated when you create products. A product labeled “Black converses” would have a handle such as black-converses. This is very helpful for SEO, as strings to URLs such as productId/1 are preferred. You will use it in your routing when navigating to your product page.
Here is the updated result:
  import * as React from 'react';
    import { useRouter } from 'next/router'

    import Box from '@mui/material/Box';
    import Typography from '@mui/material/Typography';
    import ImageList from '@mui/material/ImageList';
    import ImageListItem from '@mui/material/ImageListItem';
    import ImageListItemBar from '@mui/material/ImageListItemBar';

    const Product = ({product, goToProductPage}) => {
      const { id, title, images, variants, handle } = product
      const { src: productImage } = images[0]
      const { price } = variants[0]
      return (
        <ImageListItem
          style={{cursor: 'pointer'}}
          onClick={() => goToProductPage(handle)}>
          <img
            src={`${productImage}?w=250&auto=format`}
            srcSet={`${productImage}?w=250&auto=format&dpr=2 2x`}
            alt={title}
            loading="lazy"
          />
          <ImageListItemBar
            title={title}
            subtitle={<span>Price: {price}</span>}
            position="below"
          />
        </ImageListItem>
      )
   }
    export default function ProductsList({products}) {
      const router = useRouter()
      // Navigate to product page with handle i.e /products/black-converses
      const goToProductPage = productHandle => router.push(`/products/${productHandle}`)

      return (
        <Box>
          {
            (products && products.length > 0) ?
            <ImageList cols={5} gap={20}>
              {products.map((product) => (
                <Product
                  key={product.handle}
                  product={product}
                  goToProductPage={goToProductPage}
                />
              ))}
            </ImageList>:
            <Typography variant="body1" align="center">There are no products in this collection</Typography>
          }
        </Box>
      )
    };
Now, you can move on to update your product page. In your products/[productHandle].js, grab the handle from your query. Shopify JS SDK comes with a function called fetchByHandle that fetches a single product from its handle. Use your productHandle to get your product and add it to your props.
Now, you will need to update your product page as you did for your list of products. You can grab your title, image, and price in the same way and use them on your page:
    import * as React from 'react';
    import Image from 'next/image'

    import Container from '@mui/material/Container';
    import Box from '@mui/material/Box';
    import Grid from '@mui/material/Grid'
    import Typography from '@mui/material/Typography';
    import Button from '@mui/material/Button';

    import Navigation from '../../components/Navigation';
    import BreadcrumbsNavigation from '../../components/BreadcrumbsNavigation';
    import ProductsList from '../../components/ProductsList';
    import { shopifyClient, parseShopifyResponse } from '../../lib/shopify'

    export default function ProductPage({product}) {

      const { id, title, images, variants, handle } = product
      const { src: productImage } = images[0]
      const { price } = variants[0]

      return (
        <Box>
          <Navigation />
          {product &&
            <Container maxWidth="lg">
              <BreadcrumbsNavigation title={title} />
                <Grid container direction="row">
                  <Grid item xs={6}>
                    <Image
                      src={productImage}
                      alt={`Picture of ${title}`}
                      width={500} automatically provided
                      height={500} automatically provided
                    />
                  </Grid>
                  <Grid item xs={6}>
                    <Typography variant="h3" my={2}>{title}</Typography>
                    <Grid mt={4}>
                      <Typography variant="h6" component="span">Price: </Typography>
                      <Typography variant="body1" component="span">{price}</Typography>
                    </Grid>
                    <Grid mt={1}>
                      <Button variant="contained">Add to cart</Button>
                    </Grid>
                  </Grid>
                </Grid>
            </Container>
          }
        </Box>
      );
    }

    export const getServerSideProps = async ({params}) => {
      const { productHandle } = params
      // Fetch one product
      const product = await shopifyClient.product.fetchByHandle(productHandle);

      return {
       props: {
        product: parseShopifyResponse(product),
      },
     };
    };
For your collection’s page, you will, unfortunately, need a bit of filtering. At this moment, Shopify JS SDK only comes with the option to fetch products by collection’s ID, but not with its handle. In collections/[collectionName].js, you can use client.collection.fetchAllWithProducts() to fetch all the collections and their products.
Once you have them, you can grab the right one by checking its handle and passing it to your props.
    import * as React from 'react';

    import Container from '@mui/material/Container';
    import Box from '@mui/material/Box';

    import Navigation from '../../components/Navigation';
    import BreadcrumbsNavigation from '../../components/BreadcrumbsNavigation';
    import ProductsList from '../../components/ProductsList';
    import { shopifyClient, parseShopifyResponse } from '../../lib/shopify'

    export default function CollectionPage({products, collectionName}) {
      return (
        <Box>
          <Navigation />
          <Container maxWidth="lg">
            <BreadcrumbsNavigation title={collectionName} />
            <ProductsList products={products} />
          </Container>
        </Box>
      );
    }

    export const getServerSideProps = async ({params}) => {
      const { collectionName } = params
      // Fetch all the collections
      const collectionsData = await shopifyClient.collection.fetchAllWithProducts();
      const collections = parseShopifyResponse(collectionsData);
      // Get the right one
      const collection = collections.find(collection => collection.handle === collectionName)

      return {
       props: {
        collectionName,
        products: collection.products,
      },
     };
    };
Finally, if you are using the Image component, you will need to update next.config.js to add Shopify’s image domain:
   module.exports = {
      reactStrictMode: true,
      images: {
        domains: ['external-content.duckduckgo.com', 'cdn.shopify.com'],
      },
    };
The final result looks like this:  The complete codebase can be found in this GitHub repo.
Conclusion
In this article, you learned how to set up a Shopify store, enable the Storefront API, and get your access token. You then discovered how to create a Next.js app and set up your frontend by creating a homepage, along with collection and product pages. Finally, you installed the Shopify JS SDK and learned how to use it to fetch products from your online store.
From there, many more functionalities can be implemented. Whether it’s the creation of a cart, adding products to it, or completing checkout, Shopify’s JS SDK can help you accomplish your goals.
Monitor failed and slow GraphQL requests in production
While GraphQL has some features for debugging requests and responses, making sure GraphQL reliably serves resources to your production app is where things get tougher. If you’re interested in ensuring network requests to the backend or third party services are successful, try LogRocket.

LogRocket is like a DVR for web and mobile apps, recording literally everything that happens on your site. Instead of guessing why problems happen, you can aggregate and report on problematic GraphQL requests to quickly understand the root cause. In addition, you can track Apollo client state and inspect GraphQL queries' key-value pairs.
LogRocket instruments your app to record baseline performance timings such as page load time, time to first byte, slow network requests, and also logs Redux, NgRx, and Vuex actions/state. Start monitoring for free.


Top comments (1)
Thanks