
Written by Mario Zupan✏️
You may already be familiar with the remote procedure call framework gRPC. Given the similarity in naming, you might be inclined to believe that tRPC is somehow related to it, or does the same or a similar thing. However, this is not the case.
While tRPC is indeed also a remote procedure call framework, its goals and basis differ fundamentally from gRPC. The main goal of tRPC is to provide a simple, type-safe way to build APIs for TypeScript and JavaScript-based projects with a minimal footprint.
In this article, we’ll build a simple, full-stack TypeScript app using tRPC that will be type-safe when it comes to the code and across the API boundary. We’ll build a small, cat-themed application to showcase how to set up tRPC on the backend and how to consume the created API within a React frontend. You can find the full code for this example on GitHub. Let’s get started!
- Exploring tRPC
- Setting up tRPC
- Setting up our Express backend
- Testing our Express backend
- Creating our React frontend
- Testing and tRPC features
Exploring tRPC
If you have an application that uses TypeScript on both the backend and the frontend, tRPC helps you set up your API in a way that incurs the absolute minimum overhead in terms of dependencies and runtime complexity. However, tRPC still provides type safety and all the features that come with it, like auto-completion for the whole API and errors for when the API is used in an invalid way.
In practical terms, you can think of tRPC it as a very lightweight alternative to GraphQL. However, tRPC is not without its limitations. For one, it’s limited to TypeScript and JavaScript. Additionally, the API you are building will follow the tRPC model, which means it won’t be a REST API. You can’t simply convert a REST API to tRPC and have the same API as before but with types included.
Essentially, tRPC is a batteries-included solution for all your API needs, but it will also be a tRPC-API. That’s where the RPC in the name comes from, fundamentally changing how remote calls work. tRPC could be a great solution for you as long as you’re comfortable using TypeScript on your API gateway.
Setting up tRPC
We’ll start by creating a folder in our project root called server. Within the server folder, we create a package.json file as follows:
{
  "name": "server",
  "version": "1.0.0",
  "description": "",
  "main": "index.js",
  "scripts": {
    "test": "echo \"Error: no test specified\" && exit 1"
  },
  "author": "",
  "license": "ISC",
  "devDependencies": {
    "@tsconfig/node14": "^1.0.1",
    "typescript": "^4.5"
  },
  "dependencies": {
    "@trpc/server": "^9.21.0",
    "@types/cors": "^2.8.12",
    "@types/express": "^4.17.13",
    "cors": "^2.8.5",
    "express": "^4.17.2",
    "zod": "^3.14.2"
  }
}
We’ll also create a tsconfig.json file:
{
  "extends": "@tsconfig/node14/tsconfig.json",
  "compilerOptions": {
      "outDir": "build"
  }
}
Finally, create an executable run.sh file:
#!/bin/bash -e

./node_modules/.bin/tsc && node build/index.js
Next, we create a folder called src and include an index.ts file within it. Finally, we execute npm install in the server folder. With that, we’re done with the setup for the backend.
For the frontend, we’ll use Create React App to set up a React app with TypeScript support using the following command within the project root:
npx create-react-app client --template typescript
We can also run npm install in the client folder and run the app with npm start to see that everything works and is set up properly. Next, we’ll implement the backend of our application.
Setting up our Express backend
Install dependencies
As you can see above in the package.json of the server part of our application, we use Express as our HTTP server. Additionally, we add TypeScript and the trpc-server dependency.
Beyond that, we used the cors library for adding CORS to our API, which isn’t really necessary for this example, but it is good practice. We also add Zod, a schema validation library with TypeScript support, which is often used in combination with tRPC. However, you can also use other libraries like Yup or Superstruct. We’ll see exactly what this is for later on.
With the dependencies out of the way, let’s set up our basic Express backend with tRPC support.
Backend with Express
We’ll start by defining the tRPC router, which is a very important part of this whole infrastructure, allowing us to wire together our backend and frontend in terms of type safety and autocompletion. This router should be in its own file, for example router.ts, since we’ll import it into our React app later on as well.
Within router.ts, we start by defining the data structure for our domain object, Cat:
let cats: Cat[] = [];

const Cat = z.object({
    id: z.number(),
    name: z.string(),
});
const Cats = z.array(Cat);

...

export type Cat = z.infer<typeof Cat>;
export type Cats = z.infer<typeof Cats>;
You might be wondering why we’re not building simple JavaScript or TypeScript types and objects. Since we use Zod for schema validation with tRPC, we also need to build these domain objects with it. We can actually add validation rules using Zod, like a maximum amount of characters for a string, email validation, and more, combining type checking with actual validation.
We also get automatically created error messages when an input is not valid. However, these errors can be entirely customized. If you’re interested in validation and error handling, check out the docs for more information.
After implementing our type using Zod, we can infer a TypeScript type from it using z.infer. Once we have that, we export the type to use in other parts of the app like the frontend, and then move on to creating the heart of the application, the router:
const trpcRouter = trpc.router()
    .query('get', {
        input: z.number(),
        output: Cat,
        async resolve(req) {
            const foundCat = cats.find((cat => cat.id === req.input));
            if (!foundCat) {
                throw new trpc.TRPCError({
                    code: 'BAD_REQUEST',
                    message: `could not find cat with id ${req.input}`,
                });
            }
            return foundCat;
        },
    })
    .query('list', {
        output: Cats,
        async resolve() {
            return cats;
        },
    })
We can create a tRPC router by calling the router() method and chaining our different endpoints onto it. We can also create multiple routers and combine them. In tRPC, there are two types of procedures:
- Query: Used for fetching data. Think
GET - Mutation: Used for changing data. Think
POST,PUT,PATCH,DELETE
In the code snippet above, we create our query endpoints, one for fetching a singular Cat object by ID and one for fetching all Cat objects. tRPC also supports the concept of infiniteQuery, which takes a cursor and can return a paged response of potentially infinite data, if needed.
For out GET endpoint, we define an input. This endpoint will essentially be a GET /get?input=123 endpoint, returning the JSON of our Cat based on the definition above.
We can define multiple inputs if we need them. In the resolve async function, we implement our actual business logic. In a real world application, we might call a service or a database layer. However, since we’re just saving our Cat objects in-memory, or in an array, we check if we have a Cat with the given ID and if not, we throw an error. If we find a Cat, we return it.
The list endpoint is even simpler since it takes no input and returns only our current list of Cat objects. Let’s look at how we can implement creation and deletion with tRPC:
    .mutation('create', {
        input: z.object({ name: z.string().max(50) }),
        async resolve(req) {
            const newCat: Cat = { id: newId(), name: req.input.name };
            cats.push(newCat)
            return newCat
        }
    })
    .mutation('delete', {
        input: z.object({ id: z.number() }),
        output: z.string(),
        async resolve(req) {
            cats = cats.filter(cat => cat.id !== req.input.id);
            return "success"
        }
    });

function newId(): number {
    return Math.floor(Math.random() * 10000)
}

export type TRPCRouter = typeof trpcRouter;
export default trpcRouter;
As you can see, we use the .mutation method to create a new mutation. Within it, we can, again, define input, which in this case will be a JSON object. Be sure to note the validation option we provided here for the name.
In resolve, we create a new Cat from the given name with a random ID. Check the newId function at the bottom and add it to our list of Cat objects, returning the new Cat to the caller. Doing so will result in something like a POST /create expecting some kind of body. If we use the application/json content-type, it will return JSON to us and expect JSON.
In the delete mutation, we expect a Cat object's ID, filter the list of Cat objects for that ID, and update the list, returning a success message to the user. The responses don’t actually look like what we define here. Rather, they are wrapped inside of a tRPC response like the one below:
{"id":null,"result":{"type":"data","data":"success"}}
And that’s it for our router; we have all the endpoints we need. Now, we’ll have to wire it up with an Express web app:
import express, { Application } from 'express';
import cors from 'cors';
import * as trpcExpress from '@trpc/server/adapters/express';
import trpcRouter from './router';

const app: Application = express();

const createContext = ({}: trpcExpress.CreateExpressContextOptions) => ({})

app.use(express.json());
app.use(cors());
app.use(
    '/cat',
    trpcExpress.createExpressMiddleware({
        router: trpcRouter,
        createContext,
    }),
);

app.listen(8080, () => {
    console.log("Server running on port 8080");
});
tRPC comes with an adapter for Express, so we simply create our Express application and use the provided tRPC middleware inside of the app. We can define a sub-route where this configuration should be used, a router, and a context.
The context function is called for each incoming request, and it passes its result to the handlers. In the context function, you could add the context data you want for each request, like an authentication token or the userId of a user who is logged in.
If you want to learn more about authorization with tRPC, there’s a section about it in the docs.
Testing our Express backend
That’s it for the app! Let’s test it quickly so we know everything is working correctly We can start the app by executing the ./run.sh file and send off some HTTP requests using cURL. First, let’s create a new Cat:
curl -X POST "http://localhost:8080/cat/create" -d '{"name": "Minka" }' -H 'content-type: application/json'

{"id":null,"result":{"type":"data","data":{"id":7216,"name":"Minka"}}}
Then, we can list the existing Cat objects:
curl "http://localhost:8080/cat/list"

{"id":null,"result":{"type":"data","data":[{"id":7216,"name":"Minka"}]}}
We can also fetch the Cat by its ID:
curl "http://localhost:8080/cat/get?input=7216"

{"id":null,"result":{"type":"data","data":{"id":7216,"name":"Minka"}}}
And finally, delete a Cat:
curl -X POST  "http://localhost:8080/cat/delete" -d '{"id": 7216}' -H 'content-type: application/json'

{"id":null,"result":{"type":"data","data":"success"}}

curl "http://localhost:8080/cat/list"

{"id":null,"result":{"type":"data","data":[]}}
Everything seems to work as expected. Now, with the backend in place, let’s build our React frontend.
Creating our React frontend
First, within the src folder, let’s create a cats folder to add some structure in our application. Then, we add some additional dependencies:
npm install --save @trpc/client @trpc/server @trpc/react react-query zod
We need the server for type safety, the client for the minimal logic needed to make calls to an API, zod, as mentioned before, for schema validation, trpc/react for easier integration with React Query, and finally React Query. However, it’s also possible to use trpc/client on its own, or completely vanilla, which is also covered in the docs.
In this example, like in the official ones, we’ll use React Query, which adds API-interaction to React apps. Adding React Query is completely optional, and it’s possible to just use a vanilla client with the frontend framework of your choice, including React, and integrate it exactly the way you want to. Let’s start by building the basic structure of our app in App.tsx:
import { useState } from 'react';
import './App.css';
import type { TRPCRouter } from '../../server/src/router';
import { createReactQueryHooks } from '@trpc/react';
import { QueryClient, QueryClientProvider } from 'react-query';
import Create from './cats/Create';
import Detail from './cats/Detail';
import List from './cats/List';

const BACKEND_URL: string = "http://localhost:8080/cat";

export const trpc = createReactQueryHooks<TRPCRouter>();

function App() {
  const [queryClient] = useState(() => new QueryClient());
  const [trpcClient] = useState(() => trpc.createClient({ url: BACKEND_URL }));

  const [detailId, setDetailId] = useState(-1);

  const setDetail = (id: number) => {
    setDetailId(id);
  }

  return (
    <trpc.Provider client={trpcClient} queryClient={queryClient}>
      <QueryClientProvider client={queryClient}>
        <div className="App">
          <Create />
          <List setDetail={setDetail}/>
          { detailId > 0 ? <Detail id={detailId} /> : null }
        </div>
      </QueryClientProvider>
    </trpc.Provider>
  );
}

export default App;
There’s quite a bit to unpack, so let’s start from the top. We instantiate trpc using the createReactQueryHooks helper from trpc/react, giving it the TRPCRouter that we import from our backend app. We also export for use in the rest of our app.
Essentially, this creates all the bindings towards our API underneath. Next, we create a React Query client and a tRPC-client to provide the URL for our backend. We’ll use this client to make requests to the API, or rather the client React Query will use underneath.
In addition to all of this setup, we also define a state variable for detailId so we know which Cat detail to show if the user selects any.
If you check out what we return from App, you can see that our actual markup, the div with the App class, is nested within two layers. These layers are on the outer side, the tRPC provider, and inside that, the React Query provider.
These two components make the necessary moving parts available to our whole application. Therefore, we can use tRPC throughout our application, and our query calls get seamlessly integrated with our React app. Next, we'll add components for Create, List, and Detail to our markup, which will include all of our business logic.
Let’s start with the Create component by creating a Create.css and Create.tsx file inside the src/cats folder. In this component, we’ll simply create a form and connect the form to the create mutation we implemented on the backend. Once a new Cat has been created, we want to re-fetch the list of Cat objects so that it’s always up to date. We could implement this with the following code:
import './Create.css';
import { ChangeEvent, useState } from 'react';
import { trpc } from '../App';

function Create() {
  const [text, setText] = useState("");
  const [error, setError] = useState("");

  const cats = trpc.useQuery(['list']);
  const createMutation = trpc.useMutation(['create'], {
    onSuccess: () => {
      cats.refetch();
    },
    onError: (data) => {
      setError(data.message);
    }
  });

  const updateText = (event: ChangeEvent<HTMLInputElement>) => {
    setText(event.target.value);
  };

  const handleCreate = async() => {
    createMutation.mutate({ name: text });
    setText("");
  };

  return (
    <div className="Create">
      {error && error}
      <h2>Create Cat</h2>
      <div>Name: <input type="text" onChange={updateText} value={text} /></div>
      <div><button onClick={handleCreate}>Create</button></div>
    </div>
  );
}

export default Create;
Let's start off with some very basic, vanilla React logic. We create some internal component state for our form field and the potential errors we might want to show. We return a simple form featuring a text field connected to our state, as well as a button to submit it.
Now, let’s look at the handleCreate function. We call .mutate on the createMutation, which we define above it and reset the text field afterwards.
The createMutation is created using trpc.useMutation with our create endpoint. In your IDE or editor, note that when typing create within the useMutation call, you'll get autocomplete suggestions. We also get suggestions in the payload for the .mutate call suggesting that we use the name field.
Inside the .useMutation call, we define what should happen on success and on error. If we encounter an error, we simply want to display it using our component-internal state. If we successfully create a Cat, we want to re-fetch the data for our list of Cat objects. For this purpose, we define a call to this endpoint using trpc.useQuery with our list endpoint and call it inside the onSuccess handler.
We can already see how easy it is to integrate our app with the tRPC API, as well as how tRPC helps us during development. Let’s look at the detail view next, creating Detail.tsx and Detail.css within the cats folder:
import './Detail.css';
import { trpc } from '../App';

function Detail(props: {
  id: number,
}) {
  const cat = trpc.useQuery(['get', props.id]);

  return (
    cat.data ?
      <div className="Detail">
        <h2>Detail</h2>
        <div>{cat.data.id}</div>
        <div>{cat.data.name}</div>
      </div> : <div className="Detail"></div>
  );
}

export default Detail;
In the component above, we basically just use .useQuery again to define our getCatById endpoint, providing the ID we get from our root component via props. If we actually get data, we render the details of the Cat. We could also use effects for the data fetching here. Essentially, any way you would integrate an API with your React app will work fine with tRPC and React Query.
Finally, let’s implement our List component by creating List.css and List.tsx in cats. In our list of Cat objects, we’ll display the ID and name of a Cat, as well as a link to display it in detail and a link to delete it:
import './List.css';
import { trpc } from '../App';
import type { Cat } from '../../../server/src/router';
import { useState } from 'react';

function List(props: {
  setDetail: (id: number) => void,
}) {
  const [error, setError] = useState("");
  const cats = trpc.useQuery(['list']);
  const deleteMutation = trpc.useMutation(['delete'], {
    onSuccess: () => {
      cats.refetch();
    },
    onError: (data) => {
      setError(data.message);
    }
  });

  const handleDelete = async(id: number) => {
    deleteMutation.mutate({ id })
  };

  const catRow = (cat: Cat) => {
    return (
      <div key={cat.id}>
        <span>{cat.id}</span>
        <span>{cat.name}</span>
        <span><a href="#" onClick={props.setDetail.bind(null, cat.id)}>detail</a></span>
        <span><a href="#" onClick={handleDelete.bind(null, cat.id)}>delete</a></span>
      </div>
    );
  };

  return (
    <div className="List">
      <h2>Cats</h2>
      <span>{error}</span>
      { cats.data && cats.data.map((cat) => {
        return catRow(cat);
      })}
    </div>
  );
}

export default List;
This component basically combines the functionality we used in the two previous ones. For one, we fetch the list of cats using useQuery on our list endpoint and also implement the deletion of Cat objects with a subsequent re-fetch using deleteMutation, pointing to our delete mutation on the backend.
Besides that, everything is quite similar. We pass in the setDetailId function from App via props so that we can set the cat to show details in Detail and create a handler for deleting a cat, which executes our mutation.
Notice all the autocompletion provided by tRPC. If you mistype something, for example, the name of an endpoint, you will get an error, and the frontend won't start until the error is corrected. That’s it for our frontend, let’s test it and see tRPC in action!
Testing and tRPC features
First, let’s start the app with npm start and see how it works. Once the app is up, we can create new cats, delete them, and watch their detail page while observing the changes directly in the list. It’s not particularly pretty, but it works!


Let’s take a look at how tRPC can help us during our development process. Let’s say we want to add an age field for our cats:
const Cat = z.object({
    id: z.number(),
    name: z.string(),
    age: z.number(),
});

...
    .mutation('create', {
        input: z.object({ name: z.string().max(50), age: z.number().min(1).max(30) }),
        async resolve(req) {
            const newCat: Cat = { id: newId(), name: req.input.name, age: req.input.age };
            cats.push(newCat)
            return newCat
        }
    })
...
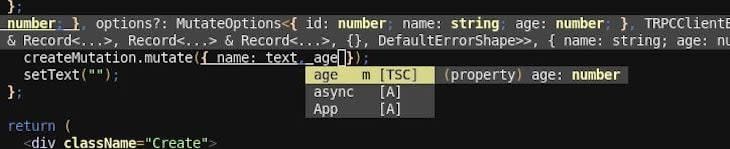
We add the field to our domain object, and we also need to add it to our create endpoint. Once you hit save on your backend code, navigate back to your frontend code in ./client/src/cats/Create.tsx. Our editor shows us an error. The property age is missing in our call to createMutation:

If we want to add the age field to our mutation now, our editor will provide us with autocomplete with full type-information directly from our changed router.ts:
From my perspective, this is the true power of tRPC. While it’s nice to have a simple way to create an API both on the frontend and the backend, the real selling point is the fact that the code actually won’t build if I make a breaking change on one side and not the other.
For example, imagine a huge codebase with multiple teams working on API endpoints and UI elements. Having this kind of safety in terms of API compatibility with almost no overhead to the application is quite remarkable.
Conclusion
Hopefully, this article showed you how tRPC could be quite useful in situations when one uses TypeScript both on the frontend and backend. I love the low-footprint approach. With minimal or no extra dependencies, you can focus on compile-time correctness instead of runtime-checking.
Obviously, in certain cases, the TypeScript limitation might be too much to bear. The principle behind tRPC is great in terms of developer experience. tRPC is an exciting project that I will certainly keep my eye on in the future. I hope you enjoyed this article! Happy coding.
Writing a lot of TypeScript? Watch the recording of our recent TypeScript meetup to learn about writing more readable code.

TypeScript brings type safety to JavaScript. There can be a tension between type safety and readable code. Watch the recording for a deep dive on some new features of TypeScript 4.4.


Top comments (0)