
Written by Rishabh Rawat✏️
In today’s world, working with data has become one of the core ingredients of any user-facing application. While it may seem insignificant at the start, handling it well is not so trivial when you’re working on the scale of thousands of daily active users.
Kafka helps you build durable, fault-tolerant, and scalable data pipelines. Moreover, it has been adopted by applications like Twitter, LinkedIn, and Netflix.
In this article, we will understand what Kafka pub-sub is, how it helps, ad how to start using it in your Node.js API.
Jump ahead:
- What is pub-sub?
- A brief introduction to Kafka
- Setting up our Node.js project
- Installing Kafka
- Creating a Kafka topic
- Setting up Kafka brokers
- Writing our first producer
- Configuring your Kafka consumer
- Kafka consumer customization options
- Why is Kafka pub-sub is better than using HTTP requests?
- What happens after consumption?
- Real-world applications of Kafka
What is pub-sub?
Pub-sub is a way to decouple the two ends of a connection and communicate asynchronously. This setup consists of publishers (pub) and subscribers (sub), where publishers broadcast events, instead of targeting a particular subscriber in a synchronous, or blocking, fashion. The subscribers then consume events from the publishers.
With this mechanism, a subscriber is no longer tied to a given producer and can consume and process events at its own pace. It promotes scalability because a single broadcast event can be consumed by multiple subscribers. It is a big leap forward from a mere HTTP request.
Contrary to this, the HTTP request-response cycle leaves the requester waiting for the response and effectively blocks them from doing anything else. This is a big reason for moving to an event-based architecture in today’s microservice-based applications environment.
A brief introduction to Kafka
Kafka offers three main capabilities:
- A pub-sub mechanism
- Storing data (even after consumption is complete) for as long as you want
- Process events in batch or real-time (use case specific)
Kafka ensures that any published event can be consumed by multiple consumers, and that those events won’t be deleted or removed from the storage once consumed. It allows you to consume the same event multiple times, so data durability is top-notch.
Now that we know what Kafka provides, let’s look at how it works. 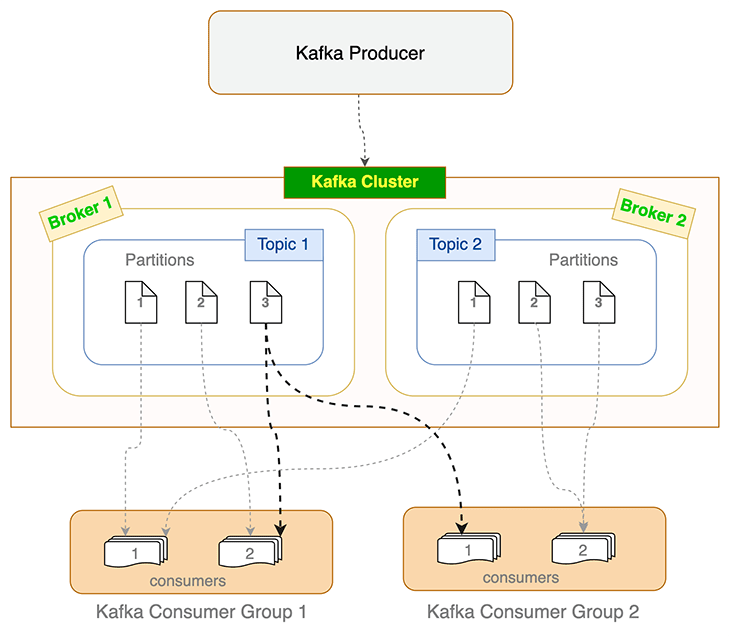 Figure 1: Kafka fundamentals overview
A fresh, self-hosted or managed Kafka cluster mostly contains brokers. A Kafka broker is a computer or cloud instance running the Kafka broker process. It manages a subset of partitions and handles incoming requests to write new events to those partitions or read them. Writes usually only happen to the instances running the leader; other instances follow through replication. For a given topic and its partitions spread across multiple brokers, Kafka seamlessly elects a new leader from the followers if a leader broker dies.
Producers and consumers use Kafka broker(s) to write events and read from Kafka topics. Topics are further divided into partitions. To keep track of how many events are processed (and committed), Kafka maintains an offset value, which is nothing but an incrementing number that reflects the number of events processed.
When a consumer dies or becomes unresponsive (i.e., failing to send heartbeats to the broker within the sessionTimeout ms set), Kafka reassigns those orphaned partitions to the remaining consumers. Similar load balancing happens when a new consumer joins the consumer group. This process of reassigning and reevaluating load is called rebalancing. When Kafka consumers rebalance, they start consumption from the latest un-committed offset.
Practical constraint on partition and consumer count
A topic’s partition can only be consumed by a single consumer in a consumer group. But multiple consumers from different consumer groups can each consume from the same partition. This is depicted in the flowchart above for Partition 3 of Topic 1.
Setting up our Node.js project
We will use a barebones Express.js API for this tutorial. You can find the starter code here. We will use it as a base and add Kafka support to the API. We can do more with the data, but the API is intentionally kept simple so that we can focus on Kafka.
If you want to follow along, run the API locally on your machine. Here are the steps:
- Clone the repository:
git clone git@github.com:Rishabh570/kafka-nodejs-starter.git - Checkout to the starter branch:
git checkout starter - Install the packages:
npm install - Run the server:
npm start
Now that the API is running locally on your machine, let’s install Kafka.
Installing Kafka
Before we start producing and consuming events, we need to install Kafka to our API. We will use the Kafka.js client library for Node.js.
Run this command to install it:
npm install kafkajs
Next, install the Kafka CLI tool. It helps with administrative tasks and experimenting with Kafka. Simply head over to kafka.apache.org and download Kafka.
We are now officially ready to dive into the interesting stuff. Let’s create a Kafka topic to start producing events.
Creating a Kafka topic
In Kafka, you need a topic to send events. A Kafka topic can be understood as a folder; likewise, the events in that topic are the files in that folder. Events sent on channelA will stay isolated from the events in channelB. Kafka topics allow isolation between multiple channels.
Let’s create a topic using the Kafka CLI we downloaded in the previous step:
bin/kafka-topics.sh --create --topic demoTopic --bootstrap-server localhost:9092
We used the kafka-topics.sh script to create the Kafka topic. When running the above command, ensure you’re in the folder where you downloaded the Kafka CLI tool.
We have created a topic named demoTopic. You can name it anything; I’d recommend following a naming convention when creating topics. For an ecommerce application, the nomenclature for Kafka topics to notify users who wishlisted an item can be like this:
-
macbook14_wishlisted_us_east_1_app -
macbook14_wishlisted_us_east_2_app -
macbook14_wishlisted_us_east_1_web -
macbook14_wishlisted_us_east_2_web
As you might have noticed, it leverages item and user properties to assign topic names. Not only does this offload a major responsibility from your shoulders, it immediately tells you what kind of events the topic holds. Of course, you can make the names even more specific and granular based on your specific project.
Setting up Kafka brokers
To send events, we need one more thing: brokers.
As we learned earlier, brokers are responsible for writing events and reading them from topics. We’ll make sure it is setup before our code runs.
This is what our index.js file looks like:
const { Kafka } = require('kafkajs')

const kafka = new Kafka({
  clientId: 'kafka-nodejs-starter',
  brokers: ['kafka1:9092'],
});
Before the API uses the routes to produce or consume events, it connects to the Kafka client and creates two brokers. That’s it.
Let’s move on to actually producing events now.
Writing our first producer
We have successfully installed Kafka on our Node.js application. It’s time to write our first Kafka producer and learn how it works.
const producer = kafka.producer()

// Connect to the producer
await producer.connect()

// Send an event to the demoTopic topic
await producer.send({
  topic: 'demoTopic,
  messages: [
    { value: 'Hello micro-services world!' },
  ],
});

// Disconnect the producer once we're done
await producer.disconnect();
We address three steps with the above code:
- Connecting to the Kafka producer
- Sending a test event on the topic we had created
- Disconnecting the producer once we’re done using it
This is a straightforward example. There are a few configuration settings that the client library provides that you might want to tweak as per your needs. These include:
- Idempotent: If set, the Kafka producer will make sure the events are written to the topic exactly once. You can choose to keep it disabled and handle idempotency while consuming
- Retry: You can choose to customize the retry mechanism when producing messages using Kafka.js; read more about how the retry mechanism works here
Configuring your Kafka consumer
We have written our Kafka producer and it is ready to send events on the demoTopic topic. Let’s build a Kafka consumer that will listen to the same topic and log it into the console.
const consumer = kafka.consumer({ groupId: 'test-group' })

await consumer.connect()
await consumer.subscribe({ topic: 'demoTopic', fromBeginning: true })

await consumer.run({
  eachMessage: async ({ topic, partition, message }) => {
    console.log({
      value: message.value.toString(),
    })
  },
});
Here’s what is happening in the above code snippet:
- We create a consumer group
- We connect to the consumer and subscribe to our
demoTopic - Finally, we process the messages consumed and log them to the console
Kafka consumer customization options
The Kafka consumer provides many options and a lot of flexibility in terms of allowing you to determine how you want to consume data. Here are some settings you should know:
autoCommit
Committing in Kafka means saving the message/event to disk after processing. As we know, offset is just a number that keeps track of the messages/events processed.
Committing often makes sure that we don’t waste resources processing the same events again if a rebalance happens. But it also increases the network traffic and slows down the processing.
maxBytes
This tells Kafka the maximum amount of bytes to be accumulated in the response. This setting can be used to limit the size of messages fetched from Kafka and avoids overwhelming your application.
fromBeginning
Kafka consumes from the latest offset by default. If you want to consume from the beginning of the topic, use the fromBeginning flag.
await consumer.subscribe({ topics: ['demoTopic], fromBeginning: true })
Seek
You can choose to consume events from a particular offset as well. Simply pass the offset number you want to start consuming from.
// This will now only resolve the previous offset, not commit it
consumer.seek({ topic: 'example', partition: 0, offset: "12384" })
The client also provides a neat pause and resume functionality on the consumer. This allows you to build your own custom throttling mechanism.
There are a lot of other options to explore and you can configure them according to your needs. You can find all the consumer settings here.
Why is Kafka pub-sub better than using HTTP requests?
HTTP has its valid use cases, but it is easy to overdo it. There are scenarios where HTTP is not suitable. For example, you can inject events into a Kafka topic named order_invoices to send them to the customers who requested them during their purchase.
This is a better approach compared to sending the events over HTTP because:
- It allows you to decouple the event sender and receiver. Since you do not expect (or need) an immediate response, an HTTP request does not help
- It is durable. Since Kafka events are not dropped upon consumption, you can replay those events if the notification-sending service fails abruptly
- It is scalable. You can consume the Kafka events at multiple places, even in different services or APIs
What happens after consumption?
If you have idempotency requirements, I’d recommend having an idempotency layer in your services as well. With an idempotency layer, you can replay all Kafka events, as well as the events between two given timestamps.
How do you filter out only specific ones between a given period of time? If you take a closer look, Kafka does not (and should not) solve this problem.
This is where the application-level idempotency layer comes into play. If you replay all of your events between specific timestamps, the idempotency mechanism in your services makes sure to only cater to the first-seen events.
A simple idempotency solution can be to pick a unique and constant parameter from the request (say, order ID in our invoices example) and create a Redis key using that. So, something like the below should work for starters:
notification:invoices:<order_id>
This way, even if you replay events, your application won’t process the same order again for sending out the notification for the invoice. Moreover, if you want this Redis key to be relevant for only a day, you can set the TTL accordingly.
Real-world applications of Kafka
Kafka pub-sub can be used in a variety of places:
- In large-scale, distributed messaging platforms, due to its durability, replication, and fault tolerance
- For user activity tracking: Kafka provides batch processing for messages, which can be used to post-process and store user clickstream and behavior information
- As a streaming pipeline for processing non-time-sensitive events. For example, sending notifications to your customers when an item is back in stock, sending announcements, or promotional campaign notifications
- In revision history, to provide the historical actions performed at specific timeframes
- To store events that you do not want to lose after they are consumed and processed once. This helps in replaying or resyncing your applications and certain operations
Twitter uses Kafka as its primary pub-sub pipeline. LinkedIn uses it to process more than 7 trillion messages per day, and Kafka event streams are used for all point-to-point and across the Netflix studio communications due to its high durability, linear scalability, and fault tolerance.
It wouldn’t be wrong to say that Kafka is one of the most important cornerstones for scalable services, satisfying millions of requests.
Conclusion
We have looked at what Kafka pub-sub is, how it works, and one of the ways you can leverage it in your Node.js application.
Now, you have all the required tools and knowledge to embark on your Kafka journey. You can get the complete code from this kafka-node-starter repository, in case you weren’t able to follow along. Just clone the repository and follow the steps shown in this guide. You will definitely have a better understanding when you follow this hands-on.
For any queries and feedback, feel free to reach out in the comments.
200’s only ✔️ Monitor failed and slow network requests in production
Deploying a Node-based web app or website is the easy part. Making sure your Node instance continues to serve resources to your app is where things get tougher. If you’re interested in ensuring requests to the backend or third party services are successful, try LogRocket.

LogRocket is like a DVR for web apps, recording literally everything that happens on your site. Instead of guessing why problems happen, you can aggregate and report on problematic network requests to quickly understand the root cause.
LogRocket instruments your app to record baseline performance timings such as page load time, time to first byte, slow network requests, and also logs Redux, NgRx, and Vuex actions/state. Start monitoring for free.


Top comments (0)