
Welcome to the second part of the "Serving website from home" serie. In this one we'll talk about making our web server more useful and complete. We'll talk about buying a domain name, pointing it to our server and then creating subdomains so we could host multiple websites from a single server instance. After that, to make websites more secure, we'll go through the installation of the SSL certificates.
Finally, we'll set up some cron jobs to make our server more stable and I will leave you with some ideas on how to achieve 99% of your home server uptime. Stay tuned!
Content:
- Get your domain name
- Point domain to your server
- Creating subdomains
- Configure Apache base domain
- Configure Apache subdomain
- Installing SSL certificates
- Improve server uptime using Cron jobs
- Improve server uptime - ideas
- Conclusion
Following through my previous blog you should have your basic website up and running from your home. Now it's time to level up your web server. Let's start by getting your domain name.
Get your domain name
You can buy a domain name from numerous different sites. For example, some of them are Namecheap, GoDaddy, AWS Route 53. I personally use Namecheap and it works fine for me. I recommend using Namecheap if you still aren't registered with some other domain provider because it will be easier for you to follow along. If you use some other provider, there shouldn't be any drastic differences in steps, so you'll probably be fine.
Go to the chosen provider site and search for a domain name you like. If the domain name is already taken, try to think of something similar of your liking. Once you found your domain name, add it to cart. You will probably be offered some extra stuff that goes with your domain, for example you could add an SSL certificate to your domain for extra $3 or $4 per year, but you don't need any of that, the domain name itself is enough, we will install the SSL certificate for free by using Let's Encrypt.
Once you bought your chosen domain name, you should see it on the domain list in your account. There you can manage your domain names, which takes us to pointing the domain to our web server.
Point a domain to your server
Pointing the domain names to your web server is a fairly simple thing to do. I use Namecheap but any other provider should have the same settings within a different user interface.
In your domain names list, click "Manage" button to access details of a certain domain name and then go to tab "Advanced DNS". There you can simply point domain or subdomain name to your network public IP address. The most simple way to find your public IP address is to visit icanhazip.com from any device connected to the same network as your web server.
Now we are ready to point domain names to our network IP address. In my case, domain name that I bought is "rusac.dev". Follow the picture below.
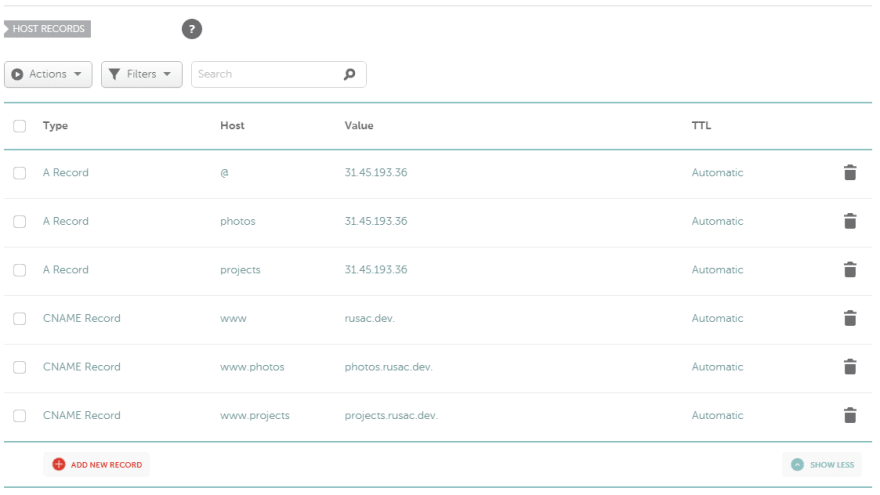
First Type A record with a host value of "@" represents where to point "rusac.dev" domain name. IP address value for every Type A record should be your network public IP address (address of your web server), and TTL set to automatic.
Time to live (TTL) is the amount of time your old DNS record could still show up the old value after you change your DNS record. For example, if you set a TTL value to 30 minutes, that means that the DNS servers around the world could still be showing the old value from their cache for up to 30 minutes after the change.
When creating a new DNS record, keep in mind that it can take a while to propagate all over the world. Usually, it takes a few minutes, you can use whatsmydns.net to check your propagation status. Just enter domain name you want to check and select "A" type from dropdown menu and click search. You will get a list of countries and IP address you see should be your network public IP address.
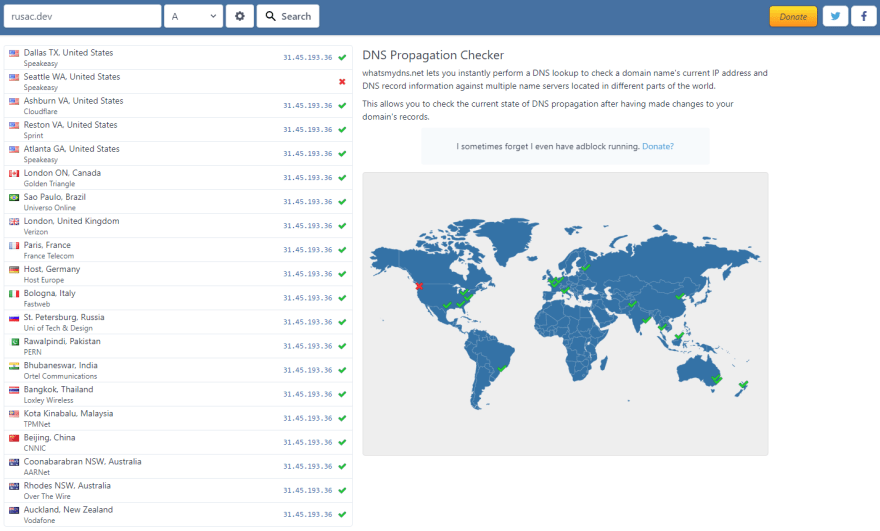
If you get a green check that means it's propagated in that country and it points to listed IP address - the public IP address of your network/web server which means domain pointing is properly done. Good job!
Creating subdomains
Second Type A record with host value of (in my case) "photos" should also point to network public IP address. By creating Type A record with a "photos" value we actually created a subdomain "photos.rusac.dev" and pointed it to our server address. I also have a third Type A record with "projects" host value which means I have another subdomain "photos.rusac.dev" - you get the idea.
This way you can create as many subdomains as you like and point them all to your web server. Once a web request comes to our web server, our Apache server will serve the appropriate website to the user. That will happen, of course, when we configure it to do so.
You may have noticed, apart from three Type A records, there are also three CNAME records. First one has a host value of "www" which means we are talking about "www.rusac.dev" domain with a value of "rusac.dev". That means "www.rusac.dev" points to "rusac.dev" and "rusac.dev" using Type A record points to our server IP address. This way we will get to "rusac.dev" website no matter if we enter "www.rusac.dev" or "rusac.dev" in our web browser.
You can check this using the whatsmydns.net, enter subdomain name, select CNAME type from dropdown list and click search. You should get a similar result as shown on the picture below.

Second CNAME record with a host value of "www.photos" refers to "www.photos.rusac.dev" domain and points to "photos.rusac.dev" domain which via Type A record points to our server IP address. Same goes for the third CNAME record. Creating CNAME records is not required, but is recommended because this way subdomains will be accessible starting with a "www" subdomain/prefix.
To summarize, my main domain name which I bought is "rusac.dev". Under my main domain I have three subdomains: "www.rusac.dev", "photos.rusac.dev" and "projects.rusac.dev". We can observe "www" subdomain the same way as "photos" or "projects" subdomains. It's as simple as that. Now that we have our subdomain DNS records created, it's time to configure our Apache server to serve requested website to the user.
Configure Apache base domain
I'll explain how I set up "rusac.dev" domain and "projects.rusac.dev" subdomain names. This way it will be easy for you to follow up using your preferred domain names.
First of all, create your website folder. You can name it however you want but good practice would be naming it the same way your domain name is except for using hyphen instead of a period, because it's cleaner.
sudo mkdir /var/www/rusac-dev // Create website folder
After creating website folder you can git clone your website inside or you can simply create basic "index.html" file with some example HTML markup.
sudo nano /var/www/rusac-dev/index.html // Create index.html file
Example HTML markup:
<html>
    <head>
        <title>Hello World!</title>
    </head>
    <body>
        <h1>Welcome to my personal website!</h1>
    </body>
</html>
Our website is ready and the next thing to do is to create Apache configuration file. Use the following command to create .conf file.
sudo nano /etc/apache2/sites-available/rusac.dev.conf
Inside "your.domain.name.conf" file paste the following configuration.
 <VirtualHost *:80>
    ServerAdmin dominik@lloyds.design
    ServerName rusac.dev
    ServerAlias www.rusac.dev
    DocumentRoot /var/www/rusac-dev

    ErrorLog ${APACHE_LOG_DIR}/error.log
    CustomLog ${APACHE_LOG_DIR}/access.log combined
</VirtualHost>
Make sure you replace ServerAdmin, ServerName, ServerAlias and DocumentRoot with your corresponding values. ServerAdmin value should be your email address, ServerName should be your domain name (Type A record) while ServerAlias should be your subdomain (CNAME record) which points to Type A record of the domain. Finally, DocumentRoot is a path to the website which you want to serve on the specified domains.
Now we have our website and configuration ready, awesome! We are almost there. All there is to do now is to test configuration, enable our website and restart Apache server. Use the following commands:
sudo apache2ctl configtest    // Should return Syntax OK message
sudo a2ensite rusac.dev.conf    // Enable website
sudo systemctl restart apache2    // Restart Apache server
Your Apache server should now serve your website globally! If you were following my setup, you can access it with or without "www" subdomain/prefix. So in my case, Apache serves the same website to both "rusac.dev" and "www.rusac.dev" domains.
NOTE: If you bought .dev domain like me, your website will not work until you install an SSL certificate because .dev domains require SSL certificate by default. You will get "Your connection is not private" message. So our next step is obtaining a free SSL certificate using Let's Encrypt.
Before installing an SSL certificate, let's quickly set up a website for "projects.rusac.dev" subdomain. Process is almost the same as for the base "rusac.dev" domain.
Configure Apache subdomain
Create website folder and "index.html" file inside with example HTML markup.
sudo mkdir /var/www/projects-rusac-dev       // Create website folder
sudo nano /var/www/projects-rusac-dev/index.html    // Create index.html file
Example HTML markup:
<html>
    <head>
        <title>Hello World!</title>
    </head>
    <body>
        <h1>Welcome to my projects website!</h1>
    </body>
</html>
Create configuration file:
sudo nano /etc/apache2/sites-available/projects.rusac.dev.conf
Fill it with your subdomain values and DocumentRoot:
<VirtualHost *:80>
    ServerAdmin dominik@lloyds.design
    ServerName projects.rusac.dev
    ServerAlias www.projects.rusac.dev
    DocumentRoot /var/www/projects-rusac-dev

    ErrorLog ${APACHE_LOG_DIR}/error.log
    CustomLog ${APACHE_LOG_DIR}/access.log combined
</VirtualHost>
Check for errors, enable site and finally restart Apache server.
sudo apache2ctl configtest    // Should return Syntax OK message
sudo a2ensite projects.rusac.dev.conf    // Enable website
sudo systemctl restart apache2    // Restart Apache server
Our website on "projects.rusac.dev" subdomain is now online and accessible with or without "www" subdomain/prefix. Let's proceed to installing SSL certificates on our domains.
Installing SSL certificates
I will install SSL certificates for "www.projects.rusac.dev" and "projects.rusac.dev" domain names. Process is the same for any other domain. Before continuing, make sure your "Apache Full" firewall profile is active and allows traffic through port 80 and 443 (SSL). Check that using the following command and allow "Apache Full" if needed:
sudo ufw status    // Check firewall status
sudo ufw allow 'Apache Full'    // Run if profile is not active
Find and follow certbot instructions to install certbot on your server. Certbot will help you to easily install SSL certificates on your websites. Once installed, run it using this command:
sudo certbot --apache
You will get a numbered list of your Apache enabled sites. Choose sites for which you want to obtain SSL certificate by entering numbers separated by commas or spaces, then press enter. I entered numbers of "projects.rusac.dev" and "www.projects.rusac.dev" domain names.
Certificates will start obtaining and you will be asked whether or not to redirect HTTP traffic to HTTPS. Enter number 2 because we want all traffic going through secure HTTPS with removing non-secure HTTP access. See the picture below.
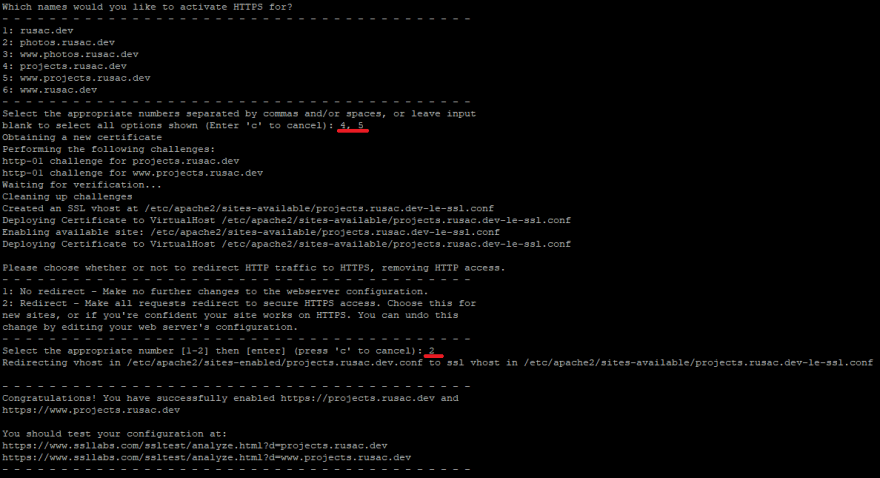
If everything goes well, you'll get congratulations message and SSL certificates installed. That's it! Also you'll get links where you can go to test your SSL configuration.
Improve server uptime using Cron jobs
If you happen to have a dynamic IP address like I do then you have a problem. Every time your IP address changes, your websites will be down because your domains will point to your old IP address. To fix this, you would need to update your DNS records at least once a day, which is really frustrating and we wanna automate that. Fortunately, Namecheap offers a solution.
You can set up a cron job on your server which sends out request to Namecheap every X minutes and update your DNS records with your current server public IP address. For example, if you send out a request from your server every 15 minutes that means your maximum server downtime per IP change would be less than 15 minutes. If you send out a request every minute, then you'll get much better server uptime. I chose to send request every 15 minutes which works fine for me.
Check Namecheap instructions on how to build URL for updating your domain DNS records. You will need your Dynamic DNS password which could be found in advanced DNS settings of your domain.
If you are not using Namecheap, check if your domain provider offers this or similar possibility. I will explain my cron job example for updating DNS records of "projects.rusac.dev" domain.
Open cron tasks using command:
crontab -e
At the bottom of the file add the following line, then save and exit:
*/15 * * * * curl "https://dynamicdns.park-your-domain.com/update?host=projects&domain=rusac.dev&password=your_namecheap_dyndns_password" > /home/dominik/projects.rusac.dev.log
The "curl" command will run every 15 minutes and will make a request to the specified URL. In this case, sending a request will update the DNS records for "projects.rusac.dev" domain and will save the result to "projects.rusac.dev.log" file. You can create as many cron jobs as you need. Create a cron job for each domain/subdomain whose DNS records must be updated regularly.
Created cron job will be updating our DNS records every 15 minutes, so if your website is down, wait for up to 15 minutes and your website will be back online, of course that is if everything else is set up properly.
There are a lot of crontab generators online which can help you create your cron job the way you want it. For example check out Crontab Generator.
Improve server uptime - ideas
No matter how good your server configuration setup is, your server uptime will mostly be defined by your internet connection. Since quality of your internet connection isn't up to you, there is not much you can do about it. You can look up the offers from different internet providers in your area and maybe even consider switching to 4G internet. I recently switched to 4G internet and got 3x faster download speed and 10x faster upload speed which came very nice since I'm hosting websites from home.
Besides bad internet connection, other thing that can affect your server uptime is the bad weather. What if the power goes out due to thunderstorm? No power means our server is down! What can we do about it?
Well we could invest in uninterruptible power supply (UPS) unit which will keep our server and 4G router running for some time when the main power goes out. You can think of it as a powerbank for a server. This way bad weather will be having a hard time bringing our server down. 💪
Conclusion
Having a server configured as described in the blog with UPS connected, stable internet connection and cron jobs set up to update DNS records every minute or two, we could achieve 99% of our server uptime in theory. 🎉
This is more than good enough for serving a personal website like rusac.dev which can afford some downtime without consequences. Of course, you could also deploy a production website or application but I wouldn't recommend doing so because the downtime in production environment is not acceptable.
Setting up your own server comes in handy for testing websites if you are into web development and also it's very educational.
Thank you for reading this! If you've found this interesting, consider leaving a ❤️ or 🦄, and of course, share and comment your thoughts!
Lloyds is available for partnership and open for new projects. If you want to know more about us, click here.


Latest comments (7)
1 Please what about if I have static ip how is settings going to be.? I am using virtual machines and I want all of them to accessible online. I used VMware
2 Secondly, with the port forwarding it hast internal host and external host. What ip address will enter in both?
If you have a static IP then you don't have dynamic IP problem so your setup should be easier and more stable. Other than that settings are pretty much the same.
In both internal and external host you should enter IP address of your virtual machine. That way through the ports traffic will be routed to your server (virtual machine).
Sorry for later reply, didn't get notification, hope that helps.
Thanks! Please is possible to use my public IP address for all my virtual machines? Instead of port forwarding through my local network(Lab). I will like to sell some of my virtual machines to my friends for hosting their site like digital ocean and other vps hosting platforms. Any ideas?
Yes, it's possible. If you have multiple virtual machines that means you have multiple servers. Your network has one public IP which you said is fixed. To differentiate those VMs you could expose them through separate ports in you router settings. Every VM has it's own local IP address, you will use that address to point to each VM through chosen port on router settings.
Thanks! Very much for your response i really appreciate it.
I need help
Some comments may only be visible to logged-in visitors. Sign in to view all comments.