Some time ago, we released our first edition of LiveG OS, an open-source operating system that is designed to run on both desktop and mobile devices.
It's based on a modified version of Debian Linux with our own web-based desktop environment on top, and is designed to run Progressive Web Apps in a more integrated experience than what other operating systems provide.
You can learn more about the OS on mobile devices on our last post, Project Prism: on the road to building an open smartphone.
In this post, we're going to show you how we built our OS, from downloading the initial Debian base image to producing a full ISO file that can be distributed and loaded onto installation media such as USB drives to run on real hardware. We also have a LiveG Developer Guide on YouTube that gives a more in-depth explanation of how we do this:
Right now, our OS only supports modern PCs running x86-64 processors (so your typical Intel or AMD processor of today). You can download a copy of LiveG OS right now to try out on modern PC platforms — or in a virtual machine on QEMU or VirtualBox, but it's still in an early Alpha stage, so don't expect it to do too much yet (there's still a lot of missing features).
For platforms such as the PinePhone or Raspberry Pi, we're planning to bring support to these devices over the next few weeks. Exciting stuff indeed!
With all that talk about LiveG OS out of the way, let's dive into how we actually build LiveG OS!
Building our desktop environment
Our desktop environment, gShell, is what provides a user interface that the user can interact with. Being written as an Electron app itself, it's the part that also runs the Progressive Web Apps inside webview elements.
I won't go too much into gShell's architecture, but for the purposes of this post, all you need to know is that we build an AppImage file using electron-builder to supply that file to our OS bootstrapping process (which is what we'll be moving onto next).
Building the OS itself
The OS build process is all automated, and relies on a bunch of bash scripts so that we can make a reproducible and robust copy of LiveG OS everytime we run them. This also lets us make different builds for different platforms while still producing a similar end result.
We keep all of those bash scripts in a GitHub repository, alongside all the other useful files (mainly for configuring parts of Debian) needed to build a complete operating system. There's a bunch of information on how to build LiveG OS yourself in its readme.
In short, we essentially run this command in bash to start building everything:
./bootstrap.sh
That's it — we can then sit back, and relax! Let's take a look at what this script exactly does by breaking it up into a series of simple steps:
1. Determine what platform to build for
Like I said earlier, we're hoping to support various platforms very soon, like the PinePhone and Raspberry Pi — in addition to our currently-supported x86-64 version.
Our bootstrap.sh file handles this by storing what platform we want to build for (as well as the architecture and QEMU emulation info) in a bunch of global variables. We can choose what platform to build for by passing it as the first argument to the script's command.
export PLATFORM="x86_64"
export QEMU_ARGS=""

if [[ "$1" != "" ]]; then
    export PLATFORM=$1
fi

case $PLATFORM in
    x86_64)
        export ARCH="x86_64"
        ;;

    *)
        echo "Invalid platform specified" >&2
        exit 1
        ;;
esac

if [[ "$2" == "--env-only" ]]; then
    echo "Applied environment variables for execution of other scripts only"
    return
fi
2. Start a web server so that QEMU can access files
We use QEMU to virtualise the system so that we can test it out and also configure it and set it up during the build process. One thing that we need to be able to do is let our virtual machine access our host's files. The way to do that is to start a web server that can be accessed over the local network by the virtual machine.
This web server is started when bootstrap.sh calls server.sh, which starts the server in the background:
pushd host/$PLATFORM
    pkill -f "python3 -m http.server"
    python3 -m http.server 8000 &
popd
We then continue through bootstrap.sh as soon as the server has started.
3. Download a minimal base copy of Debian
Since LiveG OS is based off of Debian, we need to grab a copy of it so that we can make our own customisations off of it. We just simply use wget to download the Debian installer ISO file into a repo folder:
mkdir -p cache/$PLATFORM
wget -nc https://cdimage.debian.org/debian-cd/current/amd64/iso-cd/debian-11.5.0-amd64-netinst.iso -O cache/$PLATFORM/base.iso
4. Boot the base copy of Debian and install it onto a new virtual disk
Once we've got our copy of the Debian installer downloaded, we need to run it in a QEMU virtual machine and install it onto a new virtual disk. This is done in boot.sh:
    echo "Creating new base installed image (this might take about 30 minutes or longer)..."

    qemu-img create build/$PLATFORM/system.img 4G

    ./bootkeys.sh &

    qemu-system-$ARCH \
        -enable-kvm \
        -m 1G \
        -cdrom cache/$PLATFORM/base.iso \
        -hda build/$PLATFORM/system.img \
        -netdev user,id=net0,hostfwd=tcp::8002-:8000 \
        -device virtio-net-pci,netdev=net0 \
        -monitor tcp:127.0.0.1:8001,server,nowait \
        $QEMU_ARGS

    cp build/$PLATFORM/system.img cache/$PLATFORM/baseinstall.img
This takes about 30 minutes to go through installation without KVM, but if you've got KVM enabled, then it only takes about 4 minutes. It's worth enabling KVM for!
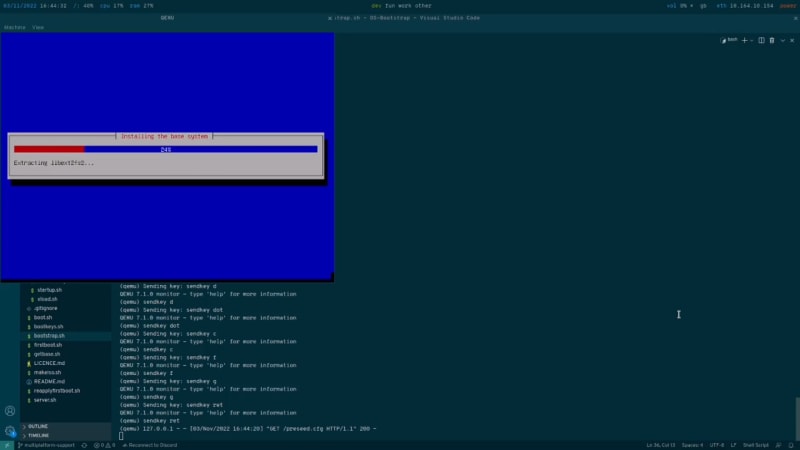
Don't forget that this is all automated — we as the developer don't need to touch a single thing. The way we do this is provide a preseed file, preseed.cfg to the virtual machine that the Debian installer uses to automatically provision the system. Without this, we'd have to manually enter what username and password we want to use, what timezone we are in, what network interfaces to enable, and so on — we don't want to have to do that every time...
5. Mount the virtual disk and add some files to it
We next need to mount the disk so that we can change some of its files and add a script that runs at startup. This is done in the boot.sh script:
echo "Mounting disk image to \`build/$PLATFORM/rootfs\`..."

sudo umount build/$PLATFORM/rootfs || /bin/true
mkdir -p build/$PLATFORM/rootfs
sudo mount -o loop,offset=1048576 build/$PLATFORM/system.img build/$PLATFORM/rootfs
We can then write files to the mount point and they'll be saved to the virtual disk image file upon unmounting.
After mounting the disk, we write some files to it, including ones to automatically log in the default user account (so that we can then start up our desktop environment), to change the hostname, as well as to change some branding details:
sudo tee build/$PLATFORM/rootfs/etc/issue << EOF
LiveG OS \n \l
EOF

sudo tee build/$PLATFORM/rootfs/etc/os-release << EOF
NAME="LiveG OS"
VERSION="0.2.0"
ID="livegos"
ID_LIKE="debian"
PRETTY_NAME="LiveG OS V0.2.0"
VERSION_ID="0"
HOME_URL="https://liveg.tech/os"
SUPPORT_URL="https://docs.liveg.tech/?product=os"
EOF
We also copy firstboot.sh to the mount point and configure the system so that the next time we boot it up, the firstboot.sh script is run (this lets us perform further customisations that are only possible when the system is booted):
sudo cp firstboot.sh build/$PLATFORM/rootfs/root/firstboot.sh

sudo tee -a build/$PLATFORM/rootfs/root/.bashrc << EOF
./firstboot.sh
EOF
Finally, we unmount the virtual disk image so that we can boot it.
6. Start up the system and execute the firstboot.sh script
We start up the system, again in boot.sh, by executing this QEMU command:
qemu-system-$ARCH \
    -enable-kvm \
    -m 1G \
    -hda build/$PLATFORM/system.img \
    -netdev user,id=net0,hostfwd=tcp::8002-:8000 \
    -device virtio-net-pci,netdev=net0 \
    $QEMU_ARGS
This script installs some necessary dependencies via APT for our desktop environment to work. It also adds our very own LiveG APT Repository that we maintain to install packages not present in the Debian APT repo, including custom Linux kernel builds for devices such as PinePhones.
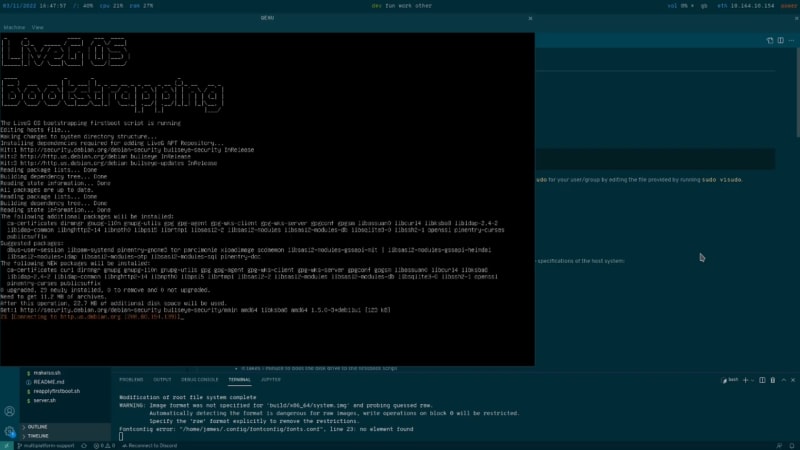
firstboot.sh script runningThe script also copies in the AppImage binary for our desktop environment itself, as well as some config files for GRUB and fstab that are copied during the LiveG OS Out-of-Box Setup process when you want to install LiveG OS to an internal storage device.
The script finally cleans up some parts of the system, which essentially consists of changing config files to prevent itself from running at startup at the next boot, and instead starting the desktop environment at boot. The system then shuts down so that bootstrap.sh can continue.
7. Mount the virtual disk again to copy more config files
This stage copies config files to the virtual disk, which includes isogrub.cfg, which configures GRUB to boot correctly in a Live CD/ISO environment, as well as isofstab and the initoverlay.sh script. This is all done inside the makeiso.sh script run by the host machine.
This process of making an ISO file is not required for some platforms — for the PinePhone and Raspberry Pi, we won't need to build an ISO file, since the virtual disk image will be copied directly onto an SD card or eMMC storage and is bootable from there.
initoverlay.sh is very important for the ISO file to be able to run — the ISO image's filesystem is read-only, which makes starting our desktop environment (to perform installation by the user onto a target disk) difficult. This script adds a filesystem overlay mapped to /tmp to make the whole root filesystem temporarily writeable. All changes are discarded in the ISO environment when the system shuts down, but being temporarily writeable to RAM is useful for running certain programs.
8. Produce an ISO image with GRUB on it
We finally need to package the mounted root filesystem from the host into one distributable ISO file. This is done by running grub-mkrescue in makeiso.sh:
sudo grub-mkrescue -o build/$PLATFORM/system.iso build/$PLATFORM/rootfs --directory=build/$PLATFORM/rootfs/usr/lib/grub/i386-pc -- \
    -volid LiveG-OS-IM \
    -chmod a+rwx,g-w,o-w,ug+s,+t,g-s,-t /usr/bin/sudo -- \
    -chmod a+rwx /usr/sbin/initoverlay --
It also gives the ISO a volume name of LiveG-OS-IM so that it can be identified by GRUB later on, and it also changes permissions for the sudo and initoverlay commands so that they can be executed.

That's it! If you wish to use any of this code (you're welcome to use it for your own projects), then be sure to make it available under the LiveG Open-Source Licence — AKA attribute us and also provide a copy of the licence alongside your own code.
I hope you've enjoyed reading up on how we build LiveG OS, and I'll be looking forward to releasing downloads for the OS for PinePhones and Raspberry Pis soon!
In the meantime, you can visit our GitHub organisation to see our various ongoing projects. You can also find us on Twitter or Mastodon, and you can join us on Discord where we have a weekly meeting on Tuesdays on what we're planning to do next with LiveG. We've got plenty of videos on LiveG OS on YouTube to watch, and if you're wanting to support us, the best way to do that is to donate to our Open Collective. All of this info is available on our website, liveg.tech.
Thanks for reading, and we'll see you soon!


Latest comments (0)