Table of Content | Read Next: Part 8: Build the client side of the app with React
In part 6, we created an ingest pipeline(earthquake_data_pipeline) to transform the data retrieved from the USGS API. We also created an index called earthquakes with the desired mapping.
In this blog, we are going to set up the server to:
- retrieve earthquake data from the USGS API
- send the retrieved data to Elasticsearch
earthquake_data_pipelinefor data transformation - instruct Elasticsearch to ingest the transformed data into the
earthquakesindex
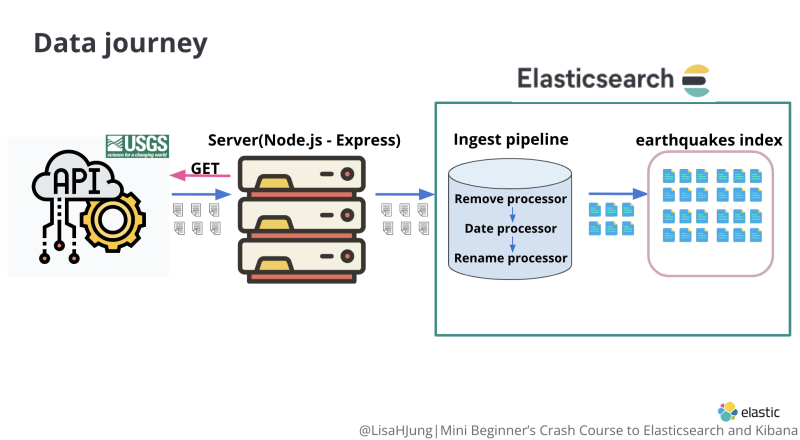
The following diagram summarizes the tasks we will perform in this blog.
Resources
Would you rather watch a video to learn this content? Click on the link below!
Want the code covered in this blog? Click on the link below to access it!
Recognition
I want to give a huge shout out to Mark Mayfield!
When I was first trying to figure out how to retrieve and ingest API data into Elasticsearch, I came across his blog.
His blog was instrumental in helping me write the part 7 blog. Thank you Mark!
I have modified the code shared in Mark's blog to fit our use case.
I have also broken down the code line by line for easier understanding.
API Data Retrieval
Step 1: Set up your server to retrieve earthquake data from the USGS API
Open the earthquake_app using the code editor of your choice.
Within the server directory, create a directory called data_management. Within the data_management directory, create a file called retrieve_and_ingest_data.js(red box).

retrieve_and_ingest_data.js file will instruct the server to execute three things:
- Upon receiving an http request from the browser, retrieve data from the USGS API
- send the retrieved data to Elasticsearch
earthquake_data_pipelinefor data transformation - instruct Elasticsearch to ingest the transformed data into the
earthquakesindex
In the retrieve_and_ingest_data.js, copy and paste the following snippet.
//in server/data_management/retrieve_and_ingest_data.js
const express = require('express');
const router = express.Router();
const axios = require('axios');
const client = require('../elasticsearch/client');
require('log-timestamp');

const URL = `https://earthquake.usgs.gov/earthquakes/feed/v1.0/summary/all_month.geojson`;

router.get('/earthquakes', async function (req, res) {
  console.log('Loading Application...');
  res.json('Running Application...');

  indexData = async () => {
    try {
      console.log('Retrieving data from the USGS API');

      const EARTHQUAKES = await axios.get(`${URL}`, {
        headers: {
          'Content-Type': ['application/json', 'charset=utf-8'],
        },
      });

      console.log('Data retrieved!');

      results = EARTHQUAKES.data.features;

      console.log('Indexing data...');

      results.map(
        async (results) => (
          (earthquakeObject = {
            place: results.properties.place,
            time: results.properties.time,
            tz: results.properties.tz,
            url: results.properties.url,
            detail: results.properties.detail,
            felt: results.properties.felt,
            cdi: results.properties.cdi,
            alert: results.properties.alert,
            status: results.properties.status,
            tsunami: results.properties.tsunami,
            sig: results.properties.sig,
            net: results.properties.net,
            code: results.properties.code,
            sources: results.properties.sources,
            nst: results.properties.nst,
            dmin: results.properties.dmin,
            rms: results.properties.rms,
            mag: results.properties.mag,
            magType: results.properties.magType,
            type: results.properties.type,
            longitude: results.geometry.coordinates[0],
            latitude: results.geometry.coordinates[1],
            depth: results.geometry.coordinates[2],
          }),
          await client.index({
            index: 'earthquakes',
            id: results.id,
            body: earthquakeObject,
            pipeline: 'earthquake_data_pipeline',
          })
        )
      );

      if (EARTHQUAKES.data.length) {
        indexData();
      } else {
        console.log('Data has been indexed successfully!');
      }
    } catch (err) {
      console.log(err);
    }

    console.log('Preparing for the next round of indexing...');
  };
  indexData();
});

module.exports = router;
Let's go over this code snippet.
Heads up!
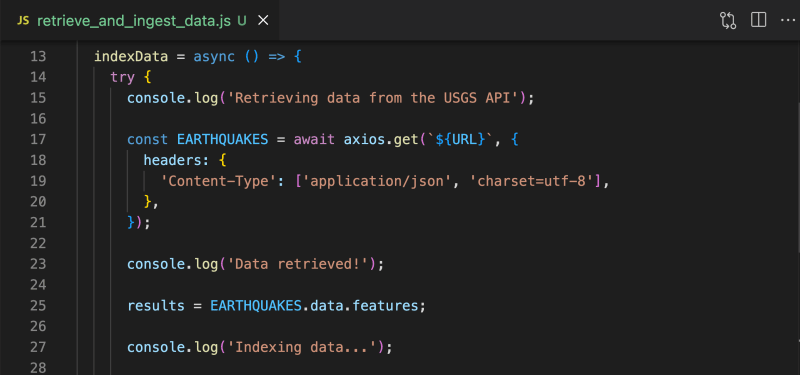
For reference purposes only, I have included screenshots of code that I will be explaining.
If you need to copy and paste the code, please refer to the code snippet above or the GitHub repo for part 7.
Lines 1-3 require dependencies necessary to receive and send HTTP requests.

Line 4
We require the Elasticsearch Client we created in part 4.
Line 5
We require a dependency called log-timestamp we installed in part 2. It prepends timestamps to the messages displayed in the terminal via the console.log() method.
You will see this dependency come into play when we retrieve data from the USGS API.
Line 7
We create a constant called URL and set it equal to the URL of the all earthquake data from the past 30 days API. We will be retrieving data from this API.
We use lines 9-77 to define what our server should do when it receives a HTTP request to the /earthquakes end point

Line 9
We define a route for /earthquakes.
Line 10
When the server receives a HTTP request to the/earthquakes end point, it displays the message "Loading application..." in the terminal.
Line 11
In the browser(client), it displays the message "Running Application..."
We use lines 13-77 to:
- retrieve data from the USGS API
- create an object for each earthquake
- send the objects to Elasticsearch
earthquake_data_pipelinefor data transformation - instruct Elasticsearch to ingest transformed objects into the
earthquakesindex
Line 13
We define a function called indexData().
Line 15
When this function is called, it prints the message "Retrieving data from the USGS API" in the terminal.
Lines 17-21
We send a GET request to the USGS API.
Line 23
We display the message "Data retrieved!" in the terminal.

Line 25
We create a variable called results. This variable is set equal to the retrieved earthquake data from the API.
Remember the USGS API data structure covered in part 5?

EARTHQUAKES.data.features gives you access to the features array(green box).
This array contains earthquake objects. Each object contains info about one earthquake.
Within each object, the fields properties(orange box) and geometry(blue box) contain the information that we want(pink box).

Line 27
We display the message "Indexing data" in the terminal.
Lines 29-55

These lines of code run through an array of earthquake objects. For each earthquake object in the array, it creates a json object that will be indexed later as documents.
Lines 56-61

We use our instance of Elasticsearch Client to:
- send retrieved API data to Elasticsearch
earthquake_data_pipelinefor data transformation - instruct Elasticsearch to ingest transformed data into the
earthquakesindex
Line 56
We use the client.index() method to index the transformed data.
Line 57
We specify that the data should be indexed into the earthquakes index.
Line 58
We give each earthquake document an id identical to the id of the earthquake object retrieved from the API. We do this to keep the earthquake id from the USGS API and document id consistent.
Line 59
We set the body equal to earthquakeObject we defined in lines 31-55. The body represents a document of one earthquake.
Line 60
We instruct Elasticsearch client to send the retrieved data to Elasticsearch earthquake_data_pipeline.
The earthquake_data_pipeline will transform the data in the manner we specified in part 6.
Then, Elasticsearch will index the transformed data into the earthquakes index.
Lines 65-72
We set up an if, else, catch statement.

Lines 65-67
If there is still data left that has not been indexed, then keep calling the indexData() function.
Lines 67-69
If all data has been indexed, then print "Data has been indexed successfully!" in the terminal.
Lines 70-72
If an error occurs during indexing, then print the error in the terminal.
Line 74
After data ingestion has been completed, print the message "Preparing for the next round of indexing..." in the terminal.
Line 76
We call the indexData() function.
Line 79
We expose the router via Node.js module exports as this will be used in server.js.
Add the data ingestion route to server.js
Step 1: open server.js within the server directory
Copy and paste the following into lines 8 and 10.
//in server/server.js
const data = require('./data_management/retrieve_and_ingest_data');

app.use('/ingest_data', data);
Your server.js should look like the following:

Let's go over this snippet.
Line 8
We create a constant called data and require the retrieve_and_ingest_data.js file from our data_management directory.
Line 10
When the server receives an http request from a url path that starts with /ingest_data, the function we defined in retrieve_and_ingest_data.js is executed.
Let's test to see if this works!
Using your terminal, cd into the earthquake_app directory. Start the server by executing the following command.
//in terminal within the earthquake_app directory
npm start
You should see something similar to the screenshot in the terminal.

Open a new browser. Arrange the the terminal and the browser side by side as shown below.

Copy and paste the following url in the address bar of your browser and hit enter:
//in the address bar of your browser
http://localhost:3001/ingest_data/earthquakes
You will see the following in the terminal acknowledging that the data is being retrieved, transformed, and ingested into Elasticsearch. You will also see that a timestamp has been prepended to the messages printed on the console!

You will also see the message "Running Application..." displayed on the browser.

Evaluate the outcome of data transformation and data ingestion
Let's take a look to see if the data has been properly transformed and ingested into Elasticsearch.
One of the ways to view data stored in Elasticsearch is via Kibana Discover tool.
With Discover, you can quickly search and filter your data, get information about the structure of the fields, and display your findings in a visualization. You can also customize and save your searches and place them on a dashboard(excerpt from Kibana documentation).
In order to use Discover, we must first specify where it can find the data we want to explore.
We do so by creating a data view.
A data view allows you to specify the data source you want to explore so that Kibana could find this data.
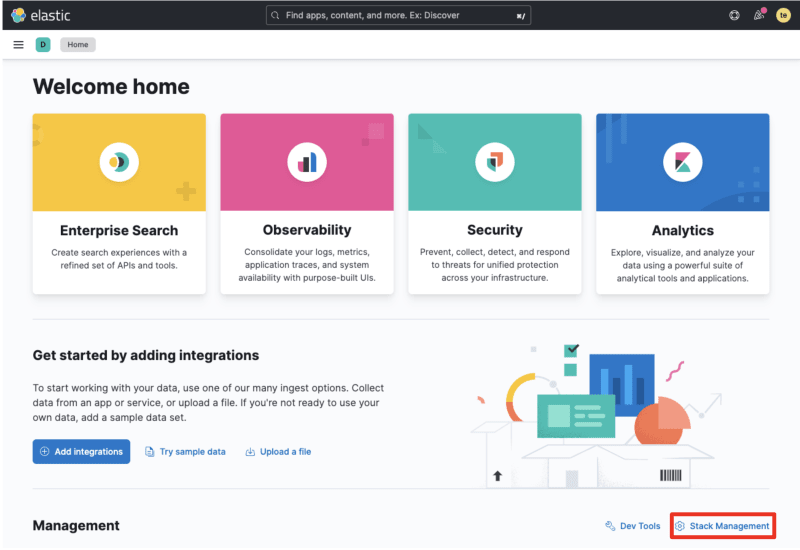
From the Kibana home page, click on the Stack Management option(red box).
From the Stack Management page, click on the Data Views option(red box).

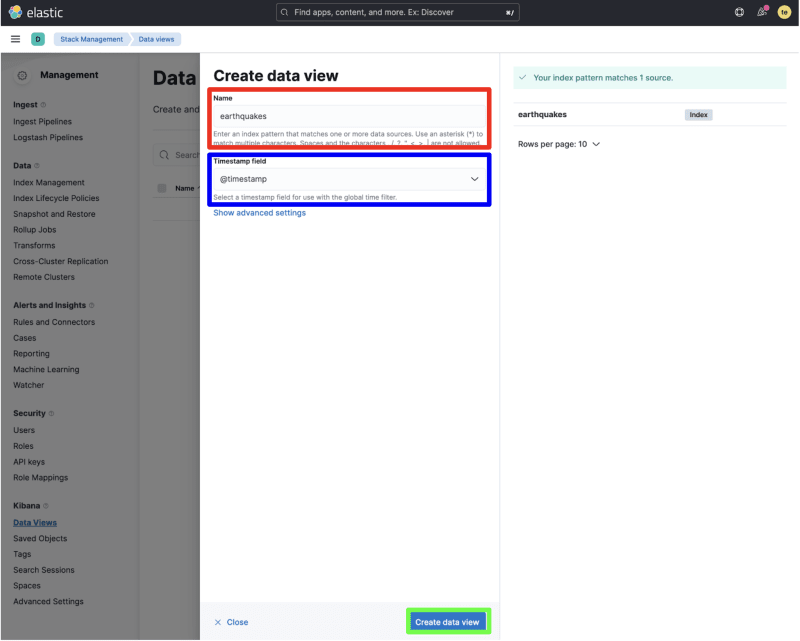
Click on the Create data view button(red box).

You will see that the index earthquakes(red box) is listed as one of our data sources.

Under the Name section, type in the name of the index earthquakes(red box).
Discover also allows you to explore data in various time ranges.
Since our earthquake data is in time series, we will be able to use the time range feature of Discover.
Since earthquake data has a timestamp field called @timestamp, Kibana will automatically update the Timestamp field with the field @timestamp(blue box).
Click on the Create data view option(green box).
You will see that data view called earthquakes have been created. The Time field has been set to field @timestamp.
Click on the menu icon(red box) and click on the Discover option(blue box).

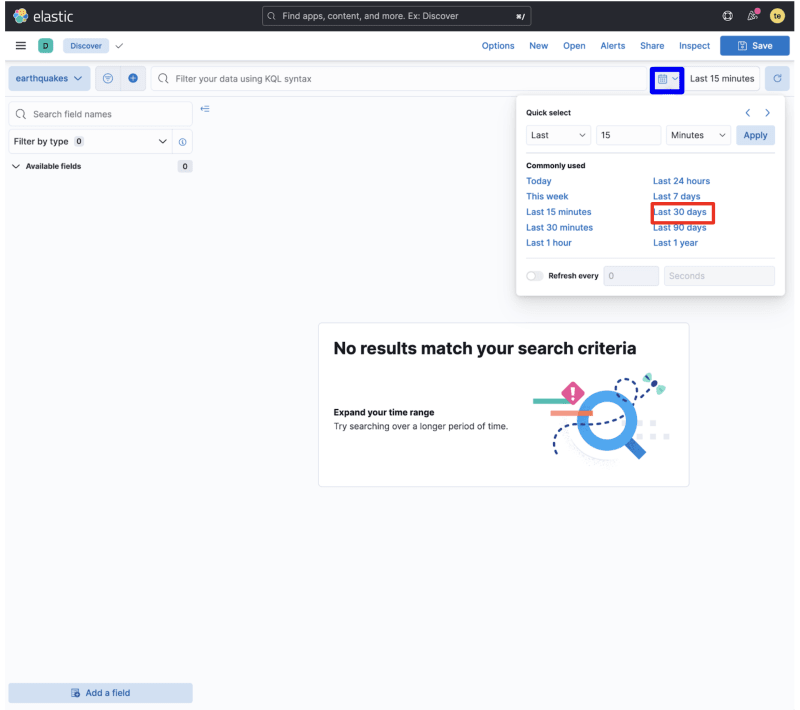
You will see that the data view earthquakes(red box) has been already selected in the Discover page.

The message "No results match your search criteria"(orange box) is also displayed on the screen.
Let's see why we are encountering this message.
Take a look at the time range highlighted with a green box.
Discover is currently being instructed to display data that has been collected within the Last 15 minutes. Since our index does not contain such data, we encounter a message that no results match our search criteria.
Let's adjust our timeline to Last 30 days to view the results.
Click on the calendar icon(blue box). You will see a drop down menu where you can select the time range in which you want to view the data. Select the Last 30 days option(red box).
You will see that in the index earthquakes, there are 9,108 documents(red box) that have been indexed from the USGS API.

The table (yellow box) displays documents within the earthquakes index. Each row displays information about a document(an earthquake).
Let's take a look at a document to see if data was properly transformed before being ingested into Elasticsearch.
Click on the arrow(red box) to expand the document information(blue box).

You will see that the document contains the desired fields and the timestamp format we have set up in part 6.
In this blog, we have successfully:
- retrieved earthquake data from the USGS API and sent the data to Elasticsearch
- transformed the retrieved data using the ingest pipeline(
earthquake_data_pipeline) - ingested the transformed data into the
earthquakesindex
Now that we have data in Elasticsearch, it is time set up our app for search.
Move on to part 8 to build the client with React so the users could specify the earthquake data that they are searching for!


Oldest comments (2)
In Create Data View, my section not only have Name and Timestamp field, but also index pattern is required. What should I put in there?

I figured out, the index pattern should just be earthquakes, same as the Name.