Hi, I am LB, a full stack developer on the core team for the Watail CMS and here is a tutorial that will hopefully teach you a bit about Wagtail but also make life better for content editors.
- Goal: Implement a simple way for users within the Wagtail CMS admin interface to focus on a sub-set of fields, hiding menus/headers and other fields.
- Why: Being able to switch 'hats' from content management to content writing is often difficult, providing a different editing mode may allow for focusing.
- How: Using the browser's built-in Fullscreen API to provide a native and accessible experience on most new devices and browsers.
Overview
- The inspiration for this is the VSCode editor's Zen mode that allows you to switch to a fullscreen version of your current editor that hides menus/footers and other UI elements.
- Create a custom Edit Handler (Panel) that works the same as MultiFieldPanel which can be used to wrap some fields on a per-model basis (e.g. the main content fields).
- Use the Wagtail editor interface hooks system to inject custom JS & CSS files that will do the admin frontend work.
Tutorial
Step 0 - Getting Started
- This tutorial was written using Wagtail version 2.14, however, you should be able to use this on older versions.
- It is assumed you have a working Wagtail project running, otherwise, you will need to go through the Wagtail getting started docs.
- Read through the MDN Fullscreen API docs.
- It is worth taking a quick look at the Wagtail source code for the
MultiFieldPanelimplementation (code below), note that it has a custom template and classes and that is pretty much it.
class MultiFieldPanel(BaseCompositeEditHandler):
    template = "wagtailadmin/edit_handlers/multi_field_panel.html"

    def classes(self):
        classes = super().classes()
        classes.append("multi-field")
        return classes
Step 1 - Build the custom Panel
- Create a new file within your app called
edit_handers.pyand then a custom class that extendsMultiFieldPanel. - We will create a new class
ZenModeMultiFieldPaneland override one attribitetemplateand one methodclasses. - For the template, we will need to create a new file
templates/edit_handlers/zen_mode_multi_field_panel.htmlthat will include the existing"wagtailadmin/edit_handlers/multi_field_panel.html"template. - In this new template we will add two buttons, an activate and an exit button, by default the exit button will have a class
'hidden'. - In the
classesmethod, we will append one class'zen-mode-panel'to make it easier to target the styles to these Panels. - The full code for this step is below.
- Once done, find an existing
Pagemodel and wrap one or more fields within thisZenModeMultiFieldPanel, for example:
        ZenModeMultiFieldPanel(
            [FieldPanel("introduction", classname="full"), StreamFieldPanel("body")],
            heading="Content",
        ),
edit_handlers.py
from wagtail.admin.edit_handlers import MultiFieldPanel


class ZenModeMultiFieldPanel(MultiFieldPanel):

    template = "myapp/edit_handlers/zen_mode_multi_field_panel.html"

    def classes(self):
        classes = super().classes()
        classes.append("zen-mode-panel")
        return classes
templates/edit_handlers/zen_mode_multi_field_panel.html
{% load wagtailadmin_tags %}

<button
  class="zen-mode activate button button-small button-secondary button--icon"
>
  Zen {% icon name="collapse-up" wrapped=1 %}
</button>
<button
  class="zen-mode exit button button-small button-secondary button--icon hidden"
>
  Exit {% icon name="collapse-down" wrapped=1 %}
</button>

{% include "wagtailadmin/edit_handlers/multi_field_panel.html" %}
Before you continue
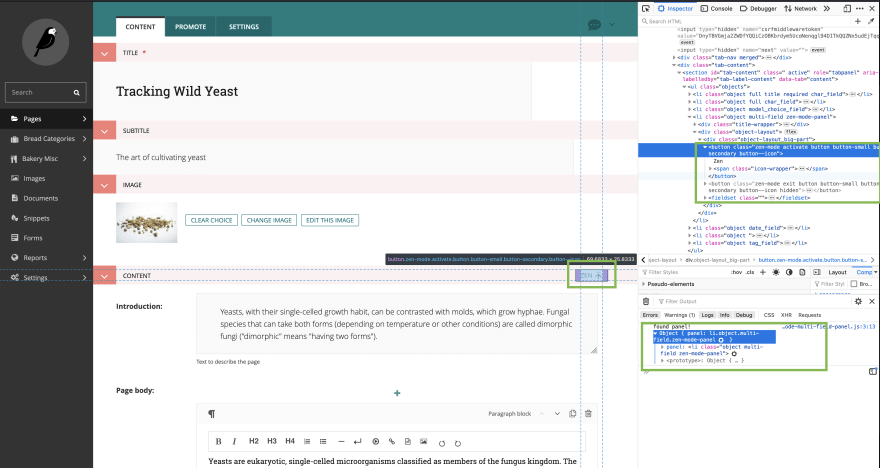
- Once complete, you should be able to see this new
Panelin the browser and see the button + classes on the panel container. - Note that the button may not be visible as it is 'behind' the header, that is fine for now, just check it is in the DOM.

Step 2 - Add initial CSS & JS injection via Hooks
- Firstly, ensure that your
staticfiles are set up in Django, if this is not already in place you will need to read the docs about Managing static files. - Create a
wagtail_hooks.pyfile if you do not already have one within your main app. - Create a CSS file in your
staticfolderstatic/css/zen-mode-multi-field-panel.cssand put a basic CSS selector to position the buttons and to test the CSS is being imported. - In your
wagtail_hooks.pyfile, use theinsert_global_admin_csshook to load the static CSS file. - Create a JS file in your
staticfolderstatic/js/zen-mode-multi-field-panel.jsand put a basic JS initiation file with a selector logging out eachZen MultiFieldPanelbased on the classes set in the.zen-mode-panelclass. - In your
wagtail_hooks.pyfile, use theinsert_global_admin_jshook to load the static JS file. - Note: You can use the page editor scoped hooks
insert_editor_css&insert_editor_js, however this means that this custom Panel will not work as desired when using it in other places (such as Snippet or ModelAdmin editing) throughout the admin. - Reminder: When adding static files, you will need to restart your server for these files to be loaded.
static/css/zen-mode-multi-field-panel.css
.object.multi-field.zen-mode-panel .button.zen-mode {
  position: absolute;
  right: 4rem;
  z-index: 100;
  top: 0.5rem;
}

.object.multi-field.zen-mode-panel .button.zen-mode.hidden {
  display: none;
}
static/js/zen-mode-multi-field-panel.js
window.addEventListener("DOMContentLoaded", () => {
  document.querySelectorAll(".zen-mode-panel").forEach((panel) => {
    console.log("found panel!", { panel });
  });
});
myapp/wagtail_hooks.py
from django.utils.html import format_html
from django.templatetags.static import static
from wagtail.core import hooks


@hooks.register("insert_global_admin_css")
def global_admin_zen_mode_multi_field_panel_css():
    return format_html(
        '<link rel="stylesheet" href="{}">',
        static("css/zen-mode-multi-field-panel.css"),
    )


@hooks.register("insert_global_admin_js")
def global_adminzen_mode_multi_field_panel__js():
    return format_html(
        '<script src="{}"></script>',
        static("js/zen-mode-multi-field-panel.js"),
    )
Before you continue
- Once complete, you should be able to reload your development server and load up the Page editor and see the following;
- 1. The Zen button should be visible and the Exit button should not.
- 2. You should see an output in your browser console with logging of the panel.
Step 3 - Get JS fully functional
- Now we will work through the JS interaction, our goal is to use the fullscreen API to make the 'Zen' button trigger the fullscreen mode on the panel's container div and then provide TWO ways to exit, the built-in 'esc' press handling and the pressing of the button 'exit'.
- There will still be further CSS refinements to do, but the goal for this step is to get the button functionality working.
- Firstly we use
document.querySelectorAll(".zen-mode-panel").forEach(...to find ALL of the zen-mode-panel (this means we can support multiple of these throughout the editor if needed). - For each
panelwe will find that panel's activate and exit buttons and set them to a variableactivateButtonandexitButton. - Then we check the browser can actually support fullscreen mode by checking that a function
requestFullscreenexists on thepanelelement, if it does not we add the class'hidden'to theactivateButtonand return so that the button is hidden and no fulscreen activation actions can take place. - After this, we create a listener on the
activateButton'sonClickevent that willrequestFullscreenon thepanel, it also needs to callevent.preventDefault()so that the form does not submit. - Create a listener on the
exitButton'sonClickevent that willexitFullscreenon thedocument(important, not the panel). It also needs to callevent.preventDefault()so that the form does not submit. - The last part of the JS is to handle when the fullscreen mode triggers (and exits) to update some classes on our elements, we want to add
fullscreen-activeto the panel container and also switch the visibility of the activate/exit button. - Note: The reason we are adding an event handler
onfullscreenchangeon thepanelis that it simplifies the overall logic, avoids content from getting out of sync and means the built-in browser handling ofescpress will work without issues.
static/js/zen-mode-multi-field-panel.js
window.addEventListener("DOMContentLoaded", () => {
  const FULLSCREEN_ACTIVE = "fullscreen-active";
  const HIDDEN = "hidden";

  document.querySelectorAll(".zen-mode-panel").forEach((panel) => {
    const activateButton = panel.querySelector(".zen-mode.activate");
    const exitButton = panel.querySelector(".zen-mode.exit");

    // ---- Hide button & return early if fullscreen is not supported ---- //

    if (!panel.requestFullscreen) {
      return activateButton.classList.toggle(HIDDEN);
    }

    // ---- Add button event listeners ---- //

    activateButton.onclick = (event) => {
      event.preventDefault(); // ensure the button does not submit the form
      panel.requestFullscreen();
    };

    exitButton.onclick = (event) => {
      event.preventDefault(); // ensure the button does not submit the form
      document.exitFullscreen();
    };

    // ---- Add fullscreen event listener ---- //

    panel.onfullscreenchange = (event) => {
      panel.classList.toggle(FULLSCREEN_ACTIVE);
      activateButton.classList.toggle(HIDDEN);
      exitButton.classList.toggle(HIDDEN);
    };
  });
});
Before you continue
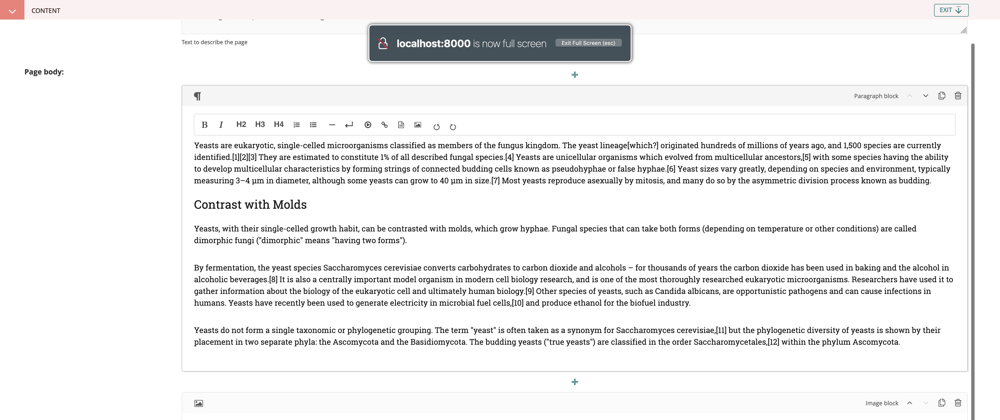
- Once complete, you should be able to reload your development server and load up the Page editor and see the following;
- 1. The Zen button should be visible and when pressed, the browser should show the panel content only in fullscreen.
- 2. You should be able to press the 'exit' button (which becomes visible) and not see the 'zen' button when in fullscreen.
- 3. When 'exit' is pressed (or 'esc' on the keyboard) the buttons should switch back and the fullscreen mode should cancel.

Step 4 - Refine CSS for various scenarios
- Finally, our goal is to refine our CSS, this is not a perfect step but will be enough to get the UI working.
- You will have noticed that the fullscreen mode has a black background, we can fix this with the dynamic class that will get added to the container when in fullscreen
fullscreen-activeand abackground-color. - The last part is some tweaks to how the fields show and how scrolling is handled for longer field content (e.g. long
StreamFields). We set amax-widthnone so content goes to full width, amax-heightandoverflow-scrollso that content scrolls and then some padding.
static/css/zen-mode-multi-field-panel.css
.object.multi-field.zen-mode-panel .button.zen-mode {
  position: absolute;
  right: 4rem;
  z-index: 100;
  top: 0.5rem;
}

.object.multi-field.zen-mode-panel .button.zen-mode.hidden {
  display: none;
}

.object.multi-field.zen-mode-panel.fullscreen-active {
  background-color: white;
}

.object.multi-field.zen-mode-panel.fullscreen-active fieldset {
  /* ensure that scrolling within content still works */
  max-width: none;
  max-height: calc(100vh - 6rem);
  overflow: scroll;
  padding-right: 1rem;
  padding-bottom: 2rem;
}
Final Implementation
- Once complete, you should be able to reload your development server and when in fullscreen mode see a white background and be able to scroll nicely when field content is too long for the screen.
- You can view the final code on my lb-/bakerydemo tutorial branch.

Future Improvements & Links
- It would be great to have a global keyboard shortcut, similar to the VSCode Zen mode, however, we would need to consider the scenarios where more than one
ZenModeMultiFieldPanelis available. - Browser Compatibility could be lacking, this will definitely not support IE11 and there could still be some issues on mobile browsers.
- Dark mode, while I do think it is not something useful everywhere, in this Zen mode it might be something helpful.
- fscreen provides an API that will work better across multiple browsers, it would be good to use that in the future.


Top comments (0)