I’m a full-stack developer and a member of the core team for Wagtail, the open-source CMS built on top of Django. I also work full time for Virgin Australia as a front end developer.
Wagtail uses React in parts of its admin, so it should be pretty straightforward to add a custom React component right?
A few months ago I was doing some investigating for a project at work and found this awesome React timeline component, React Calendar Timeline. React Calendar Tiemline is a fully interactive timeline component that lets you do anything, from simply viewing a timeline through to complete interaction, such as dragging & dropping to move items around the timeline. This timeline component is really well put together and appears to be actively maintained and improved by the team at Namespace.

I thought it would be great to be able to visualise and eventually control key Wagtail Page events such as updates and publishing dates.
The article below is 80% tutorial and 20% journey of the frustrations and fun in working with React in a slightly non-standard way. Some of this will apply to Django development as Wagtail is essentially just Django.
Step 1 - Define The Goal & Constraints
- We want to incorporate a single React component into Wagtail's Admin.
- We want to leverage the existing React library that comes with Wagtail Admin along with the existing sidebar, page title, search and messaging structure that Wagtail uses, so it feels like Wagtail.
- We want our development environment to be easy to use so we can leverage the npm ecosystem.
- We want a build output that is simple to integrate with an existing Django/Wagtail project.
Goal: Add a single page within the Wagtail Admin that looks like a normal page but uses the React Calendar Timeline component to render a timeline of published pages.
Step 2 - Set up a new Django App & Wagtail Admin Page
Important If you do not have an existing Wagtail project running locally, please follow the Wagtail Getting Started guide.
Note: We will leverage the Wagtail Bakery Demo for this tutorial.
Create a Django App named timeline - this can be done quickly via the django-admin command
./manage.py startapp timelineUpdate your settings to include this app by adding to the
INSTALLED_APPSlist.Reminder: When updating settings, you will need to restart Django for the changes to take effect.
Create a simple 'timeline' view and template that simply render a header and content. We will use some of the existing admin template includes, these are not all documented but looking at the Wagtail code can help us discover what's available.
Create a
wagtail_hooks.pyfile to register the timeline view as an admin URL (via the hookregister_admin_urls) and also to add a link to the admin settings menu via the hookregister_admin_menu_item.Code snippets below.
{% comment %} timeline/templates/timeline.html {% endcomment %}
{% extends "wagtailadmin/base.html" %}
{% load static %}

{% block titletag %}{{ title }}{% endblock %}
{% block bodyclass %}timeline{% endblock %}

{% block content %}
  {% include "wagtailadmin/shared/header.html" with title=title %}
  <div class="container">
    <div id="timeline">
      {{ title }}
    </div>
  </div>
{% endblock %}
# timeline/views.py

from django.shortcuts import render


def timeline_view(request):

    return render(request, "timeline.html", {
        'title': 'Timeline',
    })
# timeline/wagtail_hooks.py

from django.conf.urls import url
from django.urls import reverse

from wagtail.admin.menu import MenuItem
from wagtail.core import hooks

from .views import timeline_view


@hooks.register('register_admin_urls')
def urlconf_time():
    return [
        url(r'^timeline/$', timeline_view, name='timeline'),
    ]


@hooks.register('register_admin_menu_item')
def register_timeline_menu_item():
    return MenuItem(
        'Timeline',
        reverse('timeline'),
        classnames='icon icon-time',
        order=10000 # very last
    )
Step 3 - Add an in-line basic React Component
Here we want to simply confirm we can get something rendering with React, using the global React object provided by Wagtail Admin.
- Add a small Javascript script tag that will render a simple React Component. This will use the
ReactDOM.renderandReact.createElementfunctions. - Remember: As this code is not transpiled, we're unable to use the more-familiar JSX syntax, and need to consider what features the target browsers support, for example, we can't use arrow functions here as they aren't supported by IE11.
- Save the changes to the template, refresh the view and you should see the text
TIMELINE CONTENT HEREvisible.
{% block extra_js %}
  {{ block.super }}
  <script>
    // templates/timeline/timeline.html
    document.addEventListener('DOMContentLoaded', function() {
      ReactDOM.render(
        React.createElement(
          'div',
          {
            children: 'TIMELINE CONTENT HERE',
            className: 'timeline-content'
          }
        ), document.getElementById('timeline'));
    });
  </script>
{% endblock %}
Step 4 - Use a React toolkit to build a React Component
Story Time
- Initially, I tried to use create-react-app as this has worked great for me in the past. However, it did not take long for me to realise that this was not really the right tool for what we were doing. Firstly - this is not a single page app, this is an existing Django application that we want to integrate a stand-alone React component within a subset of the view.
- I did not want to eject and start to dig into Webpack configuration if I could avoid it so I went exploring.
- I found that what I was looking for is called a 'React Toolkit' (knowing the right term helps with the Googles) and found lots of lists, even some on the create-react-app documentation.
- After trying a bunch quickly, I landed two great solutions, nwb and neutrinojs.
- As seems to be the case when wanting to use something open source in the Javascript ecosystem, both of these libraries were in varying states of being "production ready".
-
nwbwas easy to get started with but the lack of updates over the past few months made it feel like it might not receive regular maintenance. -
neutrinojswas the opposite, being by a team at Mozilla, it has had a massive number of updates but of course all of these were for the version 9 release candidate but the docs were for version 8. - I ended up doing almost all of this tutorial in both nwb and neutrinojs and found that neutrinojs ended up being my pick. The documentation is more complete and overall it appears to be more flexible and requires only slightly more "config" to get working compared to nwb.
- I will put links at the end of this post for the roughly working code branch where nwb was used.
Code Time
- Set up a
clientapp within the Djangotimelineapp, this approach means we will have a client folder within the timeline folder. There are many ways to organise your JS/CSS within a Django app so do whatever works for you. - Important: We will be using the version 9 release candidate, there are a few reasons for this decision. But essentially it's better and will hopefully make the shelf life of this post a bit longer. As of the time of writing, the docs for version 9 can be found here - https://master.neutrinojs.org/.
- In the
timelinefolder run the commandnpx @neutrinojs/create-project@next client. This creates a new folder, namedclient, with the scaffolded project. - The scaffold CLI is really hhelpful, here are the answers to the questions:
- First up, what would you like to create? Components
- Next, what kind of components would you like to create? React Components
- Would you like to add a test runner to your project? Jest
- Would you like to add linting to your project? Airbnb style rules
- Test out the local dev server run
npm startfrom the client folder and you should see the demo component load in your browser athttp://localhost:5000/ - Add styles - add a
style.cssfile to the example component folder -client/src/components/Example/style.cssand import it in the componentclient/src/components/Example/index.jsx. Plain CSS works out of the box and can be imported usingimport './style.css';. Adding a trivial rule to the CSS such asbutton { background: lightblue; }allows us to test that the styles have been imported correctly. - Save the changes and confirm that the styles have been imported and used in the client demo server by opening http://localhost:5000/.
Step 5 - Render the Example component in the Django view.
Story Time
- This step took the most amount of time to work out, literally days of trying things, coming back to it, switching back to nwb and then encountering similar but still frustrating issues and switching back.
- I ended up having to dig into the internals of Neutrino, nwb, Webpack and a tricksy little library called
webpack-node-externals. - The major disconnect here is that we are building this in a bit of a blurry world, in terms of what common requirements are expected.
- Toolkits, plugins, Webpack, etc make a lot of assumptions and those are that you will be building something that is either a library (ie. publish to npm and it is imported/required into your project) or a SPA (you want to build EVERYTHING you need to get this app running with nothing but a bare index.html file).
- On top of that, my knowledge about any ends of this spectrum was limited.
-
webpack-node-externalsis used by default in a lot of build tools and makes the hard assumption that ANY import is external. Which makes sense when you want to build a small NPM utility that depends on lodash and leftpad. You really do not want to bundle these with your library. - This makes sense in terms of a common use case of Neutrino js - to output a small bundle of a 'component' without needing React and the whole universe alongside.
- The other issue is that we actually do not want to bundle everything, only some things. We do not want to bundle React with this build output either as we know it is available in Django as a global that is already imported.
- Thankfully Webpack is pretty amazing and lets you configure all the things including this exact scenario - which things are bundled and which things are not (along with a plethora of config about how those things are available to the build file). You can read more here https://webpack.js.org/configuration/externals/#externals.
- So with that rant out of the way, let's get to the one line of code that took so long.
Code Time
- Configure neutrinojs to use the global
Reactinstead of importing/requiring it. We add one more function afterjest()that will determine if the build is for production and then revise part of the config accordingly.
// timeline/client/.neutrinorc.js
const airbnb = require('@neutrinojs/airbnb');
const reactComponents = require('@neutrinojs/react-components');
const jest = require('@neutrinojs/jest');

module.exports = {
  options: {
    root: __dirname,
  },
  use: [
    airbnb(),
    reactComponents(),
    jest(),
    /**
     * Ensure that react is read from global - and webpack-node-externals is NOT used.
     *
     * By default the react-components plugin uses webpack-node-externals to build
     * the externals object. This will simply get all dependencies and assume they are
     * external AND assume that requirejs is used.
     *
     * However, for a web usage, we want only some external dependencies set up and
     * want them to read from global (aka root), hence we map the 'react' import to 'React' global.
     * See:
     *
     * https://www.npmjs.com/package/webpack-node-externals
     * https://webpack.js.org/configuration/externals/#externals
     */
    neutrino => {
      neutrino.config.when(process.env.NODE_ENV === 'production', config => {
        config.externals({ react: 'React' });
      });
    },
  ],
};
- Update the Django settings to have access to this folder as a static assets folder. (Note: We can configure neutrinojs to build to any folder, but this is the simplest way forward for now).
STATICFILES_DIRS = [
    os.path.join(PROJECT_DIR, 'static'),
    os.path.join(PROJECT_DIR, 'timeline/client/build'),  # add the default neutrino.js 'build' folder
]
- Now run the build output via
npm run buildand note that there is now a client/build folder with four files (Example.js, Example.css and a .map file for each). - Finally, update our Django template to import the Example.js and Example.css for the example component rendering. We will add the
extra_csssection to import the static fileExample.cssand add thescripttag to import Example.js and update thecreateElementfunction to useExample.default
{% extends "wagtailadmin/base.html" %}
{% comment %} timeline/templates/timeline.html {% endcomment %}
{% load static %}

{% block titletag %}{{ title }}{% endblock %}
{% block bodyclass %}timeline{% endblock %}

{% block extra_css %}
    {{ block.super }}
    <link rel="stylesheet" type="text/css" href="{% static 'Example.css' %}">
{% endblock %}

{% block extra_js %}
  {{ block.super }}
  <script src="{% static 'Example.js' %}"></script>
  <script>
    document.addEventListener('DOMContentLoaded', function() {
      ReactDOM.render(
        React.createElement(
          Example.default, // note - using .default here as this is how the global is set up
          {
            children: 'TIMELINE CONTENT HERE',
            className: 'timeline-content'
          }
        ), document.getElementById('timeline'));
    });
  </script>
{% endblock %}

{% block content %}
  {% include "wagtailadmin/shared/header.html" with title=title %}
  <div class="container">
    <div id="timeline">
      {{ title }}
    </div>
  </div>
{% endblock %}
- Save changes, refresh your Django dev server and check the Example component is rendered.
Step 6 - Development Workflow
- Just a recap, we now have two dev servers.
client
- Run by Neutrino, using
npm startand avaialable athttp://localhost:5000/. - This server has no awareness of Django and is purely a way to quickly work with your React client code.
- Hot reloading works here, save a JS file and the dev server will update instantly.
- You can modify the file
timeline/client/src/index.jsxto be anything you want to make it easier for this, this file will NOT be built and is only for development.
server
- Run by Django, this is your Wagtail application where you can view admin along with any of your CMS output.
- This will only have access to your static assets, hence the 'production' code from your client.
- Hot reloading will not work here, changing your JS file will have no effect until you run
npm run buildAND refresh your Django site. - Depending on your browser settings, you may need to disable caching (see your browser's dev tools). Django does a nice job of caching your styles, but this is not needed when making frequent changes.
making changes
- Try to break up your work into client/server, switching between the two less frequently. This helps you batch changes into the two areas of the code and lets you build the compiled output less frequently saving you time.
- Try to make your dev demo file reflect data and parts of the Django admin you want to be thinking about (eg. you may want to add a simple sidebar).
timeline/client/src/index.jsx. - Biggest thing - remember that after saving the JS and CSS files that you need to run the Neutrino build again to make the changes available to Django.
Step 7 - Make a Timeline.jsx component
- We will need to install a few npm libraries:
-
react-calendar-timelinewhich also has a peer dependencyinteractjs -
classnames- a great helper util used to generate clean classNames for React components -
moment- needed for date management and also is a peer dependency ofreact-calendar-timeline
-
- These can be imported by running
npm install react-calendar-timeline classnames moment interactjs - Let's leave Example.js as is for now and create a new component by following the example in the react-calendar-timeline README.
// timeline/client/src/components/Timeline/index.js
export { default } from './Timeline';
/* timeline/client/src/components/Timeline/timeline.css */
.timeline {
  background: lightblue;
}
// timeline/client/src/components/Timeline/Timeline.jsx

import React from 'react';
import PropTypes from 'prop-types';

import classNames from 'classnames';
import moment from 'moment';
import CalendarTimeline from 'react-calendar-timeline';

// styles
import 'react-calendar-timeline/lib/Timeline.css'; // must include to ensure the timeline itself is styled
import './timeline.css';

const Timeline = ({ className }) => {
  const groups = [
    { id: 1, title: 'group 1' },
    { id: 2, title: 'group 2' },
  ];

  const items = [
    {
      id: 1,
      group: 1,
      title: 'item 1',
      start_time: moment(),
      end_time: moment().add(1, 'hour'),
    },
    {
      id: 2,
      group: 2,
      title: 'item 2',
      start_time: moment().add(-0.5, 'hour'),
      end_time: moment().add(0.5, 'hour'),
    },
    {
      id: 3,
      group: 1,
      title: 'item 3',
      start_time: moment().add(2, 'hour'),
      end_time: moment().add(3, 'hour'),
    },
  ];

  return (
    <div className={classNames('timeline', className)}>
      <CalendarTimeline
        groups={groups}
        items={items}
        defaultTimeStart={moment().add(-12, 'hour')}
        defaultTimeEnd={moment().add(12, 'hour')}
      />
    </div>
  );
};

Timeline.propTypes = {
  className: PropTypes.string,
};

Timeline.defaultProps = {
  className: '',
};

export default Timeline;
- Important: We need to update our demo page (Remember: Used only while developing the client code) to use the
Timelinecomponent notExample.
// timeline/client/src/index.jsx

import React from 'react';
import { render } from 'react-dom';
import Timeline from './components/Timeline';

render(
  <main className="main">
    <header role="banner">
      <div className="row nice-padding">
        <div className="left">
          <div className="col header-title">
            <h1 className="icon icon-">Timeline</h1>
          </div>
        </div>
        <div className="right" />
      </div>
    </header>
    <Timeline className="additional-class" />
  </main>,
  document.getElementById('root'),
);
- Test this all works on your client dev server, confirm the CSS is used and you have a basic timeline rendering.
- Run
npm run buildto build your static assets. - Update timeline.html (the Django view) to use the new component.
{% block extra_css %}
    {{ block.super }}
    <link rel="stylesheet" type="text/css" href="{% static 'Timeline.css' %}">
{% endblock %}

{% block extra_js %}
  {{ block.super }}
  <script src="{% static 'Timeline.js' %}"></script>
  <script>
    document.addEventListener('DOMContentLoaded', function() {
      ReactDOM.render(
        React.createElement(
          Timeline.default, // note - using .default here as this is how the global is set up
          {
            className: 'timeline-content'
          }
        ), document.getElementById('timeline'));
    });
  </script>
{% endblock %}
- Refresh your Django dev server and confirm you have a basic timeline rendering.

Step 8 - Connect to Wagtail's API
Our goal out of this step is to be able to read a response from Wagtail's API in our React component.
It is important to note that while developing with the API, we need to have two things running. Firstly we need to have our client running via npm start and also our Django app running which will handle the API requests.
- Update API max response
WAGTAILAPI_LIMIT_MAX = 100in our Django settings, the default is 20 and we want to allow for returning more Pages in our use case. - Run the client app and the Django app. Client -
npm start, server -./manage.py runserver. - Set up the proxy, this is a development feature in neutrinojs which will let us redirect our JavaScript client dev server requests to the Wagtail API.
// client/.neutrinorc.js
// replace `reactComponents()` with the same call but with an objects object passed in.
    reactComponents({
      /** Change options related to starting a webpack-dev-server
       * https://webpack.js.org/configuration/dev-server/#devserverproxy
       * Proxy requests to /api to Wagtail local Django server
       */
      devServer: { proxy: { '/api': 'http://localhost:8000' } },
    }),
- Now we can build a React component that fetches the API's data and transforms it into data we want for our rendering. This step may be a big jump if you are new to React, but we will explain more after the code snippets.
New File - Messages.jsx
- This will render our loading message and potentially any error message using class names that already exist in the Wagtail Admin CSS.
// client/src/Timeline/Messages.jsx
import React from 'react';
import PropTypes from 'prop-types';

/**
 * A verbose example of a Functional component. Messages renders the loading or
 * error message states.
 * @param {Object} props
 */
const Messages = ({ error, isLoading }) => (
  <div className="messages">
    <ul>
      {isLoading && <li className="success">Loading...</li>}
      {error && (
        <li className="error">
          <span>Error: </span>
          {error.message}
        </li>
      )}
    </ul>
  </div>
);

Messages.defaultProps = {
  isLoading: false,
  error: {},
};

Messages.propTypes = {
  isLoading: PropTypes.bool,
  error: PropTypes.shape({
    message: PropTypes.string,
  }),
};

export default Messages;
New File - get-transformed-response.js
- This is a pure function, takes the response from the API and prepares the data we need for our Timeline component.
// client/src/components/Timeline/get-transformed-response.js
/* eslint-disable camelcase */
import moment from 'moment';

const getTransformedItems = ({ items = [] } = {}) =>
  items.map(({ meta: { first_published_at, type, ...meta }, ...item }) => ({
    ...item,
    ...meta,
    group: type,
    start_time: moment(first_published_at),
    end_time: moment().add(1, 'year'), // indicates they are live
  }));

const getGroups = items =>
  items
    .map(({ group }) => group)
    .reduce((groups, group, index, arr) => {
      if (arr.indexOf(group) >= index) {
        return groups.concat({
          id: group,
          /* convert 'base.IndexPage' to 'Index Page' */
          title: group.replace(/([a-z](?=[A-Z]))/g, '$1 ').split('.')[1],
        });
      }
      return groups;
    }, []);

const getDefaultTimes = items =>
  items.reduce(({ start = null, end = null }, { start_time, end_time }) => {
    if (!start && !end) return { start: start_time, end: end_time };
    return {
      start: start_time.isBefore(start) ? start_time : start,
      end: end_time.isAfter(end) ? end_time : end,
    };
  }, {});

const getTransformedResponse = response => {
  const items = getTransformedItems(response);
  return {
    defaultTimes: getDefaultTimes(items),
    groups: getGroups(items),
    items,
  };
};

export default getTransformedResponse;
Revised File - Timeline.jsx
// timeline/client/src/components/Timeline/Timeline.jsx

import React, { PureComponent } from 'react';
import PropTypes from 'prop-types';

import classNames from 'classnames';
import CalendarTimeline from 'react-calendar-timeline';

import Messages from './Messages';
import getTransformedResponse from './get-transformed-response';

// styles
import 'react-calendar-timeline/lib/Timeline.css'; // must include to ensure the timeline itself is styled
import './timeline.css';

class Timeline extends PureComponent {
  state = {
    defaultTimes: {},
    error: null,
    groups: [],
    isLoading: true,
    items: [],
  };

  componentDidMount() {
    this.fetchData();
  }

  /** set state to loading and then call the API for the items data */
  fetchData() {
    const { apiUrl } = this.props;
    this.setState({ isLoading: true });
    fetch(apiUrl)
      .then(response => response.json())
      .then(({ message, ...data }) => {
        if (message) throw new Error(message);
        return data;
      })
      .then(getTransformedResponse)
      .then(({ items, defaultTimes, groups }) =>
        this.setState({
          defaultTimes,
          error: null,
          groups,
          isLoading: false,
          items,
        }),
      )
      .catch(error => this.setState({ error, isLoading: false }));
  }

  render() {
    const { className } = this.props;
    const {
      defaultTimes: { start, end },
      error,
      groups,
      isLoading,
      items,
    } = this.state;

    return (
      <div className={classNames('timeline', className)}>
        {isLoading || error ? (
          <Messages error={error} isLoading={isLoading} />
        ) : (
          <CalendarTimeline
            defaultTimeEnd={end}
            defaultTimeStart={start}
            groups={groups}
            items={items}
            sidebarWidth={250}
            stackItems
          />
        )}
      </div>
    );
  }
}

Timeline.defaultProps = {
  apiUrl: '/api/v2/pages/?limit=100',
  className: '',
};

Timeline.propTypes = {
  apiUrl: PropTypes.string,
  className: PropTypes.string,
};

export default Timeline;
Explanation
- Our Timeline React Component has been changed to a class component.
- The component has its own state and on componentDidMount it will call its own
fetchDatafunction. -
fetchDatasets the component'sisLoadingstate to true, reads the api url from props (which defaults to Wagtail's pages endpoint) and does some basic error handling, JSON parsing and finally sends the response data through our transformer, setting the state to our transformed results. - The
rendermethod on our component will output the data from state into our timline, but may render theMessagescomponent while the data is still loading or if any errors occured. - Our transformer file does the heavy lifting of working out what dates to show on the calendar based on the dates from the pages response, also prepares the groups based on the page type. We also do a bit of formatting on the native page type to make it read nicer.
- The transformer also prepares the default start/end dates based on the overall dates of the response's pages.
- We should be able to see the data from the API now in the component.
- Run
npm run buildand then you can see the changes within your Wagtail application.
Step 9 - Integrate with the Wagtail Admin search box
- Now we want to show an example of Wagtail's Django templates and views working with our React component.
- First, update the view to include handling and passing of the search query in the URL params. The existing
wagtailadmin/shared/header.htmlinclude in the timeline.html template will read thesearch_formfrom context.
# timeline/views.py

from django.shortcuts import render

from wagtail.admin.forms.search import SearchForm


def timeline_view(request):
    # Search Handling
    query_string = None
    if 'q' in request.GET:
        search_form = SearchForm(request.GET, placeholder='Search timeline')
        if search_form.is_valid():
            query_string = search_form.cleaned_data['q']
    else:
        search_form = SearchForm(placeholder='Search timeline')

    return render(request, "timeline.html", {
        'icon': 'time', # pass in an icon to show in the header
        'query_string': query_string or '',
        'search_form': search_form,
        'search_url': 'timeline',  # url name set by wagtail_hooks
        'title': 'Timeline',
    })
- Then we need to pass in the search form's id and current query to our React component. This will mean we can update the timeline live as the user types into the search form, and handle the cases where a URL is copied or the user presses enter to submit the search form.
- Here we only need to change the
block extra_js, essentially adding two props, theinitialSearchValueand thesearchFormId. Note:id_qis just the existing convention that Wagtail has, it is set up automatically by Wagtail.
{% block extra_js %}
  {{ block.super }}
  <script src="{% static 'Timeline.js' %}"></script>
  <script>
    document.addEventListener('DOMContentLoaded', function() {
      const props = { className: 'inner timeline-content', initialSearchValue: '{{ query_string }}', searchFormId: 'id_q' };

      ReactDOM.render(
        React.createElement(
          Timeline.default, // note - using .default here as this is how the global is set up
          props
        ), document.getElementById('timeline'));
    });
  </script>
{% endblock %}
- Now we can set up an event listener on our form, along with basic text search filtering.
- Below we have added three new methods;
-
onSearch- handles the input as the user types in the search box. -
setUpSearchForm- called on mount and sets up the listener and initial state. -
getFilteredItems- returns a filtered array of items based on the search string.
-
- We have also revised the props & default props to include
initialSearchValueandsearchFormId. - Finally, we have customised the actual timeline rendering to show the searched string in the header, plus returning only the filtered items to the calendar timeline.
// timeline/client/src/components/Timeline/Timeline.jsx

import React, { PureComponent } from 'react';
import PropTypes from 'prop-types';

import classNames from 'classnames';

import CalendarTimeline, {
  DateHeader,
  SidebarHeader,
  TimelineHeaders,
} from 'react-calendar-timeline';

import Messages from './Messages';
import getTransformedResponse from './get-transformed-response';

// styles
import 'react-calendar-timeline/lib/Timeline.css'; // must include to ensure the timeline itself is styled
import './timeline.css';

class Timeline extends PureComponent {
  state = {
    defaultTimes: {},
    error: null,
    groups: [],
    isLoading: true,
    items: [],
    searchValue: null,
  };

  componentDidMount() {
    this.fetchData();
    this.setUpSearchForm();
  }

  /** handler for search form changing */
  onSearch({ target: { value } = {} } = {}) {
    const { searchValue } = this.state;

    if (value !== searchValue) {
      this.setState({ searchValue: value });
    }
  }

  /** set up a listener on a search field that is outside this component
   * (rendered by Django/Wagtail) */
  setUpSearchForm() {
    const { initialSearchValue, searchFormId } = this.props;
    this.setState({ searchValue: initialSearchValue });

    /** set up a listener on a search field that is outside this component
     * (rendered by Django/Wagtail) */
    const searchForm = document.getElementById(searchFormId);
    if (searchForm) {
      searchForm.addEventListener('keyup', event => this.onSearch(event));
    }
  }

  /** return filtered items based on the searchValue and that
   * value being included in either the group (eg. Location Page) or title.
   * Ensure we handle combinations of upper/lowercase in either part of data.
   */
  getFilteredItems() {
    const { items, searchValue } = this.state;

    if (searchValue) {
      return items.filter(({ group, title }) =>
        [group, title]
          .join(' ')
          .toLowerCase()
          .includes(searchValue.toLowerCase()),
      );
    }
    return items;
  }

  /** set state to loading and then call the API for the items data */
  fetchData() {
    const { apiUrl } = this.props;
    this.setState({ isLoading: true });
    fetch(apiUrl)
      .then(response => response.json())
      .then(({ message, ...data }) => {
        if (message) throw new Error(message);
        return data;
      })
      .then(getTransformedResponse)
      .then(({ items, defaultTimes, groups }) =>
        this.setState({
          defaultTimes,
          error: null,
          groups,
          isLoading: false,
          items,
        }),
      )
      .catch(error => this.setState({ error, isLoading: false }));
  }

  render() {
    const { className } = this.props;
    const {
      defaultTimes: { start, end },
      error,
      groups,
      isLoading,
      searchValue,
    } = this.state;

    return (
      <div className={classNames('timeline', className)}>
        {isLoading || error ? (
          <Messages error={error} isLoading={isLoading} />
        ) : (
          <CalendarTimeline
            defaultTimeEnd={end}
            defaultTimeStart={start}
            groups={groups}
            items={this.getFilteredItems()}
            sidebarWidth={250}
            stackItems
          >
            <TimelineHeaders>
              <SidebarHeader>
                {({ getRootProps }) => (
                  <div {...getRootProps()}>
                    {searchValue && (
                      <div className="search">
                        <strong className="search-label">Search: </strong>
                        <span className="search-value">{searchValue}</span>
                      </div>
                    )}
                  </div>
                )}
              </SidebarHeader>
              <DateHeader unit="primaryHeader" />
              <DateHeader />
            </TimelineHeaders>
          </CalendarTimeline>
        )}
      </div>
    );
  }
}

Timeline.defaultProps = {
  apiUrl: '/api/v2/pages/?limit=100',
  className: '',
  initialSearchValue: null,
  searchFormId: null,
};

Timeline.propTypes = {
  apiUrl: PropTypes.string,
  className: PropTypes.string,
  initialSearchValue: PropTypes.string,
  searchFormId: PropTypes.string,
};

export default Timeline;
- For the sake of development testing, we can revise our demo (index.jsx) to include a search box.
// timeline/client/src/index.jsx

import React from 'react';
import { render } from 'react-dom';
import Timeline from './components/Timeline';

render(
  <main className="main">
    <header role="banner">
      <div className="row nice-padding">
        <div className="left">
          <div className="col header-title">
            <h1 className="icon icon-">Timeline</h1>
          </div>
        </div>
        <div className="right">
          <label htmlFor="id_q">
            Search term:
            <input type="text" name="q" id="id_q" placeholder="Search" />
          </label>
        </div>
      </div>
    </header>
    <Timeline className="additional-class" searchFormId="id_q" />
  </main>,
  document.getElementById('root'),
);
- Add a bit of CSS polish, align the colours with Wagtail's Admin & make the timeline header sticky (Note: Will not work on IE11).
/* timeline/client/src/components/Timeline/timeline.css */
.timeline .react-calendar-timeline .rct-header-root {
  background: #007d7e; /* wagtail teal */
  position: sticky;
  top: 0;
  z-index: 90;
}

.timeline .search {
  align-items: center;
  color: white;
  display: flex;
  height: 100%;
  padding: 1rem;
}

.timeline .search .search-label {
  text-transform: uppercase;
  padding-right: 0.25rem;
}
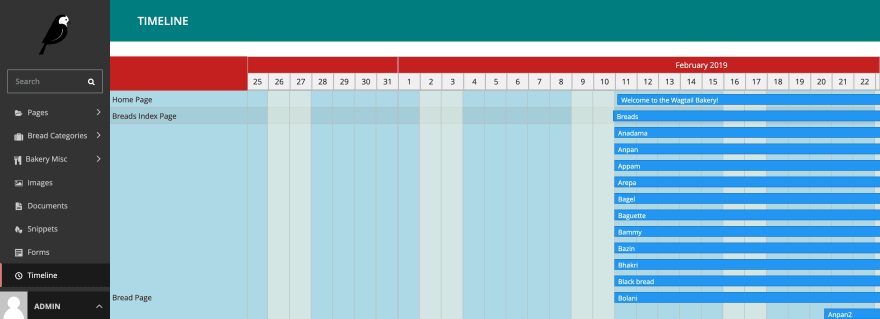
Step 10 - Final View & Future Improvements
- Now, run
npm run buildand test on your Wagtail instance. Also test submitting the form (pressing enter) after typing in the search box.

- Here is an animation of the final state.

Future Improvements
- This is a read-only timeline, and there are lots of ways this could be improved upon.
- You could add milestones or coloured parts of the timeline bar to indicate when the Page has had changes or whether the Page is live or still a draft.
- You may want to add the ability to click on a Page in the timeline and then a popover will show additional info and links.
- Grouping should be specific to your Wagtail use case, you could even have various versions of the timeline that group in different ways (adding a Django view button to the header that will then be listened to by the React component).
- Finally, you could add the ability to drag & drop or edit in the timeline, possibly to even determine when posts or pages will go live.
References & Links
Thanks to some of the Wagtail core team and Adam who helped proofread this.
Links
- Neutrinojs Docs
- Create React App Alternatives
- Wagtail Docs
- Wagtail package.json @ 2.7
- Full code branch for this tutorial
- nwb implementation of this tutorial quite rough, not polished
Versions used
As at writing.
- Django 2.3
- Wagtail 2.7 (LTS)
- Python 3
- React 16.4
- Node 10
- Neutrinojs 9.0.0-rc.5 Pre-release
- React Calendar Timeline 0.27


Latest comments (2)
Thank you, that's really helpful.
Glad to hear. Thanks