
In a previous post, I took you through using React's Context API as a way to pass data between sibling components. This time, we'll take a look at an alternative way of doing the same thing using Redux.
Redux is a useful tool which can be used to store state so that it can be used anywhere within your app.
In this example I'll show you how to make a really simple two-page app in which, on the 'Home' page, the user can save items from a list. Then, when they go over to the 'Saved' page, the saved items will be displayed and can also be removed from there.
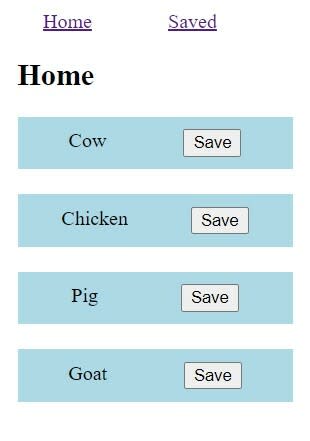
So here's our 'Home' page -
And if we click to save 'Cow' and 'Pig', then go over to the 'Saved' page, we'll see this -

I won't go through setting up the app as I just want to focus on Redux in this post. We'll start off with a 3 Components - the Navbar, the Home page and the Saved page. You can find the starting code here.
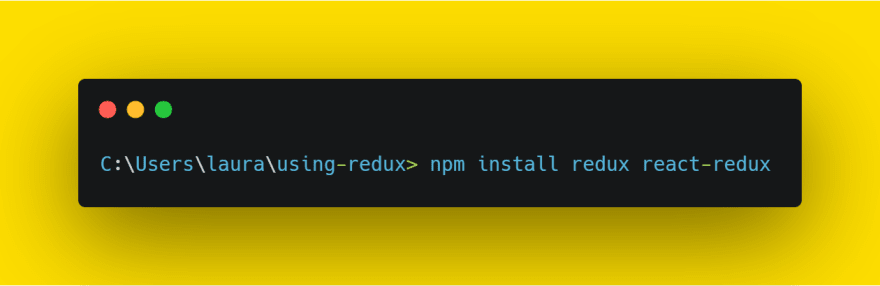
To begin, lets install the dependencies we'll need - 'redux' and 'react-redux'.
Next we need to set up our files. When using Redux there are quite a few files you'll need to create so it's a good idea to create a new folder to keep them all in. We'll call our folder 'redux'.
Create a new file called 'rootReducer.js'. Here we'll create our root reducer function and by importing 'combineReducers' from Redux it means that if we needed to add a variety of different reducers to our app, they could all run from one function. We'll leave the function empty for the moment as we need to create another file to import into the function.

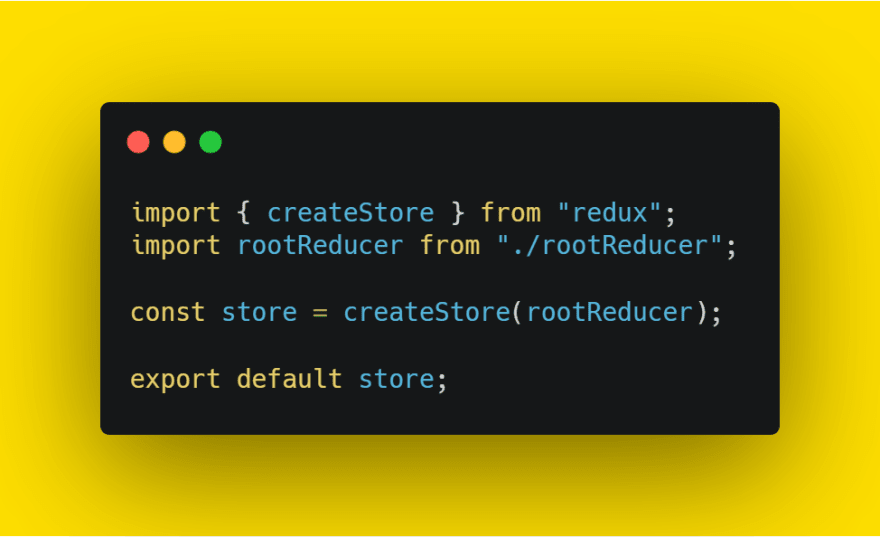
Now, create a file called 'store.js'. This will be where our state is stored. We need to import 'createStore', 'composeWithDevTools' and the 'rootReducer' that we just created. Then, we call createStore and pass in the rootReducer.
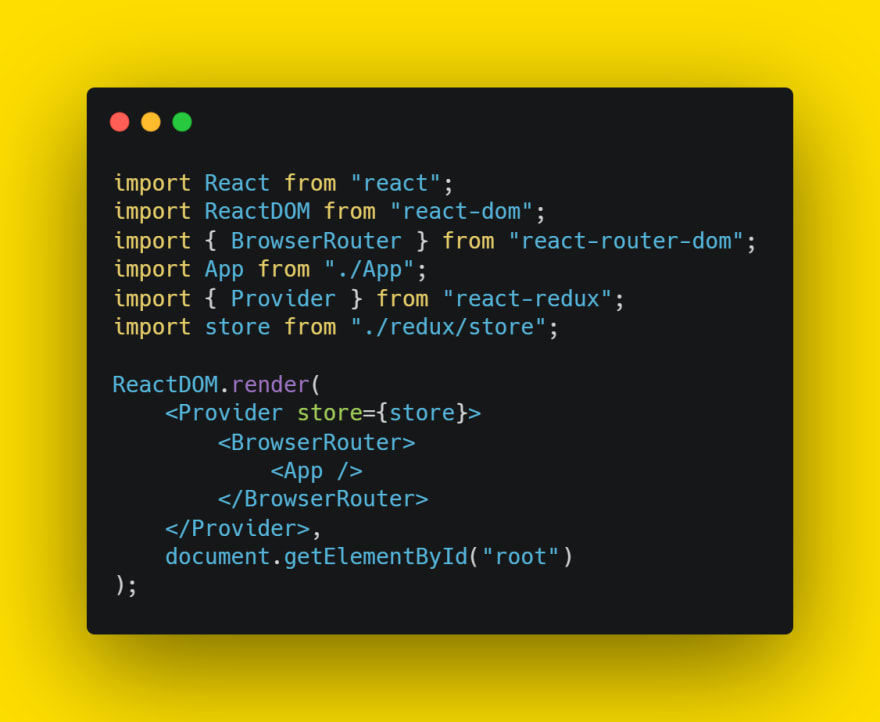
Next, let's go over to our index.js file and import 'Provider' and the store we just created. We need to wrap the entire app with tabs and pass in our store so that the entire app can communicate and use information from the store.
Now let's go back over to our redux folder and create another folder within that called 'save'.
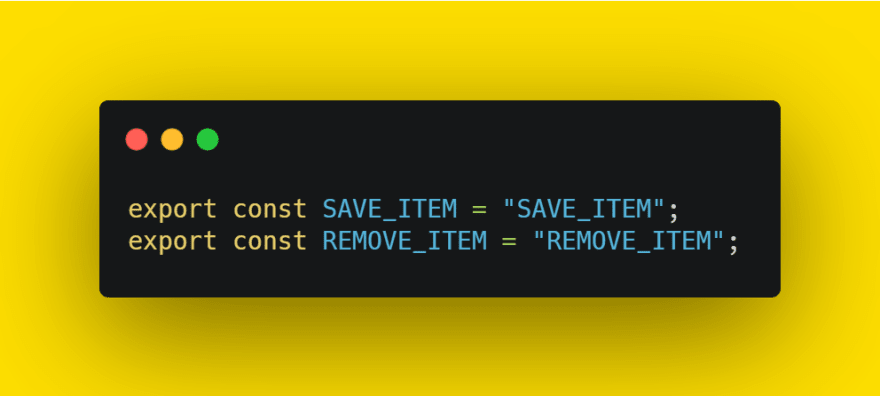
Create a file called 'saveTypes.js' and create two action types. In our case, we only have 2 actions to create - we want to save an item and we want to remove an item from the saved items. We'll call the actions 'SAVE_ITEM' and 'REMOVE_ITEM'.
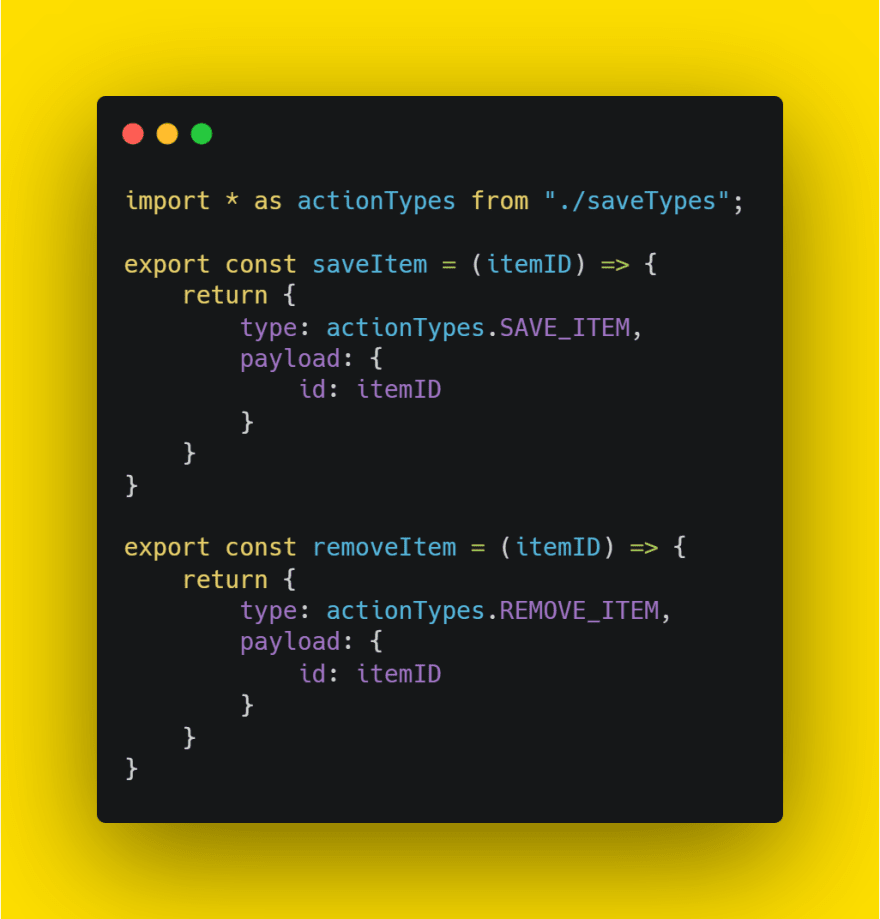
Now create another file in the 'save' folder called 'saveActions.js'. Here, import the actions we've just created, then create a function for each action. The functions will return an object with two values - the 'type', which will be the action imported from our 'saveTypes' file and the 'payload' which will be the data we want to get and store from the action. In our case, we want to get the id of the selected item.
The final file we need to create in the 'save' folder is 'saveReducer.js'. This is where the action happens!
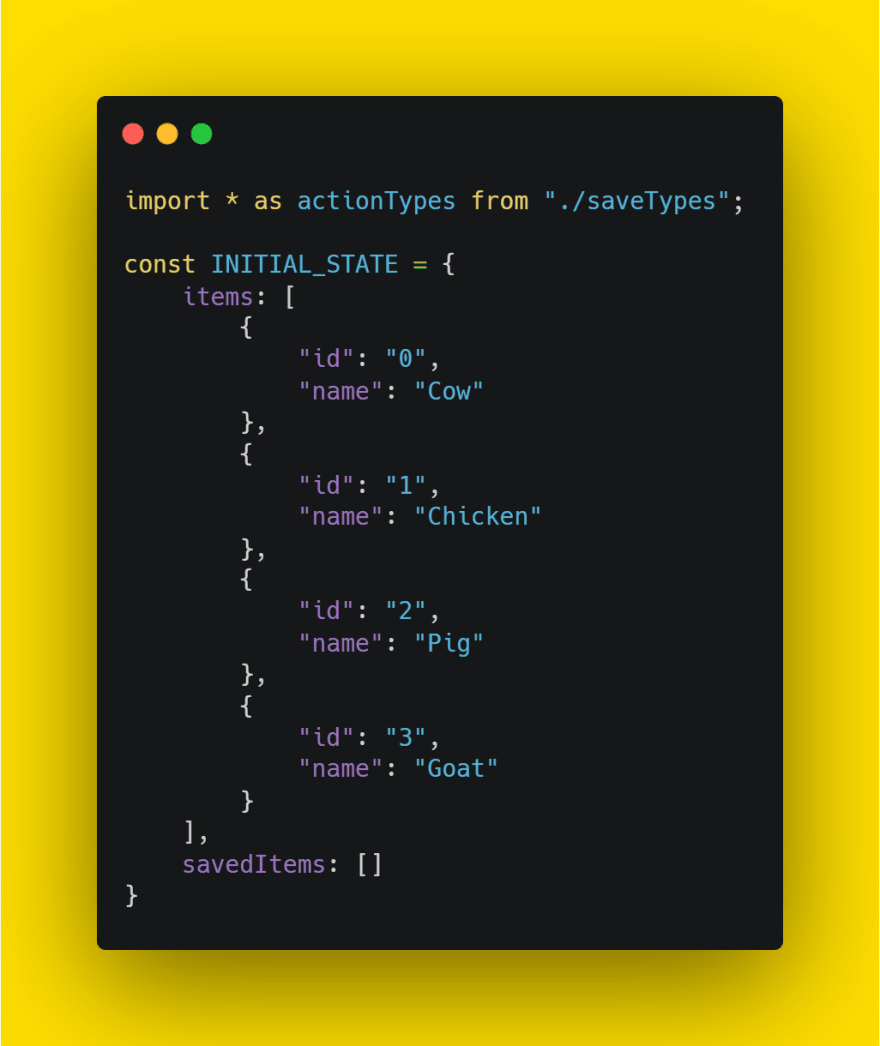
Begin by importing the action types from the 'saveTypes' file. Then create an object which initialises the state. First, we want to have a state called items which is an object array of all the items. Secondly we want to have a state for the saved objects. Since we don't want any of the items to be saved when we start, we can initialise this as an empty array.
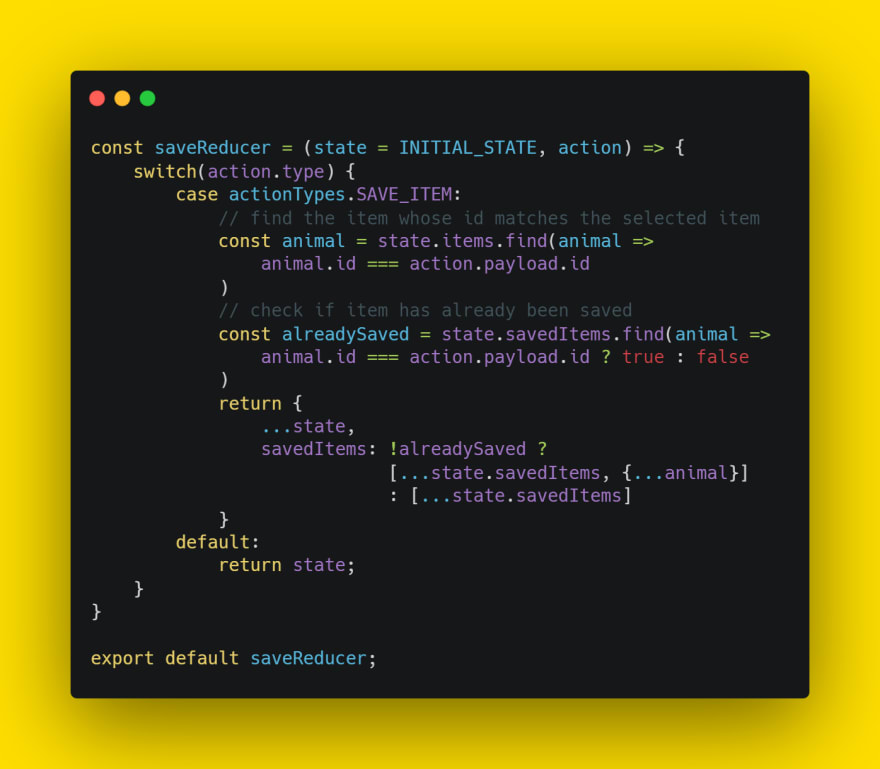
Next, let's create our saveReducer function and pass in our parameters of state and action. We want to use our INITIAL_STATE as the state so we can add that to the parameters too.

Within the function, we create a switch statement which checks for the action being used. Our default will simply return 'state'.
First, let's add the SAVE_ITEM action. This action will be used when we click the 'Save' button for any of our animals. When that happens, we want to check for the id of that animal and then add it to the 'savedItems' array.

To do that, we can use the find() method to get the object from our 'items' array whose id matches the id of the selected item (action.payload.id).

We then need to check whether that animal has already been saved as we don't want to add it to our 'savedItems' array twice. Again, we can use the find() method to search the savedItems array.

Now, in our return statement, we can use the spread operator to get our state (...state) and then update our 'savedItems' state. We can use a ternary operator which uses our 'alreadySaved' value and, if the item hasn't already been saved, add the item to our 'savedItems' array. Else it returns the current state.
Next, let's add the case for the REMOVE_ITEM action. Here, we can simply use the filter method to remove the item whose id matches the selected animal.

Now we can go back over to our 'rootReducer' file and import the 'saveReducer' which we can now assign to our 'save' reducer.
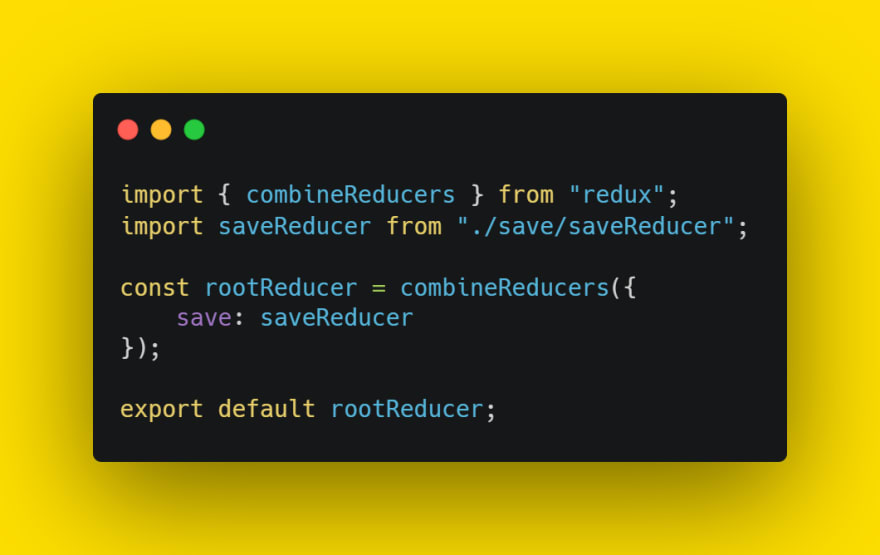
Since our app is really simple and only deals with whether the items are saved or not, we only need to include one reducer ('save'). If we were creating a more complex app, we might have a number of reducers which is why we us the 'combineReducers' function. It allows us to combine all of the reducers into one file - the 'rootReducer' file.
Now that we have all the Redux files set up, we can start introducing the stored state into our components. Let's start by going over to our 'Home' component.
First, we need to get all of our items from the stored 'items' array so that we can map them on the page. Underneath our functional component, we'll add a new function called 'mapStateToProps' and pass in state as a parameter. This function will return the items stored in state meaning that we can use them in our component by using the key value 'items'.
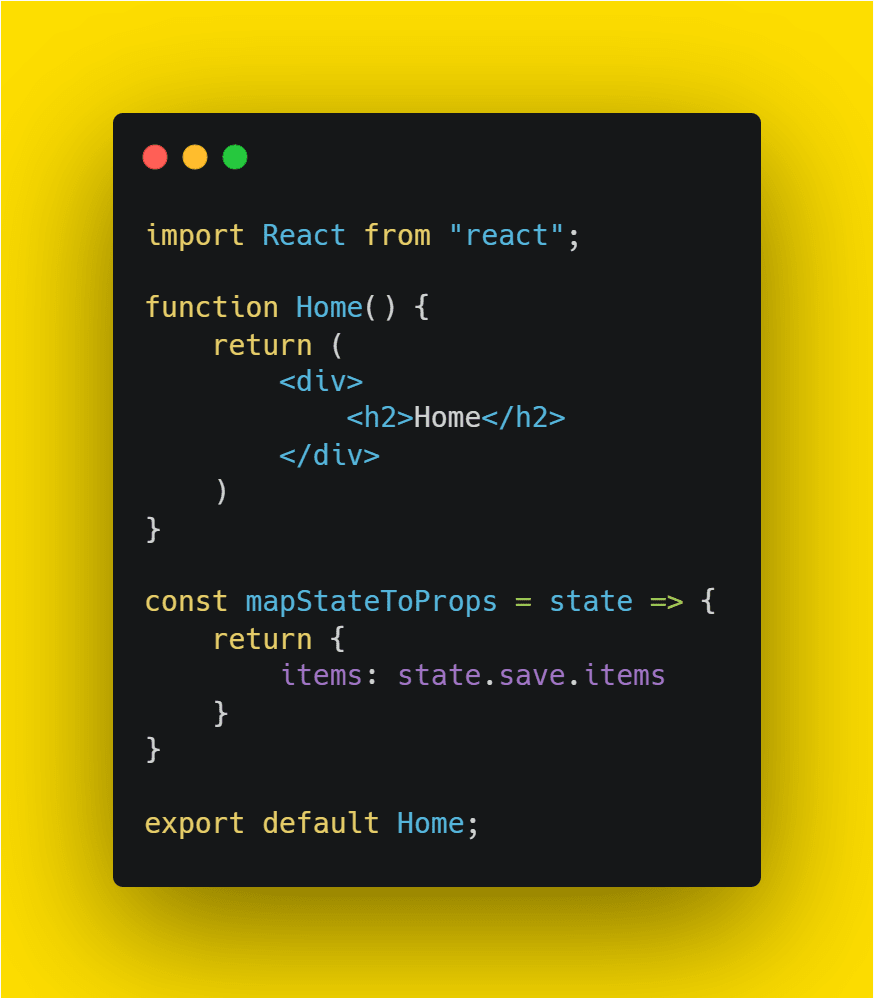
Next, import 'connect' from 'react-redux' and use this function to connect the 'Home' component to the redux store.

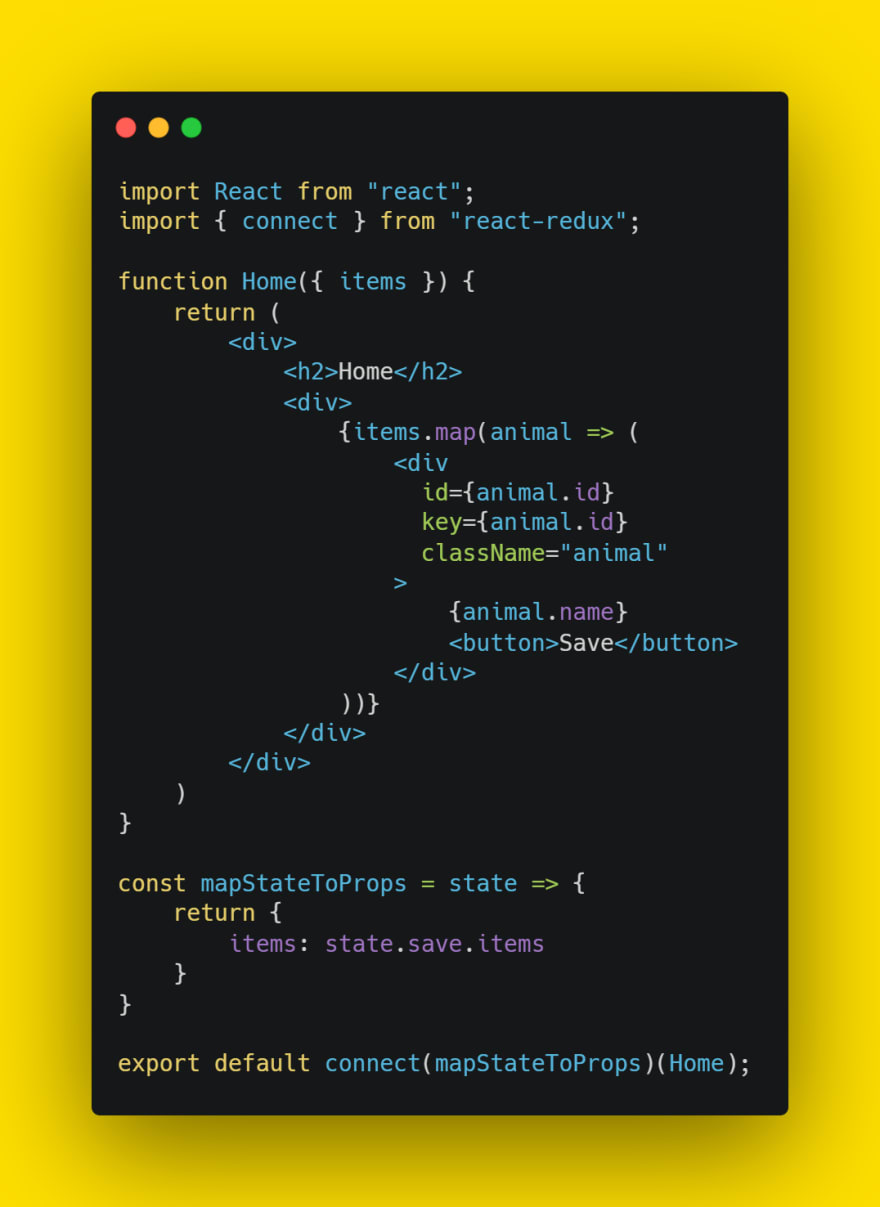
We can then pass our 'items' array into the Home function and use the map() method to display the values on the page.
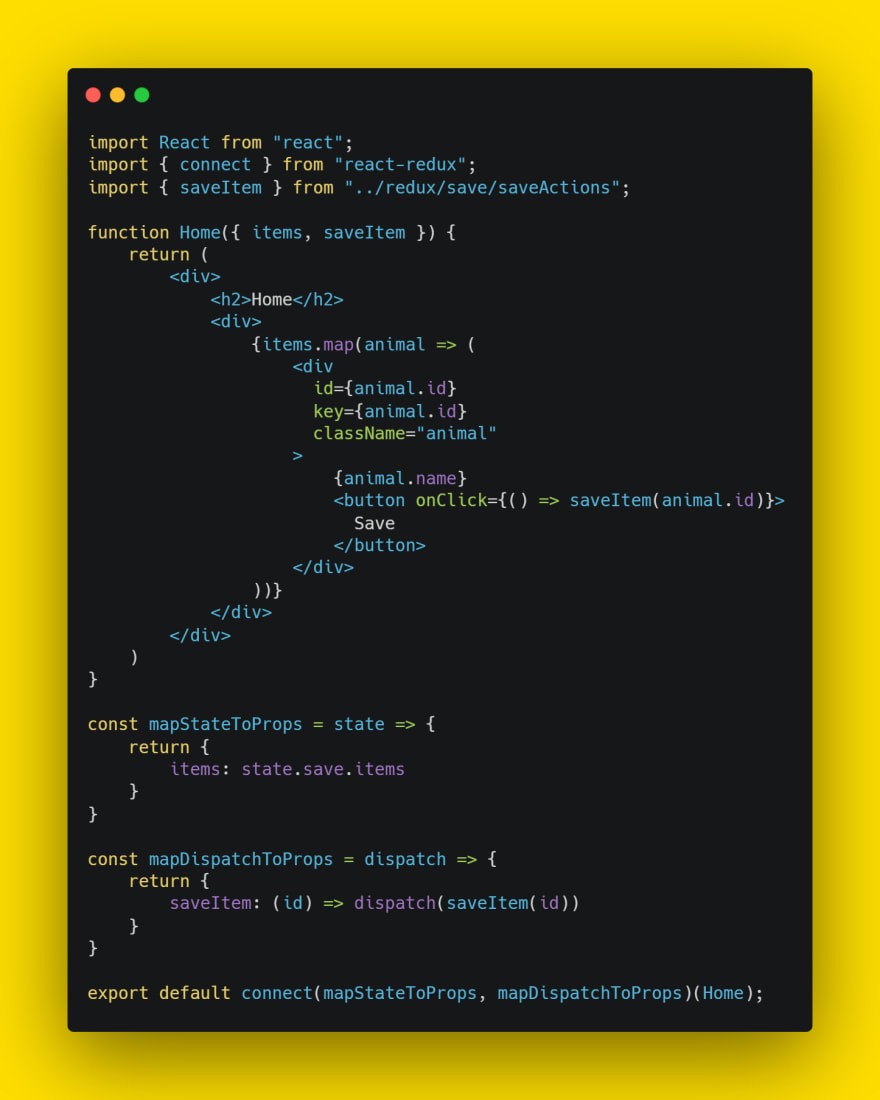
In order to save our items, we need to add the SAVE_ITEM action to our button by using the 'saveItem' function we created in the 'saveActions' file. First, import the function. Then, below our 'mapStateToProps' function, add a new function called 'mapDispatchToProps' and pass it into the connect function.
Where the 'mapStateToProps' function was retrieving information from the store, the 'mapDispatchToProps' function updates the information in the store.
Within the 'mapDispatchToProps' function we use the 'saveItem' function to get the id of the item and add it to the 'savedItems' array.

Now, pass 'saveItem' into the 'Home' component and add it to an onClick event in the button element, collecting the id of the animal being saved.
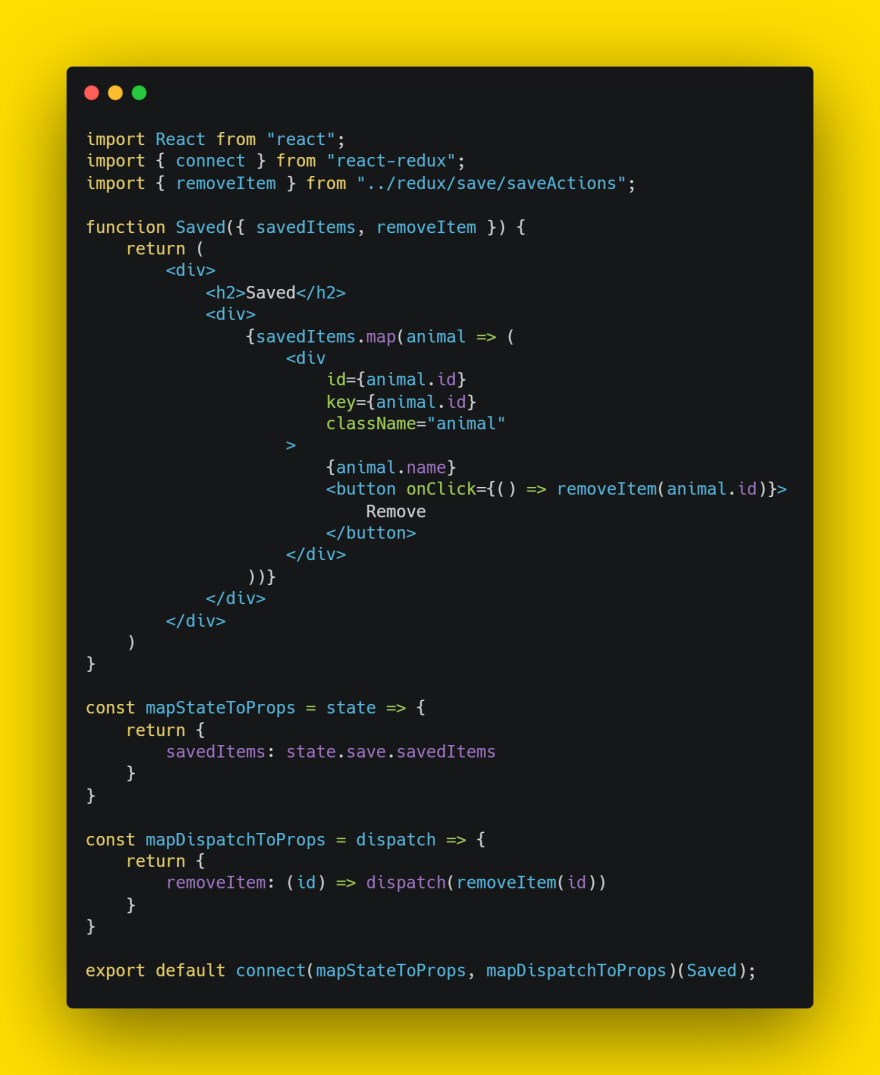
If we then go over to our 'Saved' component, we can repeat the same steps we used for the 'Home' component with some slight differences.
Instead of mapping the items in the 'items' array, we want to map the items from the 'savedItems' array and instead of using the 'saveItem' function on the button, we want to use the 'removeItem' function.
That's it! If you open up your app, you should be able to save and remove items from the Saved page.
You can check your final code here.


Oldest comments (0)