
When performing test automation, you would have come across umpteen scenarios where there is a need to verify the properties and values of the WebElements. For example, you might need to get the element’s text value in your automation test code and later verify the same against the desired value. In Selenium, the getText() method is used for fetching the text value of the WebElement.

What if the test scenario is more complicated and just getting the text value of the element is not sufficient? In such cases, you would need to use additional (and relevant) properties of the WebElements. Similarly, we may face a situation where just verifying text value is not enough for testing and we need to get additional properties of the elements that are statically or dynamically available in the DOM. Be it JavaScript or some other Selenium-supported programming language, getting specific attributes of the WebElements can be super useful in Selenium automation testing.
In this blog, we deep dive into how to get the data attribute in JavaScript for building superlative Selenium automation test scenarios.
What are Attributes in HTML
Attributes in HTML play an important role by giving additional information about the HTML elements. It also can be used to change the behavior of the elements by implementing events on them. Attributes in HTML are commonly defined using name-value pairs.
The name is the property you want to set. For example, the image tag
element in the example carries an attribute whose name is src, which indicates the source of the image.
The value indicates the value to which the corresponding property needs to be set. It is always enclosed in quotations. Here is the example which shows the value of the image with the .jpeg extension.
<img src='imagename.jpeg'/>
Attribute names and attribute values are case-insensitive. However, the World Wide Web Consortium (W3C) recommends lowercase attributes (or attribute values) as a part of the HTML 4 recommendation. You can check our earlier blog that helps you understand how to get attribute value in Selenium WebDriver.
In this Data driven testing tutorial, let us deep dive into what data driven testing is, its pros & cons, its types, data driven testing in an agile environment, benefits, and their best practices.
Commonly used Attributes in Automation Testing
Though there are a number of attributes in HTML, only some from the lot are majorly used for automation testing. Here are some of the commonly used attributes in HTML:
id: The id attribute is used to identify unique WebElements across the DOM
class: The class attribute provides a way of classifying similar WebElements
style: The style attribute is used for adding CSS styling to the WebElements
title: The title attribute is used for providing contextual information of the elements. In almost all web browsers, the title of the element can display as a tooltip on hovering the mouse over the window.
Major Types of Attributes
Listed below are some of the major categories (or types) of attributes:
Required Attributes: These attributes cannot be omitted from HTML tags. For example, an image is not displayed on the page without src for
.
Optional Attributes: These attributes should be added to give more meaning to the elements. For example — title for
provides a title to the image but it is not a compulsory attribute.
Event Attributes: These attributes are events that are triggered based on the user actions. For example — The onmouseover event on any html element is triggered when the user hovers the mouse pointer to that particular WebElement.
Standard Attributes: These are also known as global attributes. This category of attributes can be used in almost all the HTML tags (e.g. id, class, style, etc.).
Attributes in HTML play an increasingly important role in Selenium automation testing. Now that we have covered the basics of attributes in HTML, let’s look at the essential aspects of how to get data of attributes in Selenium JavaScript.
Why are Attributes important for Automation testing
Attributes can change the behavior of WebElements depending on the scenarios (or events) used for performing automation testing. Let’s take the case of a bus booking application. Here, booked seats are normally represented with the “Grey” colour, whereas the “Green” colour indicates that the seats are available for booking. In case there is a misrepresentation of the colours, customers would face problems in booking tickets. Customers would lose trust in the brand, which in turn could hamper the revenue of the company.
Hence, it becomes extremely critical to test whether booked and available tickets are represented with the right colour coding.
Manual testing is not preferred since it is not a scalable and reliable approach. However, such scenarios can be tested by getting data of attributes in Selenium JavaScript. Thus, it is an ideal testing approach before the build goes to the production environment.
Run your Jest automation tests in massive parallel across multiple browser and OS combinations with LambdaTest, Read more.
How to get Data of Attributes in Selenium JavaScript Tests
Selenium is a popular tool for web automation testing due to its large open source community support and ease of writing tests in the programming language of your choice. In addition, the Selenium automation framework is widely used for cross browser compatibility testing that ensures that the website (or web app) runs uniformly across different browser, platform, and device combinations.
Using Selenium and JavaScript, you can get the data of the attributes of the HTML elements displayed in the current state on the website (or web application). In addition, you can also verify the changed data of the attributes once the occurrence of events changes in the properties (e.g. colour, link updates for anchor tags, etc.) of the WebElements.
getAttribute() In Selenium
Selenium’s getAttribute() method is used to get attributes of HTML elements under test. This method is a part of the WebElement Class. The getAttribute() method can be used for getting values for different attributes like class, name,src, CSS style value, etc.
More precisely, this Selenium method returns the data of the given attribute if that particular attribute is present else, it returns null. For example — the getAttribute() method can be used to fetch the ‘value’ property of the textarea element. The “style” attribute is converted to a text representation with a trailing semicolon.
Syntax
var ele = driver.findElement(By.id('#'));
var attribute_value= ele.getAttribute('attribute_name');  // returns the attribute value
Demonstration — How to get Data of Attributes in Selenium JavaScript
Before we demonstrate how to get data of attributes in Selenium using JavaScript, it’s essential to have the basic setup ready for Selenium test automation. You can refer to our earlier blog titled Automation Testing With Selenium JavaScript to set up an environment for writing tests in Selenium with JavaScript bindings.
Alternatively, you can also check out the LambdaTest YouTube channel for videos that guide you through the Selenium JavaScript journey.
Consider a sample application that sells different types of pens online. This is what we plan to achieve as a part of the demonstration of how to get data of attributes using Selenium and JavaScript.
You can take this certification as proof of expertise in the field of test automation with JavaScript to empower yourself and boost your career.
Here’s a short glimpse of the Selenium JavaScript 101 certification from LambdaTest:
Test Scenarios
Two scenarios will be automated using Selenium and JavaScript. First, we get data of the relevant attributes on the page.
Verify if the product colour is the same as what is displayed to the user when the user tries to hover over the colour swatches shown in the filter section.
Verify whether the user sees the correct product name as it is fetched from the backend.
Implementation
The tests are run on the cloud-based Selenium Grid by LambdaTest. The advantage of cloud-based Grid is that Selenium test automation can be performed across a range of browsers, platforms, and device combinations at scale.
You can perform parallel testing in Selenium to leverage the advantages of speed and scale offered by the LambdaTest Grid. Once you create an account on LambdaTest, make a note of the username & access key from the LambdaTest profile section.
Use the LambdaTest capabilities generator to generate the desired browser capabilities against which Selenium test automation has to be performed. Set the environment variables LT_user & LT_token to LambdaTest username & access key respectively.
require('dotenv').config();
exports.config = {
  LT_user:  process.env.LT_user, // Your LambdaTest username
  LT_pass:process.env.LT_token, // Your LambdaTest token
  capabilities: {
  'build':  'Mocha-Selenium-Sample', //Build name
  'name':  'Test sample for getAttribute()', // Test name
  'platform':  'Windows 10', // OS name
  'browserName':  'chrome', // Browser name
  'version':  'latest', // Browser version
  'visual':  true, // To take step by step screenshot
  'network':  true, // To capture network Logs
  'console':  true, // To capture console logs.
  }
}
For demonstration, we use the Selenium 4 (Beta 2) version of Selenium WebDriver. To know more about the offerings of Selenium 4, please have a look at Selenium 4 on LambdaTest Learning Hub.
{
  "name": "lambdatest",
  "version": "1.0.0",
  "description": "",
  "main": "index.js",
  "scripts": {
    "test": "mocha --recursive --timeout 300000 ./tests/tests.js"
  },
  "keywords": [],
  "author": "",
  "license": "ISC",
  "dependencies": {
    "chromedriver": "^89.0.0",
    "dotenv": "^8.2.0",
    "mocha": "^8.3.2",
    "selenium-webdriver": "^4.0.0-beta.2"
  }
}


require('chromedriver');
const assert = require('assert');
const { Builder, By } = require('selenium-webdriver');
const { config } = require('../conf/conf.js');
const conf=require("../conf/conf.js").config;
const USERNAME = conf.LT_user
const KEY = conf.LT_pass;
const GRID_HOST = 'hub.lambdatest.com/wd/hub';

describe('Check Colours in filter section', function () {
    let driver;

    before(async function () {
        let caps=conf.capabilities;
        let gridUrl='https://' + USERNAME + ':' + KEY + '@' + GRID_HOST;
        console.log(gridUrl)
        driver = await new Builder().usingServer(gridUrl).withCapabilities(caps).build();
        await driver.get('https://www.pens.com/ie/c/pens-writing');

    });

    it('Verify the colour matches the swatch title', async function () {

        let list = await driver.findElements(By.css("a[class='colour-swatch ']"));
        let colour=[];
        for (item of list) {
            //Using getAttribute to get the data
            let col = await item.getAttribute("title");
            colour.push(col)
        }
        console.log(colour)

    });

    it('Check the Product name matches with data attribute', async function(){
        let product_data_attribute = await driver.findElement(By.id('product-card-1'));
        let product_name_displayed = await driver.findElement(By.className('product-card__name'));
        console.table([await product_data_attribute.getAttribute('data-prod-name') , await product_name_displayed.getText()])

    });

    after(() => driver && driver.quit());
})
Code Walkthrough
Step 1:
Browser capabilities that are declared in conf.js are used in the test implementation. The test will be run across Chrome 89.0 on the Windows 10 platform. The LambdaTest Grid on which Selenium web automation is performed is set to hub.lambdatest.com/wd/hub.
let caps=conf.capabilities;
let gridUrl='[https://'](https://') + USERNAME + ':' + KEY + '@' + GRID_HOST;
Step 2:
The get method of Selenium WebDriver is used for setting the test URL.
await driver.get('[https://www.pens.com/ie/c/pens-writing'](https://www.pens.com/ie/c/pens-writing'));
Step 3:
The findElements method in Selenium is used for locating the WebElements using the CSS Selector property. You can check our blog on how pro testers make use of CSS Selectors for Selenium web automation.
let list = await driver.findElements(By.css("a[class='colour-swatch ']"));
Inspect tool in the Chrome browser is used for locating the WebElements.

Step 4:
Navigate through the entire list to get the attribute “title” for each element.
for (item of list) {
            //Using getAttribute to get the data
            let col = await item.getAttribute("title");
            colour.push(col)
}
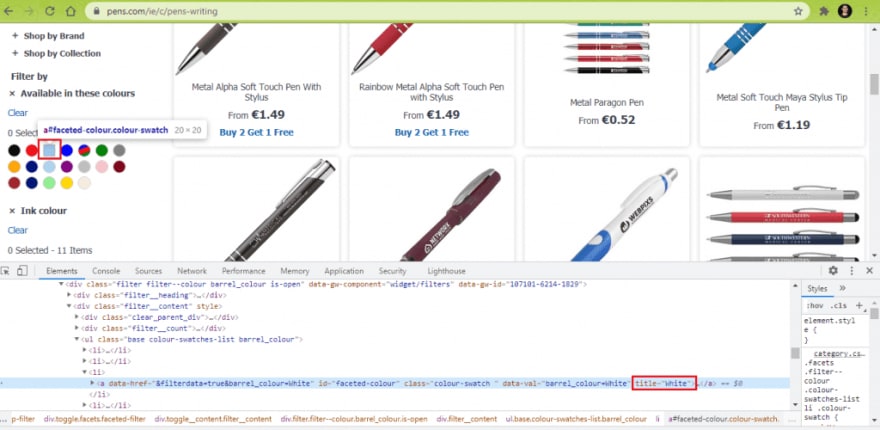
As shown below, the title of the corresponding element in the list is White. On similar lines, you would have titles like Black, Light Blue, Blue, etc. for elements in the list.
Step 5:
In the function “Check the Product name matches with data attribute”, we first locate the WebElement using the ID property (i.e. product-card-1).
let product_data_attribute = await driver.findElement(By.id('product-card-1'));
Step 6:
Using the className property in Selenium, we locate the WebElement product-card__name
let product_name_displayed = await driver.findElement(By.className('product-card__name'));
Here is how we located the WebElement using the Inspect Tool in Chrome (or Chrome DevTools):

Step 7:
The console.table function in JavaScript is used for displaying the data in a tabular format. The getAttribute method in Selenium is used to fetch the data-prod-name attribute for each item.
console.table([await product_data_attribute.getAttribute('data-prod-name') , await product_name_displayed.getText()])
Here is how the Inspect Tool in Chrome is used to get the details of the corresponding attribute:

Execution Output
Trigger the following command on the terminal to run the example that demonstrates how to get data of attributes in Selenium using JavaScript.
npm test
Here is the execution snapshot from the terminal and the LambdaTest automation dashboard which indicates that the test execution was successful.


Run Appium mobile testing of native and web apps. Improve your app quality with instant access to real devices on LambdaTest. Register now for free!
That’s All Folks

In this blog, we learnt how to read (or get) data of attributes using JavaScript and Selenium. This can be used in Selenium web automation scenarios where you have to read the values of the attributes on the page.
The getAttribute() method in Selenium is used for reading the value of the corresponding attribute. We also implemented getAttribute() in the Selenium Grid cloud offered by LambdaTest and tested the same against the Chrome browser installed on Windows 10. Thus, browser compatibility testing at a large scale can be performed using a cloud-based Selenium Grid like LambdaTest. Furthermore, it lets you run automation tests across 2,000+ browsers and operating systems online.
It’s best to leverage the advantages offered by cloud-based Selenium Grid so that you can get data of attributes in Selenium JavaScript in a more efficient manner.
Happy Testing with Selenium and JavaScript!


Oldest comments (0)