Downloading files is one of the most popular features utilized by Internet users worldwide. Almost all web applications provide a feature that allows users to download a file from the web page. It has many use cases, from downloading your favorite music or video files to invoices and bank statements.
If you are an automation tester fixated on Selenium automation testing, the chances are that you might run into a requirement of testing a feature around downloading files. While being a powerful tool for performing automated browser testing, Selenium natively doesn’t support download functionality. However, we can easily use Selenium to deal with file download, and this blog explores the exact scenario!
In this Selenium JavaScript tutorial, you will learn how to download files using JavaScript and Selenium WebDriver.
Let’s get started!
Challenges and Solutions in downloading files with Selenium
Selenium is a popular open-source tool that is used to automate web browsers. Selenium WebDriver comes with an exhaustive list of native functions that allows automation testers to effortlessly execute a wide variety of user interactions on the web application like click, type, drag and drop, etc. But when it comes to automating a feature like downloading files, things are not quite straightforward.
One obstacle that testers face while downloading files with Selenium is that every web browser offers a different UI when downloading a file. Even though there is no easy way to control the browser’s native dialogs by JavaScript, there is a workaround for it.
The solution is to trick the browser profile. By leveraging the browser profile setting, you can download files in Selenium WebDriver without interacting with the download window pop-up.
In this blog on how to download files using JavaScript, let us learn how to write automation test code to download a file using JavaScript and Selenium.

How to download files using JavaScript and Selenium?
We will be automating the following test scenario to download files using JavaScript and Selenium:
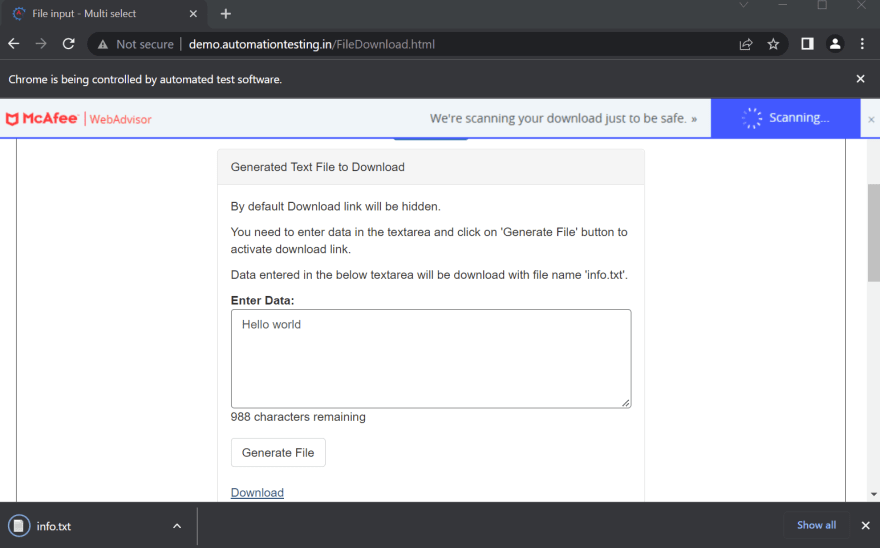
Step 1: Go to the website File Download Demo for Automation.
Step 2: Enter data in the textarea.
Step 3: Click the “Generate File” button to generate the text file.
Step 4: Click the “Download” link to download the file.

Prerequisites to download files using JavaScript
Before getting started with coding, ensure that you have the following prerequisites installed in your system to download files using JavaScript and Selenium:
Install Node.js and NPM.
Install Eclipse and IntelliJ (or any IDE of your choice).
Installation and basic project setup
In this section of this article on how to download files using JavaScript, I will be explaining briefly how to do a basic project setup for automation testing with Selenium JavaScript. Feel free to skip this section if you already have a working project.
Step 1: Create a project folder in the desired location in your system. Open the folder in your IDE.
Step 2: Initialize the project in this folder. Run the following command.
npm init -y
Step 3: Install the project dependencies. We need to install Selenium WebDriver and browser drivers. Here, I am installing the driver for the Chrome browser.
npm install --save selenium-webdriver chromedriver
With this, the project setup is now completed, and the package.json file is generated in the root folder.
Step 4: To maintain the test cases, create a new folder called tests. We will be storing our test files inside this folder.
My project folder structure now looks like this:

Accelerate JavaScript Automation with Parallel testing. Try LambdaTest Now!
Writing test case to download files using JavaScript
Now, it is time to write the code! For downloading a file using Selenium, we will be making use of the click() method. The automation steps are detailed below:
Step 1: Create a test file testOne.js inside the tests folder.
Step 2: Inside testOne.js, pull all the required functions from node_modules.
const { By, Key, Builder } = require("selenium-webdriver");
require("chromedriver");
Step 3: Create a function example(), which will be containing your test script. Feel free to provide any function name of your choice.
async function example() {

}
Step 4: Inside the function, let us write our test script using Selenium and JavaScript.
async function example() {
  //To wait for browser to build and launch properly
  let driver = await new Builder().forBrowser("chrome").build();

  try {
    //To go to the test website from the browser with our code.
    await driver.get("[http://demo.automationtesting.in/FileDownload.html](http://demo.automationtesting.in/FileDownload.html)");

    //To enter data inside the text area
    await driver
      .findElement(By.id("textbox"))
      .sendKeys("I love testing!", Key.RETURN);

    //To click on "Generate File" button
    await driver.findElement(By.id("createTxt")).click();

    //To click on "Download" link
    await driver.findElement(By.id("link-to-download")).click();

    //Wait for 5s till download is completed
    await driver.sleep(5000);
  } catch (e) {
    console.log("Error Occured:", e.name);
  }
  //It is always a safe practice to quit the browser after execution
  await driver.quit();
}
To locate the Web Elements, I have made use of the Chrome Developer Tools.

Step 5: Now simply add the function call. The full implementation is given below
const { By, Key, Builder } = require("selenium-webdriver");
require("chromedriver");

async function example() {
  //To wait for browser to build and launch properly
  let driver = await new Builder().forBrowser("chrome").build();

  try {
    //To go to the test website from the browser with our code.
    await driver.get("http://demo.automationtesting.in/FileDownload.html");

    //To enter data inside the text area
    await driver
      .findElement(By.id("textbox"))
      .sendKeys("I love testing!", Key.RETURN);

    //To click on "Generate File" button
    await driver.findElement(By.id("createTxt")).click();

    //To click on "Download" link
    await driver.findElement(By.id("link-to-download")).click();

    //Wait for 5s till download is completed
    await driver.sleep(5000);
  } catch (e) {
    console.log("Error Occured:", e.name);
  }
  //It is always a safe practice to quit the browser after execution
  await driver.quit();
}

example();
Step 6: Run the code. Make sure that the IDE terminal is pointed towards the tests folder location and execute the following command in the terminal.
node testOne.js
The test starts running and an instance of Chrome browser is instantiated.
The test gets executed successfully and the file is downloaded to your default Downloads folder location.
Pace-up your releases and ship quality products faster. Try LambdaTest Now!
Do you want to learn more about the exciting world of JavaScript automation testing? Deep dive into how Selenium WebDriver with JavaScript can be used for automated testing of web applications with this video tutorial:
Check out this blog, Emulator vs Simulator vs Real Device Testing: Key Differences
How to download files to a specific folder using JavaScript and Selenium?
Rather than downloading into the default Downloads folder, sometimes you might need to download the files to a specific folder location for storing and verifying all the downloads. In this section of this article on how to download files using JavaScript, let us learn how to configure the code to set the browser file Download directory for Chrome driver using Selenium and JavaScript.
Step 1: Make the following two additional imports in our previous code.
const chromeDriver = require("selenium-webdriver/chrome");
const webdriver = require("selenium-webdriver");
Step 2: Define Chrome options. Inside setUserPreferences, set your custom download path.
var options = new chromeDriver.Options();
  options.setUserPreferences({
    "download.default_directory": "your\download\folder\path",
  });
For example,
"download.default_directory": "D:\\Test",
Step 3: Redefine your driver instance.
var driver = new webdriver.Builder()
    .withCapabilities(webdriver.Capabilities.chrome())
    .forBrowser("chrome")
    .setChromeOptions(options)
    .build();
The full implementation is as shown below.
const { By, Key, Builder } = require("selenium-webdriver");
require("chromedriver");

const chromeDriver = require("selenium-webdriver/chrome");
const webdriver = require("selenium-webdriver");

async function example() {
  //To set chromeOptions
  var options = new chromeDriver.Options();
  options.setUserPreferences({
    "download.default_directory": "D:\\Test",
  });

  //To wait for browser to build and launch properly
  var driver = new webdriver.Builder()
    .withCapabilities(webdriver.Capabilities.chrome())
    .forBrowser("chrome")
    .setChromeOptions(options)
    .build();

  try {
    //To go to the test website from the browser with our code.
    await driver.get("http://demo.automationtesting.in/FileDownload.html");

    //To enter data inside the text area
    await driver
      .findElement(By.id("textbox"))
      .sendKeys("I love testing!", Key.RETURN);

    //To click on "Generate File" button
    await driver.findElement(By.id("createTxt")).click();

    //To click on "Download" link

    await driver.findElement(By.id("link-to-download")).click();

    //Wait for 5s till download is completed
    await driver.sleep(5000);
  } catch (e) {
    console.log("Error Occured:", e.name);
  }
  //It is always a safe practice to quit the browser after execution
  await driver.quit();
}

example();
Step 4: Run the code.
node testTwo.js
The test gets executed successfully, and the file is downloaded to the specific path mentioned.

If you are a JavaScript developer, this certification will certify your competence as an in-depth, hands-on JavaScript automation pro.

Here’s a short glimpse of the Selenium JavaScript 101 certification from LambdaTest:
Check this out: Dev Tools for Safari
How to download files using JavaScript and cloud Selenium Grid?
In the above demo test scenarios, we learned how to download files using JavaScript and Selenium WebDriver to our local systems and execute our tests in the Chrome browser.
However, most Selenium testing projects use online Selenium Grid to achieve cross browser testing and better test coverage to ensure that the test is working fine in all major browser-OS-device combinations.
In this section of this article on how to download files using JavaScript, let us learn how to execute our code in the cloud-based Selenium Grid provided by LambdaTest.
LambdaTest is a cross browser testing platform that provides an online browser farm of 3000+ browser and OS combinations and an online Selenium Grid that you can integrate with your current test project via minimum code changes. LambdaTest scalable cloud infrastructure helps you perform web testing and web application testing across real desktop and mobile browsers. You can execute your JavaScript automation tests instantly on LambdaTest cloud, without worrying about building or maintaining an in-house device lab.
Subscribe to the LambdaTest YouTube channel when you want to catch up with the latest news on automated browser testing, automated UI testing, etc.
Follow along to learn how!
Step 1: Create a free account on LambdaTest and secure your unique username and access key.
Step 2: Inside the test file, define all the required variables for connecting with the Remote Grid like your unique username, access key, grid host, remote grid URL etc.
const USERNAME = "YOUR_USERNAME"; //replace with your username
const KEY = "YOUR_ACCESSKEY"; //replace with your accesskey

const GRID_HOST = "hub.lambdatest.com/wd/hub";

const gridUrl = "https://" + USERNAME + ":" + KEY + "@" + GRID_HOST;
Step 3: Pass the browser capabilities. You can generate your custom desired capabilities using LambdaTest Capabilities Generator.

var capabilities = {
    "LT:Options": {
      user: USERNAME,
      accessKey: KEY,
      build: "JavaScript and Selenium Testing",
      name: "Download File",
      platformName: "Windows 11",
      selenium_version: "4.1.0",
      driver_version: "99.0",
    },
    browserName: "Chrome",
    browserVersion: "99.0",
  };
Here, I am configuring my test to run in Chrome Browser version 99.0 with Windows 11 OS using the latest Selenium 4.
Step 4: The configuration is completed. Our final code now looks like this.
const USERNAME = "YOUR_USERNAME"; //replace with your username
const KEY = "YOUR_ACCESSKEY"; //replace with your accesskey

const GRID_HOST = "hub.lambdatest.com/wd/hub";

const { By, Key, Builder } = require("selenium-webdriver");

async function example() {

  var capabilities = {
    "LT:Options": {
      user: USERNAME,
      accessKey: KEY,
      build: "JavaScript and Selenium Testing",
      name: "Download File",
      platformName: "Windows 11",
      selenium_version: "4.1.0",
      driver_version: "99.0",
    },
    browserName: "Chrome",
    browserVersion: "99.0",
  };

  const gridUrl = "https://" + USERNAME + ":" + KEY + "@" + GRID_HOST;

  //To wait for browser to build and launch properly
  let driver = await new Builder()
    .usingServer(gridUrl)
    .withCapabilities(capabilities)
    .build();

  try {
    //To go to the test website from the browser with our code.
    await driver.get("http://demo.automationtesting.in/FileDownload.html");

    //To enter data inside the text area
    await driver
      .findElement(By.id("textbox"))
      .sendKeys("I love testing!", Key.RETURN);

    //To click on "Generate File" button
    await driver.findElement(By.id("createTxt")).click();

    //To click on "Download" link

    await driver.findElement(By.id("link-to-download")).click();

    //Wait for 5s till download is completed
    await driver.sleep(5000);
  } catch (e) {
    console.log("Error Occured:", e.name);
  }
  //It is always a safe practice to quit the browser after execution
  await driver.quit();
}

example();
Step 5: Run the code.
node testThree.js
The test starts running. Go to the LambdaTest Dashboard to observe the live running status.

Our test got executed successfully. You can analyze the detailed report containing video and logs.

Moreover, you can navigate to the LambdaTest Analytics Dashboard to see test performance metrics. You can see the total number of tests passed or failed from the Test Summary section. You can also see the snapshot of consistent tests from the Test Overview section.


Check this out: Developer Tools for Safari
Conclusion
File Download is a common feature offered by most web applications. In this tutorial on how to download files using JavaScript and Selenium, we explored how to write an automation test case for downloading a file using JavaScript and Selenium WebDriver.
Additionally, we explored edge cases like how to download files using JavaScript to a specific folder and how to run our tests using an online Selenium Grid for better test coverage and cross browser testing. I hope this tutorial turned out to be beneficial!
Happy Testing!


Latest comments (0)