
Wondering how you can host your NodeJS app without too much hassle ?
Let me introduce you to Firebase Functions.
I became really fond of Firebase. You can host the front-end, your back-end, a database, store images/videos and files, handle analytics and so much more.
If you wish to host a NodeJS app, you found the right article.
Create a Firebase project
First you need to create a project on the Firebase website.
Go to https://firebase.google.com and click on Get Started.
- Proceed to click on Create a project.
- Enter a project name and check yes if you wish to add analytics to your project.
- Wait for the project to be created.
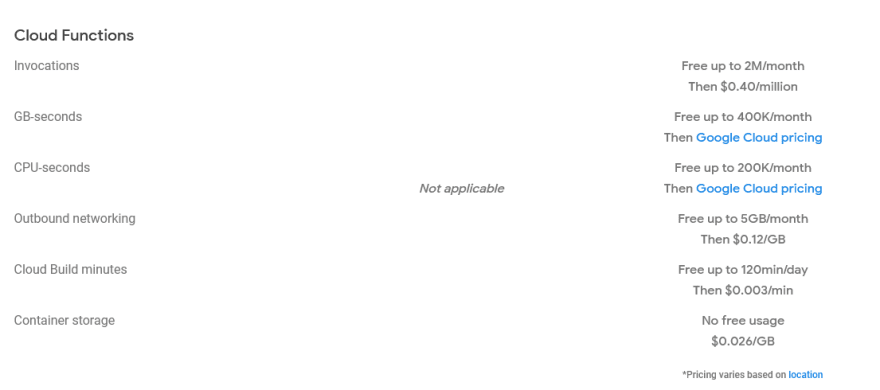
Go to the Functions tab on the sidebar, click on the ”change formula” button and select the Blaze formula.
Hosting functions isn’t free, but if you need it to host a personal project, it will cost close to nothing. You can also define a budget alert if it starts costing too much.
Here is the pricing for Firebase functions.
Logging in
Create a folder that will hold your NodeJS App. Open a Terminal and install firebase :
// NPM
npm install -g firebase-tools firebase

// Yarn
yarn add -g firebase-tools firebase
You will then need to log into your Google Account, in order to do that, use the command firebase login.
Then a window will pop up to select your google account. Authorize Firebase and a success message should appear.
Initializing the project
You can now use the firebase init command.
Firebase will then ask you which feature you want to add to your project.
We are trying to add a Function, so select Function and press enter.
Then you can either use an existing project, create a new project or add Firebase to a Google Cloud Platform project. Here we will use an existing project and select our previously created project.
- Indicate if your app is written with Javascript or Typescript
- Add ESLint if you wish
- Install the dependencies.
After answering these questions, two files will be created : firebase.json and .firebaserc.
firebase.json holds different hosting rules (here the file will be empty), and .firebaserctells which firebase project you are using.
A folder named functions will also appear with the following structure :
project
└───functions
│   │   node_modules
│   │   index.js
│   │   package-lock.json
│   │   package.json
│   .firebaserc
│   .gitignore
|   firebase.json
Create a NodeJS app
Add Express to your project :
Go inside the function folder and install Express with the command :
npm install express
# OR
yarn add express
Wait, what is Express ?
If you want to put it simply :
Express.js is a NodeJS framework. It makes writing an app much faster than with NodeJS itself.
Reminder : NodeJS is a run-time environment. It allows you to run Javascript on your machine, outside of a web browser.
Create an Express server
To create an Express server, you need to import Express in the functions/index.js file.
Remove the comments but keep the first import.
Then, add this code to import express and initiate it :
const express = require('express')
const app = express()
Then, add this code to listen to a specific port :
app.listen(8080, () => {
  console.log('Listening ...')
})
Now you can run this command in your terminal :
node index.js
Go to localhost:8080 and you will see Cannot GET /. This is normal, we didn't create any route yet.
Optional : Install Nodemon
Nodemon is a package that restarts you app whenever a file changes. This is a very useful package that I recommend using, otherwise, you will have to manually restart your app every time you change something in your code. Not very convenient.
To install it run the command :
npm install nodemon
# OR
yarn add nodemon
To use it, go to the package.json file and add/replace the “start” script by this one :
"start": "nodemon ./index.js",
You can now use the command npm start to start your server.
Create routes
We are going to create a fake route, to mimic a real API and make sure our app is working once we go live.
The most used routes are :
- GET /route - to get data
- GET /route/:id - to get data attached to a specific id
- POST /route - to add a new entry to your database
- DELETE /route/:id - to delete a specific entry
We are going to create a GET route to get a list of dogs (But in fact we are going to display an array of dog breeds) :
const express = require("express");
const app = express();

app.get("/dogs", (req, res) => {
  res.send("Dogs list");
});

app.listen(8080, () => {
  console.log("Listening ...");
});
The get method has two params :
- The route to listen to (/dogs)
- a Callback.
The Callback has also two params:
- req, which is the requested data.
- res, the response holding the **requested **data.
First, we will only show a simple string that says “Dogs list” when you hit the url localhost:8080/dogs .
If you go to localhost:8080/dogs you will see “Dogs list” appear.
Let’s add an array with dog breeds, and send that as a response :
const dogsList = ["Labrador", "Beagle", "Shiba Inu"];

app.get("/dogs", (req, res) => {
  res.send(dogsList);
});

app.listen(8080, () => {
  console.log("Listening ...");
});
This is what you should see :

Ok, but now, how do we host our app ? Firebase is here to the rescue.
At the end of your file, add this line that will export your app for firebase to use.
exports.app = functions.https.onRequest(app);
Deployment
You can now run firebase deploy --only functions and wait for the process to finish.
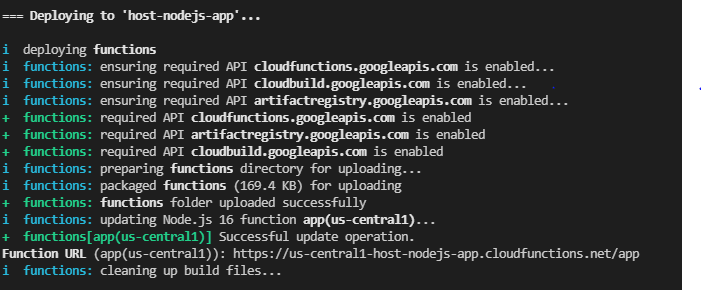
You can click on the address that looks like this : https://us-central1-host-nodejs-app.cloudfunctions.net/app/dogs and your route will appear !
Oops .. what’s happening ?

I can’t access my own app ? What is that ?
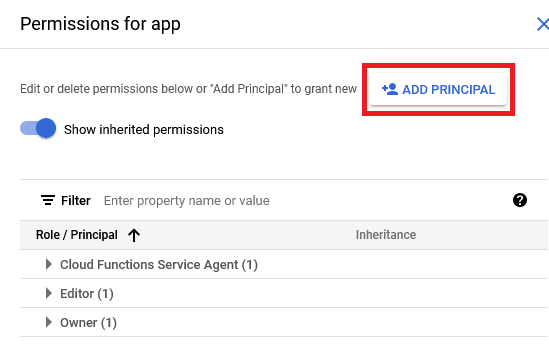
As you may know, every Firebase app you create is linked to a Google Cloud Platform project. In order to access you app, you will have to add authorizations to access your function.
Google provides a tutorial on how to add permissions, so let’s do this together.

- Go to this address https://console.cloud.google.com/functions/list and make sure you are managing the right project.
- Check the function you just created.

- Click on Permissions.

- Click on Add Principal.
- In the New Principals field write allUsers.

- Select the role Cloud Functions Invoker.
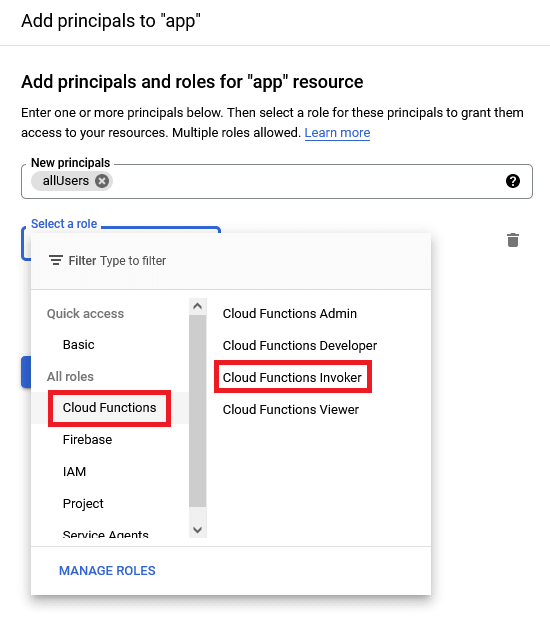
- Click save.
Now, if you go back to your app url everything should work just fine ! 🎉
Originally posted on my blog. Check out my instagram account to learn more about web development.


Top comments (0)