Uno Platform .NET WebAssembly apps on GitHub Pages
In this post, I’m going to cover how you can build a .NET WebAssembly app using the Uno Platform and use GitHub actions to publish it to GitHub pages.
The Uno Platform is C# based cross platform framework that utilizes XAML for building apps. For anyone acquainted with WPF, Xamarin or UWP, this will all look familiar.
While the apps can be deployed on a number of different platforms and devices, the platform of interest to me is WebAssembly. In particular, being able to run C# on a static site hosted on GitHub Pages.
GitHub pages allow you to host static sites for free, and because it is deployed straight from the repository, setting up an action to deploy is very easy.
Getting Started
In order to run tests on GitHub we will need these prerequisites;
- GitHub account You can join here if you don't have an account
- GitHub Repository If you don’t have a repo, take a look at the following article to get setup: Create a repo
- Repository cloned locally If you don’t already have a setup with favourite git client, try the official docs: Cloning a repository
- VSCode - IDE to edit and debug the app https://code.visualstudio.com/
Setting up your Uno WebAssembly project
First, install the project templates from Uno
dotnet new -i Uno.ProjectTemplates.Dotnet
Now we can create a new Uno project from a template with the following command.
I have disabled a number of targets, if you intend to run this app on another platform, you can flip the respective
falseoption totrue
dotnet new unoapp -o GitHub.UnoPages -wasm=true -android=false -macos=false -uwp=false -ios=false -skia-wpf=false -skia-gtk=false -st=false -v=true
After running this, you should see a new folder created call GitHub.UnoPages
To test the project is working
- Open the
GitHub.UnoPagesfolder in VSCode, - Open GitHub.UnoPages.Shared>MainPage.xaml and change the following line of XAML
From
<TextBlock Text="Hello, world!" Margin="20" FontSize="30" />To<TextBlock Text="Hello, Pages!" Margin="20" FontSize="30" /> - Save the change
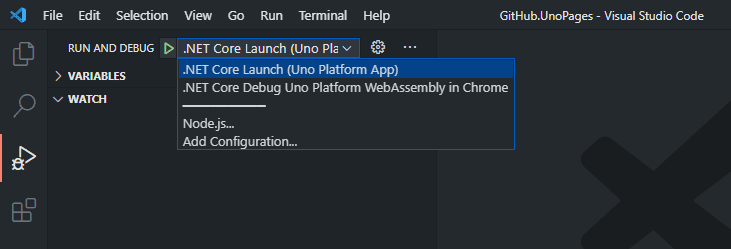
- Switch to the debug tab
- From the 'RUN AND DEBUG' menu select .NET Core Launch
- Press the green start button, or press F5
- Once the project builds and starts running, you should see
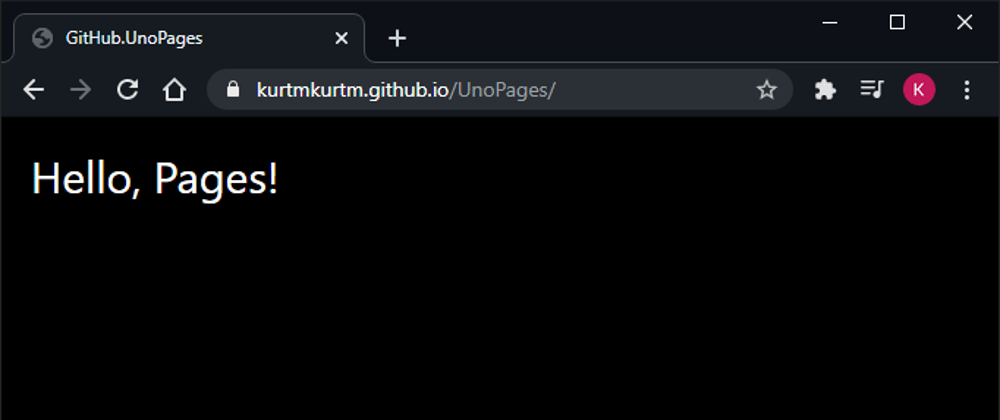
Now listening on: http://localhost:5000in the console - Open http://localhost:5000 in the browser and you should see Hello, Pages!

- With the app working, we can now stop debugging
- Commit your changes, and push to your GitHub Repository.

For simplicity in this post, I am pushing directly to the
mainbranch, In practice it is advisable to protect your main branch, and create a feature branch, and subsequent PR
Build Pipeline
We are now going to set up a pipeline to automatically build and publish our app.
- On the main page of your GitHub repo, press the Actions tab.
- On the actions page, click *set up a workflow yourself *
- Delete the pre populated Yaml
- Copy and Paste the following Yaml
name: UnoPages App
on:
  pull_request:
    branches: [ main ]
  push:
    branches: [ main ]
  workflow_dispatch:  # Allows workflow to be ran via a button
jobs:
  build:
    runs-on: ubuntu-latest
    name: Build
    env:
      config: 'Release'
      framework: 'netstandard2.0'
    steps:
    - uses: actions/checkout@v2
    - name: Setup .NET
      uses: actions/setup-dotnet@v1
      with:
        dotnet-version: 5.0.x
    - name: Restore Dependencies
      run: dotnet restore ./GitHub.UnoPages/GitHub.UnoPages.Wasm/GitHub.UnoPages.Wasm.csproj
    - name: Build
      run: dotnet build ./GitHub.UnoPages/GitHub.UnoPages.Wasm/GitHub.UnoPages.Wasm.csproj --no-restore -f $framework -c $config
    - name: Publish Artifacts
      uses: actions/upload-artifact@v1.0.0
      if: github.event_name == 'workflow_dispatch' # Only deploy if Workflow manually ran
      with:
        name: pages
        path: ./GitHub.UnoPages/GitHub.UnoPages.Wasm/bin/${{env.config}}/${{env.framework}}/dist/
  deploy:
    needs: build
    runs-on: ubuntu-latest
    name: Deploy
    if: github.event_name == 'workflow_dispatch' # Only deploy if Workflow manually ran
    steps:
    - name: Download artifacts
      uses: actions/download-artifact@v2
      with:
        name: pages
        path: dist
    - name: Deploy to GitHub Pages
      uses: crazy-max/ghaction-github-pages@v2
      with:
        target_branch: gh-pages
        build_dir: ./dist/
        jekyll: false
      env:
        GITHUB_TOKEN: ${{ secrets.GITHUB_TOKEN }}
- Save the workflow, with the following details - again for simplicity, I'm going to commit this directly to main.
- Press the 'Start commit' button
- Add the description 'CI: Build workflow'
- Leave the options as 'Commit directly to the
mainbranch' (or create a new branch if required) - Press the 'Commit new file' button
- Now, switch to the actions tab, and you should see your build that was triggered by the push to
main - Take a look at the workflow by clicking on the run CI: Build workflow

- You should now see that the build job ran, but not the deploy job. This in intentional, if you take another look at our workflow you can see that we have the condition on the event that triggered the build, which needs to be a workflow_dispatch.

deploy:
   needs: build
   runs-on: ubuntu-latest
   name: Deploy
   if: github.event_name == 'workflow_dispatch' # Only deploy if Workflow manually ran
Triggering a deployment
As covered in the pipeline section, we are only deploying when a workflow dispatch event occurs.
Switching back to main Actions tab:
- Select from the workflow list UnoPages App
- You should see a Run workflow drop down button, click this
- From the drop down panel, click the Run workflow button, and keep the branch as
Main
- Wait for the workflow to complete, and you should now see the deploy job ran too

- This deployment should have built our Uno Wasm app, and pushed it to a branch called
gh-pages
With our app built, and pipeline in place, there's one final step covered in the next section Enabling GitHub Pages
Enabling GitHub Pages
In order to use pages, you will need to enable it for your repo.
On your repo:
Click Settings, then on the Options page, scroll right down until you see the GitHub Pages header
In the source panel,
- Select from the branch dropdown
gh-pages - Leave the folder as
/(root) - Press Save
- After the page refreshes you should now see your GitHub pages url
- Click the link and you should see your deployed app!

Sample deployed version here:
https://kurtmkurtm.github.io/UnoPages/
Full Repository here: https://github.com/kurtmkurtm/UnoPages


Top comments (0)