In the following post I’m going to cover how you can run and publish results for your .NET Core Tests using GitHub actions.
Updated 2021 to replace deprecated 'set-env' usage with new command
In particular we will be setting up a CI pipeline action to publish test results in Markdown format as both a comment on pull requests (PR), and a build artifact. Running tests automatically on PRs is a good way to make sure you don’t push code that breaks your project.
To make the most of .NET Core’s cross platform builds, and while maximizing GitHub Actions free tier, we will be using the Linux (Ubuntu) runner. At the time of writing this, the GitHub free tier gives you 2000 minutes per month on Linux runners, if you use Windows this drops to 1000 minutes, and macOS only 200 minutes.
Getting Started
In order to run tests on GitHub we will need these prerequisites;
- GitHub account You can join here if you don't have an account
- GitHub Repository If you don’t have a repo, take a look at the following article to get setup: Create a repo
- Repository cloned locally If you don’t already have a setup with favorite git client, try the official docs: Cloning a repository
Setting up your .NET Core test project
The following commands should be ran in your project folder, so make sure to open up the command prompt in the directory you have checked out your project to.
Optional Step. If you already have a test project you can skip to Step 1.
Otherwise, we will create a new test project now with the following command:
dotnet new xunit
You should see a newly created test project
Step 1. Add the Markdown logger to your test project
We will be utilizing the LiquidTestReports.Markdown VS Test logger to generate a test report in the Markdown format (disclaimer: I am the creator of this library)
You can add the library either by getting it from nuget, or running the following command:
dotnet add package LiquidTestReports.Markdown
Step 2. Run the tests locally
Make sure the tests will run on your machine with the test logger attached, by running the following command:
dotnet test -l liquid.md
You output should look similar to the image below, note the “Saved report” line. If you check in your project directory you should have a new TestResults folder with the newly created TestReport.md file (preview shown below).
VS code showing dotnet test console and report preview:

You can delete the report for now, as we want to generate them inside the actions each time.
Step 3. Commit and Push your code
Now that your test project is ready from the previous steps, it’s time to get it onto GitHub itself.
To do this, commit your local changes including the test project referencing the markdown logger. And push your branch to your remote GitHub repository.
Once again, leaning on the official GitHub help docs, for more info, take a look at Committing and reviewing changes to your project
Creating your first PR
With your code now pushed to the remote, jump back on your GitHub repo, and you should now see a panel saying your branch has recent pushes, click the green 'Compare & pull request' button.

You should now see the create pull request page.
Add a comment describing the changes e.g. 'Add new test project' and press the green 'Create pull request' button.

You should now see the pull request page. For simplicity, we will just go straight to pressing the green 'Merge pull request' button
followed by the 'Confirm merge' button.
To keep things clean you can also press the 'Delete branch' button.
With this all done, we are ready to move on to setting up the action.
Setting up the Github Action
In your browser
Go to your GitHub repo and click the ‘Actions’ tab
On the Actions tab, you will see lots of workflow options, at the top click ‘Skip this and set up a workflow yourself’
You will now see the yaml editor with a default CI pipeline. Delete the contents of this, so we can start the pipeline from scratch
The GitHub Action
Starting with the setup, we will add something similar to the default dotnet workflow. Here we are setting up the environment, restoring the nuget dependencies, and building the project.
You may notice the 'on' conditions at the top, there are two scenarios that we want to trigger a build
- A PR has been created to merge into the master branch
- A push to the master branch, created by a merge commit
name: .NET Core Build with Tests

on:
  push:
    branches: [ master ]
  pull_request:
    branches: [ master ]

jobs:
  build:
    # use ubuntu for more build minutes
    runs-on: ubuntu-latest
    # use release mode for all steps
    env:
      config: 'Release'

    steps:
    - uses: actions/checkout@v2
    - name: Setup .NET Core
      uses: actions/setup-dotnet@v1
      with:
        dotnet-version: 3.1.101

      # restore dependencies
    - name: Install dependencies
      run: dotnet restore

      # build project
    - name: Build
      run: dotnet build --configuration $config --no-restore
Next, we will be conditionally setting some variables to set the test report name and title, for both cases, we want to include the run number, so we know which build the test results are for. If it is a pull request, then we additionally want to know the pull request number.
      # set pr number, if it's a pr build
    - name: set pr build number
      id: PRNUMBER
      if: ${{ github.event_name == 'pull_request' }}
      uses: kkak10/pr-number-action@v1.3

      # set report file and title
    - name: Set Test Title
      run: |
            if ${{ github.event_name == 'pull_request' }}
            then
              echo "title=Test Run for PR #${{steps.PRNUMBER.outputs.pr}} (${{github.run_number}})" >> $GITHUB_ENV
              echo "file_name=TestReport.${{steps.PRNUMBER.outputs.pr}}.${{github.run_number}}.md" >> $GITHUB_ENV
            else
              echo "title=Test Run ${{github.run_number}}" >> $GITHUB_ENV
              echo "file_name=TestReport.${{github.run_number}}.md" >> $GITHUB_ENV
            fi
With this set, we can now move on to running the tests, this is using the same dotnet test method as earlier in the post, but now passing in some parameters for the title, and file name.
  # run tests with built project
- name: Test PR
  run: dotnet test --no-restore --no-build --configuration $config --logger:"liquid.md;LogFileName=${{github.workspace}}/${{env.file_name}};Title=${{env.title}};"
Now the report is generated, we want to store it, this next step will attach the markdown file as a build artifact.
  # upload report as build artifact
- name: Upload a Build Artifact
  uses: actions/upload-artifact@v2
  if: ${{always()}}
  with:
    name: 'Test Run'
    path: ${{github.workspace}}/${{env.file_name}}
Lastly, we want to add one final step, for pull requests. This step will attach the contents of the markdown report as a comment to your pull request.
  # add report as PR comment (if PR)
- name: comment PR
  uses: machine-learning-apps/pr-comment@master
  if: ${{ github.event_name == 'pull_request' }}
  env:
    GITHUB_TOKEN: ${{ secrets.GITHUB_TOKEN }}
  with:
    path: ${{env.file_name}}
A complete copy of the workflow is available here on a gist.
Time to commit
Pressing the green "start commit" button
There's two options here, commit to master branch, or create a branch.
I'm going to:
- select the 'new branch' option
- set the branch name to
ci/test-workflow - press the green 'Propose new file' button

You should now see the familiar 'Open a pull request' page. Once again, press the green button to create the pull request.
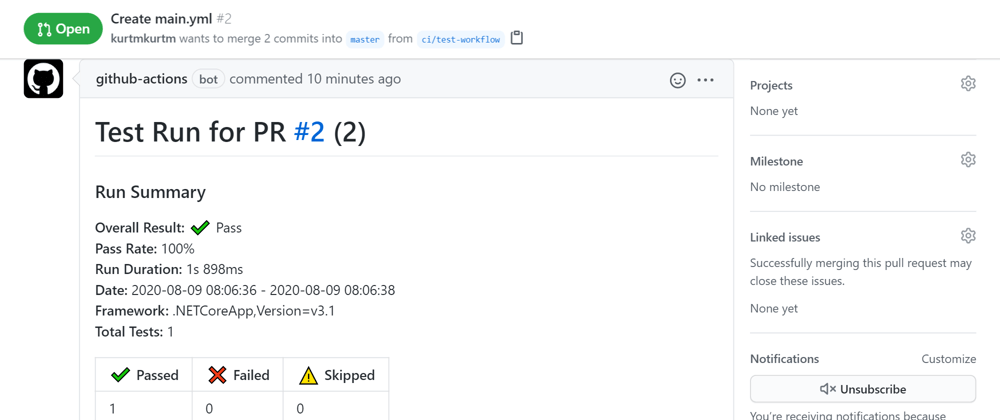
With the pull request created, switch over to the 'Actions' tab. You should now see your workflow, and after a minute or so of running, a green tick next to the workflow result.

Now, switch back to your pull request, and you should notice a new comment on it containing your test report.

From here, merge this PR, and you will have test reports included in your builds and PRs from now on.
A complete working sample is available here:
https://github.com/kurtmkurtm/.net-core-workflow/actions


Top comments (2)
Thanks for the tutorial but unfortunately "set-env" is no longer supported since Nov 2020. Can you please update the article?
Hi @hgg ,
Thanks for letting me know, I have updated this and the sample GitHub repo to use the new syntax for setting environment variables.