
When most people think of web3 development, the chain that immediately comes to mind is Ethereum. But did you know that it is possible to build completely decentralized web3 dapps on top of Bitcoin as well?
Enter Stacks, the biggest web3 project on Bitcoin. Stacks is a blockchain that allows us to build fully decentralized apps on top of Bitcoin, without modifying Bitcoin itself.
That's a simple statement, but there is a lot of amazing technology and a lot of interesting and sometimes controversial concepts packed into that simple sentence.
If you are not familiar with Stacks yet, I highly recommend diving in and learning about the basics.
At a high level, Stacks allows us to build fully decentralized software that ultimately settles on Bitcoin utilizing a unique consensus mechanism called Proof of Transfer.
Stacks is unique in that it is a Layer 1 chain with its own token that has its own smart contract language, and all Stacks transactions ultimately settle on Bitcoin.
This allows us to build fully expressive smart contracts and dapps that are secured by Bitcoin, without modifying Bitcoin itself.
If you are interested in a technical deep dive of how Stacks works and how it is different from other blockchain technologies, I highly recommend Jude Nelson's article, What Kind of Blockchain is Stacks?
This tutorial will serve as a practical introduction to actually building things on it using Clarity, Next, and Stacks.js.
The more I learn about Stacks and get involved in the community, the more I find myself fascinated by the ecosystem and the technology.
I wrote this tutorial for developers interested in getting started building dapps on Stacks.
It's designed to be an introductory tutorial, taking you from 0 to a complete, although simple, Stacks dapp.
If you are a seasoned JS developer and interested in building things on Stacks, you should be good. If you have experience writing smart contracts with another language like Solidity, even better.
I wrote this guide as a way to help get new developers started building on Stacks as fast as possible.
If anyone notices I have made a mistake or that something can be improved, please do let me know!
This tutorial is serving as an MVP of sorts for a more extensive full-stack Stacks dev guide I am working on so definitely reach out if you think something could be improved, added, removed, etc.
What is Stacks?
At a high level, it enables smart contracts on top of Bitcoin.
One of the main differentiators between Ethereum and Bitcoin is that Ethereum was programmable and had the capability to create smart contracts.
This is why the DeFi market exploded on the Ethereum blockchain. People could write code in Solidity and deploy that code as a smart contract to live forever on the blockchain.
Stacks brings this capability to Bitcoin. Stacks is working on bringing full-expressive smart contracts to Bitcoin, without modifying Bitcoin itself.
Along with related technologies like Lightning and DLCs, Stacks rounds out the dream team that will bring DeFi and smart contracts to the world's most secure blockchain and the soundest money the world has ever seen, Bitcoin.
This was one of the main advantages Ethereum had over Bitcoin, and now Bitcoin has that capability as well, without (and this is a key point) modifying Bitcoin itself.
Imagine getting involved in the Ethereum ecosystem when it was first blossoming and the amazing opportunity that would have been. I'm convinced that getting involved and building on Stacks is an equivalent (if not greater) opportunity today.
As a related benefit, because of Stacks' unique Proof of Transfer consensus mechanism, it is actually able to recycle Bitcoin's energy usage, so rather than adding to the environmental load, it extracts further benefit from the electricity Bitcoin already uses.
Because of the nature of the recycling of energy, Stacks actually uses less electricity than even PoS chains. In the words of Jude Nelson, "Bitcoin isn't wasted energy, it's simply under-utilized."
The Stacks Developer Ecosystem
We'll go over the process of building a complete (although basic) application using some of these throughout the tutorial.
Clarity
First, Clarity is the language that smart contracts are written in on Stacks. Think of this as the Stacks version of Solidity.
It has a different feel than languages like Solidity and JavaScript, so it can feel a bit weird at first, but you'll find that it clicks as you use it more and the simplicity is wonderful.
The cool thing about Clarity is that it has been intentionally designed to write safe smart contracts and make it difficult to write dangerous code and you can see what the code will do before running it.
The Stacks blockchain itself also has something to aid with writing secure contracts, post-conditions. These are conditions that have to be true when the contract finishes running. If they are not true, the contract function aborts. This can help with things like safeguarding funds in transfers.
Clarinet
Clarinet is a CLI that allows us to easily write, test, and deploy smart contracts.
If you're from the Ethereum world, this is similar to things like Hardhat or Truffle.
Clarinet is a part of our toolset that will allow us to build and test our contracts locally along with deploying them to a testnet and finally to mainnet.
We'll be using Clarinet in this tutorial but will not be covering testing our code. Testing is a complex topic that deserves its own post.
If you are interested in integrating testing into this project, Nikos Baxevanis has written an excellent introduction to testing with Clarinet using the app we're building here as a starting point.
Stacks.js
Stacks.js is how we can interact with our smart contracts from our frontend applications.
Again from the Ethereum world, this can be compared to ethers.js or web3.js.
This will help us with things like authentication, interacting with our storage system, interacting with smart contracts, and other things like stacking that we'll go over.
We're actually going to be using a few different packages in this tutorial, we'll cover them one at a time as we use them.
Gaia
Gaia is Stack's storage solution. It's a bit of a hybrid system in that it utilizes traditional cloud storage like Amazon S3.
Gaia allows us to store application and user data off-chain but still access it securely from our Stacks apps.
The blockchain should only be used to store critical metadata as it is expensive and slow to store data on the blockchain directly.
We won't be using Gaia in this particular tutorial, as we won't be storing any data off-chain, but I'm planning on writing a tutorial incorporating storage with Gaia in the future.
Awesome People and Organizations to Follow
Now that we've gone over the developer ecosystem, here's a list of people you should definitely follow on Twitter if you're looking to immerse yourself in the world of Stacks.
kenny - shameless plug, this is me
Stacks
Hiro
Stacks Foundation
Stacks Accelerator
This is just barely scratching the surface, but it will be a great jumping-off point for you to immerse yourself in the community.
What We'll Be Building
Throughout this series, we'll be building an app called Sup. Sup is a simple app that will allow visitors to our site to pay a specified amount of STX to post a message.
So visitors will be able to go to our site and pay a small fee in STX to post a message on our website.
We'll also display the currently logged-in user's message on the same page.
This basic app will be a great use case to get familiar with the various parts of the Stacks development ecosystem and the basics of the Clarity language.
We'll write our smart contracts in Clarity, use Clarinet as our development environment, and connect our frontend to the Stacks chain using stacks.js.
For the frontend, we'll be using Next and Tailwind.
Before going through this series, you should be familiar with the basics of building sites and apps with JS and React.
No existing knowledge of Stacks or Clarity is necessary, we'll be covering the basics here.
If at any point you get stuck, lost, or otherwise off track, you can compare your code to the Sup GitHub repo.
How to Use This Tutorial
If you've gone through many tutorials, you are probably familiar with the concept of tutorial hell.
This is where you get stuck endlessly consuming tutorials but never feel capable enough to actually build anything.
I'll let you in on a secret, tutorials aren't actually a great way to learn something.
Why am I writing one then?
Because they are a great way to be introduced to something and to get a high-level picture of how it works and how to stitch multiple technologies together.
But to actually learn, you need to struggle through the process of building something on your own.
So, go through this tutorial and follow along to get familiar with how it all works together.
Then, and this is critical, go and build something on your own from scratch. Something different.
Build it and deploy it for the world to see.
It will be hard and frustrating, but it's the only way to really learn.
I'm here to help if you need me, just reach out.
The Stacks Discord is another great place to go for help
Let's do this.
Project Setup
The first thing we need to do is get our dev environment set up with Clarinet and Next.
First, create a main project folder that will house both our smart contract code and our front-end Next app.
mkdir sup && cd sup
Now let's get the Next app set up with Tailwind by running:
npx create-next-app -e with-tailwindcss frontend
Change into that directory and run npm run dev to make sure everything is working.
If everything worked, you should be able to visit localhost:3000 and see the default template:
Leave that terminal window open and open up a new one to get our smart contracts set up with Clarinet.
Clarinet is super helpful in writing smart contracts because it allows us to deploy them on our own little localized blockchain. We can instantly create accounts and allocate STX to them and can run contracts without having to wait for them to process on a live chain.
Also, if you use VS Code, you may want to get the Clarity extension set up.
If you're on Mac you can install Clarinet with Homebrew.
brew install clarinet
Once we have Clarinet installed, we can instantiate a new project by changing into the main sup folder and running:
clarinet new backend
To install Clarinet on other systems, check Hiro's website.
Change into that directory and you'll see a few folders: contracts, settings, and tests. You'll also see a Clarinet.toml file for Clarinet configuration.
If we look inside the settings folder, we'll see a few config files that correspond to different networks.
When we use Clarinet to develop, we're working in the Devnet network, a localized Stacks network that runs in memory only. If you open up that file you'll see that we are setting up some mock accounts to work with.
[network]
name = "devnet"

[accounts.deployer]
mnemonic = "twice kind fence tip hidden tilt action fragile skin nothing glory cousin green tomorrow spring wrist shed math olympic multiply hip blue scout claw"
balance = 100_000_000_000_000
# secret_key: 753b7cc01a1a2e86221266a154af739463fce51219d97e4f856cd7200c3bd2a601
# stx_address: ST1PQHQKV0RJXZFY1DGX8MNSNYVE3VGZJSRTPGZGM
# btc_address: mqVnk6NPRdhntvfm4hh9vvjiRkFDUuSYsH

[accounts.wallet_1]
mnemonic = "sell invite acquire kitten bamboo drastic jelly vivid peace spawn twice guilt pave pen trash pretty park cube fragile unaware remain midnight betray rebuild"
balance = 100_000_000_000_000
# secret_key: 7287ba251d44a4d3fd9276c88ce34c5c52a038955511cccaf77e61068649c17801
# stx_address: ST1SJ3DTE5DN7X54YDH5D64R3BCB6A2AG2ZQ8YPD5
# btc_address: mr1iPkD9N3RJZZxXRk7xF9d36gffa6exNC

[accounts.wallet_2]
mnemonic = "hold excess usual excess ring elephant install account glad dry fragile donkey gaze humble truck breeze nation gasp vacuum limb head keep delay hospital"
balance = 100_000_000_000_000
# secret_key: 530d9f61984c888536871c6573073bdfc0058896dc1adfe9a6a10dfacadc209101
# stx_address: ST2CY5V39NHDPWSXMW9QDT3HC3GD6Q6XX4CFRK9AG
# btc_address: muYdXKmX9bByAueDe6KFfHd5Ff1gdN9ErG
Now let's start learning some Clarity and write our first contract. We'll continue to use and learn more about Clarinet as we go.
Our First Smart Contract with Clarity
Before we get started, ensure that you are inside the sup/backend directory.
First up, let's create our contract with
clarinet contract new sup
This sup contract is what will handle users being able to post a message to our site.
After we run this, you'll notice a few things were created.
First, a sup.clar file was created in our contracts folder. This is where we'll actually write our contract.
Second, a sup_test.ts file was created in the tests folder. This is how we can test our file using the Clarinet testing harness, which is a tool for testing smart contracts in TypeScript.
As mentioned earlier, we're not going to be testing in this tutorial, but you can check out the generated code yourself and run clarinet test if you are curious.
And if you are interested in integrating testing into this project, Nikos Baxevanis has written an excellent introduction to testing with Clarinet using the app we're building here as a starting point.
Finally, it updated our Clarinet.toml file to reference the new contract:
[contracts.sup]
path = "contracts/sup.clar"
depends_on = []
Clarity is designed to be highly readable and was written intentionally to make it easier to write safe smart contracts. It is decidable, meaning you can know with certainty what code will do before you run it.
It is meant to be predictable and secure by default, making it as simple as possible to write secure smart contracts, which is extremely important, since once they are deployed, they are deployed forever.
Clarity may seem a bit strange at first, especially if you come from the world of JavaScript or Solidity, but once you start working with it you'll love the conciseness and simplicity.
The best way to learn is by doing, so let's write this smart contract and we'll go over what each line is doing as we go, covering Clarity concepts and syntax along the way.
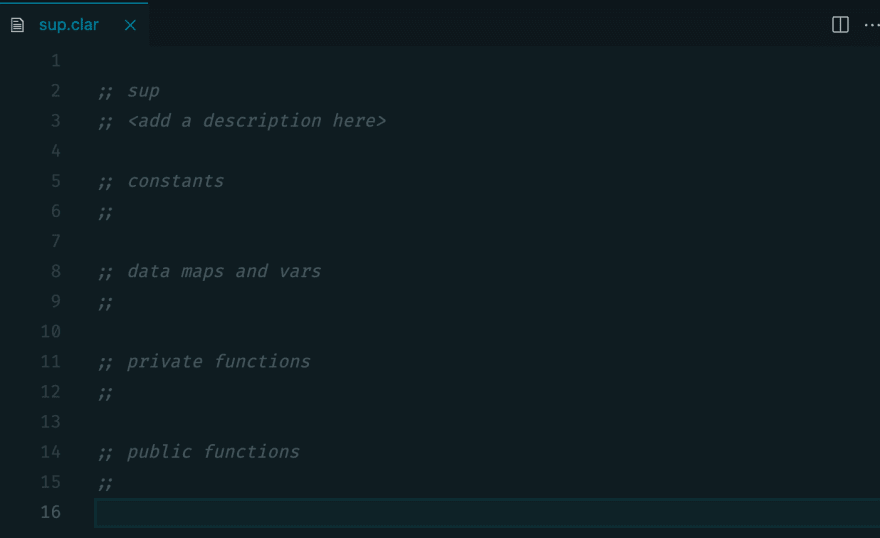
Open up the sup.clar file that was created and let's get going.
Clarinet generates some placeholder content for us, which serves as a nice outline for creating our own contract:
Contract Documenting
First up, we can add a description by prefacing it with ;;, which is Clarity's syntax for code comments. Here is some helpful information on how to effectively document your contract.
We'll write:
'Smart contract to handle writing a message to the blockchain in exchange for a small fee in STX'
For the rest of the code, let's think through what we actually need our smart contract to do.
I always like to write out the functionality of my code before I start coding to help me get started.
Usually I do that in pseudo-code comments right inside my code files.
So for Sup, we need the site visitor to be able to post a message to the blockchain. As part of that process, we need them to be able to transfer a certain amount of STX from their wallet into our wallet.
This brings up a few different pieces of data that need to be created and used, as well as a couple of functions.
First, we need the user to be able to authenticate themselves and pass their address from the front end to the contract itself.
We'll handle the front end piece in a bit, but this will be handled by integrating with the Hiro Web Wallet.
We also need them to be able to type in a message and pass that through to our contract.
As far as functionality, we need a function that will allow the visitor to post a message.
We also need a couple of getter functions, which will handle retrieving the values of the variables we are storing, like the message.
Defining Variables and Constants
First let's define our address (the one we want people to transfer STX to) as a constant.
Constants in Clarity are values that will not change throughout our contract, but that we need to reference.
For now, let's create a constant for our address and for storing an error message.
If you don't have the Hiro Web Wallet installed and set up, go ahead and do that now, we'll be using it in a bit.
For now, let's use one of the addresses generated by Clarinet on our DevNet chain. We can use the address listed in accounts.deployer from our Devnet.toml file.
(define-constant receiver-address 'ST3QFME3CANQFQNR86TYVKQYCFT7QX4PRXM1V9W6H)
Here's our first piece of Clarity code. What we're doing here is saying that we want to define a new constant with define-constant.
We want to name that constant receiver-address and we want it to be a principal with the value of ST3QFME3CANQFQNR86TYVKQYCFT7QX4PRXM1V9W6H. Principals in Clarity can be thought of as user accounts corresponding to Stacks addresses.
In this case, you'll want to replace the address with one of the generated addresses from the Devnet.toml file.
The ' character is how we denote that we are setting a principal.
Note the parentheses. Everything in Clarity is wrapped in parentheses. It takes some getting used to and can be a bit difficult to keep track of.
If you use VS Code, you can enable a setting to highlight matching bracket pairs, which can make it easier to keep track of things in Clarity.
Add the following to your settings.json file in VS Code to enable this:
"editor.bracketPairColorization.enabled": true
Make sure to open up the Devnet.toml file and add that rather than using the address listed here. This is the address my local Clarinet instance generated, and yours will be different.
Next we need to get our variables set up. The main difference between constants and variables is that variables can change throughout a contract and constants cannot.
I like to define my constants and variables at the top of my contracts, but you can also define them at the bottom if you prefer.
For Sup we'll only need two variables, one to store the total amount of sups we have received and one to store a map of each message.
A map in Clarity can map together two types and pieces of data. In our case we want to map a message to a principal.
So the way our app will work is that when a visitor posts a message, it will add a new item to our messages map with the visitor's address as the key and the message content as the value.
We don't need a variable for the sender's address because Clarity has a built-in keyword called tx-sender that will get that for us.
Let's define those underneath the ;; data maps and vars comment.
(define-data-var total-sups uint u0)
(define-map messages principal (string-utf8 500))
The top line here is saying we want to define a new variable named total-sups, we want it to be an unsigned integer, and we want the default value to be an unsigned integer of 0.
The bottom line is saying we want to define a new map called messages. It will contain data pairs consisting of a principal corresponding to a utf8 string with a max of 500 characters.
And we can retrieve this string by looking up the address.
What this means is that we are creating a map of values where the key will be a principal and the value will be a string.
This is how we will keep track of all the messages people write on the site.
Remember that a blockchain is, in a way, a distributed database. So the data in this map will persist on the blockchain. We'll look at how to read from it later in this tutorial.
Consult the Clarity Book to learn more about the different types available to you in Clarity and how to declare them.
Side note, notice how these addresses begin with ST? That means that we are dealing with an address on a testnet. If it were on mainnet, the address would begin with SP or SM instead. Just something to be aware of.
Defining Functions
Next let's create a simple getter function to retrieve our stored variable.
We want to be able to call this getter function from our front end, so it needs to be public.
Underneath the ;; public functions heading we'll create that.
(define-read-only (get-sups)
  (var-get total-sups)
)
These are pretty simple, and are essentially saying we want to define a new read-only function (read-only because we aren't modifying any data, just reading it) called get-sups, that will then retrieve that value with var-get.
We also want to set up a getter function to access the message mapped to the currently logged in user.
(define-read-only (get-message (who principal))
    (map-get? messages who)
)
The map-get? is how we retrieve a value from a map, and here we are getting the entry whose principal value is equal to whatever we pass in to the function. In this read-only function, we are passing a variable called who with a type of principal. This is how we'll look up the right message in the map we created.
Read-only functions are able to be accessed both inside and outside our contract.
If an entry is found, it will return an optional, a some or a none value. Again, consult the Clarity book for more on what that means.
Now let's create the function that will actually handle writing the message to the blockchain and transferring the STX.
(define-public (write-sup (message (string-utf8 500)) (price uint))
    (begin
        (try! (stx-transfer? price tx-sender receiver-address))

        (map-set messages tx-sender message )

        (var-set total-sups (+ (var-get total-sups) u1))

        (ok "Sup written successfully")
    )
)
Alright there is a lot going on here so let's break it down.
First we are defining a public function called write-sup that will take two parameters, the message and the price.
Then we start a begin block, which groups multiple expressions, and returns the value of the last expression. This simple construct is needed because the body of a function is limited to one expression. You may be familiar with other programming languages that use curly braces { ... } for this same purpose.
The begin block allows us to wrap multiple function calls in one. To see what I mean, comment out the beginning and end of the begin block and run clarinet check. You'll see an error saying that the number of arguments is incorrect.
The first line of this block is using a try! function to transfer STX.
From the Clarity Book:
"The try! function takes an optional or a response type and will attempt to unwrap it. Unwrapping is the act of extracting the inner value and returning it."
In this case, we are attempting to evaluate the stx-transfer? function. The function returns a response type. If the call succeeds, it will return (ok true). The try! function unwraps the inner value and therefore returns true.
If it fails, it will return the error and exit the write-sup function. All Clarity functions with a ! at the end can exit the control flow early.
The stx-transfer? function takes in a few parameters: the price, denoted in microstacks, the principal sending the STX, and the principal receiving the STX.
Next we are setting the item value in our messages map that corresponds to the person sending the transaction to the passed message.
Finally, we are incrementing the value of our total-sups variable using the + operator.
This is saying: set the total-sups value to the current total-sups value plus 1.
The Polish notation used in Clarity can take some getting used to, but practice saying to yourself what the code is doing and you'll pick it up quickly.
A helpful mental model can be to think of the symbol as the function name, and the numbers being operated on as parameters.
Finally, if the function runs successfully we return a string saying so.
To check and see if we have any syntax errors, we can run clarinet check inside the backend folder of our project.
If you've followed along so far, it will output that the syntax is correct, but we have a warning regarding our message variable:
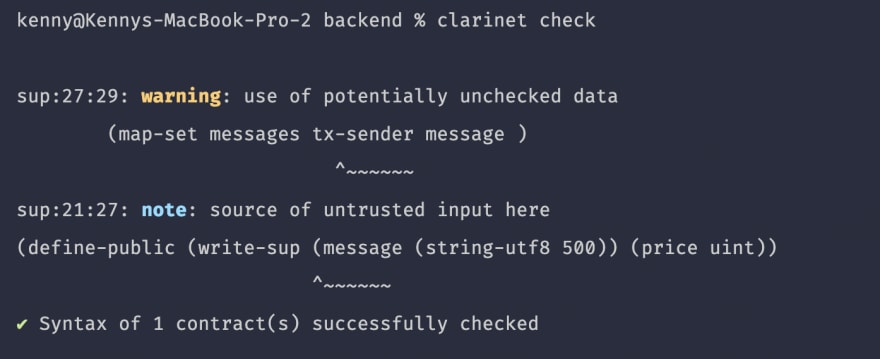
What's going on here?
Remember that Clarity is purpose-built to help us write secure code. In the spirit of that ethos, Clarinet has some checks that help us do the same thing.
Clarinet is helping us watch out for untrusted data. Blindly accepting untrusted user input is the cause for a large amount of software security vulnerabilities.
Since this is a public function, all of our data is untrusted if it is accepted as a parameter to our write-sup function.
This warning is being given as a result of a recent addition to Clarinet called the check-checker.
When we run clarinet check it will check to see if untrusted input data is being checked by our code to make sure it is legitimate.
In our case, we have the untrusted input source of message and are using that to modify our messages map.
To clear it and pass the check, we need to add some sort of check on the untrusted input. However, we actually do want the user to be able to put whatever they want here, since that's the whole point of adding the message.
We're not doing anything with this data except assigning it to the user's principal in our map, and the user should be able to write whatever they want.
So to get around this error and tell the check-checker all is well, we can add this right above the map-set call.
;; #[allow(unchecked_data)]
And with that, our check passes.
As the developer, it's your responsibility to add any checks that might need to be run in order to make sure only the data you are expecting is allowed to pass through to the function.
This feature is important to understand as it has security implications. I highly recommend reading Hiro's post on the topic.
You just wrote a Clarity smart contract. Let's switch over to the front end so we can actually use it now.
Creating the Front End with Next and Stacks.js
First let's just get some boilerplate front end code up and running. We're not focusing on learning React here so go ahead and just copy this and paste it into frontend/pages/index.tsx to update the main page of the Next app.
import { useState, useEffect } from "react";
import Head from "next/head";

export default function Home() {
  const [message, setMessage] = useState("");
  const [price, setPrice] = useState(5);
  const [userData, setUserData] = useState({});
  const [loggedIn, setLoggedIn] = useState(false);

  const handleMessageChange = (e) => {
    setMessage(e.target.value);
  };

  const handlePriceChange = (e) => {
    setPrice(e.target.value);
  };

  const handleSubmit = (e) => {
    e.preventDefault();
    // Do Stacks things
  };

  return (
    <div className="flex flex-col items-center justify-center min-h-screen py-2">
      <Head>
        <title>Sup</title>
        <link rel="icon" href="/favicon.ico" />
      </Head>

      <main className="flex flex-col items-center justify-center w-full flex-1 px-20 text-center">
        <h1 className="text-6xl font-bold mb-24">Sup</h1>
        <form onSubmit={handleSubmit}>
          <p>
            Say
            <input
              className="p-6 border rounded mx-2"
              type="text"
              value={message}
              onChange={handleMessageChange}
              placeholder="something"
            />
            for
            <input
              className="p-6 border rounded mx-2"
              type="number"
              value={price}
              onChange={handlePriceChange}
            />{" "}
            STX
          </p>
          <button
            type="submit"
            className="p-6 bg-green-500 text-white mt-8 rounded"
          >
            Post Message
          </button>
        </form>
      </main>
    </div>
  );
}
This is just setting up a basic React form.
Now we can start adding some functionality for interacting with Stacks.
Authentication
When we build web3 apps we do authentication a bit differently. Rather than setting up the typical user flow with a username or email and password, we simply allow the user to connect to our application with their wallet.
If you come from the Ethereum world, you're likely familiar with MetaMask or a similar browser-based wallet.
In the Stacks world the most common wallet is the Stacks Wallet built by Hiro.
Stacks.js comes with a connect package that we'll use to hook into the Hiro Wallet for Web and authenticate our wallet with our web app.
If you're curious about how authentication with the web wallet actually works, the Stacks website has some great documentation explaining the process.
We're going to focus on the practicalities of getting it implemented here.
The first thing we need to do is install the dependency. Make sure you are in the frontend folder and run
npm install @stacks/connect
Now open up that index file with all our React code and let's get this set up.
Add the following at the top of the file right under the other import statement.
import { AppConfig, UserSession, showConnect } from '@stacks/connect';
And this right above our state declarations:
const appConfig = new AppConfig(['publish_data']);
const userSession = new UserSession({ appConfig });
In a production app, you'd likely want to make this available globally using some sort of state management library like React Context or Zustand.
What we are doing here is initializing the auth configuration by telling connect that we need the publish_data permissions scope. This will allow us to actually publish data and interact with the app.
Next we need to set up the function to handle the authentication.
Add this right under our handleSubmit function.
function authenticate() {
    showConnect({
        appDetails: {
            name: "Sup",
            icon: "https://assets.website-files.com/618b0aafa4afde65f2fe38fe/618b0aafa4afde2ae1fe3a1f_icon-isotipo.svg",
        },
        redirectTo: "/",
        onFinish: () => {
            window.location.reload();
        },
        userSession,
    });
}

useEffect(() => {
    if (userSession.isSignInPending()) {
        userSession.handlePendingSignIn().then((userData) => {
            setUserData(userData);
        });
    } else if (userSession.isUserSignedIn()) {
        setLoggedIn(true);
        setUserData(userSession.loadUserData());
    }
}, []);
This is the function we'll call when we click the button to actually connect to our wallet, which we'll do in just a minute.
Note: If you get an error about not being able to find the regenerator-runtime package, running npm i regenerator-runtime should fix that.
This code is pretty self-explanatory, but at a high level it is calling the showConnect function which will trigger the Hiro wallet to show the connect window. The wallet will take care of the authentication functionality from there.
After it does so, it will run the onFinish function, we add any post-authentication work needs to be done there. In this case, we reload the page so our userSession gets picked up.
The appDetails passes a couple things that the Hiro window will show. For demo purposes, we're just giving it the Stacks logo.
The second part of this is a useEffect call that will run on page load and set our user session data, as well as setting our loggedIn state to true.
Now we need to add a button for the user to connect to the wallet. Let's add that right above our Sup h1 tag.
<div className="flex w-full items-end justify-center">
  <button
    className="bg-green-500 hover:bg-green-700 text-white font-bold py-2 px-4 rounded mb-6"
    onClick={() => authenticate()}
  >
    Connect to Wallet
  </button>
</div>
After you add that, switch to the testnet in your web wallet and let's see if it works.
In order to do that we first need to get a dev blockchain running using Clarinet so that we have something to work with.
Make sure you have Docker installed and switch into the backend folder. Once you're in there, run
clarinet integrate
This will set up a local blockchain on our system for testing purposes.
This will take a while to run the first time, and you'll see a crazy looking dashboard which will have the system log, service status, mempool summary, and a minimal block explorer.
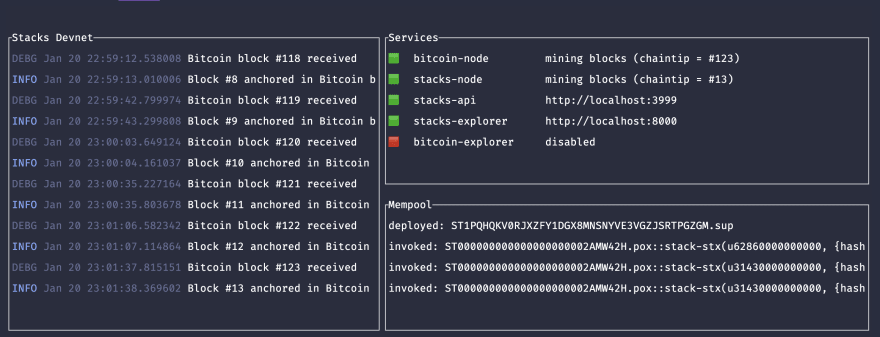
Once everything has successfully started up, we can begin interacting with our app on the local DevNet chain.
Now let's use that data and display the Sup form if the user is logged in and the connect button if they are not.
We want to change the code a bit so that the form only shows up if we are logged in with our wallet. In addition, we only want the connect wallet button to show if we are not connected currently.
Swap out the code in the index file with the following:
import { useState, useEffect } from "react";
import Head from "next/head";
import { AppConfig, UserSession, showConnect } from "@stacks/connect";

export default function Home() {
  const appConfig = new AppConfig(["publish_data"]);
  const userSession = new UserSession({ appConfig });

  const [message, setMessage] = useState("");
  const [price, setPrice] = useState(5);
  const [userData, setUserData] = useState({});
  const [loggedIn, setLoggedIn] = useState(false);

  const handleMessageChange = (e) => {
    setMessage(e.target.value);
  };

  const handlePriceChange = (e) => {
    setPrice(e.target.value);
  };

  const handleSubmit = (e) => {
    e.preventDefault();
    // Do Stacks things
  };

  function authenticate() {
    showConnect({
      appDetails: {
        name: "Sup",
        icon: "https://assets.website-files.com/618b0aafa4afde65f2fe38fe/618b0aafa4afde2ae1fe3a1f_icon-isotipo.svg",
      },
      redirectTo: "/",
      onFinish: () => {
        window.location.reload();
      },
      userSession,
    });
  }

  useEffect(() => {
    if (userSession.isSignInPending()) {
      userSession.handlePendingSignIn().then((userData) => {
        setUserData(userData);
      });
    } else if (userSession.isUserSignedIn()) {
      setLoggedIn(true);
      setUserData(userSession.loadUserData());
    }
  }, []);

  return (
    <div className="flex flex-col items-center justify-center min-h-screen py-2">
      <Head>
        <title>Sup</title>
        <link rel="icon" href="/favicon.ico" />
      </Head>

      <main className="flex flex-col items-center justify-center w-full flex-1 px-20 text-center">
        <div className="flex flex-col w-full items-center justify-center">
          <h1 className="text-6xl font-bold mb-24">Sup</h1>
          {loggedIn ? (
            <form onSubmit={handleSubmit}>
              <p>
                Say
                <input
                  className="p-6 border rounded mx-2"
                  type="text"
                  value={message}
                  onChange={handleMessageChange}
                  placeholder="something"
                />
                for
                <input
                  className="p-6 border rounded mx-2"
                  type="number"
                  value={price}
                  onChange={handlePriceChange}
                />{" "}
                STX
              </p>
              <button
                type="submit"
                className="p-6 bg-green-500 text-white mt-8 rounded"
              >
                Post Message
              </button>
            </form>
          ) : (
            <button
              className="bg-white-500 hover:bg-gray-300 border-black border-2 font-bold py-2 px-4 rounded mb-6"
              onClick={() => authenticate()}
            >
              Connect to Wallet
            </button>
          )}
        </div>
      </main>
    </div>
  );
}
Alright, we've got basic authentication going and we are conditionally displaying our form if we are connected to our wallet.
Now let's go ahead and see how we can use this form to actually post a message to the chain by paying STX.
Writing Data
The first thing we want to do here is set up our frontend so that when we submit the form, we are generating a new transaction to the Stacks blockchain.
There's a fair amount of setup we have to do to get this working properly on our local chain, so let's do that really quick.
When we ran clarinet integrate we started running a local Stacks chain on our machine at http://localhost:3999.
This gives us a lot of benefits, the main one being that we can test and interact with our smart contract without having to deploy it to a public testnet.
Adding STX to Your Local Account
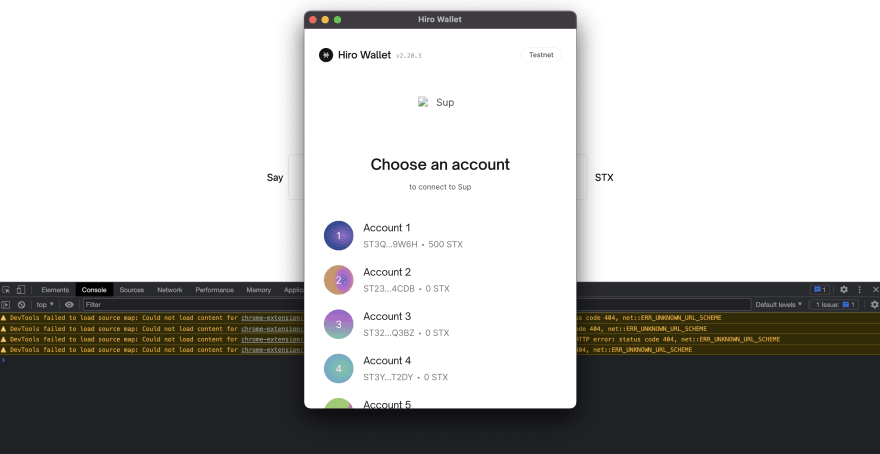
In our app we need to interact as if we are a logged in user. So we need to hook our web wallet into our local DevNet chain and get logged in as the first account.
Here's how to do this:
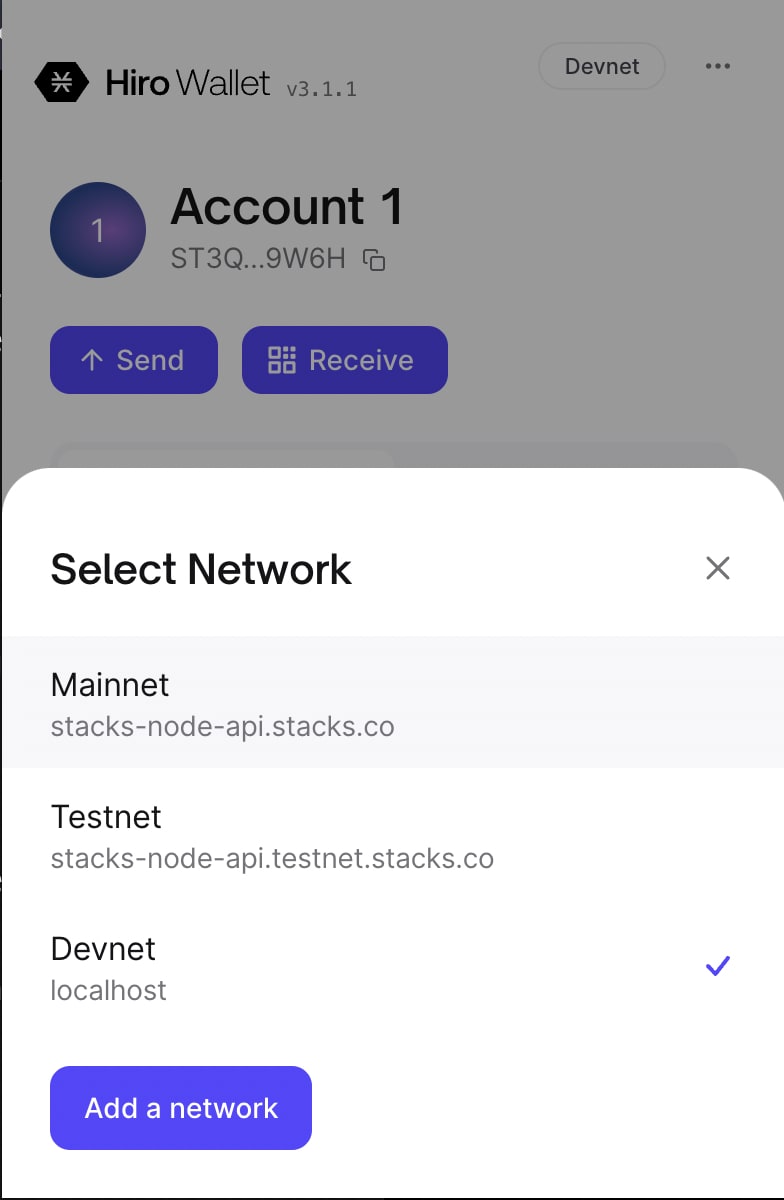
Switch to the Devnet network in the web wallet user interface by hitting the menu button in the top right and selecting 'Change Network' and select 'Devnet'.
Then make sure a user account exists on that network and is currently logged in.
Next, hit that same menu button and select 'View Secret Key'
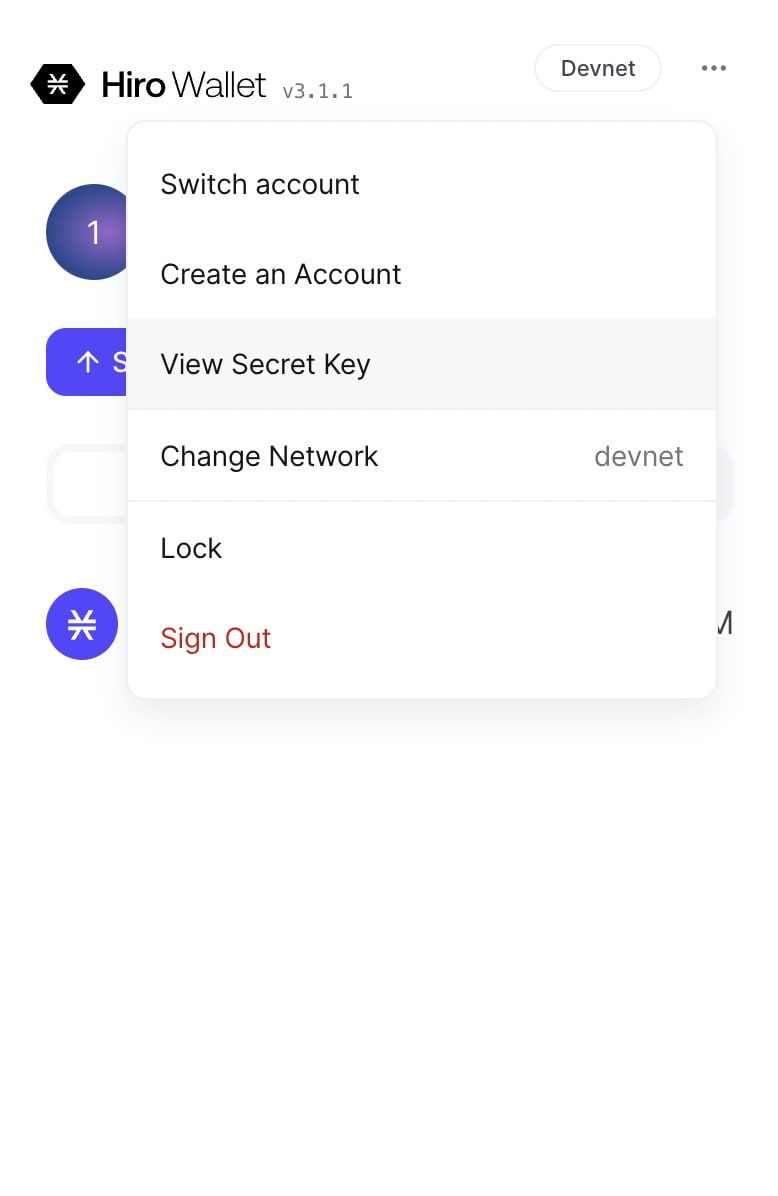
This will bring up the secret key used to authenticate that address. Take that secret key and copy it over to the memonic field in the Devnet.toml file for accounts.wallet_1.
Finally, take the account address from the Hiro Web Wallet and copy it over the stx_address field in the same file.
Do that, restart the DevNet, and you should have a bunch of STX in your Account 1.
Now we are ready to write the frontend code that will handle writing our message.
First we need a few new imports:
import { useState, useEffect } from "react";
import Head from "next/head";
import {
    AppConfig,
    UserSession,
    showConnect,
    openContractCall,
} from "@stacks/connect";
import { uintCV, stringUtf8CV } from "@stacks/transactions";
import { StacksMocknet } from "@stacks/network";
Let's add each of these pieces one by one and go over what they are doing.
First we need to set up our network with StacksMocknet. Mocknet is the same as localnet or DevNet.
Add this right below the state variable declarations:
// Set up the network
const network = new StacksMocknet();
Note that in a production application we would want to set up some sort of environment variable here to set the network based on what environment we were in.
Next up let's add a couple of other state variables to store the contract address and name, as well as the sup message itself and some loading variables. In a production app, we'd want to set up some sort of constants file and set these conditionally based on our environment.
const [supContractAddress, setSupContractAddress] = useState(
    "ST1PQHQKV0RJXZFY1DGX8MNSNYVE3VGZJSRTPGZGM"
);
const [supContractName, setSupContractName] = useState("sup");
const [error, setError] = useState("");
const [loading, setLoading] = useState(true);
Quick note: Be sure to replace the contract address here with the deployer address generated on your system by clarinet integrate.
Next we need to update our handleSubmit function to call the write-sup function in our contract:
const handleSubmit = async (e) => {
    e.preventDefault();

    const functionArgs = [stringUtf8CV(message), uintCV(price * 1000000)];

    const options = {
        contractAddress: supContractAddress,
        contractName: "sup",
        functionName: "write-sup",
        functionArgs,
        network,
        appDetails: {
            name: "Sup",
            icon: window.location.origin + "/vercel.svg",
        },
        onFinish: (data) => {
            console.log("Stacks Transaction:", data.stacksTransaction);
            console.log("Transaction ID:", data.txId);
            console.log("Raw transaction:", data.txRaw);
        },
    };

    await openContractCall(options);
};
Alright we've got a few things going on here.
First we're creating a constant called functionArgs where we are setting up the arguments we need to pass to our function.
We are setting the price to be equal to price * 1000000 because in our contract, prices are denoted in microstacks. 1,000,000 microstacks is equal to 1 STX.
The other option here would be to set the price to 5000000 instead and do the conversion in our input field.
When we set up arguments to pass to a Clarity function, we need to turn them into Clarity variables. That's what we're doing here with the stringUtf8CV and uintCV functions.
You can see what all the different functions are in this file.
Next we're setting up an options object where we pass in everything we just set up and do some stuff after it finishes being called.
Finally, we actually call the contract.
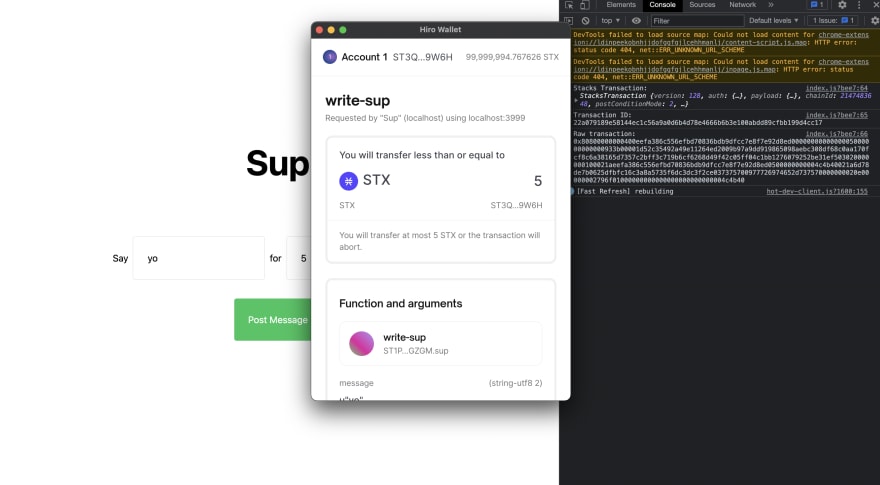
But we have one more piece to add here. If you begin the process of submitting this transaction, you'll see a message at the top of the Hiro Web Wallet screen saying that no stx will be transferred:
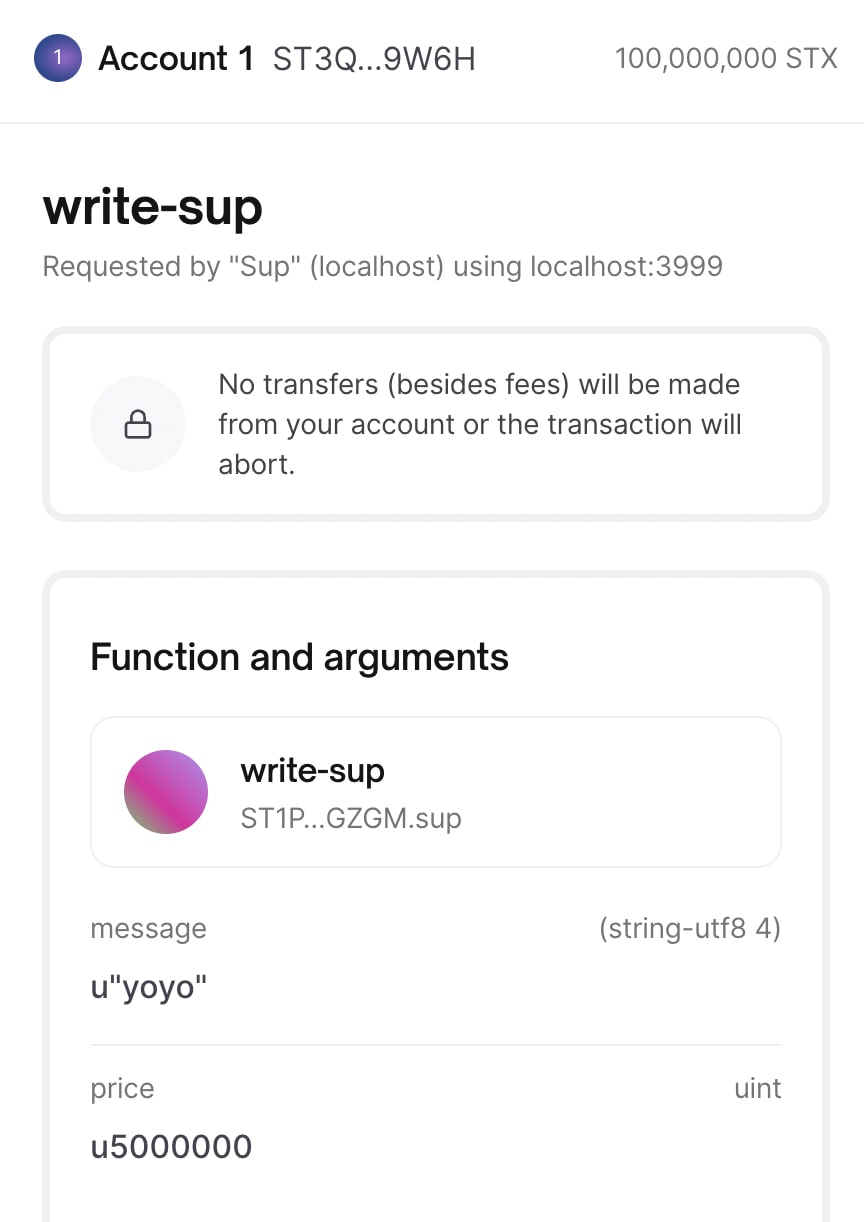
But we set the price to be 5 STX, so what's going on here?
These are the post-conditions I mentioned earlier in the article.
If we try to run this now, it will fail because the supplied post-conditions were not met. What is actually happening here is that we didn't set up any post-conditions to tell our wallet that we were going to be transferring some STX.
So it defaulted to thinking nothing would be transferred. These post-conditions are one of the many built-in features of Clarity that can help us to write secure code.
To fix this we need to add some post-conditions.
Add the following underneath where we create the functionArgs constant:
const postConditionAddress = userSession.loadUserData().profile.stxAddress.testnet;
const postConditionCode = FungibleConditionCode.LessEqual;
const postConditionAmount = price * 1000000;
const postConditions = [
    makeStandardSTXPostCondition(
        postConditionAddress,
        postConditionCode,
        postConditionAmount
    ),
];
Update the imports:
import { useState, useEffect, useCallback } from "react";
import Head from "next/head";
import {
    AppConfig,
    UserSession,
    showConnect,
    openContractCall,
} from "@stacks/connect";
import {
    uintCV,
    stringUtf8CV,
    standardPrincipalCV,
    hexToCV,
    cvToHex,
    makeStandardSTXPostCondition,
    FungibleConditionCode,
} from "@stacks/transactions";
import { StacksMocknet } from "@stacks/network";
And pass in the post conditions to our contract call:
...
network,
postConditions,
appDetails: {
    name: "Sup",
    icon: window.location.origin + "/vercel.svg",
},
...
Now if we run this, we'll see the correct post-condition message and everything should run successfully.
Awesome! You just made an app that writes data to the Stacks blockchain and successfully transfers STX in the process.
Now let's go about reading that data.
Reading Data
Reading data is a bit more straightforward because we are going to be calling one of our read-only functions (get-messages in this case) and don't have to create a transaction, since we aren't modifying the blockchain.
For this we can use a function from the @stacks/transactions package called callReadOnlyFunction.
First, go ahead and import that.
import {
    uintCV,
    stringUtf8CV,
    standardPrincipalCV,
    hexToCV,
    cvToHex,
    makeStandardSTXPostCondition,
    FungibleConditionCode,
    callReadOnlyFunction
} from "@stacks/transactions";
Next we need to install another package in the frontend folder by running npm i @use-it/interval.
That is a custom hook that makes it easy to run a function on a certain interval, we'll get to that in a minute.
Import that, and let's get building.
import useInterval from "@use-it/interval";
Here's how we're going to handle getting the message. We're going to set up a callback function to fetch the message corresponding to the logged in user.
Then we're going to call that function on load and every 30 seconds to check to see if it has changed. Another option would be to use the API's websockets functionality which would give this app a better UX. I leave that as an exercise for the reader.
Let's add that below the handleSubmit call to get this going.
const getMessage = useCallback(async () => {
    if (
        userSession &&
        userSession.isUserSignedIn() &&
        userSession.loadUserData()
    ) {
        const userAddress = userSession.loadUserData().profile.stxAddress.testnet;
        const clarityAddress = standardPrincipalCV(userAddress);
        const options = {
            contractAddress: supContractAddress,
            contractName: supContractName,
            functionName: "get-message",
            network,
            functionArgs: [clarityAddress],
            senderAddress: userAddress,
        };

        const result = await callReadOnlyFunction(options);
        console.log(result);
    }
}, []);

// Run the getMessage function at load to get the message from the contract
useEffect(getMessage, [userSession]);

// Poll the Stacks API every 30 seconds looking for changes
useInterval(getMessage, 30000);
We also need to add a new state variable for storing the posted message.
const [postedMessage, setPostedMessage] = useState("none");
There's a fair amount going on here so let's walk through it.
The first thing we are doing here is defining a useCallback hook. If you jump down to the bottom of the code, we are running this function any time the userSession variable changes and re-running it every 30 seconds.
The getMessage function itself first checks to see if we are logged in and then sets up our read-only contract call with some options.
Take a look at the options here. When we are working with Clarity values, we need to do a bit of work to convert the values from the client into a format that Clarity can understand, hence the standardPrincipalCV(userAddress).
If you run this all, write a sup, you should see the value being logged to the console as soon as the transaction finishes processing.
Now we have one more step to go. We're going to actually display the message we have written.
We're pulling it in, we just need to add some logic to either display it if it exists, or to display some sort of 'not found' message if our smart contract returns none.
Now we need to change the console.log statement to set this when our get-message function finishes.
if (result.value) {
    setPostedMessage(result.value.data);
}
Final step: we need to conditionally display the message if it exists.
Add this right under the closing </form> tag. You'll also need to wrap both the form and this new addition in a fragment so React can render it correctly.
<div className="mt-12">
    {postedMessage !== "none" ? (
        <p>You said "{postedMessage}"</p>
    ) : (
        <p>You haven't posted anything yet.</p>
    )}
</div>
Now if we write our message and wait a bit for the transaction to process on the local chain and the block to settle, we'll see it display in the UI. Note that this could take a minute or two, you can monitor the progress in the Clarinet console.
Congratulations! You've just made your first complete, full-stack Stacks app.
All this code lives on GitHub if you need to compare with anything. This is only the beginning of your Stacks development journey, there's a lot more to learn and a lot more to build.
Where to Go From Here
You now have a basic Stacks app under your belt. If you are getting started on your Stacks development journey, there are a few things I recommend doing from here.
Get plugged in
I highly recommend joining the Stacks Discord. You can find me on Discord as kennny#0001 (that's three n's). My DMs and friend requests are open.
Feel free to tag me in the Stacks Discord or DM me with any questions, feedback, suggestions, or just to say hi.
I would also love to connect on Twitter.
Add features
By far the best way to learn is by building things on your own. You've built a solid foundation here and learned the fundamentals, but you need to build on your own to really cement the knowledge.
Here are a few ideas for features to add to this to further your learning:
- Utilize the
get-supsvariable and getter we created on the frontend - Switch to websockets
- Deploy to testnet
- Run your own API node
Look into these topics and others and remember to reach out if you need any guidance!
Further your Clarity knowledge
The Stacks Foundation runs a class called Clarity Universe that teaches you smart contract development with Clarity from the ground up.
If you are interested in learning more about Clarity, sign up for the waitlist.
Work on a real project
The Stacks Foundation is interested in funding people building useful things for the Stacks Ecosystem. If you feel ready to use your knowledge to build something for the real world, apply for a grant.
Keep learning and practicing
Finally, be sure you continue your journey by learning and building as much as you can. I'm going to be creating lots of content targeted at helping devs build awesome things on Stacks, so if you have any feedback on how to improve this tutorial or suggestions for future content, I would absolutely love it if you reached out on Twitter or Discord.


Top comments (5)
Thanks for the article Kenny. I have come across one issue
I do not see a response object, where do you get this ?
index.tsx
if (response.okay && response.result) {
setPostedMessage(hexToCV(response.result).value.data);
}
Hey thanks for pointing this out! I had heard this from a few other people as well, was a mistype from an older version of the code. Just updated the article and the GitHub repo. That section should be:
💚
Love Stacks.
Thanks for this Kenny.