I am seeking a good stack I can switch to for my new projects. So, I decided to try and evaluate Next.js, Tailwind CSS, and Prisma stack with a small project.
Before I start, I must admit that I have zero experience or don't have experience at all with React, Tailwind CSS, and Prisma. I also don't feel that I am profound in JavaScript. And this is excellent news because you will see this stack through the lens of a newcomer, not a passionate fan of these technologies.
Why Next.js, Tailwind CSS, and Prisma
Next.js
I picked up Next.js for testing because it is popular and has good tooling around it. Yes, popularity is a good factor for me. I am tired of searching for solutions to infrequent bugs for the "underground" framework I chose in the past.
I want to find one widespread stack with good developer experience that is performant and scalable. I don't say Next.js satisfies my criteria, but it looks like it might. That's why I am building an app to test it.
Tailwind CSS
I mostly used Twitter Bootstrap as a CSS framework, but Tailwind CSS has become quite popular over the last few years. And it proposes a different approach from what you do with the Bootstrap framework.
From the beginning, Twitter Bootstrap focused on providing many convenient components like buttons, sliders, tables, etc.
Tailwind CSS is a utility-first framework. It means that there are no components at all by default, and you decide how you want to style your page.
However, in recent times, I have seen a lot of convergence in both approaches. Twitter Bootstrap adds more and more utility classes, and you can buy Tailwind UI or take a look at daisyUI and Flowbite, which provide many components that you might want to use along with Tailwind CSS.
Prisma
There are many popular ORM libraries for Node.js: Prisma, Sequelize, TypeORM, and others.
I decided to try out Prisma first because I like the simplicity of their approach. I don't need to create a model as in ORMs based on Active Record and Data Mapper patterns.
Prisma gives me a typed abstraction over the database, and I can decide how I want to use it. I can build models or use Prisma directly — it solely depends on my needs.
I picked up SQLite as a database for simplicity of development. But you can use MySQL, PostgreSQL, MongoDB, and many other DBs supported by Prisma.
Wrap up
Next.js, Tailwind CSS, and Prisma can be good starting choices for indie hackers, solo entrepreneurs, and small and enterprise teams.
Let's write some code and taste this stack!
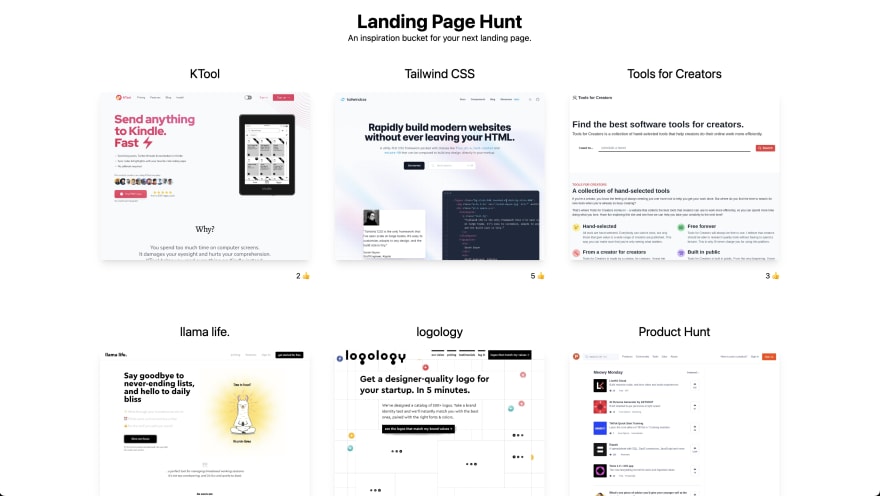
Meet "Landing Page Hunt"
Have you ever seen ProductHunt, BetaList, Tools for Creators, or CtrlAlt.CC?
We will build a small application — site directory that contains a list of landing pages with screenshots. An app user can like pages and submit their landing page.
That's all the functions we are going to implement. I want to focus only on the app's core functions; everything else is irrelevant. I will expand a bit on the topic of authentication and subscriptions at the end of the post.
The source code of the project is available on github.com/screenshotone/landing-page-hunt.
Quick start
Let's create a Next.js app:
npx create-next-app landing-page-hunt && cd landing-page-hunt
Then install Tailwind CSS:
npm install -D tailwindcss postcss autoprefixer
npx tailwindcss init -p
We need to update our template paths in tailwind.config.js to match the Next.js directory structure:
/** @type {import('tailwindcss').Config} */
module.exports = {
  content: [
    "./pages/**/*.{js,ts,jsx,tsx}",
    "./components/**/*.{js,ts,jsx,tsx}",
  ],
  theme: {
    extend: {},
  },
  plugins: [],
}
To enable support for the Tailwind CSS classes we need to import it in globals.css:
@tailwind base;
@tailwind components;
@tailwind utilities;
Then we can run the app in the development mode and start coding:
npm run dev
Let's quickly create a basic template and render pages:
// pages/index.js
export default function Home({ landingPages }) {
return (
<div className="md:container md:mx-auto px-4">
<h1 className="text-4xl font-bold text-center pt-5">
Landing Page Hunt
</h1>
<h2 className="pb-5 text-center">
An inspiration bucket for your next landing page.
</h2>
<div className="flex flex-row flex-wrap justify-center gap-8">
{landingPages.map(landingPage =>
(<div key={landingPage.url} className="p-2">
<div className="text-2xl text-center py-3">
<a href={landingPage.url}>{landingPage.name}</a>
</div>
<div className="mt-2 shadow-lg">
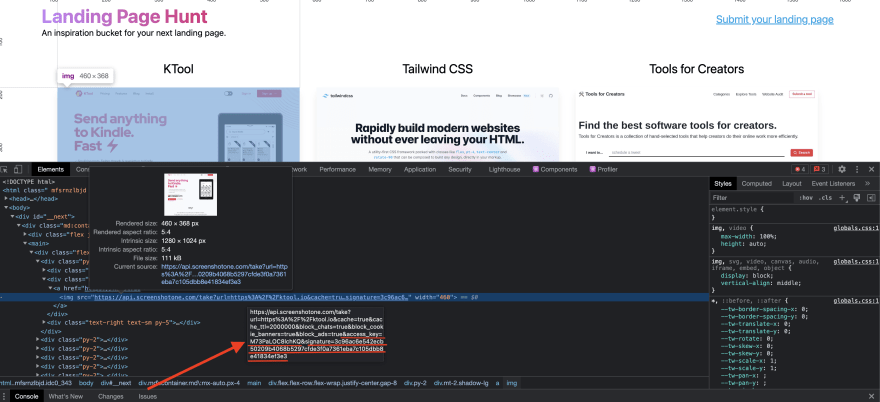
<a href={landingPage.url}><img src={landingPage.screenshotUrl} width="400" /></a>
</div>
<div className="text-right text-sm py-5">
{landingPage.likes} 👍
</div>
</div>))}
</div>
</div>
)
}
export async function getStaticProps() {
const accessKey = process.env.SCREENSHOTONE_ACCESS_KEY;
const screenshotUrl = (url) => {
return `https://api.screenshotone.com/take?access_key=${accessKey}&url=${url}&cache=true`;
}
const landingPages = [
{
name: "KTool",
url: "https://ktool.io",
likes: 2,
},
// ...
{
name: "Ship SaaS",
url: "https://shipsaas.com/",
likes: 3,
}
];
for (let landingPage of landingPages) {
landingPage.screenshotUrl = screenshotUrl(landingPage.url);
}
return {
props: {
landingPages
},
}
}
Sign up to ScreenshotOne to get a screenshot API access key and to make it work, we need to create a .env.local file and set a SCREENSHOTONE_ACCESS_KEY environment variable:
SCREENSHOTONE_ACCESS_KEY=<YOUR ACCESS KEY>
Let's examine the result:

A few key highlights:
Next.js is based on React but solves its most popular pains, so we can quickly build components without thinking about routing, server-side rendering, and even API. It is a fully-fledged full-stack framework.
I used the getStaticProps function to provide data for the index page at build time. It means that our main page is not dynamic. It is static and already rendered — thus it is blazingly fast.
I didn't set up Puppeteer to take screenshots of the sites but decided to use a screenshot as a service API. It gives a bunch of free screenshots to render websites, so that's enough to play with our project. Because taking screenshots of the site is not a core topic of the post, and using Puppeteer would be a pain in the ass.
Refactoring to use dynamic content
We started by using static site generation of Next.js, but we want to like pages, submit pages and get updated results. So, we need to refactor the code to use a more sophisticated approach for our needs.
I propose to do two things:
Extract the logic related to landing pages into a separate unit — a
Directoryclass representing the landing page directory. It will help us migrate to an actual database instead of an in-memory cache later.And use getServerSideProps to render pages dynamically on each request.
Extracting the "business" logic
The Directory class will encapsulate all the logic related to the landing page directory:
// lib/directory.js
class Directory {
    constructor() {
        const accessKey = process.env.SCREENSHOT_ONE_ACCESS_KEY;

        const screenshotUrl = (url) => {
            return `https://api.screenshotone.com/take?access_key=${accessKey}&url=${url}&cache=true`;
        }

        const landingPages = [
            {
                name: "KTool",
                url: "https://ktool.io",
                likes: 2,
            },
            // ...
            {
                name: "Ship SaaS",
                url: "https://shipsaas.com/",
                likes: 3,
            }
        ];

        for (let landingPage of landingPages) {
            landingPage.slug = landingPage.name.toLowerCase().replace(' ', '');
            landingPage.screenshotUrl = screenshotUrl(landingPage.url);
        }

        this.landingPages = landingPages;
    }

    async loadLandingPages() {
        return this.landingPages;
    }
}

let directory = null;
if (process.env.NODE_ENV === 'production') {
    directory = new Directory(prisma);
} else {
    if (!global.directory) {
        global.directory = new Directory(prisma);
    }

    directory = global.directory;
}

export default directory;
To speed up development, I store everything in memory and once the app is ready, we will simply migrate to use a real database.
getServerSideProps
Instead of using getStaticProps, we now switch to use getServerSideProps. It will allow us to render the page dynamically on each request. Look how simple it is:
// pages/index.js
import directory from "../lib/directory";

export default function Home(props) {
  // ...
}

// switch to getServerSideProps instead of using getStaticProps
// to render the content on a per-request basis.
export async function getServerSideProps(context) {
  const landingPages = await directory.loadLandingPages();

  return {
    props: {
      landingPages
    },
  }
}
Sending API requests with Next.js
Let's see how easy it is to add API handlers on the backend and send API requests from the client side. We are going to implement the "like page" feature.
First, I put the logic in the lib/directory.js:
// lib/directory.js
class Directory {
    // ...
    async likePage(slug) {
        for (const landingPage of this.landingPages) {
            if (landingPage.slug == slug) {
                landingPage.likes++;

                return landingPage.likes;
            }
        }

        return 0;
    }
    // ...
}
Then we create an API handler pages/api/like.js:
// pages/api/like.js
import directory from "../../lib/directory";

export default async function handler(req, res) {
  const { slug } = req.body;
  const likes = await directory.likePage(slug);

  res.status(200).json({ likes: likes });
}
Next.js will handle all the routing issues for us automatically. So, let's update the page component pages/index.js to send an HTTP request to the like API handler:
// pages/index.js
import React, { useState } from "react";
import directory from "../lib/directory";

export default function Home(props) {
  const [landingPages, setLandingPages] = useState(props.landingPages);

  const likePage = async (slug) => {
    try {
      const response = await fetch(
        `/api/like`,
        {
          headers: {
            'Content-Type': 'application/json'
          },
          method: 'POST',
          body: JSON.stringify({ slug })
        }
      );
      const data = await response.json();
      setLandingPages(
        landingPages.map(p => p.slug == slug ? { ...p, ...{ likes: data.likes } } : p)
      );
    } catch (err) {
      console.error(err);
    }
  };

  return (
    <div className="md:container md:mx-auto px-4">
      <h1 className="text-4xl font-bold text-center pt-5 bg-clip-text text-transparent bg-gradient-to-r from-purple-400 to-pink-600">
        Landing Page Hunt
      </h1>
      <h2 className="pb-5 text-center">
        An inspiration bucket for your next landing page.
      </h2>
      <div className="flex flex-row flex-wrap justify-center gap-8">
        {landingPages.map(landingPage =>
        (<div key={landingPage.url} className="p-2">
          <div className="text-2xl text-center py-3">
            <a href={landingPage.url}>{landingPage.name}</a>
          </div>
          <div className="mt-2 shadow-lg">
            <a href={landingPage.url}><img src={landingPage.screenshotUrl} width="400" /></a>
          </div>
          <div className="text-right text-sm py-5">
            <button onClick={async () => await likePage(landingPage.slug)} className="bg-transparent  hover:text-blue-400 text-blue-900 font-semibold py-2 px-4 border hover:border-blue-400 border-blue-900 rounded">
              {landingPage.likes} 👍
            </button>
          </div>
        </div>))}
      </div>
    </div>
  );
}
The result is that we can click on the like button. Then an HTTP request is made to the API handler, likes property of the page updated, and we receive the result so we can re-render all the landing pages.
More pages and forms
We need an opportunity to submit a landing page. So, let's develop the page. It is straightforward to add new pages with Next.js, and as I mentioned before, routing is done for us.
When I create pages/submit.js, Next.js will handle all requests to the page under the path /submit.
Let's create a simple submit page:
// pages/submit.js
import { useState } from "react";
import Confetti from 'react-confetti';
import { useWindowSize } from 'react-use';

export default function Submit(props) {
  const endpoint = '/api/submit';
  const [landingPage, setLandingPage] = useState(null);

  const handleSubmit = async (event) => {
    event.preventDefault();
    try {
      const response = await fetch(endpoint, {
        method: 'POST',
        headers: {
          'Content-Type': 'application/json',
        },
        body: JSON.stringify({
          name: event.target.name.value,
          url: event.target.url.value,
        }),
      })

      setLandingPage(await response.json());
    } catch (error) {
      console.error(error);
    }
  }

  const { width, height } = useWindowSize();

  return (
    <div className="mx-auto w-1/2">
      <h3 className="text-xl text-center">{landingPage ? "The page has been submitted successfully 🥳" : "Submit a landing page"}</h3>
      {
        landingPage ? (
          <div className="mx-auto py-2 max-w-fit">
            <Confetti opacity={0.5} width={width} height={height} run={landingPage != null} />
            <div className="text-2xl text-center py-3">
              <a href={landingPage.url}>{landingPage.name}</a>
            </div>
            <div className="mt-2 shadow-lg">
              <a href={landingPage.url}><img src={landingPage.screenshotUrl} width="460" /></a>
            </div>
          </div>
        ) : (
          <form onSubmit={handleSubmit} action={endpoint} className="mt-5">
            <div className="mb-6">
              <label htmlFor="name" className="block mb-2 text-sm font-medium text-gray-900">Name</label>
              <input type="text" id="name" className="bg-gray-50 border border-gray-300 text-gray-900 text-sm rounded-lg focus:ring-blue-500 focus:border-blue-500 block w-full p-2.5 " required />
            </div>
            <div className="mb-6">
              <label htmlFor="url" className="block mb-2 text-sm font-medium text-gray-900">URL</label>
              <input type="text" id="url" className="bg-gray-50 border border-gray-300 text-gray-900 text-sm rounded-lg focus:ring-blue-500 focus:border-blue-500 block w-full p-2.5 " required />
            </div>
            <div className="text-right">
              <button type="submit" className="text-white bg-gradient-to-br from-purple-600 to-blue-500 hover:bg-gradient-to-bl font-medium rounded-lg text-sm px-5 py-2.5 text-center mr-2 mb-2">Submit</button>
            </div>
          </form>
        )
      }
    </div>
  );
}
I added confetti after the submission by using the react-confetti library:

On submit, we read the form data and send a request to a submit API handler (pages/api/submit.js):
// pages/api/submit.js
import directory from "../../lib/directory";

export default async function handler(req, res) {
    const body = req.body
    if (!body.name || !body.url) {
        return res.status(400).json({ data: 'Name and URL are required' })
    }

    const landingPage = await directory.submitPage(body.name, body.url);

    res.status(200).json(landingPage);
}
And the apparent logic for the submit function in the Directory class:
// lib/directory.js
class Directory {
    // ...
    async submitPage(name, url) {
        const landingPage = {
            name: name,
            url: url,
            slug: this.slug(name),
            screenshotUrl: this.screenshotUrl(url),
            likes: 0,
        };

        this.landingPages.push(landingPage);

        return landingPage;
    }

    slug(name) {
        return name.toLowerCase().replace(' ', '');
    }

    screenshotUrl(url) {
        const accessKey = process.env.SCREENSHOTONE_ACCESS_KEY;

        return `https://api.screenshotone.com/take?access_key=${accessKey}&url=${url}&cache=true`;
    }
    // ...
}
That's how simple it is to develop with Next.js. Do you feel it?
Switching to a SQL database — a case for Prisma
The core functionality of our app is ready and tested. Since it is encapsulated, we can easily switch to storing data in the permanent database, not in temporary memory.
But before that, let's install and configure Prisma:
npm i prisma
Let's create a directory, prisma, where we will store all the Prisma-related configuration and start with the main DB configuration and schema:
// prisma/schema.prisma
generator client {
    provider = "prisma-client-js"
}

datasource db {
    provider = "sqlite"
    url      = "file:./dev.db"
}

model LandingPage {
    id    Int    @id @default(autoincrement())
    slug  String @unique()
    name  String
    url   String
    likes Int

    @@index([slug])
}
The schema file is written in PSL (Prisma Schema Language).
Then, let's create a seed file prisma/seed.js with landing pages:
// prisma/seed.js
const { PrismaClient } = require('@prisma/client');

const prisma = new PrismaClient();

const landingPages = [
    {
        slug: "ktool",
        name: "KTool",
        url: "https://ktool.io",
        likes: 2,
    },
    // ...
    {
        slug: "shipsaas",
        name: "Ship SaaS",
        url: "https://shipsaas.com/",
        likes: 3,
    }
];


async function main() {
    console.log(`Start seeding ...`)
    for (const lp of landingPages) {
        const user = await prisma.landingPage.create({
            data: lp,
        })
        console.log(`Created landing page with id: ${user.id}`)
    }
    console.log(`Seeding finished.`)
}

main()
    .then(async () => {
        await prisma.$disconnect()
    })
    .catch(async (e) => {
        console.error(e)
        await prisma.$disconnect()
        process.exit(1)
    });
To make it part of the migration process, we need to specify the seed in package.json:
{
    // ...
    "prisma": {
        "seed": "node prisma/seed.js"
    }
    // ...
}
And after running migrations, including seeding:
npx prisma migrate dev
We are ready to use the Prisma client in our application. Let's instantiate the Prisma client in lib/prisma.js:
// lib/prisma.js
import { PrismaClient } from "@prisma/client";

let prisma = null;
if (process.env.NODE_ENV === 'production') {
    prisma = new PrismaClient();
} else {
    if (!global.prisma) {
        global.prisma = new PrismaClient();
    }

    prisma = global.prisma;
}

export default prisma;
PrismaClient is attached to the global object in development to prevent exhausting your database connection limit.
And we are ready to refactor the Directory class to entirely rely on Prisma:
// lib/directory.js
import prisma from "./prisma";
import screenshotUrl from "./screenshotone";

class Directory {
    constructor(prisma) {
        this.prisma = prisma;
    }

    async submitPage(name, url) {
        const landingPage = await this.prisma.landingPage.create({
            data: {
                slug: this.slug(name),
                name,
                url,
                likes: 0,
            },
        })

        return {
            ...landingPage,
            screenshotUrl: screenshotUrl(url)
        };
    }

    async likePage(slug) {
        const landingPage = await this.prisma.landingPage.update({
            where: {
                slug: slug
            },
            data: {
                likes: {
                    increment: 1,
                }
            },
        });

        return landingPage.likes;
    }

    async loadLandingPages() {
        const pages = await this.prisma.landingPage.findMany();

        return pages.map(p => {
            return {
                ...p,
                screenshotUrl: screenshotUrl(p.url)
            };
        });
    }

    slug(name) {
        return name.toLowerCase().replace(' ', '').replace('.', '');
    }
}

let directory = null;
if (process.env.NODE_ENV === 'production') {
    directory = new Directory(prisma);
} else {
    if (!global.directory) {
        global.directory = new Directory(prisma);
    }

    directory = global.directory;
}

export default directory;
I chose SQLite for simplicity. I also extracted the link generation logic to a separate module.
Securing API keys for screenshot API
The rendered screenshots in the app expose the screenshot API access key. For the development stage, it was OK, but for deployment to production, we need to store the key securely.
ScreenshotOne API allows using signed links. It means that every exposed screenshot URL is publicly signed, and if you try to change any parameter and to reuse (steal) an API key, you need to compute a new signature, but you can't without having a secret key.
In addition to that, you can force ScreenshotOne API to accept only signed requests.
That's how I generated the signed links with ScreenshotOne API SDK:
// lib/screenshotone.js
import * as screenshotone from 'screenshotone-api-sdk';

let client = null;
if (process.env.NODE_ENV === 'production') {
    client = new screenshotone.Client(process.env.SCREENSHOTONE_ACCESS_KEY, process.env.SCREENSHOTONE_SECRET_KEY);
} else {
    if (!global.client) {
        global.client = new screenshotone.Client(process.env.SCREENSHOTONE_ACCESS_KEY, process.env.SCREENSHOTONE_SECRET_KEY);
    }

    client = global.client;
}

export default function url(url) {
    const options = screenshotone.TakeOptions
        .url(url)
        .cache(true)
        .cacheTtl(2000000)
        .blockChats(true)
        .blockCookieBanners(true)
        .blockAds(true);

    return client.generateTakeURL(options);
}
Another solution would be to render screenshots and store screenshots on the backend site and share rendered images with the front end. Or use the "upload screenshots to S3" feature by ScreenshotOne and then serve files from a CDN.
Expanding the app to complete the SaaS solution
And we have arrived at the stage when we want to make a bit of money with our small, simple project. Imagine allowing accept payments for featuring landing pages. But users will need to sign up. And we need to make sure that voting is fair. There are a few things required to do it:
- Authentication;
- Billing and subscriptions;
- Transactional emails;
- Dashboard to manage the app;
- Cover the app with tests;
- Make sure that the site is SEO-friendly;
- Internalization if we want to go wide.
Next.js has many solutions you can combine to solve all problems mentioned above.
But I want to propose something interesting if your goal is to ship SaaS and not just play with code like I love to do. I would argue that starting with a SaaS template is better to save time and energy.
Nowadays, there are many SaaS solutions you can pick up to bootstrap your project quickly. Take a look at Ship SaaS — a SaaS template based on Next.js, for example, and the problems it solves for you. It literally can save you thousands of hours.
Instead of summary
As you might sense, I enjoyed it a lot to build with Next.js, Tailwind CSS, and Prisma. I am impatient to try them for any new idea I will have in the future. Many problems are already solved in these frameworks, and it is easy to use them.
In addition, there are a bunch of good SaaS templates I can use if I want to bootstrap a SaaS quicker.


Top comments (1)
Folks, I am curious what do you think about Next.js? Do you like it or not?