AWS AppSync helps you build data-driven apps with real-time and offline capabilities. The AppSync Android SDK enables you to integrate your app with the AppSync service and is based off of the Apollo project found here. The SDK supports multiple authorization models, handles subscription handshake protocols for real-time updates to data, and has built-in capabilities for offline support that makes it easy to integrate into your app.
AWS Amplify lets you quickly add backend features to your application so that you can focus on your application code. In this case you can use Amplify to quickly set up a GraphQL API as well as a backing database to manage your data.
Setting Up the Project
Create a new Android Project
To get started, we first need to create a new Android project.
If you already have Android Studio installed and configured, go ahead and create a new Android project.
In the Add an Activity to Mobile screen, select Empty Activity. Click Next, keep the default values, and click Finish to finish project setup.
Import AWS AppSync SDK and Config
To use AWS AppSync in our new Android project, modify the project's build.gradle file and add the following dependency in the build script:
classpath 'com.amazonaws:aws-android-sdk-appsync-gradle-plugin:2.6.+'
Next, in the app's build.gradle add in a plugin of apply plugin: 'com.amazonaws.appsync' and dependencies for AWS AppSync and MqttServices.
As a result, your build.gradle should look like:
apply plugin: 'com.android.application'
apply plugin: 'com.amazonaws.appsync'
android {
    // ... typical items
}
dependencies {
    // ... typical dependencies

    implementation 'com.amazonaws:aws-android-sdk-appsync:2.6.+'
    implementation 'org.eclipse.paho:org.eclipse.paho.client.mqttv3:1.2.0'
    implementation 'org.eclipse.paho:org.eclipse.paho.android.service:1.1.1'
}
Finally, update your AndroidManifest.xml with updates to <uses-permissions> for network calls and offline state. Also, add a <service> entry under <application> for MqttService so we can use subscriptions:
<uses-permission android:name="android.permission.INTERNET"/>
<uses-permission android:name="android.permission.ACCESS_NETWORK_STATE"/>
<uses-permission android:name="android.permission.WAKE_LOCK" />
<uses-permission android:name="android.permission.READ_PHONE_STATE" />
<uses-permission android:name="android.permission.WRITE_EXTERNAL_STORAGE"/>
<uses-permission android:name="android.permission.READ_EXTERNAL_STORAGE"/>

        <!--other code-->

    <application
        android:allowBackup="true"
        android:icon="@mipmap/ic_launcher"
        android:label="@string/app_name"
        android:roundIcon="@mipmap/ic_launcher_round"
        android:supportsRtl="true"
        android:theme="@style/AppTheme">

        <service android:name="org.eclipse.paho.android.service.MqttService" />

        <!--other code-->
    </application>
Now is a good time to build your project, ensuring there are no issues.
Installing the AWS Amplify CLI amd Initializing a new AWS Amplify Project
Installing the AWS Amplify CLI
To fully leverage the AWS Amplify CLI toolchain, let's install the AWS Amplify CLI. Open your Terminal, and run the following in command line:
npm install -g @aws-amplify/cli
Initializing the AWS Amplify Project
Next, let's initialize a new AWS Amplify project for your Android app.
cd into your Android Studio project root in a Terminal window, and run the following:
amplify init
- Choose your default editor: Visual Studio Code (or your favorite editor)
- Please choose the type of app that you're building: android
- Where is your Res directory: (app/src/main/res): Press Enter to accept the default
- Do you want to use an AWS profile? Y
- Please choose the profile you want to use: YOUR_PROFILE
CloudFormation will now run for your AWS account to configure the initial infrastructure to support your app. After it's completed, the AWS Amplify CLI toolchain will have initialized a new project and you will see a couple of new files and folders in your app's project directory: amplify and .amplifyrc. These files hold your project's configuration.
Adding a GraphQL API, Authentication and Generating the Client Code
The AWS Amplify toolchain provides us with a streamlined process for API creation, authentication and client code generation. Let's start by running the following command in your app's root directory:
amplify add api
Answer the following questions:
- Please select from one of the above mentioned services GraphQL
- Provide API name: AmplifyAndroidExample
- Choose an authorization type for the API: Amazon Cognito User Pool
- Do you want to use the default authentication and security configuration? Yes, use the default configuration.
- Do you have an annotated GraphQL schema? N
- Do you want a guided schema creation? Y
- What best describes your project: Single object with fields (e.g. “Todo” with ID, name, description)
- Do you want to edit the schema now? (Y/n) Y
When prompted, update the schema to the following:
  type Todo @model {
    id: ID!
    title: String!
    description: String
  }
- Go back to the Terminal, and press enter to continue.
Next, let's push the configuration to your AWS account by running:
amplify push
You will be prompted with your added changes:
| Category | Resource name          | Operation | Provider plugin   |
| -------- | ---------------------- | --------- | ----------------- |
| Auth     | cognito12345678        | Create    | awscloudformation |
| Api      | AmplifyAndroidWorkshop | Create    | awscloudformation |
- Are you sure you want to continue? (Y/n) Y
Now you will be prompted to generate code for your brand new API:
- Do you want to generate code for your newly created GraphQL API (Y/n) Y
- Enter the file name pattern of graphql queries, mutations and subscriptions (app/src/main/graphql/*/.graphql): Press Enter to accept the default
- Do you want to generate/update all possible GraphQL operations - queries, mutations and subscriptions (Y/n) Y
CloudFormation will run again to update the newly created API and authentication mechanism to your AWS account. This process may take a few minutes.
To view the new AWS AppSync API at any time after its creation, go to the dashboard at https://console.aws.amazon.com/appsync. Also be sure that your region is set correctly.
To view the new Cognito authentication service at any time after its creation, go to the dashboard at https://console.aws.amazon.com/cognito/. Also be sure that your region is set correctly.
After CloudFormation completes updating resources in the cloud, you will be given a GraphQL API endpoint, and generated GraphQL statements will be available in your project.
Although it is transparent to you and we can start consuming the API right away, you can always examine the newly generated GraphQL queries, mutations and subscriptions in Android Studio under
app/src/main/graphql/com/amazonaws/amplify/generated/graphql.
Build the Android Application
Our backend is ready. Let's start using it in our Android app!
Before you start, if you haven't already, you should turn on Auto-Import. We are using lots of libraries! To do so, open Preferences -> Editor -> General -> Auto import -> check Add unambiguous imports on the fly.
Build your project to kick off the client code generation process. This gradle build process will create all the native object types which you can use right away.
If you are curious, you can switch to the
Projectview, and browse toapp/build/generated/source/appsync/com/amazonaws/amplify/generated/graphql/to examine all the generated object Types, Queries, Mutations and Subscriptions Java classes.
Add Authentication
Since we have configured earlier to use Cognito User Pool for authentication, we need to integrate authentication to our app. For simplicity, we are going to leverage AWS Mobile library's build in SignInUI for Cognito authentication.
Open your app's build.gradle, and add the following dependencies:
    // Mobile Client for initializing the SDK
    implementation('com.amazonaws:aws-android-sdk-mobile-client:2.7.+@aar') { transitive = true }

    // Cognito UserPools for SignIn
    implementation('com.amazonaws:aws-android-sdk-auth-userpools:2.7.+@aar') { transitive = true }

    // Sign in UI Library
    implementation('com.amazonaws:aws-android-sdk-auth-ui:2.7.+@aar') { transitive = true }
Right click on your application directory, select New -> Activity -> Empty Activity. Name your activity AuthenticationActivity, check the checkbox Launcher Activity, and click Finish.
In AuthenticationActivity.java class, modify the class to be following:
public class AuthenticationActivity extends AppCompatActivity {

    @Override
    protected void onCreate(Bundle savedInstanceState) {
        super.onCreate(savedInstanceState);
        setContentView(R.layout.activity_authentication);

        // Add a call to initialize AWSMobileClient
        AWSMobileClient.getInstance().initialize(this, new AWSStartupHandler() {
            @Override
            public void onComplete(AWSStartupResult awsStartupResult) {
                SignInUI signin = (SignInUI) AWSMobileClient.getInstance().getClient(
                        AuthenticationActivity.this,
                        SignInUI.class);
                signin.login(
                        AuthenticationActivity.this,
                        MainActivity.class).execute();
            }
        }).execute();
    }
}
Now let's make sure the Authentication activity is our launcher activity. Open AndroidManifest.xml, ensure the <intent-filter> block is specified for the AuthenticationActivity as follows. You can also remove the <intent-filter> and android:theme for MainActivity.
<!-- ... Other Code... -->

<activity
    android:name=".MainActivity"
    android:label="@string/app_name">
</activity>
<activity
    android:name=".AuthenticationActivity">
    <intent-filter>
        <action android:name="android.intent.action.MAIN" />
        <category android:name="android.intent.category.LAUNCHER" />
    </intent-filter>
</activity>
Build and launch your app in your emulator. The SignIn UI shows up as follows:

Now let's add a user. In your emulator, click Create New Account. Enter user name, choose a complex password (minimum length 8, includes uppercase letters, lowercase letters, special characters, and numbers). Enter a valid email so you can receive the verification code.
Your confirmation code should arrive shortly in your specified email inbox. Enter that code into the next screen to complete the sign up process.
After you successfully sign in, you should see a blank screen, which is our MainActivity.
To view the new user that was created in the Cognito User Pool, go back to the dashboard at https://console.aws.amazon.com/cognito/. Also be sure that your region is set correctly.
Create the AppSync Client
We now will need to create an AWSAppSyncClient to perform API calls. Add a new ClientFactory.java class in your package:
public class ClientFactory {
    private static volatile AWSAppSyncClient client;

    public static synchronized void init(final Context context) {
        if (client == null) {
            final AWSConfiguration awsConfiguration = new AWSConfiguration(context);

            CognitoUserPoolsSignInProvider cognitoUserPoolsSignInProvider =
                    (CognitoUserPoolsSignInProvider) IdentityManager.getDefaultIdentityManager().getCurrentIdentityProvider();
            BasicCognitoUserPoolsAuthProvider basicCognitoUserPoolsAuthProvider =
                    new BasicCognitoUserPoolsAuthProvider(cognitoUserPoolsSignInProvider.getCognitoUserPool());

            client = AWSAppSyncClient.builder()
                    .context(context)
                    .awsConfiguration(awsConfiguration)
                    .cognitoUserPoolsAuthProvider(basicCognitoUserPoolsAuthProvider)
                    .build();
        }
    }

    public static synchronized AWSAppSyncClient appSyncClient() {
        return client;
    }
}
This ClientFactory class will supply an AppSync client which we can leverage to perform data access activities.
Query for Data
We don't have any data in our list yet, but let's build the capacity to display them once we do.
Add a RecyclerView to display a list of items
Now let's start building our app to allow display of items!
We'll use RecyclerView to display data. Open src/res/layout/activity_main.xml, switch to Text view, and replace the <TextView> with the following:
<android.support.v7.widget.RecyclerView
            android:id="@+id/recycler_view"
            android:layout_width="match_parent"
            android:layout_height="wrap_content" />
Now let's define what each item in our list looks like. Right click on your res/layout folder, add a new Layout resource file. Let's call it recyclerview_row.xml. Change the Root element to LinearLayout, keep the rest as default, and press OK.
Switch to the Text view of recyclerview_row.xml, and modify the layout as follows:
<?xml version="1.0" encoding="utf-8"?>
<LinearLayout
    xmlns:android="http://schemas.android.com/apk/res/android"
    android:layout_width="match_parent"
    android:layout_height="wrap_content"
    android:orientation="vertical"
    android:padding="10dp">

    <TextView
        android:layout_width="match_parent"
        android:layout_height="wrap_content"
        android:layout_marginTop="10dp"
        android:paddingLeft="10dp"
        android:textSize="15dp"
        android:id="@+id/txt_title"
        />
    <TextView
        android:layout_width="match_parent"
        android:layout_height="wrap_content"
        android:layout_marginTop="10dp"
        android:paddingLeft="10dp"
        android:textSize="15dp"
        android:id="@+id/txt_description"
        />

</LinearLayout>
Since we are using a RecyclerView, we need to provide an Adapter for it. Add a new Java class MyAdapter.java as below which extends RecyclerView.Adapter:
public class MyAdapter extends RecyclerView.Adapter<MyAdapter.ViewHolder> {

    private List<ListTodosQuery.Item> mData = new ArrayList<>();;
    private LayoutInflater mInflater;


    // data is passed into the constructor
    MyAdapter(Context context) {
        this.mInflater = LayoutInflater.from(context);
    }

    // inflates the row layout from xml when needed
    @Override
    public ViewHolder onCreateViewHolder(ViewGroup parent, int viewType) {
        View view = mInflater.inflate(R.layout.recyclerview_row, parent, false);
        return new ViewHolder(view);
    }

    // binds the data to the TextView in each row
    @Override
    public void onBindViewHolder(ViewHolder holder, int position) {
        ListTodosQuery.Item item = mData.get(position);
        holder.txt_title.setText(item.title());
        holder.txt_description.setText(item.description());
    }

    // total number of rows
    @Override
    public int getItemCount() {
        return mData.size();
    }

    // resets the list with a new set of data
    public void setItems(List<ListTodosQuery.Item> items) {
        mData = items;
    }

    // stores and recycles views as they are scrolled off screen
    class ViewHolder extends RecyclerView.ViewHolder {
        TextView txt_title;
        TextView txt_description;

        ViewHolder(View itemView) {
            super(itemView);
            txt_title = itemView.findViewById(R.id.txt_title);
            txt_description = itemView.findViewById(R.id.txt_description);
        }
    }
}
Note the class level variable mData. It is a list of type ListTodosQuery.Item, which is a generated GraphQL type based on our schema.
We have also exposed a setItems method, to allow outside re-setting of our data set.
Build the screen to populate the RecyclerView
Open MainActivity.java, modify the class to implement a query method and populate the RecyclerView:
public class MainActivity extends AppCompatActivity {

    RecyclerView mRecyclerView;
    MyAdapter mAdapter;

    private ArrayList<ListTodosQuery.Item> mTodos;
    private final String TAG = MainActivity.class.getSimpleName();

    protected void onCreate(Bundle savedInstanceState) {
        super.onCreate(savedInstanceState);
        setContentView(R.layout.activity_main);

        mRecyclerView = findViewById(R.id.recycler_view);

        // use a linear layout manager
        mRecyclerView.setLayoutManager(new LinearLayoutManager(this));

        // specify an adapter (see also next example)
        mAdapter = new MyAdapter(this);
        mRecyclerView.setAdapter(mAdapter);

        ClientFactory.init(this);
    }

    @Override
    public void onResume() {
        super.onResume();

        // Query list data when we return to the screen
        query();
    }

    public void query(){
        ClientFactory.appSyncClient().query(ListTodosQuery.builder().build())
                .responseFetcher(AppSyncResponseFetchers.CACHE_AND_NETWORK)
                .enqueue(queryCallback);
    }

    private GraphQLCall.Callback<ListTodosQuery.Data> queryCallback = new GraphQLCall.Callback<ListTodosQuery.Data>() {
        @Override
        public void onResponse(@Nonnull Response<ListTodosQuery.Data> response) {

            mTodos = new ArrayList<>(response.data().listTodos().items());

            Log.i(TAG, "Retrieved list items: " + mTodos.toString());

            runOnUiThread(new Runnable() {
                @Override
                public void run() {
                    mAdapter.setItems(mTodos);
                    mAdapter.notifyDataSetChanged();
                }
            });
        }

        @Override
        public void onFailure(@Nonnull ApolloException e) {
            Log.e(TAG, e.toString());
        }
    };
}
The appSyncClient is responsible for querying the AppSync GraphQL endpoint. We chose to use CACHE_AND_NETWORK mode because it will retrieve the data in the local cache first, while reaching out to the network for latest data. Once the fetch is complete, queryCallback is invoked again, and our data set is updated with the latest data. There are other Cache or Network only/first modes which can be used depending on different app data fetching needs.
Build your app again to ensure there are no errors. A blank screen still displays, but you should be able to see the log in the Logcat window indicating a query is completed successfully, similar to below:
09-28 10:32:16.789 11605-11699/com.example.demo.amplifyandroidexample I/MainActivity: Retrieved list items: []
Modify Data: Add a Todo
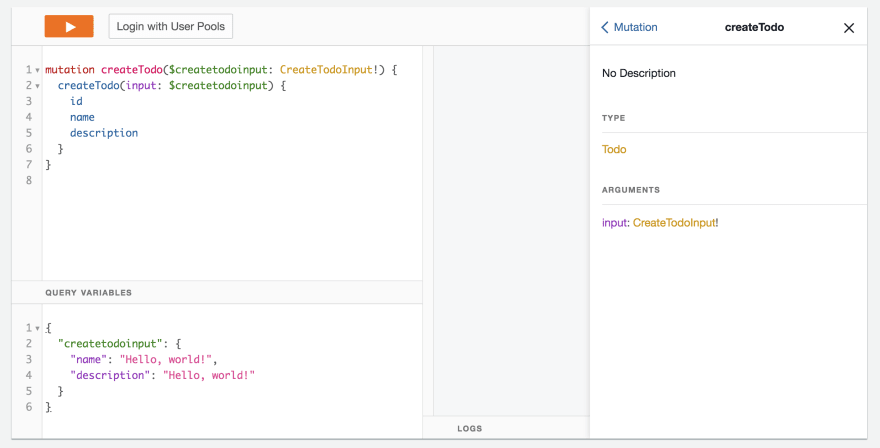
In the AppSync console, navigate to the Queries section and create a few Todos:
Then refresh your app and you should now have Todos displaying in your main activity!
For more information on GraphQL with Amplify and AppSync, check out the docs here.
Also, you should check out AWS Device Farm for testing your app across a wide range of devices and OSs (https://dev.to/kkemple/how-to-set-up-end-to-end-tests-for-android-with-zero-code-1ka).
Lastly, you can find out more about Amplify for Android here:


Top comments (3)
Can you pleas share the complete source code.
Hi, sure.
My MainActivity code is:
import android.os.Bundle;
import android.util.Log;
import android.view.View;
import android.view.Menu;
import com.amazonaws.mobile.client.AWSMobileClient;
import com.amazonaws.mobile.client.Callback;
import com.amazonaws.mobile.client.SignOutOptions;
import com.example.ventasbn.Clientes.ClientFactory;
import com.google.android.material.floatingactionbutton.FloatingActionButton;
import com.google.android.material.navigation.NavigationView;
import androidx.navigation.NavController;
import androidx.navigation.Navigation;
import androidx.navigation.ui.AppBarConfiguration;
import androidx.navigation.ui.NavigationUI;
import androidx.drawerlayout.widget.DrawerLayout;
import androidx.appcompat.app.AppCompatActivity;
public class MainActivity extends AppCompatActivity {
}
The code works but when I close the app with the close all option I have this error:
Caused by: java.lang.NullPointerException: Attempt to invoke virtual method 'com.amazonaws.mobileconnectors.cognitoidentityprovider.CognitoUserPool com.amazonaws.mobile.auth.userpools.CognitoUserPoolsSignInProvider.getCognitoUserPool()' on a null object reference
at com.example.ventasbn.Clientes.ClientFactory.init(ClientFactory.java:21)
at com.example.ventasbn.MainActivity.onCreate(MainActivity.java:40)
Some comments may only be visible to logged-in visitors. Sign in to view all comments.