
As I continue my post graduation journey and start marketing myself to potential employers, one of the things that was stressed as import to me is having a personal website. There are so many great options out there to get started. (If you'd like to check out the resources I used to decide the best path for myself click here)
For me, I decided to go with a template that I could tweak and personalize. This worked well for me because I wanted the freedom to add my own features and personal touches, but the template allowed me to get a responsive site working quickly without having to spend too much worrying about styling.
Call Me Maybe
The template came with a lot of really great stuff out of the box. (You can check out the one I decided on here) As I started making my own tweaks to the site, I stumbled upon the contact section. What came out of the box was a template contact form that wasn't set up beyond being an HTML form. A contact form is an awesome tool to have, so I decided to get that up and working.
While researching ways to make that happen, the most common solution that I saw was to set up a back end that would handle form submission and sending the emails. While that solution is perfectly fine, it was a little more involved than I really wanted to get with this. My goal in building the site was to create a simple front end portfolio to showcase my skills and projects. Ideally a front end solution is what I wanted to work with, and I managed to find that with EmailJS.
How Will I Know
So what is EmailJS? It is a free (there are also premium features available) service that allows you to send up to 200 emails per month. All you have to do is connect an email service (I used Gmail), create an email template, and then use their SDK in your form code to send emails. This was perfect for what I needed, and I'll walk you through how I got it working below.
The Rainbow Connection
The first step is to sign up and connect your email service. After signing up and logging in, navigate to the Email Services page in the dashboard. Click on the "Add new service" button, select an email service, and click the "Connect account" button. You will be directed to a pop up that will connect your account. Before you add the service, you also have the option to customize the name and have EmailJS send you a test email so you can make sure everything is working correctly.
Blank Space
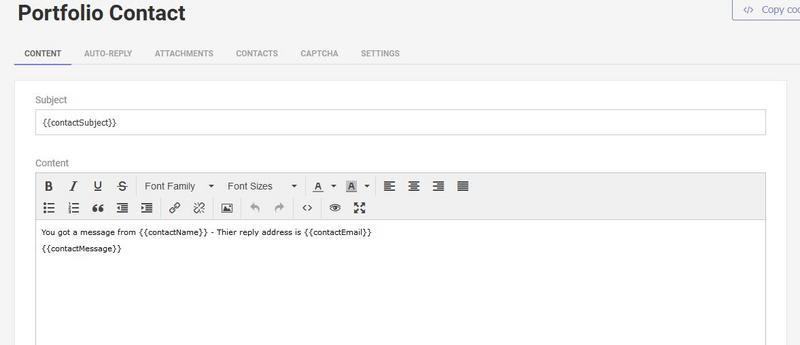
The next thing you are going to want to do is create a new email template. You can either modify the provided one or create a new one from scratch. When we get around to setting everything up in our code, you will be able to specify the template email to be sent when someone clicks the submit button on our form.
The great thing about the template is that we can use variables to dynamically generate our email. These variables can be passed into the function that we will use later on to send our emails, just make sure that the variables that we pass into the function match the ones in the template or vice versa. We will be able to pass in as many as we would like. (generally one for each input field in your form) Variables in the template are surrounded by {{}}. This is what the template I created looks like:
The Final Countdown
The last step is to hook this all into our site. To do this you have two options: either use something like npm to add the package to your project or link the script directly. Linking the script directly allows you to skip passing your user ID into the emailjs.send function we will be using later, but since I was only using the function once I decided to install the package. After installing, just add import emailjs from 'emailjs-com'; at the top of your file to import the function we will be using.
If you would rather link the script, just add the code below to your HTML file. (Remember to add your username to the init function)
<script type="text/javascript"
        src="https://cdn.jsdelivr.net/npm/emailjs-com@2/dist/email.min.js">
</script>
<script type="text/javascript">
   (function(){
      emailjs.init("YOUR_USER_ID");
   })();
</script>
The last thing we need to do is create a handleSubmit function for our form that will include all of the code needed to handle the email request. Let's take a look at what mine looks like and we can walk through what is going on so that you can customize yours however you'd like.
handleSubmit = (event) => {
     event.preventDefault();

     emailjs.send("gmail", "portfolio_contact", this.state, "YOUR_USER_ID")
      .then(function(response) {
         console.log('SUCCESS!', response.status, response.text);
      }, function(error) {
         console.log('FAILED...', error);
      });

     this.setState({
      contactName: "",
      contactEmail: "",
      contactSubject: "",
      contactMessage: ""
   })
  }
The emailjs.send() function is the meat of what we want to look at here. It take 4 arguments: serviceID, templateID, templateParams, and userID. (You can omit the user ID if you went the script method) See below for an explanation from the docs.
Syntax
emailjs.send(serviceID, templateID, templateParams, userID);
Parameters
| Name | Type | Description |
|---|---|---|
serviceID |
String | Service ID of the service through which the email should be sent. Reserved keyword 'default_service' is supported, and should be used to use the default service, which can be set and changed via EmailJS dashboard. |
templateID |
String | Template ID of the email |
templateParams |
Object | Template parameters of the template. |
userID |
String | (optional) User ID of the account. It’s not required if you used the init method. |
The docs are pretty self explanatory, the only thing of interest here is that the templateParams is an object. In my example, the only information stored in my component state was what I wanted to pass as template params so I was able to pass the component state directly. You could just as well add a variable declaration to your handleSubmit to set the params up however you would like.
Easy Like Sunday Morning
And that's it! Now you should have a simple email contact form set up with EmailJS. I hope this little guide was helpful. If you would like to check out the docs themselves, you can do so here. Feel free to leave a comment if there is anything you think I missed or if you found the post helpful.
You can also find me elsewhere on Twitter, Github, or LinkedIn.


Oldest comments (0)