Hi everyone, this is my first tutorial on dev.to, I'll love to share with you an awesome frontend development framework which I've been learning; Hyperapp JS.
We're going to be building a movie shopping cart single page app to learn how to use some basic features of hyperapp which includes Virtual-dom rendering, routing and application state managment.
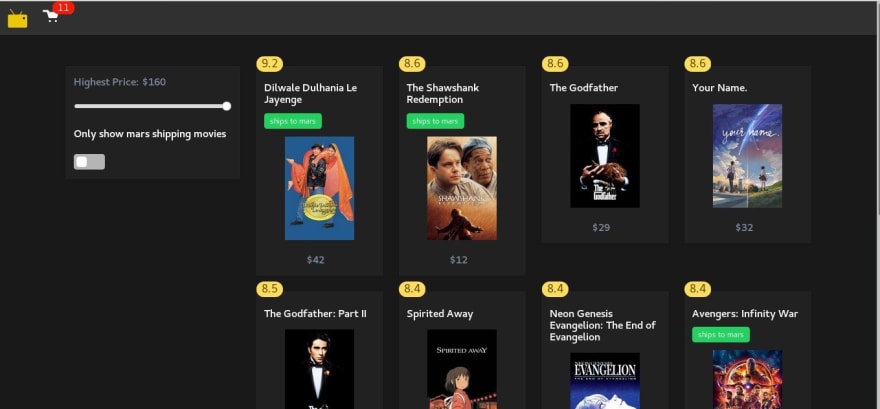
screenshot
Here's the github repo incase you would love to go straight to the code, and here is the Live Demo hosted on github pages. Go ahead and play with the buttons.
Requirements
There is'nt much required to follow/complete this tutorial but a basic knowledge of hyperapp (the quick documentation has a really simple example for this), and also it would help to know the basics of Javascript's ES6 syntax.
npm packages we will be installing
Hyperapp : a micro-framework for building modern web applications, it combines state management with a virtual DOM engine that supports keyed updates & lifecycle events - all with no dependencies.
Hyperapp-router: the official routing package for hyperapp.
Hyperapp-transitons: smooth animations for our components.
Bulma: flex-box based framework for css styling.
Getting started
If you read through hyperapp basics, I suppose you already know about hyperapp state, actions and view concepts, but if you're still a bit confused; i got you buddy.
state
state is basically just data associated with the views/components of a webapp or any other software. Any time you like a post on twitter and then the love-shaped icon becomes red, we can say you have changed it's state from white to red, other examples include data from an API presented in a list/grid of css cards, a user's username or profile picture used across many components.
actions
As earlier said hyperapp provides us means to update or change the state data throughout all components in our app using actions. In hyperapp actions are functions a developer can create to do that. Hyperapp supports asynchronous actions and actions that produce side effects.
views
the view function automatically updates the virtual-DOM when there are changes in state based on how you want it to look like and renders our components.
setting up our project
We won't be covering setting up rollup or webpack & babel configs in this tutorial, it's quicker and easier to use this hyperapp-rollup-babel-hyperapp-router boilerplate. It contains dependencies/rollup module bundling configurations we need to develop/ship our app.
Let's run the following commands in terminal to clone the repo, navigate to the folder and the install all project dependencies from package.json and also add bulma packages for styling.
    git clone https://github.com/selfup/hyperapp-one
    cd hyperapp-one
    npm install
    npm install bulma bulma-slider bulma-switch bulma bulma-badge
run the command below and visit localhost:8080 in your browser to view our app.
npm start
Our boilerplate comes with live reload so the browser automatically refreshes our app to reflect any saves/changes we make in our code.
Folder structure
We're not going to cover all the files/folders explanations in our project in this tutorial (I'm too lazy, no not now!).
But it's always good to explain the main folders/files which we will be using frequently in our project.
/src folders:
Inside the main folder /src you will find we have folders:
/state with a state.js file.
/actions with actions.js file.
/views/containers with lazy/container components files.
/components with regular components files.
/config folder for any helper functions/files we want. It comes empty in this boilerplate.
/src files:
index.js to serve as entry file for our module bundler.
routes.js files for our routes and view function.
(We're very close to knowing in detail what every file does in a moment).
Faking our Data.
Navigate to src/config folder and create a file data.js which will contain fake top-rated movie data, you can copy the data from here and paste it in the data.js file.
In styles folder in the same location as config folder create another sass file with name variables.sass to customize bulma and declare our bulma packages.
Edit the app.sass file and add the following sass imports for our bulma packages:
@import "variables";
@import "node_modules/bulma/bulma.sass";
@import "node_modules/bulma-badge/src/sass/index.sass";
@import "node_modules/bulma-switch/src/sass/index.sass";
@import "node_modules/bulma-slider/src/sass/index.sass";
In variables.sass copy and paste the following styling/variables from here, you can customize it if you want, but to get the dark theme of our app etc we need to use this. Our rollup config includes a packages that compiles sass in our project.
About JSX
We will be writing our components using JSX.
JSX is a language syntax extension that lets you write HTML tags interspersed with JavaScript. Because browsers don't understand JSX, we use a transpiler like babel to transform it into hyperapp.h function calls under the hood.
Now let's get to it!
Set up our app state model.
The first thing we're going to do is to declare the state model which our app will use, navigate to path src/state.js and add this code:
import { location } from "@hyperapp/router"


import  { data } from '../config/data'


export const state =  {
  location: location.state,
  movies: data,
  movie_list: [],
  cart: [],
  range_value: 160,
  switch_value: false,
  cart_item_count: 0,
  cart_item_total: 0,
}
In this code, we import the hyperapp-router location api function as required by hyperapp and register it in our state object for routing purposes.
We also import our mock data from config/ folder and then set it as our movies state value. In other cases we can get this data from anywhere; a json response from a server etc but here we just fake it as an already gotten response data. This is what our fake data looks like.
After that, we create an empty array which is then attached to our movie_list property, it's empty so we can fill it up with any kind of data we want, later we will use this to our advantage in a functionality in our app.
the cart state property is also an empty array that will contain any movie a user adds to cart using an ADD_TO_CART action we will define soon.
range_value will hold an integer value from the range slider element. Here the default value is 160.
switch_value will hold a boolean value of an html switch element.
cart_item_count will hold an integer value of the count of items in cart array.
cart_item_total will hold an integer value of the total price of items in cart array.
It's great to define our state object and it's properties/values as it serves as the data model for our application. Don't worry soon you'll see how everything links together.
Mutating our state data using actions.
We have briefly explained state concept previously and declared our state model,
next we need to navigate to our actions file, this is where we will be writing actions functions that can mutate our state data, only actions can mutate state data in hyperapp.
let's go ahead and write our first action. Add this code in src/actions/actions.js:
import { location } from "@hyperapp/router"

export const actions = {

  location: location.actions,

  GET_ALL_MOVIES: () => (state) => ({

    movie_list: state.movie_list = state.movies,

  }),

}
If you have read the basics of hyperapp then you already know what this code does, but better still let's explain it a bit;
we import and register our router api as usual, and create a function GET_ALL_MOVIES() which is passed our state store data, it mutates our initially empty movie_list state by copying the fake data from the movies state to it. Dont worry you will see why we are are not using the movies state instead in a bit.
now let's add some other actions in the action object for the functionality features of our app. In Hyperapp you can have as many actions as you want;
Add movie to cart action:
 ADD_MOVIE_TO_CART: (movie_id) => (state) => ({

    cart_item_count: state.cart_item_count += 1,

    cart:  state.cart.filter(movie => movie.id === movie_id).length>0
    ?
    Object.assign(state.cart, state.cart[state.cart.findIndex(obj =>
    obj.id === movie_id )].quantity ++ )
    :
    state.cart.concat(state.movies.filter( movie => movie.id == movie_id).map(res =>
    ({ movie_title: res.title,
       price: res.price,
       movie_poster: res.poster_path,
       total: res.price,
       quantity: 1,
       id: res.id }) )),

    cart_item_total: state.cart.reduce( (acc, cur) => {
    return acc + cur.price * cur.quantity;

    }, 0),

  }),
the action ADD_MOVIE_TO_CART() contains functions that modify the state property values they are assigned to. The functions are:
cart_item_count function increment's the cart_item_count state property value by adding 1 to it's current state value each time a movie object is added into the state cart array. It is called each time the ADD_MOVIE_TO_CART action is called.
cart function adds a movie object into the state cart array from our state. Since actions have access to state, and can also be passed payload(data) from our components, we use Javascript's .filter() function on our movies state data to return the movie object from it's array whose id is same as the movie id passed from the movie component and return a boolean value so we can check if it is already present in the array or not.
If it is present then we just only increase the movie's quantity property by 1
but if it isn't present we locate the movie using it's id in the movies state array and then copy it's properties into the cart state array along with some new properties to help us create a quantity and a total property/value.
cart_item_total function calculates the total price of the movies in the cart array.
Note: we are using JavaScript's .filter(), .concat(), .map(), .reduce() functions when mutating state data in hyperapp because they are pure functions that do not modify an array but instead return a new array after an operation.
Filter movies by price range and shipping actions:
FILTER_BY_PRICE: (event) => (state) => ({

    range_value: state.range_value = event.target.value,

    movie_list: state.movie_list = state.movies.filter( movies =>
      state.switch_value ?
      movies.price <=  state.range_value && movies.planet_shipping == true :
      movies.price <= state.range_value ),
  }),

  FILTER_BY_SHIPPING: (event) => (state) => ({

    switch_value: state.switch_value = event.target.checked,

    movie_list: state.movie_list = state.movies.filter( movies =>
      state.switch_value ?
      movies.price <=  state.range_value && movies.planet_shipping == true :
      movies.price <= state.range_value ),
  }),
These actions are called by the range slider/switch html elements in our components, you can see how hyperapp renders state changes/updates the DOM quickly as the values are updated/changed.
We pass the values as event data from the range slider or switch element depending on which is used.
Remember we created a movie_list state array separate for these filtering operations, even though we are using pure functions for our operations, we do not want to modify the movies state array using dynamic data like this because it would be difficult to filter it again after the merge.
Rendering our state data/executing actions using hyperapp View function components.
With Hyperapp we can create 2 kinds of components (Components are pure functions that return a virtual-node).
Regular components are components that have access to hyperapp state and actions. I like to think of them as container components with which we manipulate state/actions.
Lazy components are components that do not have access to/cannot mutate state and actions. I like to think of them as presentational components where we just pass our state values as properties for styling, re-use , applying behaviours etc in our views.
Creating our components.
<App/> component.
The first component we are going to create is the App.js component. It is a lazy/container component that would be rendered as our root / route component when a user visits our app. It calls the GET_ALL_MOVIES() actions from our actions api when it is created.
Navigate to src/views/containers/App.js and add this code.
import { h } from 'hyperapp'
import { Link, Route, location, Switch } from "@hyperapp/router"

import { NavBar } from '../../components/NavBar'
import { MovieCard }  from '../../components/MovieCard'


export const App = () => ( state, actions ) =>


<div oncreate= { () => actions.GET_ALL_MOVIES() } >

      <NavBar cart_count= {state.cart_item_count}/>

<section class="section">
<div class="container">
<div class="columns">
<div class="column  is-3">

    <div class="box">
    <div class="content">
    <b> Highest Price: ${state.range_value} </b>
    <input
    type="range"
    oninput = { (event) => actions.FILTER_BY_PRICE(event) }
    onchange = { (event) => actions.FILTER_BY_PRICE(event) }
    class="slider is-fullwidth is-small is-circle"
    step="0.1" min="0" max="150"
    value = {state.range_value}  />
    </div>

    <h1 class="title is-6 has-text-white"> Only show mars shipping movies</h1>

    <div class="field">
    <input id="switchMovie"
     type="checkbox"
     name="switchMovie"
     class="switch is-success"
     checked={state.switch_value}
     onchange= { (event) => actions.FILTER_BY_SHIPPING(event) } />
     <label for="switchMovie"></label>

     </div>

    </div>

    </div>

<div class="column  is-9">
<div class="columns is-multiline is-mobile">

  { state.movie_list &&
    state.movie_list.map(
   ({ id, title, poster_path, price, vote_average, planet_shipping, overview, release_date }) =>

<div className="column  is-half-mobile is-one-third-tablet is-one-third-desktop is-one-quarter-widescreen is-one-quarter-fullhd">


      <MovieCard movie_id = {id}
                 title = {title }
                 poster = {poster_path }
                 price = {price}
                 rating = {vote_average}
                 planet_shipping = { planet_shipping }
                 plot = { overview }
                 release_date = {release_date }  />

          </div>
                  )

  }

</div>
</div>
</div>
</div>
</section>

     </div>
Here we import hyperapp h function to transform our components written in JSX to virtual-Dom nodes.
Also we import hyperapp routing api functions from the installed hyperapp-router package.
We then import two regular/presentational components which we will create next for the purpose of styling and etc. (it's often good practice to do this, it encourages code reuse).
Then we create a function that creates the App.js component and add a hyperapp life-cycle event which calls our intially created GET_ALL_MOVIES() action from our hyperapp actions when the App.js component is created in the DOM. Checkout hyperapp life-cycle events
Then we create a function using jsx and the && operator in javascript to check the state store if state.movie_list has any data and executes Javascript's .map() function to each of the items in the movie_list array which in this case is our fake, top-rated movies data. Remember we talked about creating a presentational component soon, inside the .map() function we pass data from the returned objects into the component which we will call <MovieCard/> to style each object item as a component on it's own.
Also you can see our range slider and switch elements and how they have access to their respective state data properties and also how they call actions and pass payload event data to them. Note the kind of javascript DOM event listeners attached to each of the elements.
The rest is just responsive/grid styling thanks to the awesome bulma.
<MovieCard/> component.
Navigate to src/components and create a MovieCard.js file and add this code, this will be a normal component child of the lazy component App.js.
import { h } from 'hyperapp'
import { Enter } from "@hyperapp/transitions"
import { Link, Route, location, Switch } from "@hyperapp/router"

export const MovieCard = ({ movie_id, title, poster, price, rating, planet_shipping, plot }) => (

<div>

<Link to={`/details/${movie_id}`} >

 <Enter time={200} easing="ease-in-out"
        css={{opacity: "0", transform: "scale(1,1)"}}>

    <div class="box">
    <div class="media">

    <div class="media-content">

      <div class="content">
      <span class="badge is-badge-warning is-badge-large" data-badge={rating}></span>
      </div>

       <div class="content">
       <p class="title is-6 has-text-light"> {title} </p>
       </div>

        <div class="content">
       <div class="tags has-addons">
         { planet_shipping &&
         <span class="tag is-success">ships to mars</span>  }
        </div>
        </div>


       <div class="content">
       <figure class="image">
       <img src={`http://${poster}`}/>
       </figure>
       </div>


      <nav class="level is-mobile">

            <span class="level-item">
            <b> ${price} </b>
             </span>


      </nav>
      </div>


    </div>
    </div>


    </Enter>
    </Link>
</div>
    )
Here we import the same packages as before and a new { Enter } component from the hyperapp-transitions package which we will use to create a nice,smooth animation for our moviecard component.
Also we use the <Link/> component from the hyperapp router which we will use to open a modal route where a user can see more details of a selected/clicked movie card.
The most important thing to note is that we pass the movie data as properties from our App.js lazy component to our normal component, the rest of the code just covers some styling of the data from our properties like {title} which is the movie title, {poster} is the movie poster url, {price} is the movie price and {planet_shipping} is the boolean value true/false which we will use to check if a movie ships to mars or not.
You can see how we apply some logic using the && operator to render an element conditionally after we evaluate the {planet_shipping} property. You can use if/else or even the ? operator if you like but i prefer the && operator as it best suits this sort of simple evaluation for me.
The rest of the code is just styling.
<ViewMovieDetails/> component.
Now we need to create a container component <ViewMovieDetails/> that will be rendered by hyperapp-router when the user selects a movie, it displays more information about the movie. It's route path is /details/:movie_id. Do take note of the special :movie_id term after the route path, it's just a parameter which the router package uses to grab the id property from our selected movie object in the previous component and pass it as a route parameter in the url for this component to use.
In src/views/containers/ create a ViewMovieDetails.js file and add the code
import { h } from 'hyperapp';

import { MovieDetails  } from '../../components/MovieDetails'


export const ViewMovieDetails = ({match}) => (state, actions) => (

<div>


{

    state.
    movie_list.
    filter( movie => movie.id == match.params.movie_id ).
    map( ({ id, title, overview, poster_path, vote_average, release_date , price }) =>

    <MovieDetails
        cart_count={state.cart_item_count}
        id={id}
        title={title}
        plot={overview}
        poster={poster_path}
        price={price}
        rating={vote_average}
        release_date={release_date}
        addAction={  () => actions.ADD_MOVIE_TO_CART(id) }
        />

    )
  }
</div>
)
As always we import the pnormal component called <MovieDetail/> for presentational use as a child component (we will create it shortly) and then we filter through movie_list state array to find a movie whose id is equal to id passed from the route and then applying .map() function to the result data as the <MovieDetail/> component which is then passed it's necessary properties which also includes an action ADD_MOVIE_TO_CART() and state value of the cart_item_count.
<MovieDetails/> component.
Now let's create the child component of the <ViewMovieDetails/> lazy component.
In src/components/ folder create a file MovieDetails.js and add this code:
import { h } from 'hyperapp'


export const MovieDetails = ({ cart_count, id, title, addAction, poster, price, rating, release_date, plot }) => (
    <div>
          <div class="modal is-active">
          <div class="modal-background"></div>
          <div class="modal-card">
          <header class="modal-card-head">
          <p class="modal-card-title">{title} </p>

          <button class="delete" aria-label="close"  onclick= { () => { window.history.back() }}></button>
          </header>
          <section class="modal-card-body">

          <div class="columns">

          <div class="column">

         <figure class="media-left">

         <img src={`http://${poster}`} />

         </figure>

          </div>

          <div class="column">
          <p class="title is-5 has-text-white"> Plot: </p>
          <p class="title is-6 has-text-white"> {plot} </p>

          <p class="title is-6 has-text-white">Release date {release_date} </p>
          <span class="tag is-warning">{rating}</span>


          </div>
          </div>

    </section>
    <footer class="modal-card-foot">

    <a class="button is-success" onclick={ addAction }>
    <b>  Add to Cart  ${price}  </b>
    </a>
    <b> {cart_count} Items in cart</b>


    </footer>
  </div>
</div>

    </div>
        )
here we recieve properties cart_count, price e.t.c from the <ViewMovieDetails/> component and then add some styles to it. Remember we passed and action responsible for adding a selected movie to cart when the button onclick event is fired as {addAction} and the number of total items in the cart as {cart_count}.
<ViewCart/> component.
Now let's create a lazy component that will be rendered when a user visits /cart route. In this component we will display movies which have been added to cart by the user.
In src/views/containers/ add a file ViewCart.js and add this code;
import { h } from 'hyperapp';

import { CartItems } from '../../components/CartItems'
import { NavBar } from '../../components/NavBar'


export const ViewCart = ({match}) => ( state, actions ) => (


<div>

    <NavBar cart_count= {state.cart_item_count}/>

<section class="section">
<div class="container">

             <p class="title is-3 has-text-white"> Cart Items </p>

{
    state.cart.filter(res => res.id )
    .map( res =>

        <CartItems movie_id={res.id}
        title={res.movie_title}
        price={res.price}
        quantity= {res.quantity}
        total= {res.quantity * res.price }
        poster= {res.movie_poster}
        />


    )


}
    { <p class="title is-5 has-text-white"> total price: ${state.cart_item_total}  </p> }


</div>
</section>
</div>

)
In this code we have the <NavBar/> imported and used and also we mapped through items that are in our state's cart array and passed the results to it's child component <CartItems/>.
<CartItems/> component.
Now let's create the <CartItems/> component.
In src/components create a file CartItems.js and add this code:
import { h } from 'hyperapp'

export const CartItems = ({ movie_id, title, price, quantity, total, poster }) => (

    <div>

         <article class="media">

         <figure class="media-left">
         <p class="image is-64x64">
         <img src={`http://${poster}`}/>
         </p>
         </figure>

         <div class="media-content">
         <div class="content">

            <p class="title is-5 has-text-white"> {title} </p>

            <small> ${price} x </small>
            <b>{quantity} copies</b>

            <p/>

            <small> Total price: </small> <b> ${total}</b>

            <hr/>

         </div>
         </div>

          </article>

    </div>
        )
I assume this component is self-explanatory, it just styles the properties passed to it from it's parent component <ViewCart/> and applies some behaviour to it.
<NavBar/> component.
And then finally the NavBar component.
Navigate to src/components and create a NavBar.js file and add this code so we can create a nice navigation bar that would hold links to other components and recieve the cart's items count data from any parent lazy component where it is used.
import { h } from 'hyperapp'

import { Link, Route, location, Switch } from "@hyperapp/router"

export const NavBar =  ({cart_count}) => (
<nav class="navbar is-primary has-shadows" role="navigation" aria-label="main navigation">
<div class="navbar-brand">

<a class="navbar-item" href="">
<svg xmlns="http://www.w3.org/2000/svg" width="30" height="30"
viewBox="0 0 133.80357 132.29168"><g transform="translate(-37.57 -49.048)"><rect width="132.292" height="90.714" x="38.554" y="90.625" ry="9.719" fill="#edc905" paint-order="stroke fill markers"/><rect width="5.292" height="61.988" x="12.631" y="72.602" ry="1.911" transform="rotate(-34.65)" fill="#edc905" paint-order="stroke fill markers"/><rect transform="rotate(-145.35)" ry="1.911" y="-39.86" x="-154.078" height="61.988" width="5.292" fill="#edc905" paint-order="stroke fill markers"/><ellipse cx="148.923" cy="115.949" rx="7.56" ry="7.182" paint-order="stroke fill markers"/></g></svg>
</a>

<Link to="/cart" class="navbar-item">
<span class="badge is-badge-danger is-badge-medium" data-badge={cart_count}>
<svg xmlns="http://www.w3.org/2000/svg"
width="25" height="25" fill="#FFFFFF"
viewBox="0 0 8 8">
<path d="M.34 0a.5.5 0 0 0 .16 1h1.5l.09.25.41 1.25.41 1.25c.04.13.21.25.34.25h3.5c.14 0 .3-.12.34-.25l.81-2.5c.04-.13-.02-.25-.16-.25h-4.44l-.38-.72a.5.5 0 0 0-.44-.28h-2a.5.5 0 0 0-.09 0 .5.5 0 0 0-.06 0zm3.16 5c-.28 0-.5.22-.5.5s.22.5.5.5.5-.22.5-.5-.22-.5-.5-.5zm3 0c-.28 0-.5.22-.5.5s.22.5.5.5.5-.22.5-.5-.22-.5-.5-.5z"
transform="translate(0 1)" />
</svg>
</span>
</Link>
</div>

</nav> )
we create navigation bar component with a cart_count property to display the amount of items we have in our cart.
Registering our lazy components to their respective route paths.
Now that we have created all necessary components for our app, the next thing we need to do is register the parent/lazy components as route components so the hyperapp View function can return their respective virtual nodes and watch for state changes aka rendering UI. We are using hyperapp-router's <Switch/> component to declare multiple route paths and their respective components to render when the route path is visited.
import { h } from 'hyperapp'
import { Link, Route,location, Switch } from "@hyperapp/router"


import { App } from './views/containers/App'
import { ViewMovieDetails } from './views/containers/ViewMovieDetails'
import { ViewCart } from './views/containers/ViewCart'


export const view = ( state, actions ) =>

<div>

<Switch>
    <Route path="/" render={ App } />
    <Route path="/cart" render={ ViewCart } />
    <Route path={ "/details/:movie_id"} render={ ViewMovieDetails} />
  </Switch>

</div>
checkout hyperapp-router docs to learn more about routing in hyperapp,
Connecting everything.
Now we need to mount our entire app to the DOM, hyperapp requires us to do this in an index.js file, this file serves as an entry file for rollup or any other module bundler to bundle our entire application codes into a single javascript file.
Let's add this code in the /index.js file;
import { h , app } from 'hyperapp'

import {  location } from "@hyperapp/router"

import { state }  from './state/state'
import  { actions } from './actions/actions'
import { view }   from './routes'


import  './styles/app.scss'


const main = app(state, actions, view, document.querySelector('.hyperapp-root'))

const unsubscribe = location.subscribe(main.location)
Here we import the needed hyperapp api functions and also our state, actions and view files which we then mount to the DOM using hyperapp's app function. We have also imported our sass file so it can be compiled too when our module bundler package processes the index.js file. The processing includes transpiling our JSX/ES6 syntax using babel, treeshaking, compiling sass to css e.t.c.
That's it!
We have finished our project for this tutorial, I suppose you have been checking our progress gradually in your browser at localhost:8080 to see our final output.
You can run a production build and deploy to github pages or whatever static file server you want so you can share with others. There is a tutorial on this if this is your first time.
Thank you so much for reading, I'm very much interested in any opinions to correct or report errors, or suggest anything that would make this tutorial better as I am looking to improve. You can visit the project repo on github. Feel free to open issues!


Top comments (1)
Too complicated, try this:
gitlab.com/peter-rybar/prest-lib/b...