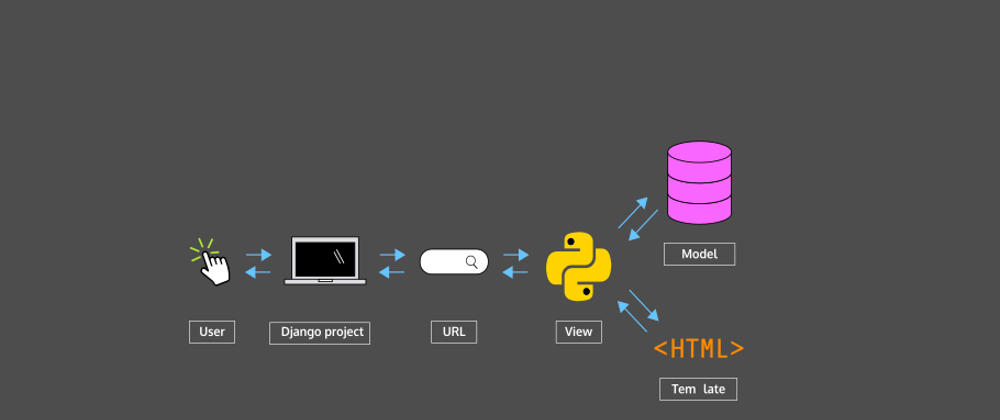
Before we create our first Django web app, let’s take a little look into how Django works underneath the hood. The Django project describes itself as an MTV framework, using Models, Templates and Views. Let’s break down these components:
- The model portion deals with data and databases, it can retrieve, store, and change data in a database.
- The template determines how the data looks on a web page.
- The view describes the data to be presented, and passes this information to the template.
With the basics of the components explained let’s understand how they work together when we visit a Django website. When a request comes to a web server, it’s passed to Django to figure out what is requested. A client requests a URL, let’s use codecademy.com as an example, Django will take the web address and pass it to its urlresolver. Django will try to match the URL to a list of patterns, and if there is a match, then pass the request to the associated view function.
Imagine a mail carrier delivering a letter. They walk down the street checking each house number until they find the exact one on the letter. Once they find the house, they deliver the letter. That’s how the urlresolver works!
When we land on the right page, Django uses data from the model and feeds it into the view function to determine what data is shown. That data is given to the template and presented to us via the web page.
This is a bit of a simplified version of what Django is doing underneath the hood, but a key takeaway is that Django follows this MTV pattern.
Starting a Django Project
Now that we have a basic understanding of what Django is and how it works, let’s get started with creating a project. Django provides us with django-admin, a command-line utility that helps us with a variety of administrative tasks. We can use it with various commands by calling it in the terminal like this:
django-admin <command> [options]
Running django-admin help will provide a list of possible commands.
A Django project can be easily created with the startproject command. It takes a couple of options– the name of the project and optionally the directory for our project. The full command would look like this:
django-admin startproject projectname
Inside the project root folder is a Python file, manage.py, that contains a collection of useful functions used to administer the project. This file performs the same actions as django-admin but is set specifically to the project. We can do a number of things with it, such as starting a server.
Alongside the manage.py is another directory with the same name as the project. This folder is treated as a Python package because of the presence of init.py, and inside this directory contains important settings and configuration files for the project.
We’ll start a project in this exercise, and in the next exercise we will go into more detail about the specific files that are created.
Configuring Django Settings
With only a one-line command, Django has started a functioning project! Behind the scenes, Django will do all the configurations for us and store them in an inner directory with the same name as the project. Important for us are settings.py and urls.py. We can safely ignore the other files, just remember to not delete them by accident!
settings.py is a Python file that contains configurations that we’ll be editing throughout the development of our project. Inside, there is a list called INSTALLED_APPS which contains the apps that make up the Django project, more on these later. After running the startproject command, our settings.py should contain:
INSTALLED_APPS = [
  'django.contrib.admin',
  'django.contrib.auth',
  'django.contrib.contenttypes',
  'django.contrib.sessions',
  'django.contrib.messages',
  'django.contrib.staticfiles',
]
We can see that Django pre-installs some common apps for us, such as admin, authentication, sessions, and an app to help manage static files. When we create new applications for the project, we have to include them here so that Django will know about them!
Further down in settings.py, is a dictionary named DATABASES. It looks like:
DATABASES = {
  'default': {
    'ENGINE': 'django.db.backends.sqlite3',
    'NAME': BASE_DIR / 'db.sqlite3',
  }
}
We see that Django by default will set up an SQLite database for us. In later lessons, we’ll learn how to use it to store content.
Next, in the same directory where settings.py is located, is another Python file named urls.py. Inside are the URL declarations for this Django project, or a “table of contents” for the Django project. Remember earlier when we said that Django goes down a list of patterns to match a URL? This is that list!
When we first create the project, urls.py will include this:
urlpatterns = [
  path('admin/', admin.site.urls),
]
This means that the admin app already has a route.
Since the project comes pre-configured, we can start a server to test that the project works. A development server can be started by using manage.py and providing the runserver command. This command must be run in the root directory, the same directory where manage.py is located. By default, Django will start a development server with port 8000, but an alternate port can be provided as an option.
The full command will look like this:
python3 manage.py runserver
The Django development server will hot-reload as changes are made to the project, so we don’t have to keep restarting the server as we develop. The server will keep running until we stop it with the ctrl + c.
Note: Our Codecademy Django environment must run the development server on port 4001 by providing the option 0.0.0.0:4001 This port is specific to working on Codecademy. If you want to work locally on your computer, you can let Django set the default port for you.


Top comments (0)