Use the tools on your own computer to start your own HTML/CSS project!
Requirements:
- Text editor (we recommend VS Code)
- An Internet browser
Introduction
In this article, we’ll cover how to take CSS skills and use them to create a basic web page built entirely from the tools you have on your computer. Before you proceed, you should already be familiar with the basics of text editors, local files, and directories.
Step 1: Create a Folder Structure For Your Web Page
Let’s create a folder structure to support your web page. A well-designed folder structure will help you quickly navigate to the HTML or CSS files that contain your code.
First, open Finder (in Mac) or Explorer (in Windows). Next, create a folder (also known as a directory) called DevProject. This folder will contain all of the files for your HTML and CSS project.
Open the DevProject folder. Inside, create the following items:
- A new file called index.html (use your preferred text editor)
- A new folder called resources
The index.html file will contain the HTML code for your web page, while the resources folder will contain all of the necessary resources needed by the HTML files (CSS files, images, etc.).
Next, open the newly created resources folder. Inside of this folder, create the following:
- An additional folder named css The css folder will contain the CSS files needed to style your web page.
Finally, open the css folder you just created. Inside of this folder, create the following:
- A new file named index.css (use your preferred text editor)
The index.css file will contain all of the CSS styling rules that will be applied to your web page.
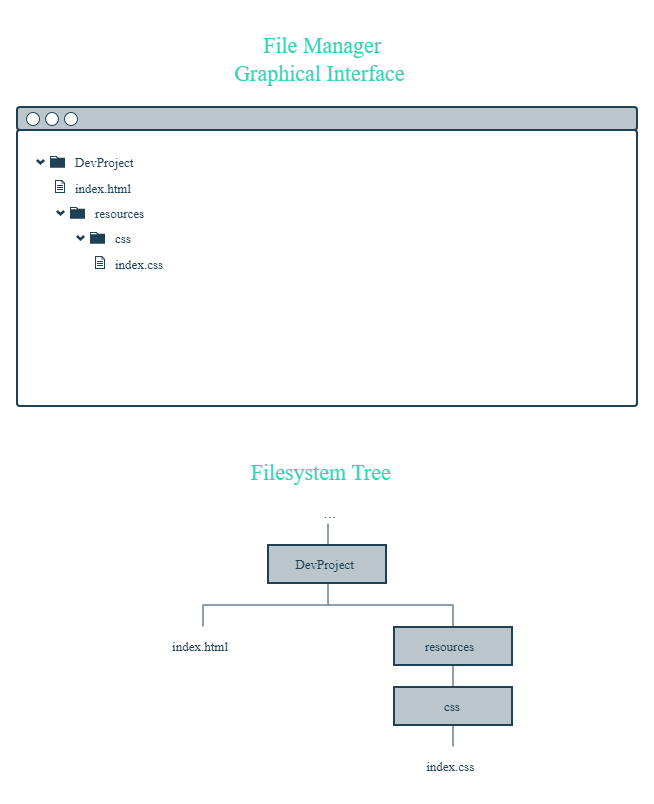
This overall folder structure will help support your workflow as you add files or resources. At a high-level, here’s what it should look like:
*Step 2: Add Content To Your Web Page *
Great! With your folder structure, HTML, and CSS files all in the right place, we can add content to the web page.
First, open the index.html file in your preferred text editor. Next, add the required boilerplate HTML code:
<!DOCTYPE html>
<html>
<head>
  <title></title>
</head>
<body>


</body>
</html>
After you add the boilerplate HTML code, feel free to also add the following items:
- Your own title between the tags
- Your own content within the tags. If you need some quick, pre-written content, feel free to use the following and modify as you wish:
<h1>FirstName LastName</h1>
<p>I'm learning to code on Codecademy! My goals include:</p>
<ul>
  <li>Learn to code</li>
  <li>Start a company</li>
  <li>Help the world</li>
</ul>
<p>This is one of my favorite websites: <a href="https://www.google.com/" target="_blank">Google</a></p>
Finally, open the index.css file in your preferred text editor. Add the following pre-written CSS rules to the file (feel free to modify as you wish):
* {
  font-family: Helvetica, Arial, sans-serif;
}


h1 {
  color: SeaGreen;
}


p,
li {
  font-size: 18px;
}


a {
  text-decoration: none;
}
Be sure to save your changes for both files!
Step 3: Link Your HTML File and CSS File
As it turns out, the HTML content you added will not be styled by the CSS rules unless index.html and index.css are linked together. In the
<link href="./resources/css/index.css" type="text/css" rel="stylesheet">
You might be wondering why the href attribute is set to ./resources/css/index.css. This is because you must specify exactly where the index.css file lives within your folder(s) relative to where index.html lives (otherwise, the two files won’t link).
Again, make sure to save your changes!
Step 4: View Your Project
Great work - let’s take a look at your web page in the browser.
Open your preferred web browser. In the menu bar, click on “File” and then click on “Open File…” (or equivalent). Navigate to your index.html file and then click “Open” (or equivalent). The browser should load your web page. What do you see?
At this point, feel free to make changes to your HTML or CSS code. Keep in mind that in order to view any new changes you make, you’ll have to refresh your browser.
Review
You successfully learned how to:
- Create a folder structure to support both your workflow and your web page
- Add HTML content and CSS styling to respective files
- Link the HTML and CSS files together
- View your web page in a browser (and refresh the browser to view new changes)
In general, the four points above are a strong starting point for your own developer workflow.
As you learn more, you may modify the workflow to fit your specific needs. At this point, feel free to modify the content of the web page or create an entirely new project.
** Happy coding!**


Top comments (2)
Want to respect the post for beginners. In all dev/coding communities beginners and newbies are not welcome, they do not know basic things and make stupid questions. So people who try to support them should be regarded.
Thanks
sure sure
I try as much as possible to have them know the basics