Kentico Kontent delivers all the benefits of a headless CMS while empowering your marketing team to manage the experience across your digital channels.
This guide showcases how to use Kontent with Next.js Static Generation to generate static pages from your Kontent data, delivering a lightning-fast experience for your users.
Following text is an extended explanation of the Statically generated blog using Next.js and Kontent repository.
Step 1: Creating a Kontent + Next.js Project
You can view a working demo, the app you will create is shown in the screenshot below:

The Next.js + Kontent demo app.
Register Kontent project
To get started, create an account on Kontent.ai. After signing up, create an empty project.
Create the content models and fill them with data
The content model defines the data structures of your application/websites. The structures are flexible and you can tailor them to your needs.
For this example, you need to create a content model that defines an author and a post content type.
You can create the content model and fill it with data manually to familiarize yourself with the Kontent user interface.
To import the content models with their data automatically, follow the next steps:
- Enter Kontent application
- Go to "Project Settings", select API keys
- Activate Management API
- Copy
Project IDandManagement APIkey - Install Kontent Backup Manager and import data to newly created project from kontent-backup.zip file (place appropriate values for
apiKeyandprojectIdarguments):
npm i -g @kentico/kontent-backup-manager
kbm --action=restore --apiKey=<Management API key> --projectId=<Project ID> --zipFilename=kontent-backup
💡 Alternatively, you can use the Template Manager UI for importing the content.
- Go to your Kontent project and publish all the imported items. > You could deactivate the Management API, it is not necessary anymore.
Application initialization
Initialize the application locally with following command:
npm init next-app --example cms-kontent nextjs-kontent-app && cd nextjs-kontent-app
Initializing a Next.js + Kontent app and entering the project directory.
Step 2: Set up Environment Variables
Copy the .env.local.example file in this directory to .env.local (which will be ignored by Git):
Then set each variable on .env.local using the keys Project settings > API keys:
-
KONTENT_PROJECT_ID- Should be the Project ID inProject settings>API keys. -
KONTENT_PREVIEW_API_KEY- One of the Preview API keys inProject settings>API keys. -
KONTENT_PREVIEW_SECRET- Can be any random string (but avoid spaces), likeMY_SECRET- this is used for Preview Mode.
After installing the required dependencies, you are now able to run and develop your Next.js + Kontent app locally.
npm install
npm run dev
yarn
yarn dev
Step 3: Understanding the Code
To understand how the app works, there are three main areas to explore:
Page Setup
Each page displays a single blog post with the dynamic Object slug and two latest blog posts teasers from Kontent:
import { useRouter } from 'next/router'
import ErrorPage from 'next/error'
import Container from '../../components/container'
import PostBody from '../../components/post-body'
import MoreStories from '../../components/more-stories'
import Header from '../../components/header'
import PostHeader from '../../components/post-header'
import SectionSeparator from '../../components/section-separator'
import Layout from '../../components/layout'
import {
  getAllPostSlugs,
  getPostBySlug,
  getMorePostsForSlug,
} from '../../lib/api'
import PostTitle from '../../components/post-title'
import Head from 'next/head'
import { CMS_NAME } from '../../lib/constants'

export default function Post({ post, morePosts = [], preview }) {
  const router = useRouter()
  if (!router.isFallback && !post?.slug) {
    return <ErrorPage statusCode={404} />
  }
  return (
    <Layout preview={preview}>
      <Container>
        <Header />
        {router.isFallback ? (
          <PostTitle>Loading…</PostTitle>
        ) : (
          <>
            <article className="mb-32">
              <Head>
                <title>
                  {post.title} | Next.js Blog Example with {CMS_NAME}
                </title>
                <meta property="og:image" content={post.coverImage.url} />
              </Head>
              <PostHeader
                title={post.title}
                coverImage={post.coverImage}
                date={post.date}
                author={post.author}
              />
              <PostBody content={post.content} />
            </article>
            <SectionSeparator />
            {morePosts.length > 0 && <MoreStories posts={morePosts} />}
          </>
        )}
      </Container>
    </Layout>
  )
}

export async function getStaticProps({ params, preview = null }) {
  return await Promise.all([
    getPostBySlug(params.slug, preview),
    getMorePostsForSlug(params.slug, preview),
  ]).then((values) => ({
    props: {
      post: values[0],
      morePosts: values[1],
      preview,
    },
  }))
}

export async function getStaticPaths() {
  const slugs = await getAllPostSlugs(['slug'])
  return {
    paths: slugs.map(
      (slug) =>
        ({
          params: {
            slug,
          },
        } || [])
    ),
    fallback: false,
  }
}
The pages/posts/[slug].js file for your Next.js +
Kontent app.
Retrieving Content
Kontent data is retrieved in the lib/api.js file making requests to the Kontent Delivery API using the Kontent Delivery SDK.
import { DeliveryClient } from '@kentico/kontent-delivery'
import { name, version } from '../package.json'

const sourceTrackingHeaderName = 'X-KC-SOURCE'

const client = new DeliveryClient({
  projectId: process.env.KONTENT_PROJECT_ID,
  previewApiKey: process.env.KONTENT_PREVIEW_API_KEY,
  globalHeaders: (_queryConfig) => [
    {
      header: sourceTrackingHeaderName,
      value: `@vercel/next.js/example/${name};${version}`,
    },
  ],
})

function parseAuthor(author) {
  return {
    name: author.name.value,
    picture: author.picture.value[0].url,
  }
}

function parsePost(post) {
  return {
    title: "post.title.value,"
    slug: post.slug.value,
    date: post.date.value.toISOString(),
    content: post.content.value,
    excerpt: post.excerpt.value,
    coverImage: post.cover_image.value[0].url,
    author: parseAuthor(post.author.value[0]),
  }
}

export async function getAllPostSlugs() {
  const postsResponse = await client
    .items()
    .type('post')
    .elementsParameter(['slug'])
    .toPromise()

  return postsResponse.items.map((post) => post.slug.value)
}

export async function getMorePostsForSlug(slug, preview) {
  return client
    .items()
    .queryConfig({
      usePreviewMode: !!preview,
    })
    .type('post')
    .orderByDescending('elements.date')
    .withParameter('elements.slug[neq]', slug)
    .limitParameter(2)
    .toPromise()
    .then((res) => {
      return res.items.map((post) => parsePost(post))
    })
}

export async function getPostBySlug(slug, preview) {
  const post = await client
    .items()
    .queryConfig({
      usePreviewMode: !!preview,
    })
    .type('post')
    .equalsFilter('elements.slug', slug)
    .toPromise()
    .then((result) => result.getFirstItem())
    .then((post) => parsePost(post))
  return post
}

export async function getAllPosts(preview) {
  return await client
    .items()
    .queryConfig({
      usePreviewMode: !!preview,
    })
    .type('post')
    .orderByDescending('elements.date')
    .toPromise()
    .then((postsResponse) => postsResponse.items.map((post) => parsePost(post)))
}
The lib/api.js file for your Next.js + Kontent app.
Image Transformation possibilities
If you want to optimize the speed of your site, it is possible to use Kontent Image Transformation API to transform retrieved images and reduce the download time for images. This could be applied to the blog post's cover image or the author's profile picture. The easiest way is to use the Image transformation support in Kontent Delivery SDK.
import cn from 'classnames'
import Link from 'next/link'
import {
  ImageUrlBuilder,
  ImageCompressionEnum,
  ImageFormatEnum,
} from '@kentico/kontent-delivery'

export default function CoverImage({ title, src, slug }) {
  const transformedSrc = new ImageUrlBuilder(src)
    .withCompression(ImageCompressionEnum.Lossless)
    .withAutomaticFormat(ImageFormatEnum.Webp)
    .withQuality(80)
    .getUrl()

  const image = (
    <img
      src={transformedSrc}
      alt={`Cover Image for ${title}`}
      className={cn('shadow-small', {
        'hover:shadow-medium transition-shadow duration-200': slug,
      })}
    />
  )
  return (
    <div className="-mx-5 sm:mx-0">
      {slug ? (
        <Link as={`/posts/${slug}`} href="/posts/[slug]">
          <a aria-label={title}>{image}</a>
        </Link>
      ) : (
        image
      )}
    </div>
  )
}
Possible modification of
components/cover-image.js
component using Image Transformation API to get images in
modern WebP format.
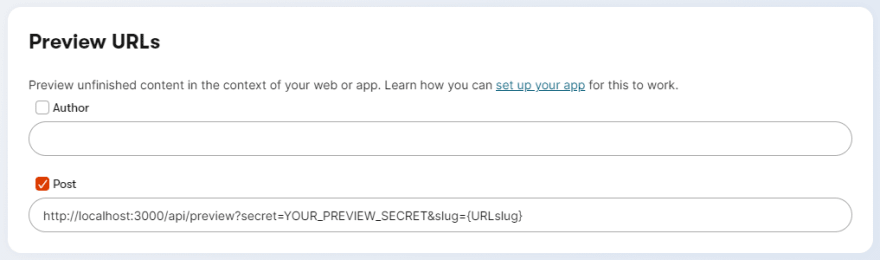
Step 4: Using Preview Mode
To add the ability to preview content from your Kontent project using Preview Delivery API, open your Kontent project, go to Project Settings > Preview URLs, and set a new preview URL for the Post content type to:
http://localhost:3000/api/preview?secret=<KONTENT_PREVIEW_SECRET>&slug={URLslug}
Replace
<KONTENT_PREVIEW_SECRET>with its respective value in.env.local:
Once saved, go to one of the posts you've created and:
- Create a new version of the post
-
Update the title. For example, you can add
[Draft]in front of the title. > Mind the title also regenerates the URL slug, if you want to change any other field that does not influence the URL slug, feel free to do so. - Do not publish it. By doing this, the post will be in the draft workflow step.
- On the menu, you will see the Preview button. Click on it!

You will now be able to see the updated title. To exit preview mode, you can click on Click here to exit preview mode at the top of the page.
Step 5: Deploying Your App with Vercel
To deploy your Next.js + Kontent site with a Vercel for Git Integration, make sure it has been pushed to a Git repository.
During the import process, you will need to add the following environment variables:
- KONTENT_PROJECT_ID
- KONTENT_PREVIEW_API_KEY
- KONTENT_PREVIEW_SECRET
Import the project into Vercel using your Git Integration of choice:
After your project has been imported, all subsequent pushes to branches will generate Preview Deployments, and all changes made to the Production Branch (commonly "main") will result in a Production Deployment.
Once deployed, you will get a URL to see your site live, such as the following: https://next-blog-kontent.vercel.app/
Set up a Next.js + Kontent site with a few clicks using the Deploy button, and create a Git repository for it in the process for automatic deployments for your updates.
If you want to explore a more complex example for Kentico Kontent and Next.js, check out this Corporate Starter.
Kentico / kontent-starter-corporate-next-js
Next.js corporate starter site using Kentico Kontent as a data source.


Top comments (0)