
Few months ago, I was trying to setup a pipeline for a Laravel project that I was working on, but I encountered some issues, I wasn't able to get an article that explains the process to a beginner, the Whys and Hows you know, but I was able to get it done.
In this article, I would explain the process like one would do to a beginner.
Setting up a Pipeline for a PHP or a Laravel project is easier than you might think, the prerequisite for this article are;
- Docker (Install docker on your computer, we'd be using a Jenkins image and setting up Laravel and PHP in the container).
- Jenkins (Don't install yet, we would be doing this later in the article).
- Basic understanding of Docker and Jenkins generally.
Now, let's get our hands dirty!
First of all, we need to find a suitable Jenkins image that we can use, visit hub.docker.com and search for Jenkins.

We would be using that one above, just get the tag you need, let's follow the steps below.
1. Build our Jenkins Docker Container
We need to Setup Jenkins on Docker and Install PHP and Laravel.
Open your text editor and Create a Dockerfile.
FROM jenkins/jenkins:centos7

USER root
We used the jenkins/jenkins:centos7, this image is using cent-os based on RHEL (Red Hat Enterprise Linux), you can decide to use image tag you prefer.
You can go ahead and build the image for now using docker image build -t jenkins-laravel .
The command builds the Dockerfile in your current directory (.) then tag the image as jenkins-laravel.
2. Setup PHP and Remi Repository in the Dockerfile
FROM jenkins/jenkins:centos7

USER root

RUN yum -y install epel-release
RUN rpm -Uvh http://rpms.famillecollet.com/enterprise/remi-release-7.rpm
RUN yum-config-manager --enable remi-php74
RUN yum install php php-mbstring php-xml php-pdo php-pdo_mysql php-xdebug -y
RUN yum update -y
We added few lines to the Dockerfile, what the lines do is to setup the Remi RPM repository on cent-os, this allow us to be able to install PHP, and then install PHP on it.
So far we have setup Jenkins and PHP on the same image, this means we can run PHP commands right from Jenkins Pipeline Console, but PHP is not enough, we need to install Composer too.
3. Setting up Composer in the Dockerfile
FROM jenkins/jenkins:centos7

USER root

RUN yum -y install epel-release
RUN rpm -Uvh http://rpms.famillecollet.com/enterprise/remi-release-7.rpm
RUN yum-config-manager --enable remi-php74
RUN yum install php php-mbstring php-xml php-pdo php-pdo_mysql php-xdebug -y
RUN yum update -y
RUN cd /tmp
RUN curl -sS https://getcomposer.org/installer | php
RUN mv composer.phar /usr/local/bin/composer
The last few lines installs Composer, curl downloads the composer file and pipes it to PHP CLI., then the last line, we moved the actual downloaded composer file, composer.phar to /usr/local/bin/composer, this makes composer to be able to run with just typing composer in the terminal.
Everything is setup now, run docker image build -t jenkins-laravel ., we can now run PHP and composer commands right inside Jenkins Pipeline Console and this is all we need to setup Laravel.
It might take a while to get those images, just be patient, when it finishes, continue the article.
Now let us the launch our Container from the terminal with the new image we created.
docker run -d -p 4000:8080 --name jenkins jenkins-laravel
This runs our created Jenkins Image tagged jenkins-laravel in a detached mode and mapped the port 4000 on your host machine to the Container's port 8080.
After running this command, you would see an output of strings, that is the container ID, this means our container is now running in detached mode.
To access it, open your browser and visit http://localhost:4000, where 4000 is the port you mapped to your container.
You should see this screen if all went well.

Getting the Password for Jenkins
Run docker exec jenkins cat /var/jenkins_home/secrets/initialAdminPassword, copy the output and paste it in the password section on your Jenkins, then install suggested plugins.
If you can see this then you are good to go.

Let's create a Pipeline
Click on New Item on the Sidebar, give the Item a name and select Pipeline then click on OK.
Give it a description, just anything is OK for now.
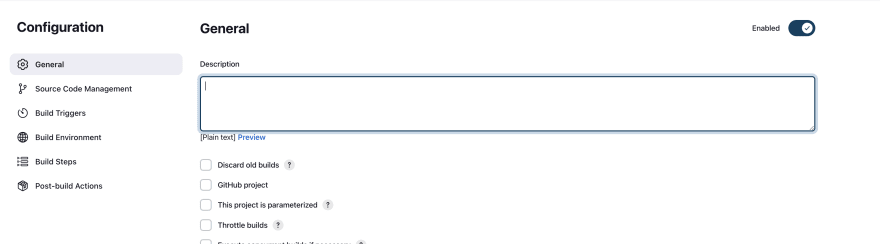
Scroll down to the Pipeline section and make sure Pipeline Script is selected.

Paste these codes in there.
pipeline {
    agent any

    stages {
        stage('Build') {
            steps {
                git 'https://github.com/Kennibravo/jenkins-laravel.git'
                sh 'composer install'
                sh 'cp .env.example .env'
                sh 'php artisan key:generate'
            }
        }
        stage('Test') {
            steps {
                sh './vendor/bin/phpunit'
            }
        }
    }
}
Quick explanation on what the codes actually does
    stages {
        stage('Build') {
            steps {
                git 'https://github.com/Kennibravo/jenkins-laravel.git'
                sh 'composer install'
                sh 'cp .env.example .env'
                sh 'php artisan key:generate'
            }
        }
        stage('Test') {
            steps {
                sh './vendor/bin/phpunit'
            }
        }
    }
The laravel project is just basic laravel boilerplate codes, nothing else.
- Stages: We defined all steps needed in our Pipeline here.
- Stage: You can notice that we have two stage (Build and Test) inside the stages{} braces, in the Build stage, we cloned the https://github.com/Kennibravo/jenkins-laravel.git github repo, then run composer install and do other necessary things.
Don't forget we already installed Composer and Jenkins in the same container, so Jenkins can use the composer command.

After this, click on Save.
It takes you here.

We've created our Pipeline, now we need to launch it, to launch it, click on Build Now in the sidebar, then the Pipeline starts.
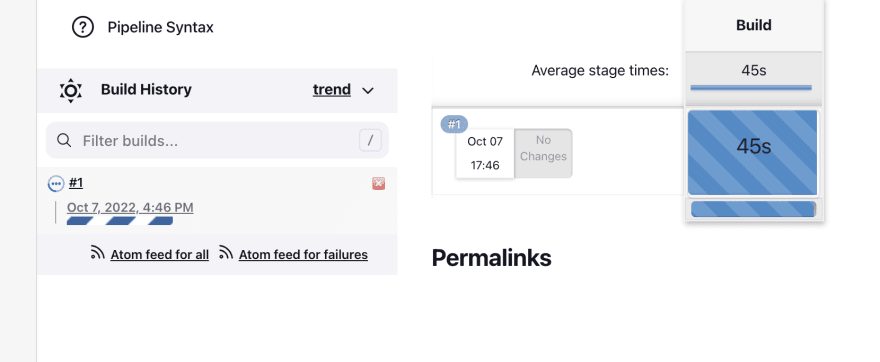
To see what's going on, click on that #1, then Console Output.
If your Pipeline was successful, you should see this.

You can see the two stages we created, Build and Test, if the pipeline fails, try checking the Console Output to see what's wrong.
Note that there are more to creating CI/CD pipelines to this, this article just covered the basics for you.
This brings us to the end of this article, if you enjoyed, you can add a Reaction or drop a comment if you had any issues or questions.
Thanks for reading. 😃


Latest comments (2)
Very nice article, can you create another one for NodeJS(Express.js) or Python(Django or Flask)?
Alright, I'd look at that. 👍