In the previous post, I created new react application by using TypeScript template. In this article, I add Redux.
Redux Toolkit
I can use normal redux module, but there is a toolkit which is TypeScript friendly. So I decided to Redux Toolkit which is an official, opinionated, batteries-included toolset for efficient Redux development.
React-Redux hook
Redux Toolkit Advanced page shows me how I can use hook to simplify the component without using traditional connect function. I will try it later but as my project still use traditional way, I stick with connect in this article.
Update the application
Let's change the sample app to use redux from static "hello react" page. I will create "voting" app which I can vote to cat or dog.
Create Redux Store
First of all, I need redux store.
1. Install dependencies.
npm install react-redux @types/react-redux @reduxjs/toolkit
2. Add redux folder in src folder where I put all redux code, then add reducer folder.
3. Add voteSlice.ts in the reducer folder. This is simple basic slicer which contains two actions: increment and decrement. Refer to Create Slice for more detail.
/// voteSlice.ts


import { createSlice, PayloadAction } from '@reduxjs/toolkit';

export interface CountState {
    catCount: number;
    dogCount: number;
}

const initialState: CountState = { catCount: 0, dogCount: 0 };

const voteSlice = createSlice({
    name: 'vote',
    initialState: initialState,
    reducers: {
        increment(state: CountState, action: PayloadAction<string>) {
            action.payload === 'cat' ? state.catCount++ : state.dogCount++;
        },
        decrement(state: CountState, action: PayloadAction<string>) {
            action.payload === 'cat' ?
                state.catCount = state.catCount > 0 ? state.catCount - 1 : 0 :
                state.dogCount = state.dogCount > 0 ? state.dogCount - 1 : 0;
        },
    }
});

export const { increment, decrement } = voteSlice.actions;
export default voteSlice.reducer;
4. Add another file, rootReducer.ts, in the reducer folder. This is a place where I can combine multiple reducers, though I only have one for now. I also export state type as well.
///rootReducer.ts

import { combineReducers } from '@reduxjs/toolkit';
import voteReducer from './voteSlice';

const rootReducer = combineReducers({
    vote: voteReducer
});

export type RootState = ReturnType<typeof rootReducer>;
export default rootReducer;
5. Add store.ts in redux folder. See Using ConfigureStore with Typescript for more detail.
///store.ts
import { configureStore } from '@reduxjs/toolkit';
import rootReducer from './reducer/rootReducer';

const store = configureStore({
    reducer: rootReducer
});

export type AppDispatch = typeof store.dispatch;
export default store;
Update the application
Next, update the application to use it.
1. Update index.tsx to use redux and the store. This is same as normal redux which wrap the root with Provider and pass the store.
/// index.tsx

import React from 'react';
import ReactDOM from 'react-dom';
import './index.css';
import App from './App';
import * as serviceWorker from './serviceWorker';
import { Provider } from 'react-redux';
import store from './redux/store';

ReactDOM.render(
    <Provider store={store}>
        <App />
    </Provider>,
    document.getElementById('root'));

    // If you want your app to work offline and load faster, you can change
    // unregister() to register() below. Note this comes with some pitfalls.
    // Learn more about service workers: https://bit.ly/CRA-PWA
    serviceWorker.unregister();
2. Update App.tsx next.
- MyProps holds voting information and actions
- Map state and dispatches, then connect
- Update JSX to display vote results (only increment this time)
/// App.tsx

import React from 'react';
import logo from './logo.svg';
import './App.css';
import { connect } from 'react-redux';
import { RootState } from './redux/reducer/rootReducer';
import { increment, decrement } from './redux/reducer/voteSlice';

type MyProps = {
  catCount: number;
  dogCount: number;
  increment: any;
  decrement: any;
};

class App extends React.Component<MyProps> {

  render() {
    return (
      <div className="App">
        <header className="App-header">
          <p>
            cat: {this.props.catCount}      <br />
            dog: {this.props.dogCount}
          </p>
          <button onClick={() => this.props.increment('cat')}>Vote Cat</button>
          <button onClick={() => this.props.increment('dog')}>Vote Dog</button>
          <img src={logo} className="App-logo" alt="logo" />
          <a
            className="App-link"
            href="https://reactjs.org"
            target="_blank"
            rel="noopener noreferrer"
          >
            Learn React
          </a>
        </header>
      </div>
    );
  }
}

const mapStateToProps = (state:RootState) => ({
  catCount: state.vote.catCount,
  dogCount: state.vote.dogCount,
})
const mapDispatchToProps = { increment, decrement };

export default connect(mapStateToProps, mapDispatchToProps)(App);
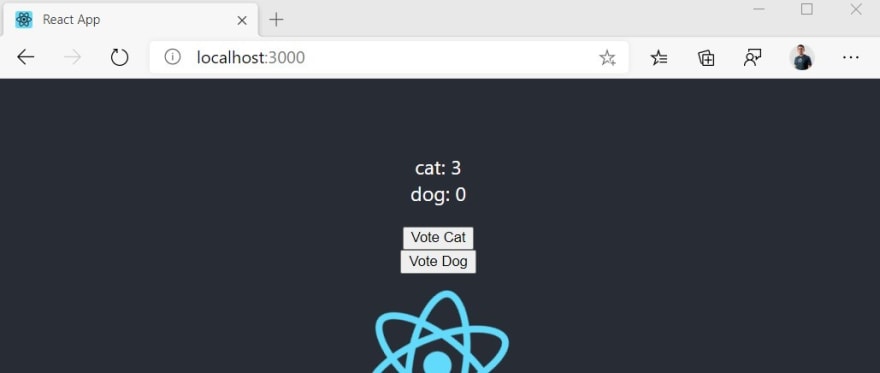
3. Run the application to see if it works as expected.
Test for Redux
Typically redux has action creator and reducer as separate object and I need to test both. But I use Slice from Redux Toolkit this time, so I simply test slice this time.
1. Add voteSlice.test.ts in the same folder as voteSlice.ts. I use same test framework as previous article.
- Use initialState to modify the current state
///voteSlice.test.ts
import vote, { increment, decrement, CountState } from './voteSlice'
import { PayloadAction } from '@reduxjs/toolkit';

it('handle increment for cat', () => {
  const action: PayloadAction<string> = {
    type: increment.type,
    payload: 'cat'
  };
  expect(vote(undefined, action)).toEqual({ "catCount": 1, "dogCount": 0 })
});

it('handle increment for dog', () => {
  const action: PayloadAction<string> = {
    type: increment.type,
    payload: 'dog'
  };
  expect(vote(undefined, action)).toEqual({ "catCount": 0, "dogCount": 1 })
});

describe('handle decrement for cat', () => {
  it('handle decrement for cat when catCount > 0', () => {
    const initialState: CountState = {
      catCount: 1,
      dogCount: 1
    };
    const action: PayloadAction<string> = {
      type: decrement.type,
      payload: 'cat'
    };
    expect(vote(initialState, action)).toEqual({ "catCount": 0, "dogCount": 1 })
  });

  it('handle decrement for cat when catCount already 0', () => {
    const initialState: CountState = {
      catCount: 0,
      dogCount: 1
    };
    const action: PayloadAction<string> = {
      type: decrement.type,
      payload: 'cat'
    };
    expect(vote(initialState, action)).toEqual({ "catCount": 0, "dogCount": 1 })
  });
});

describe('handle decrement for dog', () => {
  it('handle decrement for dog when dogCount > 0', () => {
    const initialState: CountState = {
      catCount: 1,
      dogCount: 1
    };
    const action: PayloadAction<string> = {
      type: decrement.type,
      payload: 'dog'
    };
    expect(vote(initialState, action)).toEqual({ "catCount": 1, "dogCount": 0 })
  });

  it('handle decrement for dog when dogCount already 0', () => {
    const initialState: CountState = {
      catCount: 1,
      dogCount: 0
    };
    const action: PayloadAction<string> = {
      type: decrement.type,
      payload: 'dog'
    };
    expect(vote(initialState, action)).toEqual({ "catCount": 1, "dogCount": 0 })
  });
});
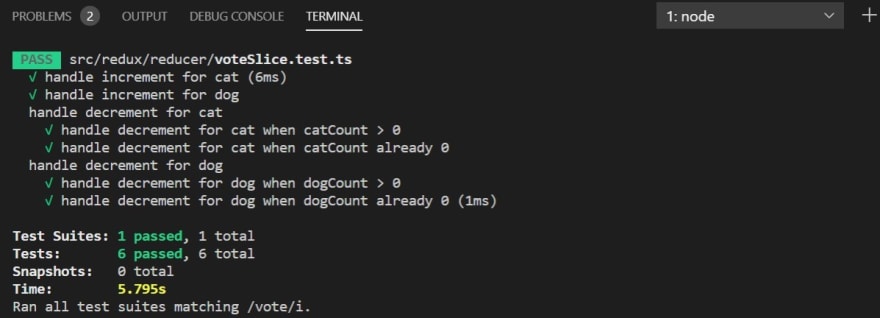
2. Run the test by npm test. The App test shall fail but I still can see if above test succeeded or not.
Test for App.tsx
According to Redux documentation, it suggest export the component itself, not with connect.
In order to be able to test the App component itself without having to deal with the decorator, we recommend you to also export the undecorated component:
So let's try this first.
1. Add export to App class in App.tsx
export class App
2. Update App.test.tsx. In this test, I check rendering result and if the function has been called with expected parameter.
- Wrap App as it's not default export
- Pass props
/// App.test.tsx

import React from 'react';
import { render, fireEvent } from '@testing-library/react';
import { App } from './App';

it('should render vote into', () => {
    const { getByText } = render(<App catCount={1} dogCount={1} increment={jest.fn()} decrement={jest.fn()} />);
    const catVote = getByText(/cat: 1/);
    const dogVote = getByText(/cat: 1/);
    expect(catVote).toBeInTheDocument();
    expect(dogVote).toBeInTheDocument();
});

it('should call increment function with cat parameter', async () => {
    const increment = jest.fn();
    const { getByText } = render(<App catCount={1} dogCount={1} increment={increment} decrement={jest.fn()} />);

    // Get Vote Cat Button and fire click event
    fireEvent.click(getByText(/Vote Cat/));
    expect(increment).toBeCalledWith('cat');
    expect(increment).toBeCalledTimes(1);
});

it('should call increment function with dog parameter', async () => {
    const increment = jest.fn();
    const { getByText } = render(<App catCount={1} dogCount={1} increment={increment} decrement={jest.fn()} />);

    // Get Vote Cat Button and fire click event
    fireEvent.click(getByText(/Vote Dog/));
    expect(increment).toBeCalledWith('dog');
    expect(increment).toBeCalledTimes(1);
});
3. Run test and see results.

Summary
In this article, I added redux by using Redux Toolkit, but I didn't take advantage of the latest feature on purpose so that my test here is relevant to my work.
In the next article, I setup DevOps pipeline in Azure DevOps.


Top comments (0)