
C# is great that it can run pretty much anywhere.
- Web App
- Local Service/Console
- Mix Reality devices
- Mobile App
Yes, for mobile, I can use Xamarin to write iOS and Android application. Then the question is how Azure and GCP support mobile application development.
In this article, I look into Azure Mobile App service.
Azure Mobile Apps
It is not single service, but it contains multiple services to optimize mobile development experience which are:

Key Features for Developer
It offers several key features for mobile application development.
- Multi-platform: It provides SDK for native Windows/iOS/Android applications, as well as Xamarin/Cordova applications.
- Authentication: With SSO, easy to access backend services and data in Enterprise.
- Data access: OData v3 support for data sources for many data sources.
- Offline: Support offline mode and synchronization capability when goes back to online.
- Notification: Notify to mobile devices.
Key Features for Operation
In addition to Developer Experience, it offers operation features such as:
- Autoscaling: It is Web Apps base, so easy to auto scale.
- Staging: Support multiple versions for A/B testing, UI testing, etc.
- Continuous Deployment: Support integration with many SCM to support DevOps.
- Networking: Support virtual network so that it easily talks to On-Premise systems.
Try it!
Time to write code!! This time, I use pre-configured sample application.
Get sample code
1. Go to Azure Portal and create new resource. Search "Mobile App" and create.

2. Once it is created, go to the resource and select "Quick Start". Select any sample you want to try. I did select "Windows (C#)" here.

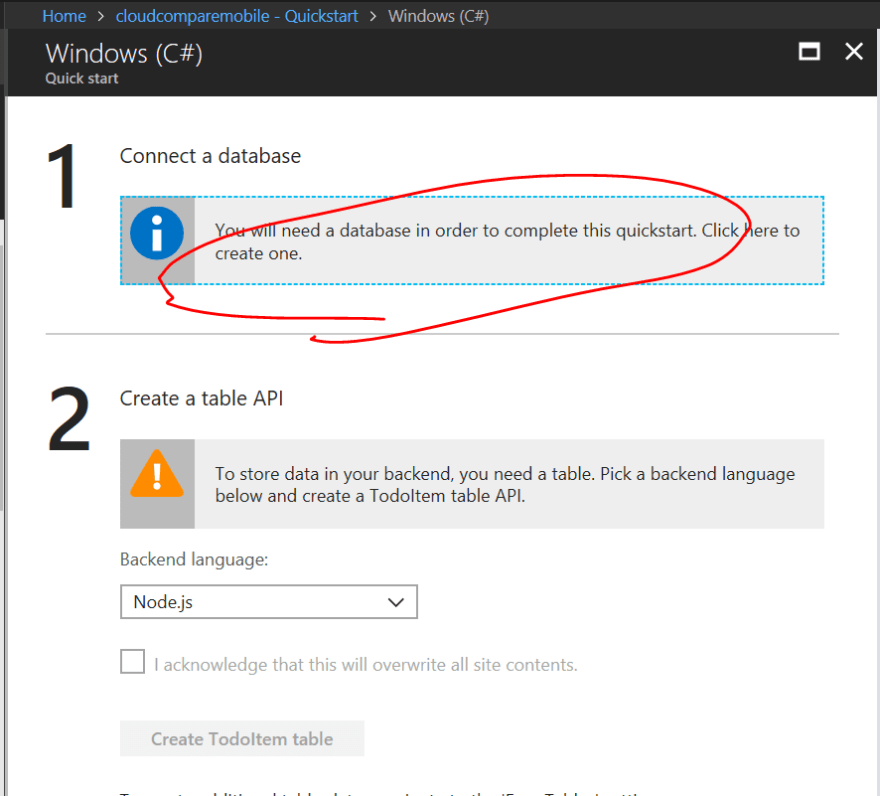
3. Follow the wizard to complete. First of all, create database. Click the "Connect a database" area.
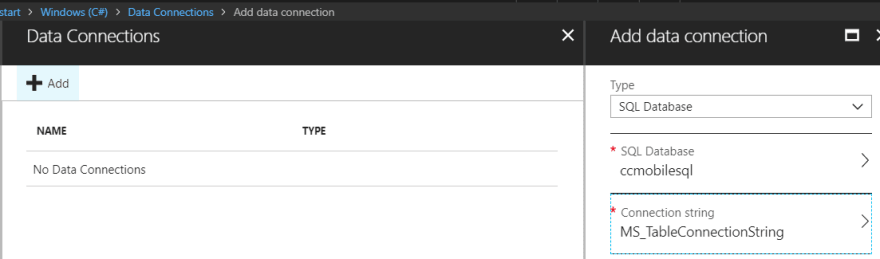
4. Click "Add" and create any database type you want. I selected "SQL" and follow the wizard to add new one, or select existing.
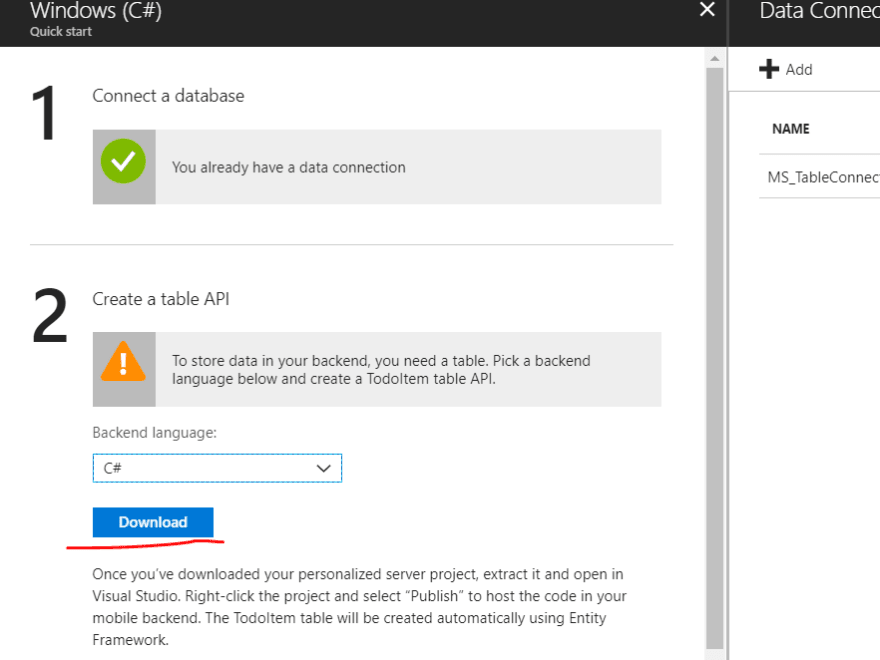
5. Next, in "Create a table API", select a language you want. I picked C# and click "Download". This is your server side code.
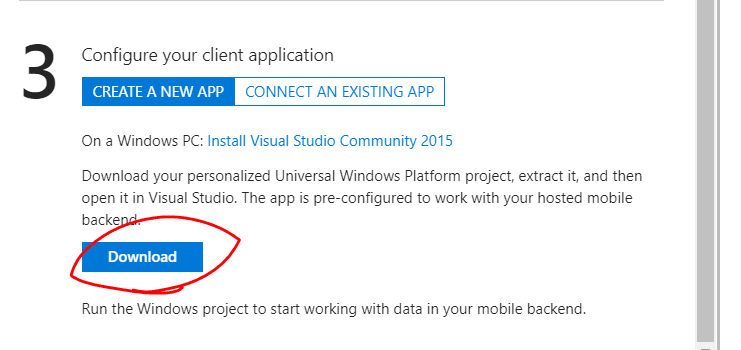
6. In "Configure your client application", click "CREATE NEW APP" and click "Download". This is your client.
7. Extract both zip files we just downloaded.
Deploy backend
First of all, I deploy backend service.
1. Open server side sample code solution via Visual Studio.
2. Open Web.config and make sure the connection string name is what you specified.
2. Right click the project and click "Publish".
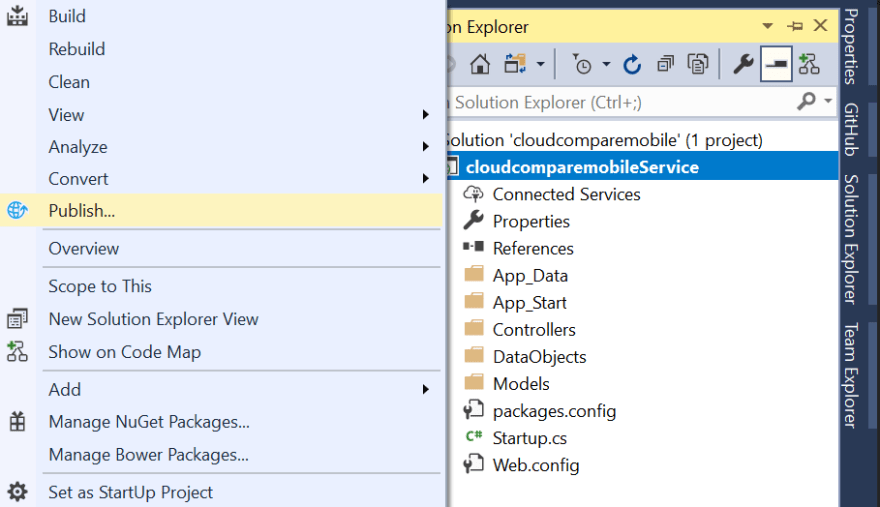
3. Check "Select Existing" for "Microsoft Azure App Service" and click "Publish".

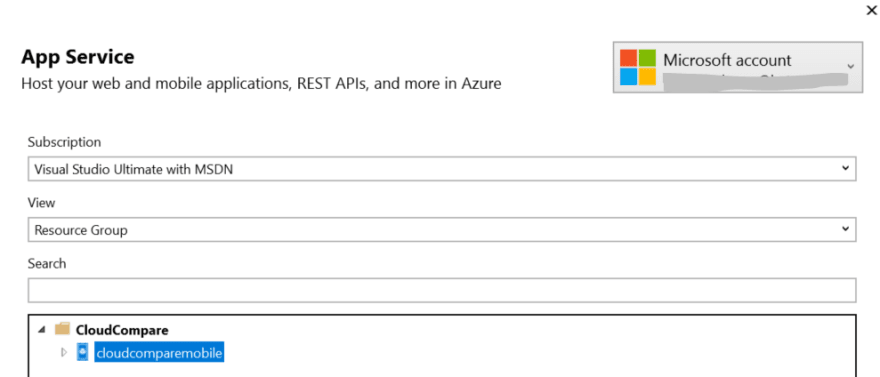
4. Select the mobile app resource you created, and click "OK".
Run client
As backend is up and running, next, run the client.
1. Open client side sample code solution via Visual Studio and press "F5" to start debugging the application.
2. Enter todo item in the screen and hit Enter.

3. Confirm new item added. You can delete the item by clicking it which indicates you completed the item.

Add Offline
The basic usage is simple. Now add offline capability.
1. Open MainPage.xaml.cs in client sample. There is instruction how to enable offline capability in the comment.

2. Right click the project and select "Manage Nuget Packages", then install "Microsoft.Azure.Mobile.Client.SQLiteStore". Also, apply all updates.

3. Uncomment #define OFFLINE_SYNC_ENABLED as instruction said.
4. In addition, update the code to use try/catch for all PushAsync method.
try
{
    await App.MobileService.SyncContext.PushAsync();
}
catch (MobileServicePushFailedException ex)
{
    if (ex.PushResult.Status == MobileServicePushStatus.CancelledByNetworkError)
    {
        // ignore
    }
}
5. Run the application, then make the device offline. Add several items.

6. Back to online and check the Azure SQL first before sync. "Try offline sync" is created when I was online, thus no item added while I am offline yet.
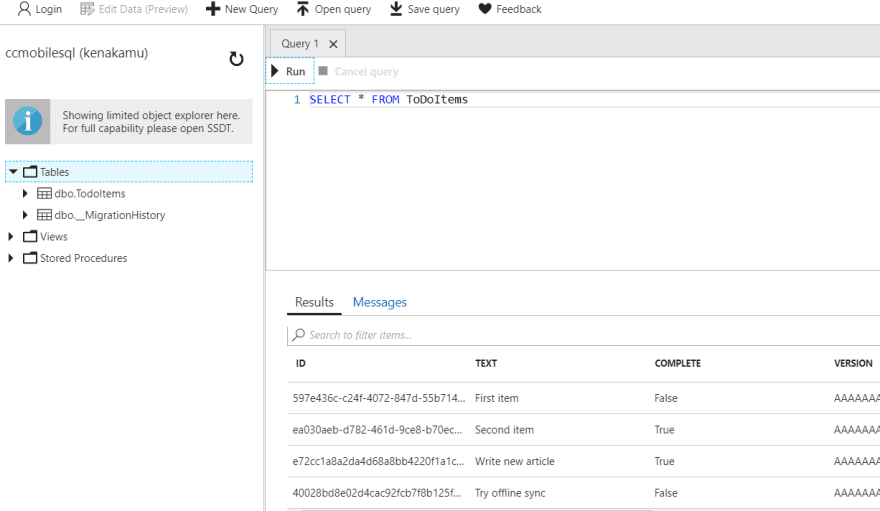
7. Click "Refresh" on the client and query database again. I can see all the items are synchronized.

Add Authentication
This time, I use Facebook to authenticate user.
Configure Facebook Login.
1. Refer the document here to register the application.
2. Once you configure the Facebook application, go to back azure portal and select the mobile app. Click "Authentication/Authorization" section and click "Facebook".
3. Enter facebook App Id and Secret you configured and click OK.
4. In the "ALLOWED EXTERNAL REDIRECT URLS", enter the value as "cloudcompare://easyauth.callback". I use "cloudcompare" as protocol to invoke my application.

Update code
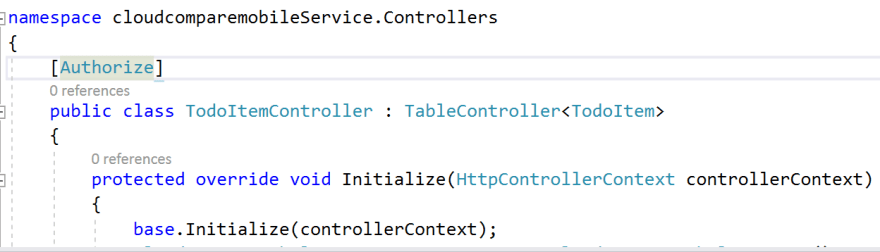
1. Go to back-end project and open ToDoItemController.cs. Add [Authorize] attribute at class level.
2. Publish the back-end.
3. Go to client project and open MainPage.xaml.cs. Add following method. This code authenticates the user with a Facebook login. If you are using an identity provider other than Facebook, change the value of MobileServiceAuthenticationProvider above to the value for your provider.
// Define a member variable for storing the signed-in user.
private MobileServiceUser user;

// Define a method that performs the authentication process
// using a Facebook sign-in.
private async System.Threading.Tasks.Task<bool> AuthenticateAsync()
{
    string message;
    bool success = false;
    try
    {
        // Change 'MobileService' to the name of your MobileServiceClient instance.
        // Sign-in using Facebook authentication.
        user = await App.MobileService
            .LoginAsync(MobileServiceAuthenticationProvider.Facebook, "cloudcompare");
        message =
            string.Format("You are now signed in - {0}", user.UserId);

        success = true;
    }
    catch (InvalidOperationException)
    {
        message = "You must log in. Login Required";
    }

    var dialog = new MessageDialog(message);
    dialog.Commands.Add(new UICommand("OK"));
    await dialog.ShowAsync();
    return success;
}
4. Replace the OnNavigatedTo method to support auth.
protected override async void OnNavigatedTo(NavigationEventArgs e)
{
    if (e.Parameter is Uri)
    {
        App.MobileService.ResumeWithURL(e.Parameter as Uri);
    }
}
5. Add login button clicked event. I will add actual button later.
private async void ButtonLogin_Click(object sender, RoutedEventArgs e)
{
    // Login the user and then load data from the mobile app.
    if (await AuthenticateAsync())
    {
        // Switch the buttons and load items from the mobile app.
        ButtonLogin.Visibility = Visibility.Collapsed;
        ButtonSave.Visibility = Visibility.Visible;
        await InitLocalStoreAsync(); //offline sync support.
        await RefreshTodoItems();
    }
}
6. Open MainPage.xaml and add login under save.
<Button Name="ButtonLogin" Visibility="Visible" Margin="0,8,8,0"
        Click="ButtonLogin_Click" TabIndex="0">
    <StackPanel Orientation="Horizontal">
        <SymbolIcon Symbol="Permissions"/>
        <TextBlock Margin="5">Sign in</TextBlock>
    </StackPanel>
</Button>
7. Open App.xaml.cs and add OnActivated method.
protected override void OnActivated(IActivatedEventArgs args)
{
    if (args.Kind == ActivationKind.Protocol)
    {
        ProtocolActivatedEventArgs protocolArgs = args as ProtocolActivatedEventArgs;
        Frame content = Window.Current.Content as Frame;
        if (content.Content.GetType() == typeof(MainPage))
        {
            content.Navigate(typeof(MainPage), protocolArgs.Uri);
        }
    }
    Window.Current.Activate();
    base.OnActivated(args);
}
8. I need to add protocol activation. Double click Package.appxmanifest and select "Declarations". Then select "protocol" and click "Add".

9. Enter "cloudcompare" to Name field and save.

Test authentication
All set, now test it!
1. Run the client by pressing F5 and click "SignIn".
2. When you navigated to facebook login page, login. If succeeded, you see the popup message indicating you signed in.

3. Now I can do any operation as I am authenticated.
Push Notification
Okay, the last feature is push notification. Let's do it.
Create and configure Notification Hub for the application
I need to create the service and associate it with mobile app and client app.
1. Go to Azure Portal and select the mobile app service. Then, click "Push" menu.

2. Click "Connect" button and add Notification Hub.

3. Once Notification Hub deployed, enable notification to the app. Go to client project, right click the project and select Store | Associate App with the Store.

4. Reserve the application name. I use "CloudCompareMobile" as its name.
5. Once association done, go to Windows Dev Center and login by using the same account you use azure. Select the reserved application.
6. Click App management | WNS/MPNS and click "Live Services Site" link.

7. Copy the Application Secret and Package SID.
8. Go back to Azure Portal, and select Notification Hub you just created. Then select "Windows" from the menu. Enter SID and key which you just obtained.

Update code
Next, update back-end code to enable push.
1. Go to back-end project and add Microsoft.Azure.NotificationHubs NuGet package.

2. Open TodoItemContoller.cs and add using statements.
using System.Collections.Generic;
using Microsoft.Azure.NotificationHubs;
using Microsoft.Azure.Mobile.Server.Config;
3. In PostTodoItem method, insert the following code after InsertAsync. It defines toast format and send it to notification hub.
// Get the settings for the server project.
HttpConfiguration config = this.Configuration;
MobileAppSettingsDictionary settings =
    this.Configuration.GetMobileAppSettingsProvider().GetMobileAppSettings();

// Get the Notification Hubs credentials for the Mobile App.
string notificationHubName = settings.NotificationHubName;
string notificationHubConnection = settings
     .Connections[MobileAppSettingsKeys.NotificationHubConnectionString].ConnectionString;

// Create the notification hub client.
NotificationHubClient hub = NotificationHubClient
    .CreateClientFromConnectionString(notificationHubConnection, notificationHubName);

// Define a WNS payload
var windowsToastPayload = @"<toast><visual><binding template=""ToastText01""><text id=""1"">"
                        + item.Text + @"</text></binding></visual></toast>";
try
{
    // Send the push notification.
    var result = await hub.SendWindowsNativeNotificationAsync(windowsToastPayload);

    // Write the success result to the logs.
    config.Services.GetTraceWriter().Info(result.State.ToString());
}
catch (System.Exception ex)
{
    // Write the failure result to the logs.
    config.Services.GetTraceWriter()
        .Error(ex.Message, null, "Push.SendAsync Error");
}
4. Publish the server.
5. Go to client project and open App.xaml.cs. Add using statements.
using System.Threading.Tasks;
using Windows.Networking.PushNotifications;
6. Add following method in App class, which register the application to the notification hub.
private async Task InitNotificationsAsync()
{
    // Get a channel URI from WNS.
    var channel = await PushNotificationChannelManager
        .CreatePushNotificationChannelForApplicationAsync();

    // Register the channel URI with Notification Hubs.
    await App.MobileService.GetPush().RegisterAsync(channel.Uri);
}
7. Add the following code in OnLaunched to initialize the hub. I also need to mark OnLaunched method as async.
await InitNotificationsAsync();
Test notification
1. Run the client app and sign in.
2. Add an item then.

3. Check if you get notification.

Summary
I could build simple application with offline, authentication and push notification within hours. It's great to have samples!


Top comments (0)